
Spring Cloud(3):Ribbon的使用
基于搭建好的Eureka Server+Eureka Client:https://www.cnblogs.com/xuyiqing/p/10861541.html
有了服务,那么现在学习如何调用服务
上文搭建的是商品服务,以下搭建订单服务,订单服务调用商品服务
对Eureka Client进行改造,方便以后得到数据来源
在商品服务的Controller层注入端口号,并进行回显:
package org.dreamtech.product.controller;

import org.dreamtech.product.domain.Product;

import org.dreamtech.product.service.ProductService;

import org.springframework.beans.BeanUtils;

import org.springframework.beans.factory.annotation.Autowired;

import org.springframework.beans.factory.annotation.Value;

import org.springframework.web.bind.annotation.RequestMapping;

import org.springframework.web.bind.annotation.RequestParam;

import org.springframework.web.bind.annotation.RestController;

@RestController

@RequestMapping("/api/product")

public class ProductController {

    @Value("${server.port}")

    private String port;

    private final ProductService productService;

    @Autowired

    public ProductController(ProductService productService) {

        this.productService = productService;

    }

    @RequestMapping("/list")

    public Object list() {

        return productService.getProductList();

    }

    @RequestMapping("/find")

    public Object findById(@RequestParam("id") int id) {

        Product product = productService.findById(id);

        Product result = new Product();

        BeanUtils.copyProperties(product,result);

        result.setName(result.getName()+" data from port="+port);

        return result;

    }

}
启动Eureka Server,8761端口
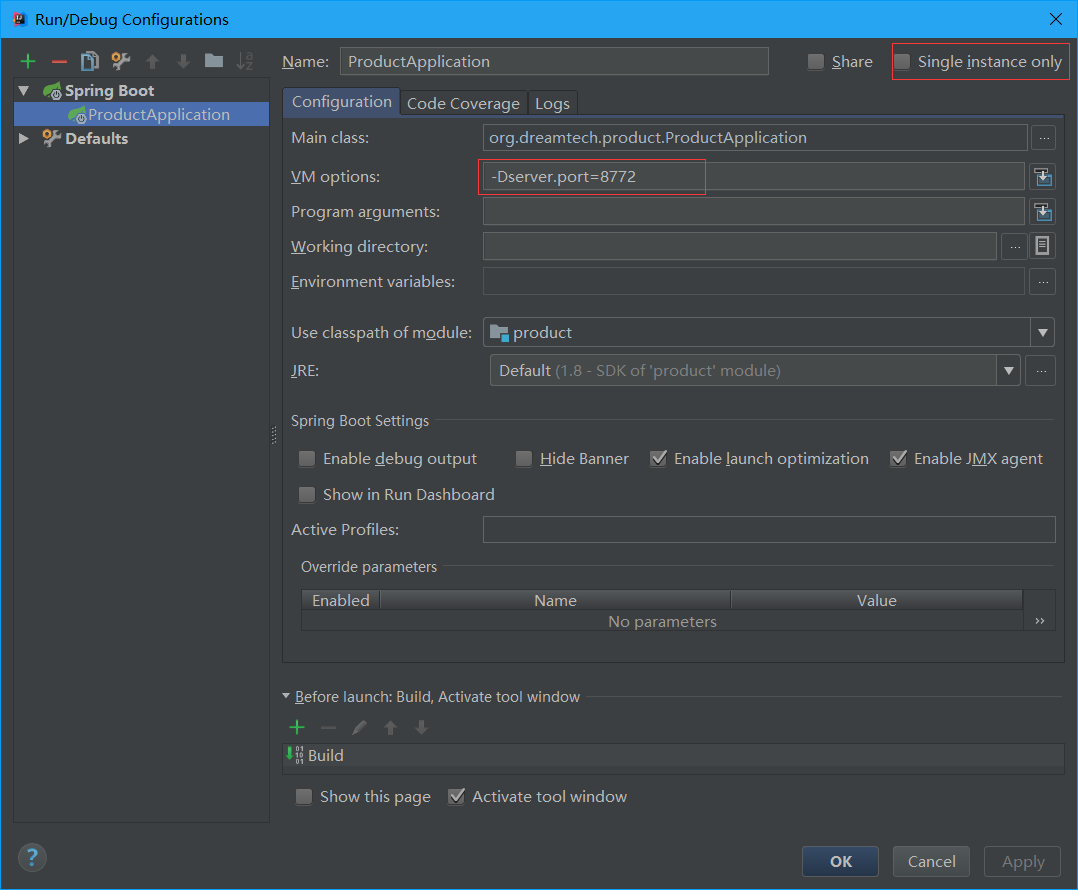
启动三个商品服务,一个项目8771端口,一个8772端口,一个8773端口:
多实例启动方法如下图
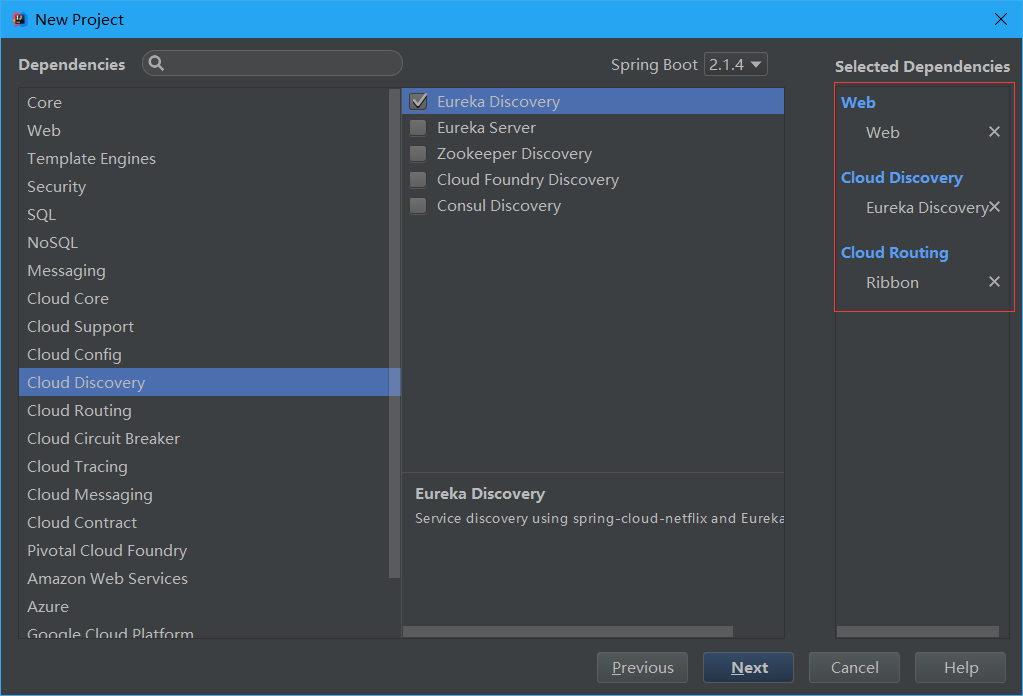
新建一个SpringBoot项目order-service:
Web模块必须的,由于订单服务本身也是服务需要Eureka,最后负载均衡调用Ribbon
订单服务开发(模拟实现):
实体类
package org.dreamtech.orderservice.domain;

import java.io.Serializable;

import java.util.Date;

public class ProductOrder implements Serializable {

    //ID

    private int id;

    //商品名称

    private String productName;

    //订单号

    private String tradeNo;

    //价格

    private int price;

    //创建时间

    private Date createTime;

    //用户ID

    private int userId;

    //用户名

    private String userName;

    public String getUserName() {

        return userName;

    }

    public void setUserName(String userName) {

        this.userName = userName;

    }

    public int getUserId() {

        return userId;

    }

    public void setUserId(int userId) {

        this.userId = userId;

    }

    public int getId() {

        return id;

    }

    public void setId(int id) {

        this.id = id;

    }

    public String getProductName() {

        return productName;

    }

    public void setProductName(String productName) {

        this.productName = productName;

    }

    public String getTradeNo() {

        return tradeNo;

    }

    public void setTradeNo(String tradeNo) {

        this.tradeNo = tradeNo;

    }

    public int getPrice() {

        return price;

    }

    public void setPrice(int price) {

        this.price = price;

    }

    public Date getCreateTime() {

        return createTime;

    }

    public void setCreateTime(Date createTime) {

        this.createTime = createTime;

    }

}
为了方便,和商品服务一样,不调用数据库,只做简单的模拟:
在SpringBoot启动类中加入Bean
package org.dreamtech.orderservice;

import org.springframework.boot.SpringApplication;

import org.springframework.boot.autoconfigure.SpringBootApplication;

import org.springframework.cloud.client.loadbalancer.LoadBalanced;

import org.springframework.context.annotation.Bean;

import org.springframework.web.client.RestTemplate;

@SpringBootApplication

public class OrderServiceApplication {

    public static void main(String[] args) {

        SpringApplication.run(OrderServiceApplication.class, args);

    }

    @Bean

    @LoadBalanced

    public RestTemplate restTemplate(){

        return new RestTemplate();

    }

}
配置文件对端口和服务名称进行配置:
server:

  port: 8781

eureka:

  client:

    service-url:

      defaultZone: http://localhost:8761/eureka/

spring:

  application:

    name: order-service
Controller:
package org.dreamtech.orderservice.controller;

import org.dreamtech.orderservice.service.ProductOrderService;

import org.springframework.beans.factory.annotation.Autowired;

import org.springframework.web.bind.annotation.RequestMapping;

import org.springframework.web.bind.annotation.RequestParam;

import org.springframework.web.bind.annotation.RestController;

@RestController

@RequestMapping("/api/order")

public class OrderController {

    private final ProductOrderService productOrderService;

    @Autowired

    public OrderController(ProductOrderService productOrderService) {

        this.productOrderService = productOrderService;

    }

    @RequestMapping("/save")

    public Object save(@RequestParam("user_id") int userId, @RequestParam("product_id") int productId) {

        return productOrderService.save(userId, productId);

    }

}
Service:
package org.dreamtech.orderservice.service;

import org.dreamtech.orderservice.domain.ProductOrder;

public interface ProductOrderService {

    /**

     * 下单接口

     *

     * @param userId    用户ID

     * @param productId 商品ID

     * @return ProductOrder

     */

    ProductOrder save(int userId, int productId);

}
package org.dreamtech.orderservice.service.impl;

import org.dreamtech.orderservice.domain.ProductOrder;

import org.dreamtech.orderservice.service.ProductOrderService;

import org.springframework.beans.factory.annotation.Autowired;

import org.springframework.http.ResponseEntity;

import org.springframework.stereotype.Service;

import org.springframework.web.client.RestTemplate;

import java.util.Date;

import java.util.Map;

import java.util.UUID;

@Service

public class ProductOrderServiceImpl implements ProductOrderService {

    private final RestTemplate restTemplate;

    @Autowired

    public ProductOrderServiceImpl(RestTemplate restTemplate) {

        this.restTemplate = restTemplate;

    }

    @Override

    @SuppressWarnings("unchecked")

    public ProductOrder save(int userId, int productId) {

        Map<String, Object> productMap = restTemplate.getForObject("http://product-service/api/product/find?id=" + productId, Map.class);

        ProductOrder productOrder = new ProductOrder();

        productOrder.setCreateTime(new Date());

        productOrder.setUserId(userId);

        productOrder.setTradeNo(UUID.randomUUID().toString());

        if (productMap != null) {

            productOrder.setProductName(productMap.get("name").toString());

            productOrder.setPrice(Integer.parseInt(productMap.get("price").toString()));

        }

        return productOrder;

    }

}
注意:getForObject方法的url中product-service是我在商品服务中配置的名称
启动项目,如果正常情况,Eureka应该显示如图:

访问http://localhost:8781/api/order/save?user_id=1&product_id=2多次,我将多次的返回结果记录在下:
{"id":0,"productName":"iPhone2 data from port=8771","tradeNo":"8beb0fe0-83ef-4d23-ae53-9399bac7eacc","price":2222,"createTime":"2019-05-15T03:21:12.432+0000","userId":1,"userName":null}

{"id":0,"productName":"iPhone2 data from port=8773","tradeNo":"09544f1d-462b-413a-b14a-cc9d599bce39","price":2222,"createTime":"2019-05-15T03:21:48.467+0000","userId":1,"userName":null}

{"id":0,"productName":"iPhone2 data from port=8771","tradeNo":"543e83a7-3e58-48bb-8aba-bd7635a10131","price":2222,"createTime":"2019-05-15T03:21:57.244+0000","userId":1,"userName":null}

{"id":0,"productName":"iPhone2 data from port=8772","tradeNo":"b30bbd40-49e8-4001-917a-0ae36b172463","price":2222,"createTime":"2019-05-15T03:22:06.509+0000","userId":1,"userName":null}
可以观察到,我开启了三个商品服务,这里自动在三个服务中进行了负载均衡,8771-8773随机访问
在SpringBoot启动类中加入Bean是一种方式,还有另一种调用方式:
不过还是推荐第一种
package org.dreamtech.orderservice.service.impl;

import org.dreamtech.orderservice.domain.ProductOrder;

import org.dreamtech.orderservice.service.ProductOrderService;

import org.springframework.beans.factory.annotation.Autowired;

import org.springframework.cloud.client.ServiceInstance;

import org.springframework.cloud.client.loadbalancer.LoadBalancerClient;

import org.springframework.stereotype.Service;

import org.springframework.web.client.RestTemplate;

import java.util.Date;

import java.util.Map;

import java.util.UUID;

@Service

public class ProductOrderServiceImpl implements ProductOrderService {

    private final LoadBalancerClient loadBalancer;

    @Autowired

    public ProductOrderServiceImpl(, LoadBalancerClient loadBalancer) {

        this.loadBalancer = loadBalancer;

    }

    @Override

    @SuppressWarnings("unchecked")

    public ProductOrder save(int userId, int productId) {

        ServiceInstance instance = loadBalancer.choose("product-service");

        String url = String.format("http://%s:%s/api/product/find?id="+productId,instance.getHost(),instance.getPort());

        RestTemplate restTemplate = new RestTemplate();

        Map<String, Object> productMap = restTemplate.getForObject(url, Map.class);

        ProductOrder productOrder = new ProductOrder();

        productOrder.setCreateTime(new Date());

        productOrder.setUserId(userId);

        productOrder.setTradeNo(UUID.randomUUID().toString());

        if (productMap != null) {

            productOrder.setProductName(productMap.get("name").toString());

            productOrder.setPrice(Integer.parseInt(productMap.get("price").toString()));

        }

        return productOrder;

    }

}
自定义负载均衡策略:
Ribbon默认是轮询策略
比如我想要使用随机策略,配置如下:
product-service:

  ribbon:

    NFLoadBalancerRuleClassName: com.netflix.loadbalancer.RandomRule
注意:服务名的一致,比如区分"_"和"-"
通常情况下,不需要改变策略,轮询策略为最佳
但是如果有一个好机器,一堆差机器,那么可以调整好机器的权重
Spring Cloud(3):Ribbon的使用的更多相关文章
- spring cloud 使用ribbon简单处理客户端负载均衡
假如我们的multiple服务的访问量剧增,用一个服务已经无法承载, 我们可以把Hello World服务做成一个集群. 很简单,我们只需要复制Hello world服务,同时将原来的端口8762修改 ...
- spring cloud: 关闭ribbon负载均衡
spring cloud: 关闭ribbon负载均衡 1.eureka服务 2.2个user服务:7900/7901 3,movie服务 movie服务去请求 user的用户信息,而此时只想请求790 ...
- Spring Cloud 之 Ribbon
新建Spring Boot工程,命名为ribbon 1.pom.xml添加依赖 <?xml version="1.0" encoding="UTF-8"? ...
- 笔记:Spring Cloud Feign Ribbon 配置
由于 Spring Cloud Feign 的客户端负载均衡是通过 Spring Cloud Ribbon 实现的,所以我们可以直接通过配置 Ribbon 的客户端的方式来自定义各个服务客户端调用的参 ...
- Spring cloud 之Ribbon(一)基本使用
简介 Spring cloud Ribbon是一个基于HTTP和TCP的客户端负载均衡工具,它是基于Netflix的Riboon实现的.Ribbon是客户端负载均衡器,这有别语例如Nginx服务端负载 ...
- Spring Cloud Gateway Ribbon 自定义负载均衡
在微服务开发中,使用Spring Cloud Gateway做为服务的网关,网关后面启动N个业务服务.但是有这样一个需求,同一个用户的操作,有时候需要保证顺序性,如果使用默认负载均衡策略,同一个用户的 ...
- 从零开始学spring cloud(六) -------- Ribbon
一.Ribbon介绍 Ribbon就是客户端侧负责均衡实现的一种方式,那么Ribbon是什么呢? Ribbon是Netflix发布的云中间层服务开源项目,其主要功能是提供客户端侧负载均衡算法.Ribb ...
- spring cloud 自定义ribbon客户端
一.自定义Ribbon客户端-[方式一]配置类 1.1.自定义负载规则 增加RibbonConfiguration.java配置类 public class RibbonConfiguration { ...
- Spring Cloud Feign Ribbon 配置
由于 Spring Cloud Feign 的客户端负载均衡是通过 Spring Cloud Ribbon 实现的,所以我们可以直接通过配置 Ribbon 的客户端的方式来自定义各个服务客户端调用的参 ...
- Spring Cloud之Ribbon与Nginx区别
客户端负载均衡器 在SpringCloud中Ribbon负载均衡客户端,会从eureka注册中心服务器端上获取服务注册信息列表,缓存到本地. 让后在本地实现轮训负载均衡策略. Ribbon与Nginx ...
随机推荐
- linux日常管理-free查看内存工具
查看内存 命令 free 默认是k为单位 也可以指定 m为单位 或者G为单位,这个不精准 total 总容量 used 使用了多少 free 剩余多少 看第二行.第一行是物理内存,加上虚拟内存b ...
- shell入门-awk-1
awk对于sed grep的优势在于分段,把分隔符分割成一小段一小段,针对段进行匹配,替换,操作,逻辑判断,比较...等 awk的基本操作 [root@wangshaojun ~]# awk -F ' ...
- OpenCV创建轨迹条,图片像素的访问
.OpenCV创建进度条以及图像对比度,亮度调整 1.创建轨迹条createTrackbar() 函数原型C++: intcreateTrackbar(conststring& trackba ...
- OpenCV 鼠标手动绘制掩码图像
OpenCV 鼠标手动绘制掩码图像 完整的代码: #include <opencv2/core/core.hpp> #include <opencv2/highgui/highgui ...
- 获得Servlet的初始化参数
通过ServletConfig接口的getInitParameter(java.lang.String name)方法
- Session和cookie有什么区别?
cookie是保存在客户端的信息,它只能保存String类型的,没有session安全,如果客户端禁用了cookie就不能够使用了 Cookie是客户端技术,程序把每个用户的数据以cookie的形式写 ...
- MD5Init-MD5Update-MD5Final
MD5Init是一个初始化函数,初始化核心变量,装入标准的幻数 MD5Update是MD5的主计算过程,inbuf是要变换的字节串,inputlen是长度,这个函数由getMD5ofStr调用,调用之 ...
- AI学习指南
这是一份关于如何学习深度学习以及为AI面试做准备的指南,个人觉得写的很不错,文章中还有很多有用的资料链接,源自机器之心,下面是文章的链接: https://mp.weixin.qq.com/s/kKB ...
- Codeforces Round #179 (Div. 2) B. Yaroslav and Two Strings (容斥原理)
题目链接 Description Yaroslav thinks that two strings s and w, consisting of digits and having length n ...
- Head First HTML与CSS(第2版) 中文pdf扫描版
是不是已经厌倦了那些深奥的HTML书?你可能在抱怨,只有成为专家之后才能读懂那些书.那么,找一本新修订的<Head First HTML与CSS(第2版)>吧,来真正学习HTML.你可能希 ...