Spring3 (事务管理)
简介: 1、事务管理。2、整合Junit。3、整和Web
1 事务管理
1.1 回顾事务
l 事务:一组业务操作ABCD,要么全部成功,要么全部不成功。
l 特性:ACID
原子性:整体
一致性:完成
隔离性:并发
持久性:结果
l 隔离问题:
脏读:一个事务读到另一个事务没有提交的数据
不可重复读:一个事务读到另一个事务已提交的数据(update)
虚读(幻读):一个事务读到另一个事务已提交的数据(insert)
l 隔离级别:
read uncommitted:读未提交。存在3个问题
read committed:读已提交。解决脏读,存在2个问题
repeatable read:可重复读。解决:脏读、不可重复读,存在1个问题。
serializable :串行化。都解决,单事务。

l mysql 事务操作--Savepoint
 需求:AB(必须),CD(可选)

 Connection conn = null;

 Savepoint savepoint = null;  //保存点,记录操作的当前位置,之后可以回滚到指定的位置。(可以回滚一部分)

 try{

   //1 获得连接

   conn = ...;

   //2 开启事务

   conn.setAutoCommit(false);

   A

   B

   savepoint = conn.setSavepoint();

   C

   D

   //3 提交事务

   conn.commit();

 } catche(){

   if(savepoint != null){   //CD异常

      // 回滚到CD之前

      conn.rollback(savepoint);

      // 提交AB

      conn.commit();

   } else{   //AB异常

      // 回滚AB

      conn.rollback();

   }

 }
事物操作伪代码演示
1.2 事务管理介绍
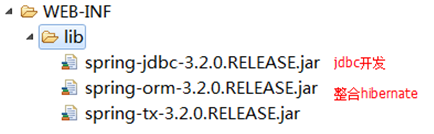
1.2.1 导入jar包
transaction -->spring-tx-3.2.0.RELEASE

1.2.2 三个顶级接口
1、 PlatformTransactionManager 平台事务管理器,spring要管理事务,必须使用事务管理器
进行事务配置时,必须配置事务管理器。
2、 TransactionDefinition:事务详情(事务定义、事务属性),spring用于确定事务具体详情,
例如:隔离级别、是否只读、超时时间 等
进行事务配置时,必须配置详情。spring将配置项封装到该对象实例。
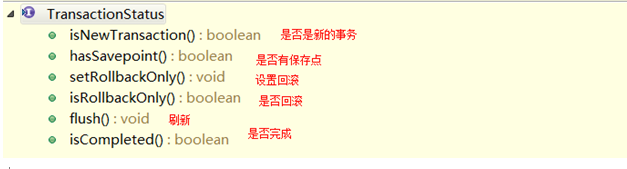
3、 TransactionStatus:事务状态,spring用于记录当前事务运行状态。例如:是否有保存点,事务是否完成。
spring底层根据状态进行相应操作。
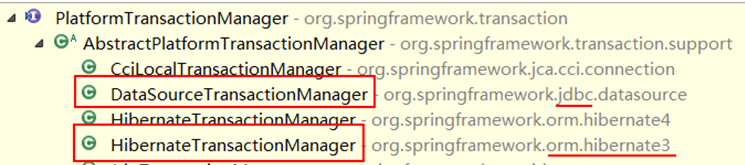
1.2.3 PlatformTransactionManager 事务管理器
l 导入jar包:需要时平台事务管理器的实现类
l 常见的事务管理器
DataSourceTransactionManager ,jdbc开发时事务管理器,采用JdbcTemplate
HibernateTransactionManager,hibernate开发时事务管理器,整合hibernate
l api详解
TransactionStatus getTransaction(TransactionDefinition definition) ,事务管理器 通过“事务详情”,
获得“事务状态”,从而管理事务。
void commit(TransactionStatus status) 根据状态提交
void rollback(TransactionStatus status) 根据状态回滚
1.2.4 TransactionStatus
1.2.5 TransactionDefinition
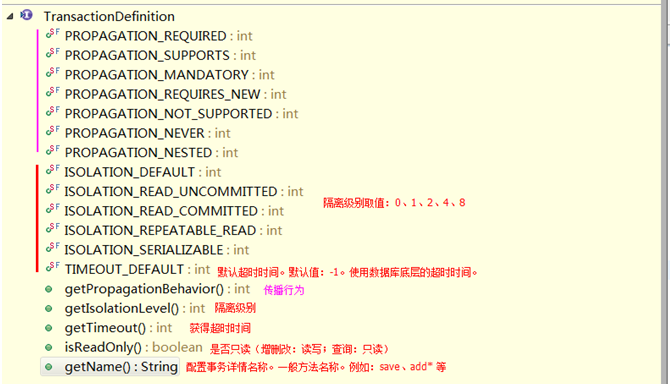
l 传播行为:在两个业务之间如何共享事务。
PROPAGATION_REQUIRED , required , 必须 【默认值】
支持当前事务,A如果有事务,B将使用该事务。
如果A没有事务,B将创建一个新的事务。
PROPAGATION_SUPPORTS ,supports ,支持
支持当前事务,A如果有事务,B将使用该事务。
如果A没有事务,B将以非事务执行。
PROPAGATION_MANDATORY,mandatory ,强制
支持当前事务,A如果有事务,B将使用该事务。
如果A没有事务,B将抛异常。
PROPAGATION_REQUIRES_NEW , requires_new ,必须新的
如果A有事务,将A的事务挂起,B创建一个新的事务
如果A没有事务,B创建一个新的事务
PROPAGATION_NOT_SUPPORTED ,not_supported ,不支持
如果A有事务,将A的事务挂起,B将以非事务执行
如果A没有事务,B将以非事务执行
PROPAGATION_NEVER ,never,从不
如果A有事务,B将抛异常
如果A没有事务,B将以非事务执行
PROPAGATION_NESTED ,nested ,嵌套
A和B底层采用保存点机制,形成嵌套事务。
掌握:PROPAGATION_REQUIRED、PROPAGATION_REQUIRES_NEW、PROPAGATION_NESTED
1.3 案例:转账
1.3.1 搭建环境
1.3.1.1 创建表
create database ee19_spring_day03;

use ee19_spring_day03;

create table account(

  id int primary key auto_increment,

  username varchar(50),

  money int

);

insert into account(username,money) values('jack','');

insert into account(username,money) values('rose','');
表格Sql代码
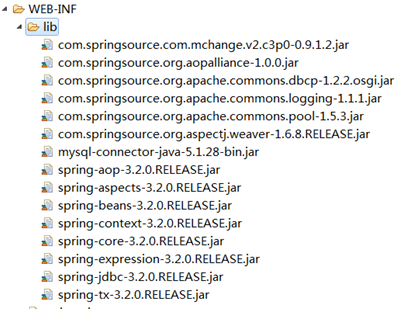
1.3.1.2 导入jar包
l 核心:4+1
l aop : 4 (aop联盟、spring aop、aspectj规范、spring aspect)
l 数据库:2 (jdbc/tx)
l 驱动:mysql
l 连接池:c3p0
1.3.1.3 dao层
 public class AccountDaoImpl extends JdbcDaoSupport implements AccountDao {

    @Override

    public void out(String outer, Integer money) {

       this.getJdbcTemplate().update("update account set money = money - ? where username = ?", money,outer);

    }

    @Override

    public void in(String inner, Integer money) {

       this.getJdbcTemplate().update("update account set money = money + ? where username = ?", money,inner);

    }

 }
Dao
1.3.1.4 service层
 public class AccountServiceImpl implements AccountService {

    private AccountDao accountDao;

    public void setAccountDao(AccountDao accountDao) {

       this.accountDao = accountDao;

    }

    @Override

    public void transfer(String outer, String inner, Integer money) {

       accountDao.out(outer, money);

       //断电

 //    int i = 1/0;

       accountDao.in(inner, money);

    }

 }
service
1.3.1.5 spring配置
<!-- 1 datasource -->

    <bean id="dataSource" class="com.mchange.v2.c3p0.ComboPooledDataSource">

        <property name="driverClass" value="com.mysql.jdbc.Driver"></property>

        <property name="jdbcUrl" value="jdbc:mysql://localhost:3306/ee19_spring_day03"></property>

        <property name="user" value="root"></property>

        <property name="password" value="1234"></property>

    </bean>

    <!-- 2 dao  -->

    <bean id="accountDao" class="com.itheima.dao.impl.AccountDaoImpl">

        <property name="dataSource" ref="dataSource"></property>

    </bean>

    <!-- 3 service -->

    <bean id="accountService" class="com.itheima.service.impl.AccountServiceImpl">

        <property name="accountDao" ref="accountDao"></property>

    </bean>
applicationContext.xml
1.3.1.6 测试
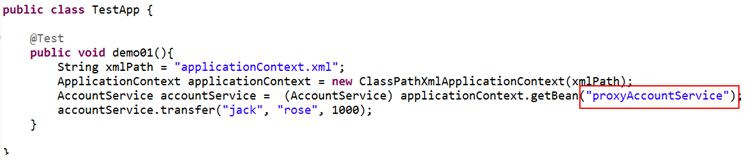
   @Test

     public void demo01(){

         String xmlPath = "applicationContext.xml";

         ApplicationContext applicationContext = new ClassPathXmlApplicationContext(xmlPath);

         AccountService accountService =  (AccountService) applicationContext.getBean("accountService");

         accountService.transfer("jack", "rose", 1000);

     }
Test
1.3.2 手动管理事务(了解)
l spring底层使用 TransactionTemplate 事务模板进行操作。
l 操作
1.service 需要获得 TransactionTemplate
2.spring 配置模板,并注入给service
3.模板需要注入事务管理器
4.配置事务管理器:DataSourceTransactionManager ,需要注入DataSource
1.3.2.1 修改service
 //需要spring注入模板

     private TransactionTemplate transactionTemplate;

     public void setTransactionTemplate(TransactionTemplate transactionTemplate) {

         this.transactionTemplate = transactionTemplate;

     }

     @Override

     public void transfer(final String outer,final String inner,final Integer money) {

         transactionTemplate.execute(new TransactionCallbackWithoutResult() {

             @Override

             protected void doInTransactionWithoutResult(TransactionStatus arg0) {

                 accountDao.out(outer, money);

                 //断电

 //              int i = 1/0;

                 accountDao.in(inner, money);

             }

         });

     }
Service2
1.3.2.2 修改spring配置
 <!-- 3 service -->

     <bean id="accountService" class="com.itheima.service.impl.AccountServiceImpl">

         <property name="accountDao" ref="accountDao"></property>

         <property name="transactionTemplate" ref="transactionTemplate"></property>

     </bean>

     <!-- 4 创建模板 -->

     <bean id="transactionTemplate" class="org.springframework.transaction.support.TransactionTemplate">

         <property name="transactionManager" ref="txManager"></property>

     </bean>

     <!-- 5 配置事务管理器 ,管理器需要事务,事务从Connection获得,连接从连接池DataSource获得 -->

     <bean id="txManager" class="org.springframework.jdbc.datasource.DataSourceTransactionManager">

         <property name="dataSource" ref="dataSource"></property>

     </bean>
applicationContext.xml
1.3.3 工厂bean 生成代理:半自动
l spring提供 管理事务的代理工厂bean TransactionProxyFactoryBean
1.getBean() 获得代理对象
2.spring 配置一个代理
1.3.3.1 spring配置
 <!-- 4 service 代理对象

         4.1 proxyInterfaces 接口

         4.2 target 目标类

         4.3 transactionManager 事务管理器

         4.4 transactionAttributes 事务属性(事务详情)

             prop.key :确定哪些方法使用当前事务配置

             prop.text:用于配置事务详情

                 格式:PROPAGATION,ISOLATION,readOnly,-Exception,+Exception

                     传播行为        隔离级别    是否只读        异常回滚        异常提交

                 例如:

                     <prop key="transfer">PROPAGATION_REQUIRED,ISOLATION_DEFAULT</prop> 默认传播行为,和隔离级别

                     <prop key="transfer">PROPAGATION_REQUIRED,ISOLATION_DEFAULT,readOnly</prop> 只读

                     <prop key="transfer">PROPAGATION_REQUIRED,ISOLATION_DEFAULT,+java.lang.ArithmeticException</prop>  有异常扔提交

     -->

     <bean id="proxyAccountService" class="org.springframework.transaction.interceptor.TransactionProxyFactoryBean">

         <property name="proxyInterfaces" value="com.itheima.service.AccountService"></property>

         <property name="target" ref="accountService"></property>

         <property name="transactionManager" ref="txManager"></property>

         <property name="transactionAttributes">

             <props>

                 <prop key="transfer">PROPAGATION_REQUIRED,ISOLATION_DEFAULT</prop>

             </props>

         </property>

     </bean>

     <!-- 5 事务管理器 -->

     <bean id="txManager" class="org.springframework.jdbc.datasource.DataSourceTransactionManager">

         <property name="dataSource" ref="dataSource"></property>

     </bean>
ApplicationContext.xml
1.3.3.2 测试
1.3.4 AOP 配置基于xml【掌握】
l 在spring xml 配置aop 自动生成代理,进行事务的管理
1.配置管理器
2.配置事务详情
3.配置aop
(使用上一个笔记的aop编程实现)
 <!-- 4 事务管理 -->

     <!-- 4.1 事务管理器 -->

     <bean id="txManager" class="org.springframework.jdbc.datasource.DataSourceTransactionManager">

         <property name="dataSource" ref="dataSource"></property>

     </bean>

     <!-- 4.2 事务详情(事务通知)  , 在aop筛选基础上,对ABC三个确定使用什么样的事务。例如:AC读写、B只读 等

         <tx:attributes> 用于配置事务详情(属性属性)

             <tx:method name=""/> 详情具体配置

                 propagation 传播行为 , REQUIRED:必须;REQUIRES_NEW:必须是新的

                 isolation 隔离级别

     -->

     <tx:advice id="txAdvice" transaction-manager="txManager">

         <tx:attributes>

             <tx:method name="transfer" propagation="REQUIRED" isolation="DEFAULT"/>

         </tx:attributes>

     </tx:advice>

     <!-- 4.3 AOP编程,目标类有ABCD(4个连接点),切入点表达式 确定增强的连接器,从而获得切入点:ABC -->

     <aop:config>

         <aop:advisor advice-ref="txAdvice" pointcut="execution(* com.itheima.service..*.*(..))"/>

     </aop:config>
applicationContext.xml
1.3.5 AOP配置基于注解【掌握】
l 1.配置事务管理器,将并事务管理器交予spring
l 2.在目标类或目标方法添加注解即可 @Transactional
1.3.5.1 spring配置
 <!-- 4 事务管理 -->

     <!-- 4.1 事务管理器 -->

     <bean id="txManager" class="org.springframework.jdbc.datasource.DataSourceTransactionManager">

         <property name="dataSource" ref="dataSource"></property>

     </bean>

     <!-- 4.2 将管理器交予spring

         * transaction-manager 配置事务管理器

         * proxy-target-class

             true : 底层强制使用cglib 代理

     -->

     <tx:annotation-driven transaction-manager="txManager"/>
applicationContext.xml
1.3.5.2 service 层
@Transactional

public class AccountServiceImpl implements AccountService {
1.3.5.3 事务详情配置

@Transactional(propagation=Propagation.REQUIRED , isolation = Isolation.DEFAULT)

public class AccountServiceImpl implements AccountService {
2 整合Junit
l 导入jar包
基本 :4+1
测试:spring-test...jar
1.让Junit通知spring加载配置文件
2.让spring容器自动进行注入
l 修改测试类
 @RunWith(SpringJUnit4ClassRunner.class)

 @ContextConfiguration(locations="classpath:applicationContext.xml")

 public class TestApp {

     @Autowired  //与junit整合,不需要在spring xml配置扫描

     private AccountService accountService;

     @Test

     public void demo01(){

 //      String xmlPath = "applicationContext.xml";

 //      ApplicationContext applicationContext = new ClassPathXmlApplicationContext(xmlPath);

 //      AccountService accountService =  (AccountService) applicationContext.getBean("accountService");

         accountService.transfer("jack", "rose", 1000);

     }

 }
Test
3 整合web
0.导入jar包
spring-web.xml
1.tomcat启动加载配置文件
servlet --> init(ServletConfig) --> <load-on-startup>2
filter --> init(FilterConfig) --> web.xml注册过滤器自动调用初始化
listener --> ServletContextListener --> servletContext对象监听【】
spring提供监听器 ContextLoaderListener --> web.xml <listener><listener-class>....
如果只配置监听器,默认加载xml位置:/WEB-INF/applicationContext.xml
2.确定配置文件位置,通过系统初始化参数
ServletContext 初始化参数 web.xml
<context-param>
<param-name>contextConfigLocation
<param-value>classpath:applicationContext.xml
 <!-- 确定配置文件位置 -->

   <context-param>

       <param-name>contextConfigLocation</param-name>

       <param-value>classpath:applicationContext.xml</param-value>

   </context-param>

   <!-- 配置spring 监听器,加载xml配置文件 -->

   <listener>

       <listener-class>org.springframework.web.context.ContextLoaderListener</listener-class>

   </listener>
Web.xml
3.从servletContext作用域 获得spring容器 (了解)
 // 从application作用域(ServletContext)获得spring容器

         //方式1: 手动从作用域获取

         ApplicationContext applicationContext =

                 (ApplicationContext) this.getServletContext().getAttribute(WebApplicationContext.ROOT_WEB_APPLICATION_CONTEXT_ATTRIBUTE);

         //方式2:通过工具获取

         ApplicationContext apppApplicationContext2 =

                 WebApplicationContextUtils.getWebApplicationContext(this.getServletContext());
Servlet
Spring3 (事务管理)的更多相关文章
- Spring3事务管理——使用@Transactional 注解(转)
文章地址:http://my.oschina.net/guanzhenxing/blog/214228
- [转]Spring3核心技术之事务管理机制
原文地址:http://chouyi.iteye.com/blog/1675199 Spring对事务的解决办法其实分为2种:编程式实现事务,AOP配置声明式解决方案. http://jinnians ...
- Spring3数据库事务管理机制
Spring对事务的解决办法其实分为2种:编程式实现事务,AOP配置声明式解决方案. http://jinnianshilongnian.iteye.com/blog/1496953 Spring提供 ...
- 跟我学Spring3(9.2):Spring的事务之事务管理器
原文出处: 张开涛9.2.1 概述 Spring框架支持事务管理的核心是事务管理器抽象,对于不同的数据访问框架(如Hibernate)通过实现策略接口PlatformTransactionManage ...
- spring3.0事务管理配置
转载:http://war-martin.iteye.com/blog/1396335 第一种配置方法:基于XML的事务管理 这种方法不需要对原有的业务做任何修改,通过在XML文件中定义需要拦截方法的 ...
- Spring3之事务管理
事务管理是企业应用开发中确保数据完整性和一致性的关键技术.对于并发和分布式坏境中从不可预期的错误中恢复来说,事务管理特别重要.Spring作为一个企业应用框架,在不同的事务管理API之上提供了一个抽象 ...
- Spring3.0配置多个事务管理器(即操作多个数据源)的方法
大多数项目只需要一个事务管理器.然而,有些项目为了提高效率.或者有多个完全不同又不相干的数据源,最好用多个事务管理器.机智的Spring的Transactional管理已经考虑到了这一点,首先分别定义 ...
- Spring的事务管理
事务 事务:是逻辑上一组操作,要么全都成功,要么全都失败. 事务特性(ACID) 原子性:事务不可分割 一致性:事务执行的前后,数据完整性保持一致 隔离性:一个事务执行的时候,不应该受到其他事务的打扰 ...
- hibernate4整合spring3事务问题
本文是作者在对hibernate4+spring3+struts2整合中遇到的一个问题.对s2sh进行了基本的整合搭建以后,就是对事务的控制管理,将hibernate的事务交由spring管理.根据网 ...
随机推荐
- IWMS后台上传文章,嵌入视频,调用优酷通用代码
<a href="http://player.youku.com/player.php/sid/XODcxNjM3OTYw/v.swf " target="_bla ...
- PHPStorm从入门到精通
1. 使用phpstorm+xdebug进行调试 首先,安装php的xdebug扩展 查看phpinfo中php的版本,php的安装位数,php的是否线程安全:根据这些下载对应的xdebug.dll ...
- tornado.gen.coroutine-协程
http://blog.csdn.net/seeground/article/details/49488281
- rediret 加/与不加/的区别
- poj-3080(kmp+暴力枚举)
题意:给你多个字符串,问你这几个字符串的最长公共子串是哪个,如果有多个,输出字典序最大的那个,如果最长的公共子串长度小于3,输出一个奇怪的东西: 解题思路:首先看数据,数据不大,开始简单快乐的暴力之路 ...
- hdu—3861(tarjan+二分图)
题意:给你n个城市,每个城市之间有一条有向边,将城市划分为几个区域,问你最小的划分方法, 划分规则为:能相互到达的放在一个区域:然后区域内的a,b两点肯定存在某种方式,使得a能到b或者b能到a(注意, ...
- Nginx TSL/SSL优化握手性能
L:131
- Nginx 针对建立TCP连接优化
L:124 sysctl -a | grep file-max //通过命令查看系统最大句柄数 [root@3 ~]# sysctl -a | grep file-max fs.file-max = ...
- springboot 学习
参考:http://www.cnblogs.com/sam-uncle/p/8796212.html spring boot 系列之一:spring boot 入门 注意:main启动类和contro ...
- Chrome不安装插件实现页面长截图
1.打开需要截图的页面,按F12进入审查模式 或直接在页面右击鼠标右键-检查,打开如下窗口 2.在控制台中按下 ctrl+shift+p,弹出如下输入框 3.输入screen进行模糊查找,选择“Ca ...