
springBoot整合mybatis、jsp 或 HTML
springBoot整合mybatis、jsp
Spring Boot的主要优点:
1: 为所有Spring开发者更快的入门;
2: 开箱即用,提供各种默认配置来简化项目配置;
3: 内嵌式容器简化Web项目;
4: 没有冗余代码生成和XML配置的要求
本项目使用到的工具:
- 开发工具:Intellij IDEA 2018.1.4
- springboot:2.0.1.RELEASE
- jdk:1.8.0_40
- maven:3.3.9
开始搭建:
项目创建
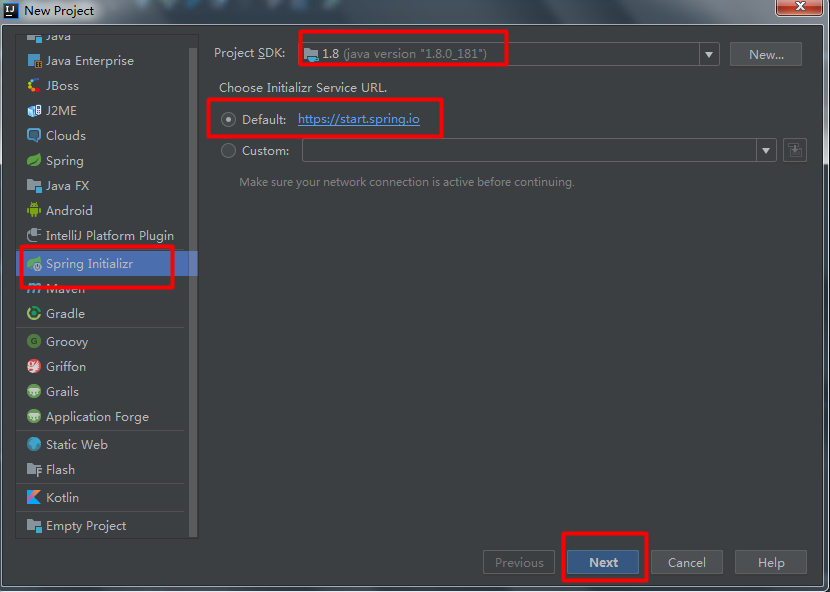
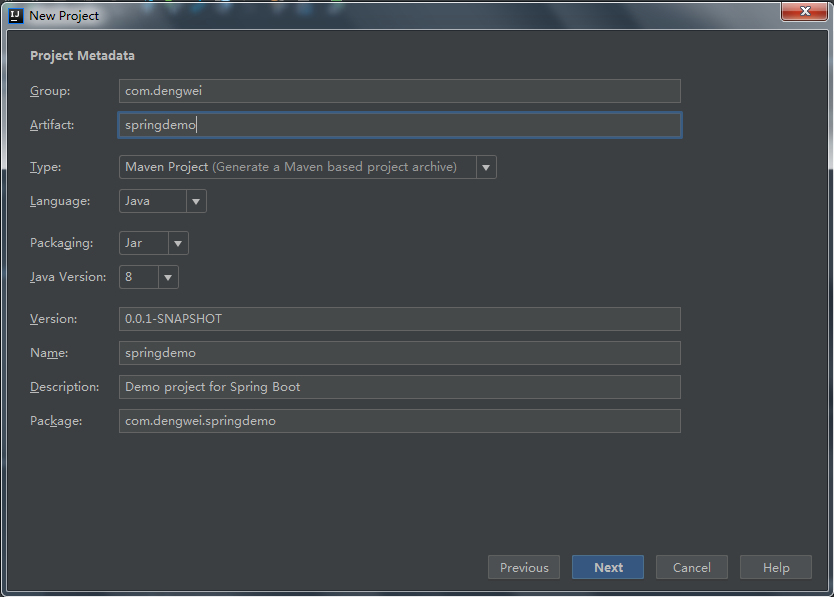
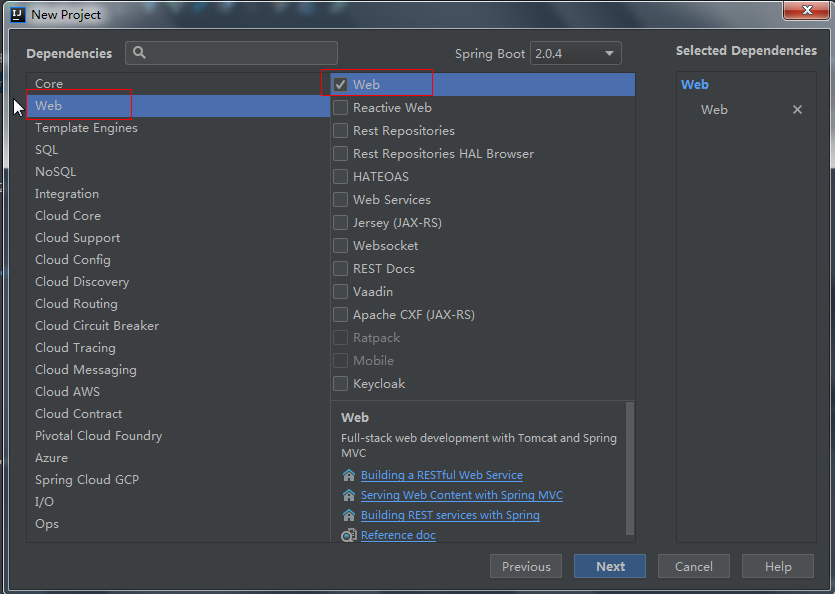
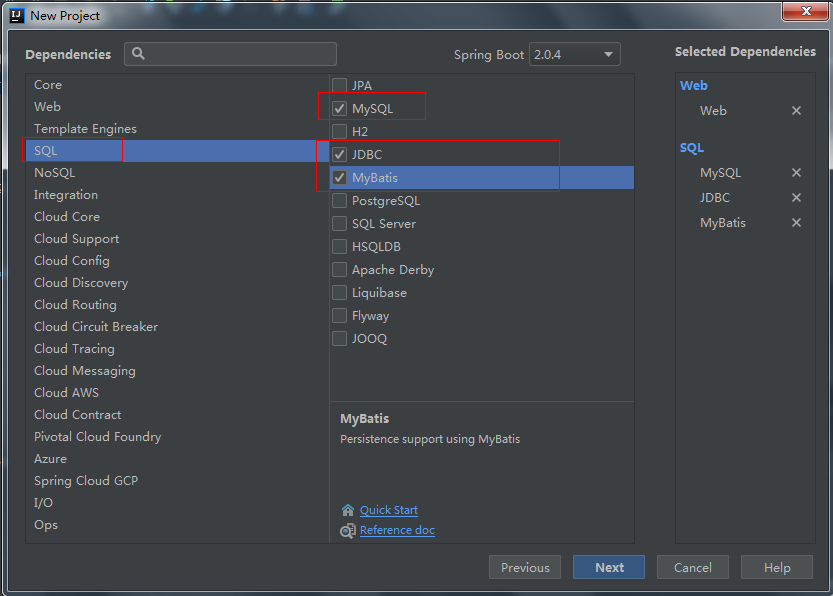
finish即可。
建好后的 项目结构:

pom.xml:
 <?xml version="1.0" encoding="UTF-8"?>

 <project xmlns="http://maven.apache.org/POM/4.0.0" xmlns:xsi="http://www.w3.org/2001/XMLSchema-instance"

          xsi:schemaLocation="http://maven.apache.org/POM/4.0.0 http://maven.apache.org/xsd/maven-4.0.0.xsd">

     <modelVersion>4.0.0</modelVersion>

     <groupId>com.dengwei</groupId>

     <artifactId>springdemo</artifactId>

     <version>0.0.1-SNAPSHOT</version>

     <packaging>jar</packaging>

     <name>springdemo</name>

     <description>Demo project for Spring Boot</description>

     <parent>

         <groupId>org.springframework.boot</groupId>

         <artifactId>spring-boot-starter-parent</artifactId>

         <version>2.0.1.RELEASE</version>

         <relativePath/> <!-- lookup parent from repository -->

     </parent>

     <properties>

         <project.build.sourceEncoding>UTF-8</project.build.sourceEncoding>

         <project.reporting.outputEncoding>UTF-8</project.reporting.outputEncoding>

         <java.version>1.8</java.version>

     </properties>

     <dependencies>

         <dependency>

             <groupId>org.springframework.boot</groupId>

             <artifactId>spring-boot-starter-jdbc</artifactId>

         </dependency>

         <dependency>

             <groupId>org.springframework.boot</groupId>

             <artifactId>spring-boot-starter-web</artifactId>

         </dependency>

         <dependency>

             <groupId>org.mybatis.spring.boot</groupId>

             <artifactId>mybatis-spring-boot-starter</artifactId>

             <version>1.3.2</version>

         </dependency>

         <dependency>

             <groupId>mysql</groupId>

             <artifactId>mysql-connector-java</artifactId>

             <scope>runtime</scope>

         </dependency>

         <dependency>

             <groupId>org.springframework.boot</groupId>

             <artifactId>spring-boot-starter-test</artifactId>

             <scope>test</scope>

         </dependency>

         <!--springBoot整合jsp-->

         <dependency>

             <groupId>org.springframework.boot</groupId>

             <artifactId>spring-boot-starter-tomcat</artifactId>

         </dependency>

         <dependency>

             <groupId>org.apache.tomcat.embed</groupId>

             <artifactId>tomcat-embed-jasper</artifactId>

         </dependency>

     </dependencies>

     <build>

         <plugins>

             <plugin>

                 <groupId>org.springframework.boot</groupId>

                 <artifactId>spring-boot-maven-plugin</artifactId>

             </plugin>

         </plugins>

     </build>

 </project>
我们先建一个controller层,写一个简单的类访问一下:
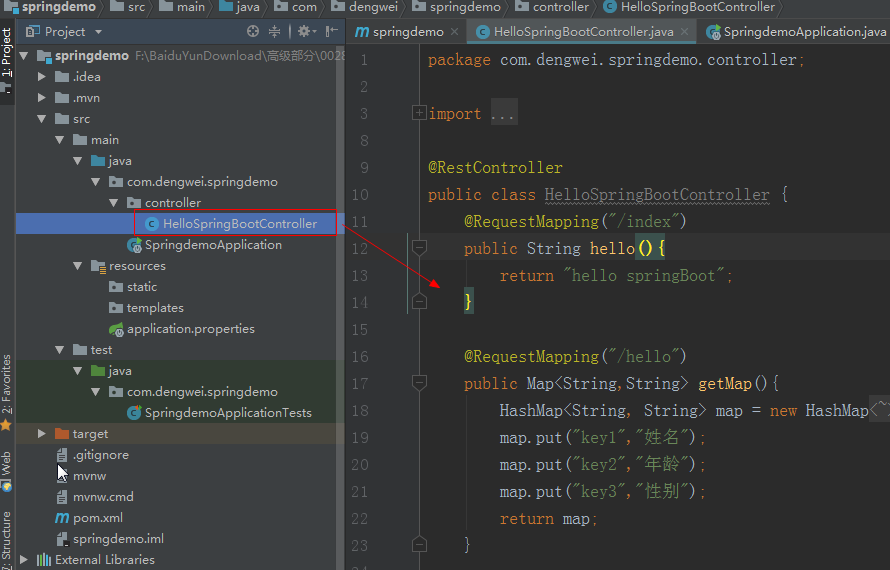
HelloSpringBootController:
 package com.dengwei.springdemo.controller;

 import org.springframework.web.bind.annotation.RequestMapping;

 import org.springframework.web.bind.annotation.RestController;

 import java.util.HashMap;

 import java.util.Map;

 @RestController

 public class HelloSpringBootController {

     @RequestMapping("/index")

     public String hello(){

         return "hello springBoot";

     }

     @RequestMapping("/hello")

     public Map<String,String> getMap(){

         HashMap<String, String> map = new HashMap<String,String>();

         map.put("key1","姓名");

         map.put("key2","年龄");

         map.put("key3","性别");

         return map;

     }

 }
下面我们启动一下:
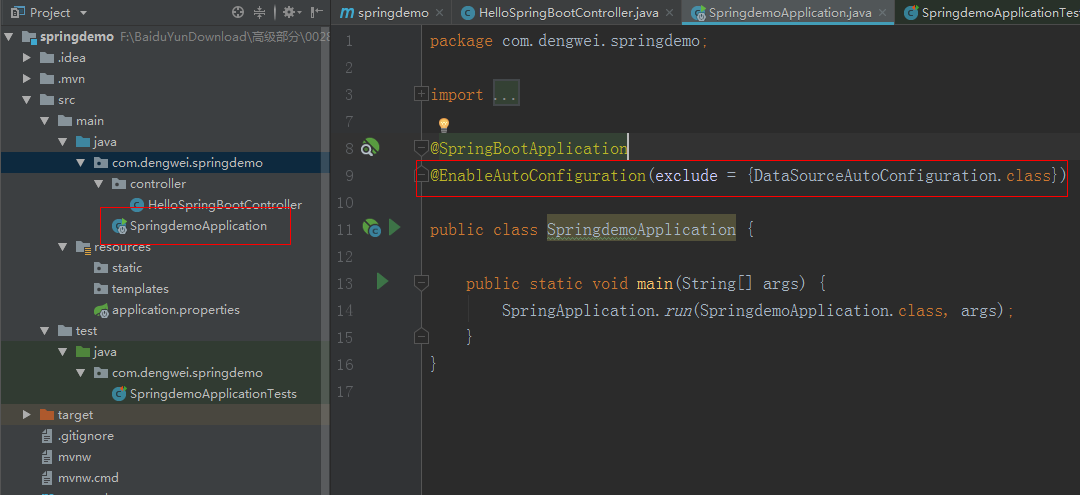
每一个springBoot项目中都有一个XXXAplication类,这个类就是springBoot的启动类。
注意:因为我们前面添加了数据库相关的依赖,但是我们还没有具体配置,如果直接运行的话会报错:
***************************
APPLICATION FAILED TO START
***************************
Description:
Failed to auto-configure a DataSource: 'spring.datasource.url' is not specified and no embedded datasource could be auto-configured.
Reason: Failed to determine a suitable driver class
Action:
Consider the following:
If you want an embedded database (H2, HSQL or Derby), please put it on the classpath.
If you have database settings to be loaded from a particular profile you may need to activate it (no profiles are currently active).
解决:
在@EnableAutoConfiguretion中添加 exclude= {DataSourceAutoConfiguration.class},排除此类的autoconfig。启动以后就可以正常运行。
好的,启动没问题,我们下面正式进入mybatis与jsp的整合:
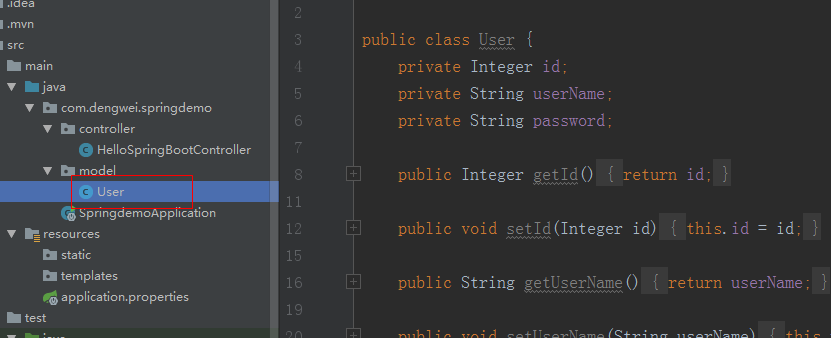
建model层:
 package com.dengwei.springdemo.model;

 public class User {

     private Integer id;

     private String userName;

     private String password;

     public Integer getId() {

         return id;

     }

     public void setId(Integer id) {

         this.id = id;

     }

     public String getUserName() {

         return userName;

     }

     public void setUserName(String userName) {

         this.userName = userName;

     }

     public String getPassword() {

         return password;

     }

     public void setPassword(String password) {

         this.password = password;

     }

     @Override

     public String toString() {

         return "User{" +

                 "id=" + id +

                 ", userName='" + userName + '\'' +

                 ", password='" + password + '\'' +

                 '}';

     }

 }
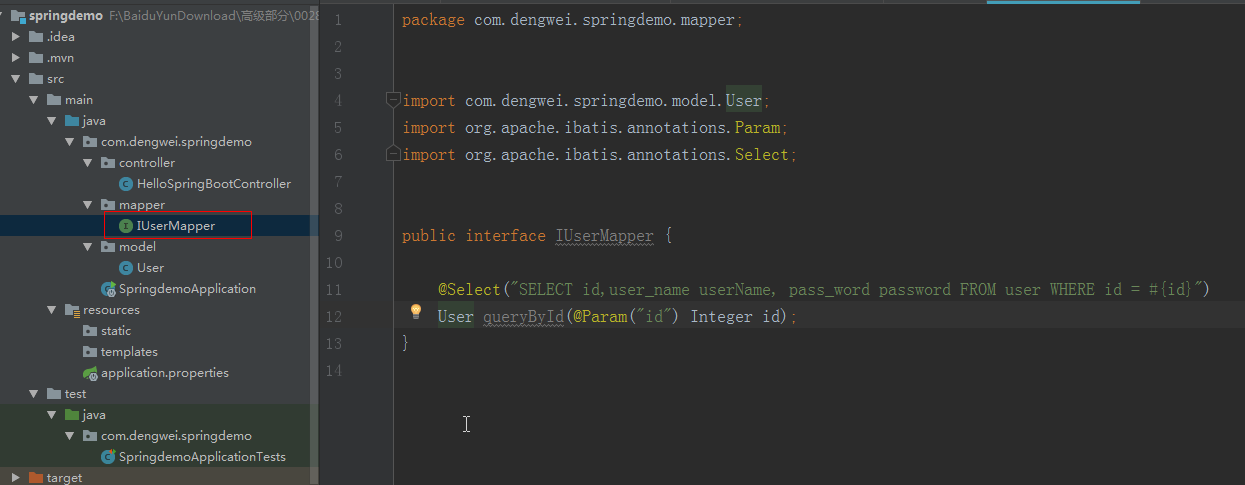
2:建mapper层:
注意:我们这里的sql语句是通过注解的形式和接口写在一起的,也可以通过xml的形式配置,可以见另外一篇博客:
 package com.dengwei.springdemo.mapper;

 import com.dengwei.springdemo.model.User;

 import org.apache.ibatis.annotations.Param;

 import org.apache.ibatis.annotations.Select;

 public interface IUserMapper {

     @Select("SELECT id,user_name userName, pass_word password FROM user WHERE id = #{id}")

     User queryById(@Param("id") Integer id);

 }
3:建Service层:
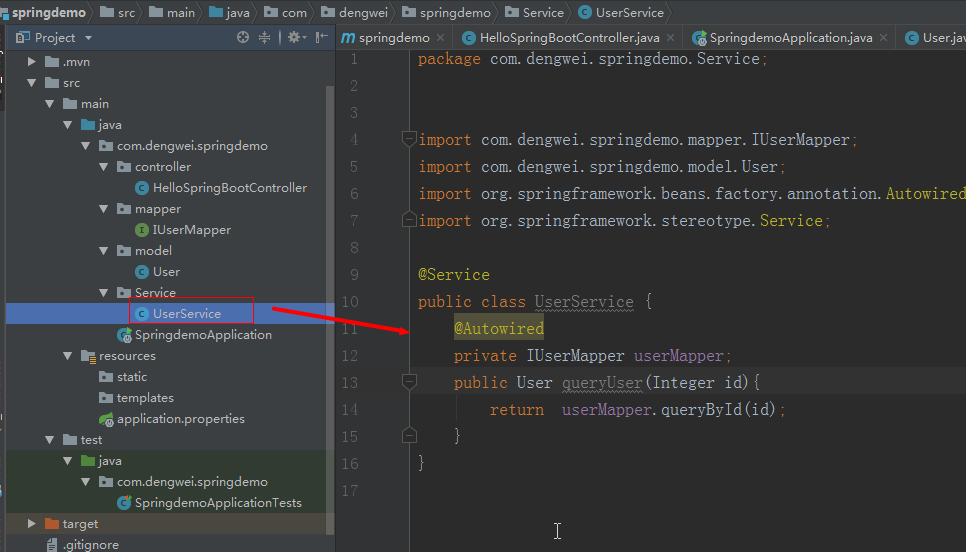
 package com.dengwei.springdemo.Service;

 import com.dengwei.springdemo.mapper.IUserMapper;

 import com.dengwei.springdemo.model.User;

 import org.springframework.beans.factory.annotation.Autowired;

 import org.springframework.stereotype.Service;

 @Service

 public class UserService {

     @Autowired

     private IUserMapper userMapper;

     public User queryUser(Integer id){

         return  userMapper.queryById(id);

     }

 }
4:控制层访问:
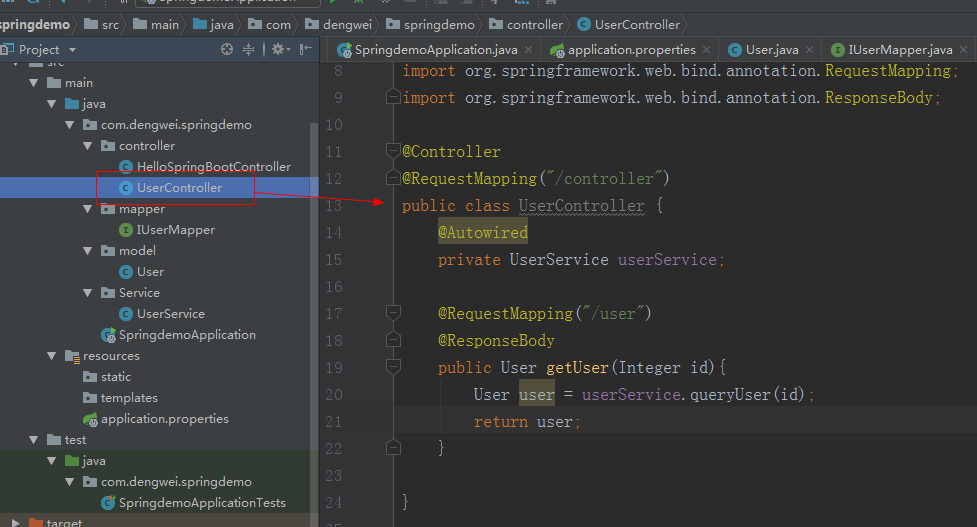
 package com.dengwei.springdemo.controller;

 import com.dengwei.springdemo.Service.UserService;

 import com.dengwei.springdemo.model.User;

 import org.springframework.beans.factory.annotation.Autowired;

 import org.springframework.stereotype.Controller;

 import org.springframework.web.bind.annotation.RequestMapping;

 import org.springframework.web.bind.annotation.ResponseBody;

 @Controller

 @RequestMapping("/controller")

 public class UserController {

     @Autowired

     private UserService userService;

     @RequestMapping("/user")

     @ResponseBody

     public User getUser(Integer id){

         User user = userService.queryUser(id);

         return user;

     }

 }
数据库连接配置文件:
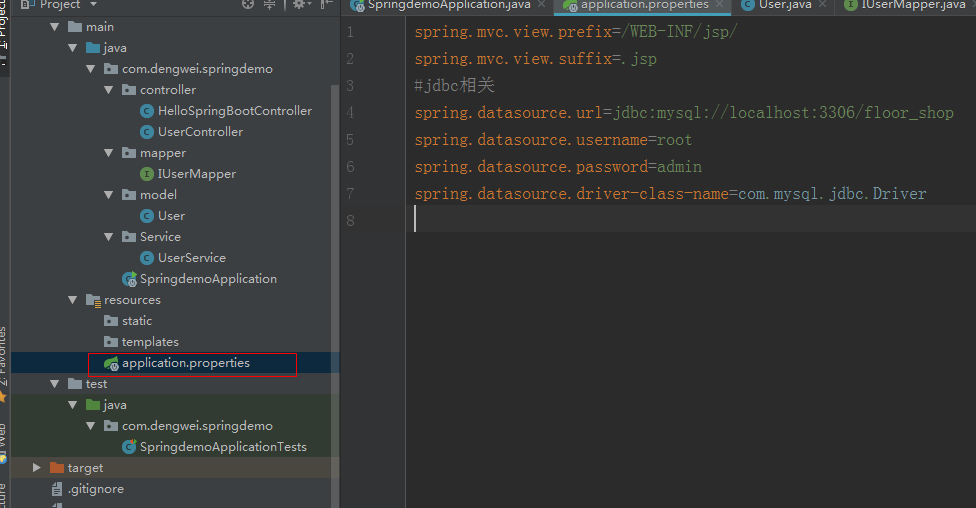
 spring.mvc.view.prefix=/WEB-INF/jsp/

 spring.mvc.view.suffix=.jsp

 #jdbc相关

 spring.datasource.url=jdbc:mysql://localhost:3306/floor_shop

 spring.datasource.username=root

 spring.datasource.password=admin

 spring.datasource.driver-class-name=com.mysql.jdbc.Driver
启动springBoot:
注意:前面我们排除了对数据库相关的自动配置,现在我们配置了数据库实体配置,所以把之前的排除要删掉,并且多添加@MapperScan("mapper映射文件的地址")
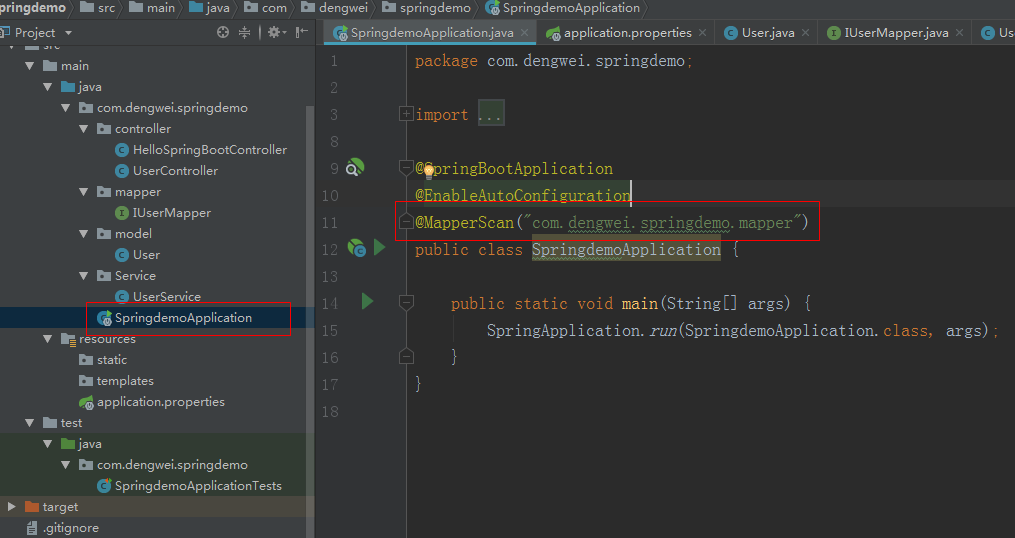
 package com.dengwei.springdemo;

 import org.mybatis.spring.annotation.MapperScan;

 import org.springframework.boot.SpringApplication;

 import org.springframework.boot.autoconfigure.EnableAutoConfiguration;

 import org.springframework.boot.autoconfigure.SpringBootApplication;

 import org.springframework.boot.autoconfigure.jdbc.DataSourceAutoConfiguration;

 @SpringBootApplication

 @EnableAutoConfiguration

 @MapperScan("com.dengwei.springdemo.mapper")

 public class SpringdemoApplication {

     public static void main(String[] args) {

         SpringApplication.run(SpringdemoApplication.class, args);

     }

 }
好的直接启动即可。上面我们简单实现了数据库的查询,增删改就自己取写一写吧。
下面我们看看springBoot整合jsp:
1、在原来的依赖中添加依赖:
 <!--对jsp访问的支持-->

        <dependency>

            <groupId>org.apache.tomcat.embed</groupId>

            <artifactId>tomcat-embed-jasper</artifactId>

        </dependency>
2、跳转页面:
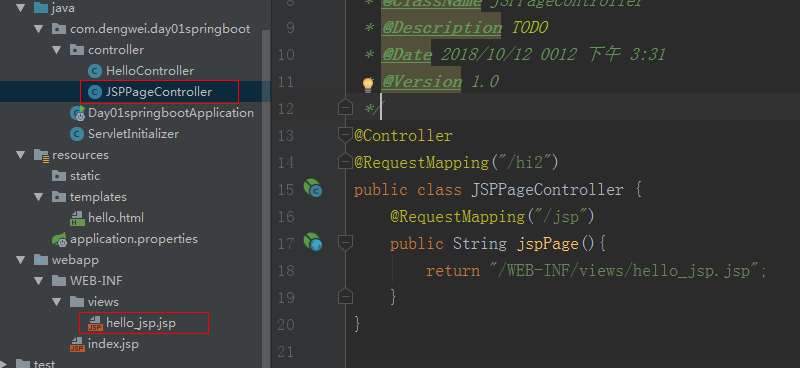
springBoot整合thymeleaf:
 <!--模板引擎thmeleaf对HTML的支持-->

        <dependency>

            <groupId>org.springframework.boot</groupId>

            <artifactId>spring-boot-starter-thymeleaf</artifactId>

        </dependency>
跳转页面:
不用加前后缀,可以直接跳转页面:
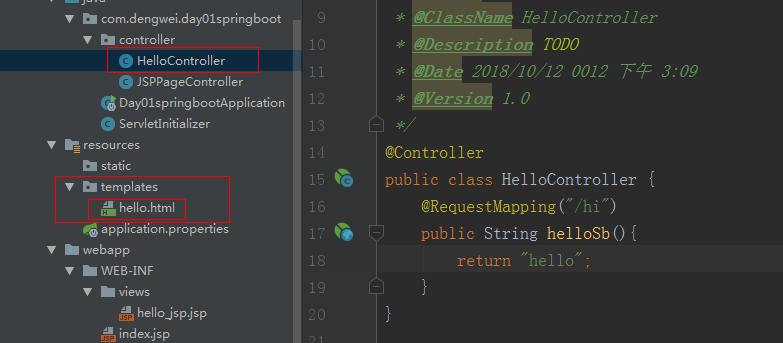
关于thymeleaf的基础使用参考:
https://www.jianshu.com/p/6953671d4645
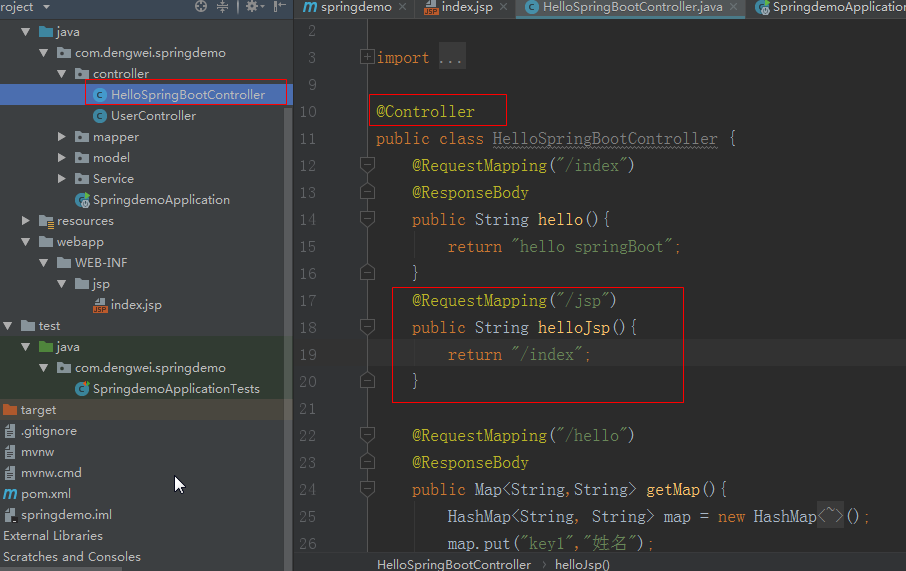
在我们第一次新建的HelloSpringBootController中 新建一个helloJsp()方法,注意:我们之前用的注解是@RestController ,这个注解相当于@Controller + @ResponseBody
表示标注的类或则方法返回的都是json格式的,而我们这次需要访问jsp页面所以需要换成@Controller注解。在需要的返回json格式的方法上添加@ResponseBody,而不是整个类的所有方法都返回json格式。
下面我们看一下springBoot中的全局异常捕获:
异常捕获的核心标签:@ControllerAdvice + @ExceptionHandler(RuntimeException.class)
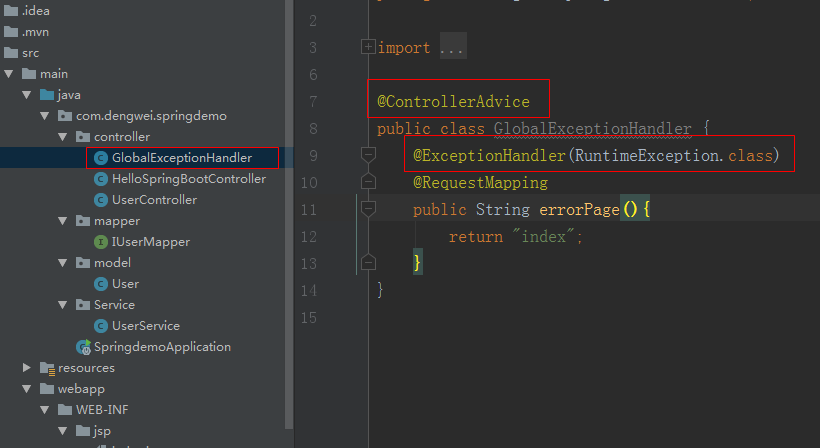
 package com.dengwei.springdemo.controller;

 import org.springframework.web.bind.annotation.ControllerAdvice;

 import org.springframework.web.bind.annotation.ExceptionHandler;

 import org.springframework.web.bind.annotation.RequestMapping;

 @ControllerAdvice

 public class GlobalExceptionHandler {

     @ExceptionHandler(RuntimeException.class)

     @RequestMapping

     public String errorPage(){

         return "index";

     }

 }
好了,就先到这儿吧!
springBoot整合mybatis、jsp 或 HTML的更多相关文章
- springboot系列四:springboot整合mybatis jsp
一.用IDEA 创建maven项目 项目目录结构 1.添加pom jar依赖 <?xml version="1.0" encoding="UTF-8"?& ...
- SpringBoot整合mybatis、shiro、redis实现基于数据库的细粒度动态权限管理系统实例
1.前言 本文主要介绍使用SpringBoot与shiro实现基于数据库的细粒度动态权限管理系统实例. 使用技术:SpringBoot.mybatis.shiro.thymeleaf.pagehelp ...
- SpringBoot整合MyBatis与MySql8.0
一.前言 之前已经有一篇文章讨论过SpringBoot整合MyBatis,因而此篇不在重复累赘,本文主要是最新版的SpringBoot2.0与MyBatis.最新MySQL8.0整合过程中遇到的问题进 ...
- SpringBoot整合Mybatis之项目结构、数据源
已经有好些日子没有总结了,不是变懒了,而是我一直在奋力学习springboot的路上,现在也算是完成了第一阶段的学习,今天给各位总结总结. 之前在网上找过不少关于springboot的教程,都是一些比 ...
- SpringBoot整合Mybatis【非注解版】
接上文:SpringBoot整合Mybatis[注解版] 一.项目创建 新建一个工程 选择Spring Initializr,配置JDK版本 输入项目名 选择构建web项目所需的state ...
- SpringBoot整合Mybatis注解版---update出现org.apache.ibatis.binding.BindingException: Parameter 'XXX' not found. Available parameters are [arg1, arg0, param1, param2]
SpringBoot整合Mybatis注解版---update时出现的问题 问题描述: 1.sql建表语句 DROP TABLE IF EXISTS `department`; CREATE TABL ...
- springboot学习随笔(四):Springboot整合mybatis(含generator自动生成代码)
这章我们将通过springboot整合mybatis来操作数据库 以下内容分为两部分,一部分主要介绍generator自动生成代码,生成model.dao层接口.dao接口对应的sql配置文件 第一部 ...
- springboot整合mybatis出现的一些问题
springboot整合mybatis非常非常的简单,简直简单到发指.但是也有一些坑,这里我会详细的指出会遇到什么问题,并且这些配置的作用 整合mybatis,无疑需要mapper文件,实体类,dao ...
- SpringBoot系列七:SpringBoot 整合 MyBatis(配置 druid 数据源、配置 MyBatis、事务控制、druid 监控)
1.概念:SpringBoot 整合 MyBatis 2.背景 SpringBoot 得到最终效果是一个简化到极致的 WEB 开发,但是只要牵扯到 WEB 开发,就绝对不可能缺少数据层操作,所有的开发 ...
随机推荐
- [国家集训队]整数的lqp拆分
我们的目标是求$\sum\prod_{i=1}^m F_{a_i}$ 设$f(i) = \sum\prod_{j=1}^i F_{a_j}$那么$f(i - 1) = \sum\prod_{j=1}^ ...
- 【BZOJ5305】[HAOI2018]苹果树(组合计数)
[BZOJ5305][HAOI2018]苹果树(组合计数) 题面 BZOJ 洛谷 题解 考虑对于每条边计算贡献.每条边的贡献是\(size*(n-size)\). 对于某个点\(u\),如果它有一棵大 ...
- stm32使用rt-thread在文件《stm32f1xx_hal.h》中头文件包含顺序引出的错误
@2019-01-24 [小记] 在学习 rt-thread BSP制作过程中,发现文件<stm32f1xx_hal.h>中 Env工具生成的原始顺序 1. #include " ...
- extern C小结
名词解释 1.extern extern翻译为外部的,用在变量或函数之前,使其可见范围拓宽,这就是为啥叫extern吧.那它是用来干嘛的呢?当用在变量或函数之前,提示编译器到其他模块寻找其定义. 举个 ...
- UVA10559 Blocks(区间dp)
有n个带有颜色的方块,没消除一段长度为x的连续的相同颜色的方块可以得到x^2的分数,让你用一种最优的顺序消除所有方块使得得分最多. 输入格式 第一行包含测试的次数t(1≤t≤15) 每个案例包含两行. ...
- springcloud干货之服务注册与发现(Eureka)
springcloud系列文章的第一篇 springcloud服务注册与发现 使用Eureka实现服务治理 作用:实现服务治理(服务注册与发现) 简介: Spring Cloud Eureka是Spr ...
- Kafka史上最详细原理总结
https://blog.csdn.net/ychenfeng/article/details/74980531 Kafka Kafka是最初由Linkedin公司开发,是一个分布式.支持分区的(pa ...
- MVC aspx
客户端服务器---Model(模型)---View(视图)---Control(控制器) 1.ASP.NET MVC 2.新建项目引擎选aspx.在Controllers创建控制器,默认启动Home ...
- A1141. PAT Ranking of Institutions
After each PAT, the PAT Center will announce the ranking of institutions based on their students' pe ...
- B1018. 锤子剪刀布
大家应该都会玩“锤子剪刀布”的游戏:两人同时给出手势,胜负规则如图所示: 现给出两人的交锋记录,请统计双方的胜.平.负次数,并且给出双方分别出什么手势的胜算最大. 输入格式: 输入第1行给出正整数N( ...