MongoDB Sharding分片配置
- shard key在sharding搭建完毕后是不能修改的,一个collection上只能有一个shard key。
- shard key上必须有索引(可以是以shard key开头的联合索引),如果没有mongodb会为shard key创建索引。如果是已经存在的collection那么必须手动为shard key创建索引。
- 在sharding的collection中只有_id和shard key前缀的索引可以是unique index,其他索引只能是普通索引。如果一个普通key上有unique index那么你不能以其他key为shard key对collection进行sharding。
- shard key的选择将会影响整个集群的效率,可扩展性和性能。而且也会影响你所能选择的分片策略。
- sh.addShardTag() 给shard设置标签A
- sh.addTagRange() 给集合的某个chunk范围设置标签A,最终MongoDB会保证设置标签 A 的chunk范围(或该范围的超集)分布设置了标签 A 的 shard 上。
MongoDB版本:3.2.9
节点:192.168.20.70/71/72
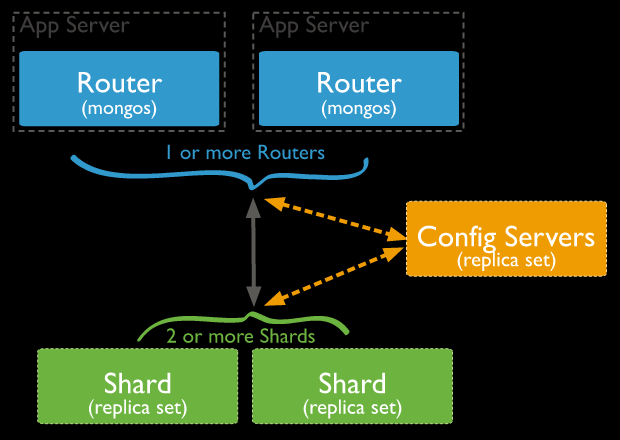
架构说明:
70:包含mongos、config server(master)、3个shards(master)
71:包含config server(slave)、3个shards(slave)
72:包含3个shards(arbiter)
--网上很多资料说config server必须是奇数个,但至少在本次搭建的3.2.9版本中2个也是可以的。
--master的mongo.conf(192.168.20.70)

directoryperdb=true

replSet=config

configsvr=true

logpath=/home/mongod/config_master/mongod.log

logappend=true

fork=true

port=27018

dbpath=/home/mongod/config_master

pidfilepath=/home/mongod/config_master/mongod.pid
--slave的mongo.conf(192.168.20.71)

directoryperdb=true

replSet=config

configsvr=true

logpath=/home/mongod/config_slave/mongod.log

logappend=true

fork=true

port=27018

dbpath=/home/mongod/config_slave

pidfilepath=/home/mongod/config_slave/mongod.pid
mongod -f /home/mongod/config_master/mongo.conf

mongod -f /home/mongod/config_slave/mongo.conf

use admin

cfg={_id:"config",members:[{_id:0,host:'192.168.20.70:27018',priority:2}, {_id:1,host:'192.168.20.71:27018',priority:1}]};

rs.initiate(cfg)
--shard1的master、slave、arbiter的配置文件(分别在70、71、72上)

--master:

directoryperdb=true

replSet=shard1

shardsvr = true

logpath=/home/mongod/shard1_master/mongod.log

logappend=true

fork=true

port=27017

dbpath=/home/mongod/shard1_master

pidfilepath=/home/mongod/shard1_master/mongod.pid
--slave:

directoryperdb=true

replSet=shard1

shardsvr = true

logpath=/home/mongod/shard1_slave/mongod.log

logappend=true

fork=true

port=27017

dbpath=/home/mongod/shard1_slave

pidfilepath=/home/mongod/shard1_slave/mongod.pid
--arbiter:

directoryperdb=true

replSet=shard1

shardsvr = true

logpath=/home/mongod/shard1_arbiter/mongod.log

logappend=true

fork=true

port=27017

dbpath=/home/mongod/shard1_arbiter

pidfilepath=/home/mongod/shard1_arbiter/mongod.pid
use admin

cfg={_id:"shard1",members:[{_id:0,host:'192.168.20.70:27017',priority:2}, {_id:1,host:'192.168.20.71:27017',priority:1},{_id:2,host:'192.168.20.72:27017',arbiterOnly:true}]};

rs.initiate(cfg)
--注意:dbpath、directoryperdb等参数是不能出现在mongos的配置文件中的,简单起见只配置如下参数即可:

configdb = config/192.168.20.70:27018,192.168.20.71:27018 --这里的config是config server副本集的名称,后接config server的2个副本集节点。

logpath=/home/mongod/mongos/mongod.log

logappend=true

fork=true

port=27019

pidfilepath=/home/mongod/mongos/mongod.pid
mongos -f /home/mongod/mongos/mongo.conf
登录mongos服务器:

mongo --port=27019

use admin

sh.addShard("shard1/192.168.20.70:27017,192.168.20.71:27017,192.168.20.72:27017");

sh.addShard("shard2/192.168.20.70:27020,192.168.20.71:27020,192.168.20.72:27020");

sh.addShard("shard3/192.168.20.70:27021,192.168.20.71:27021,192.168.20.72:27021");

然后在mongos上为具体的数据库配置sharding:

sh.enableSharding("test") --允许test数据库进行sharding

sh.shardCollection("test.t",{id:"hashed"}) --对test.t集合以id列为shard key进行hashed sharding

通过db.t.getIndexes()可以看到自动为id列创建了索引。
mongo --port=27019 --27019是mongos的端口号

use test

for(i=1,i<=1000,i++){db.t.insert({id:i,name:"Leo"})}
sh.shardCollection("test.t",{id:1}) --对test.t集合以id列为shard key进行ranged sharding
for(i=1;i<=1000;i++){db.t.insert({id:i,name:"Leo"})}
--sh.status()的相关结果:

test.t

shard key: { "id" : 1 }

unique: false

balancing: true

chunks:

shard1 1

shard2 1

shard3 1

{ "id" : { "$minKey" : 1 } } -->> { "id" : 2 } on : shard1 Timestamp(2, 0)

{ "id" : 2 } -->> { "id" : 22 } on : shard3 Timestamp(3, 0)

{ "id" : 22 } -->> { "id" : { "$maxKey" : 1 } } on : shard2 Timestamp(3, 1)

从sh.status的结果可以看到id为[1,2)的被分配至shard1,[2,22)被分配至shard2,其他的全部被分配至shard3,分布极其不均匀。
sh.splitAt("test.t",{id:500})

sh.splitAt("test.t",{id:1000})

sh.splitAt("test.t",{id:1500})

sh.splitAt("test.t",{id:2000})

for(i=1;i<=3000;i++){db.t.insert({id:i,name:"Leo"})}

--sh.status()显示的分片结果如下:

test.t

shard key: { "id" : 1 }

unique: false

balancing: true

chunks:

shard1 2 --shard2上有2个chunks,分别是[1500,2000]和[2000,$maxKey)

shard2 2

shard3 1

{ "id" : { "$minKey" : 1 } } -->> { "id" : 500 } on : shard1 Timestamp(2, 0)

{ "id" : 500 } -->> { "id" : 1000 } on : shard3 Timestamp(3, 0)

{ "id" : 1000 } -->> { "id" : 1500 } on : shard1 Timestamp(4, 0)

{ "id" : 1500 } -->> { "id" : 2000 } on : shard2 Timestamp(4, 1)

{ "id" : 2000 } -->> { "id" : { "$maxKey" : 1 } } on : shard2 Timestamp(3, 3)
directoryperdb=true

shardsvr = true

logpath=/home/mongod/shard4/mongod.log

logappend=true

fork=true

port=27022

dbpath=/home/mongod/shard4

pidfilepath=/home/mongod/shard4/mongod.pid
sh.addShard("192.168.20.70:27022")
test.t

shard key: { "id" : 1 }

unique: false

balancing: true

chunks:

shard1 1

shard0004 1 --mongos自动将新的单实例mongoDB的chunk命名为shard0004

shard2 2

shard3 1

{ "id" : { "$minKey" : 1 } } -->> { "id" : 500 } on : shard0004 Timestamp(5, 0)

{ "id" : 500 } -->> { "id" : 1000 } on : shard3 Timestamp(3, 0)

{ "id" : 1000 } -->> { "id" : 1500 } on : shard1 Timestamp(5, 1)

{ "id" : 1500 } -->> { "id" : 2000 } on : shard2 Timestamp(4, 1)

{ "id" : 2000 } -->> { "id" : { "$maxKey" : 1 } } on : shard2 Timestamp(3, 3)

--可以看到balancer自动将chunk进行了迁移,迁移机制为mongodb内部决定,原理参见第八部分。
mongo --port=27019 --连接到mongos

use config

db.settings.update(

{ _id: "balancer" },

{ $set: { activeWindow : { start : "02:00", stop : "06:00" } } },

{ upsert: true }

)

Balancer会在服务器local time的凌晨2-6点才执行chunk的balance。
sh.setBalancerState("false")

或者:

sh.stopBalancer()
PRIMARY> db.isMaster()

{

"hosts" : [

"host1:9003",

"host2:9003",

"host3:9003"

],

"setName" : "mongo-9003",

"setVersion" : 9,

"ismaster" : false, // primary 的 ismaster 为 false???

"secondary" : true,

"primary" : "host1:9003",

"me" : "host1:9003",

"electionId" : ObjectId("57c7e62d218e9216c70aa3cf"),

"maxBsonObjectSize" : 16777216,

"maxMessageSizeBytes" : 48000000,

"maxWriteBatchSize" : 1000,

"localTime" : ISODate("2016-09-01T12:29:27.113Z"),

"maxWireVersion" : 4,

"minWireVersion" : 0,

"ok" : 1

}
MongoDB Sharding分片配置的更多相关文章
- mongodb数据库集群及sharding分片配置
复制集群的配置 1.安装mongodb数据库 在主节点和从节点上都安装mongodb # rpm -ivh mongo-10gen-2.4.6-mongodb_1.x86_64.rpm mongo-1 ...
- MongoDB Sharding分片 shell 脚本
#!/bin/sh CONFIG_NAME=$ CONFIG_PORT=$ SERIAL_NUM=$ STORAGE_HOME=$ if [ ! -n "$CONFIG_NAME" ...
- 第41章:MongoDB-集群--Sharding(分片)
①Sharding分片概念 分片(sharding)是指将数据库拆分,将其分散在不同的机器上的过程.将数据分散到不同的机器上,不需要功能强大的服务器就可以存储更多的数据和处理更大的负载. 分片是每个分 ...
- mongodb sharding配置
mongodb集群配置 1 Mongo使用sharding集群 mongodb副本集群 mongos1 192.168.20.137 mongos2 192.168.20.138 mongo_conf ...
- MongoDB之分片集群(Sharding)
MongoDB之分片集群(Sharding) 一.基本概念 分片(sharding)是一个通过多台机器分配数据的方法.MongoDB使用分片支持大数据集和高吞吐量的操作.大数据集和高吞吐量的数据库系统 ...
- mongodb集群配置分片集群
测试环境 操作系统:CentOS 7.2 最小化安装 主服务器IP地址:192.168.197.21 mongo01 从服务器IP地址:192.168.197.22 mongo02 从服务器IP地址: ...
- MongoDB学习笔记(六)--复制集+sharding分片 && 总结
复制集+sharding分片 背景 主机 IP 服务及端口 Server A ...
- MongoDB学习笔记(五)--复制集 && sharding分片
主从复制 主从节点开启 主节 ...
- MongoDB 自动分片 auto sharding
MongoDB部署实验系列文章 MongoDB做为NoSQL数据库,最近几年持续升温,越来越多的企业都开始尝试用MongoDB代替原有Database做一些事情.MongoDB也在集群,分片,复制上也 ...
随机推荐
- SVN不能解锁,报错:没有匹配的可用锁令牌的解决方法
命令行进入到要解锁的目录,执行 svn unlock 要解锁的文档名 进行解锁:若还是打不开锁,就用强制解锁 , svn unlock -f(--force) 要解锁的文档名 也可以通过 svnadm ...
- 痞子衡嵌入式:忘掉cmd.exe吧!选用优雅的控制台终端(ConsoleZ)
大家好,我是痞子衡,是正经搞技术的痞子.今天痞子衡给大家介绍的是一款优雅的替换cmd的命令行终端ConsoleZ. 1.使用cmd的烦恼 嵌入式开发经常会用到命令行工具,Windows系统自带的com ...
- vue开发中vue-resource + canvas 图片压缩、上传、预览
1.使用vue-resource上传,也可以自定义ajax上传: 2.使用<input type="file" @change="submit()" na ...
- js_html_input中autocomplete="off"在chrom中失效的解决办法
分享网上的2种办法: 1-可以在不需要默认填写的input框中设置 autocomplete="new-password"(已实测,有效) 网上咱没有找到对其详细解释,但是发现16 ...
- .Net NPOI 根据excel模板导出excel、直接生成excel
一.根据Excel模板导出excel 1.导入NPOI.dll 2.DAL中添加类ExportExcel.cs using NPOI.SS.UserModel; using System; usin ...
- vim撤销undo与反撤销redo
普通模式下 u 撤销 ctrl + r 反撤销
- iframe实用操作
iframe高度设置为子页面高度 //需要使用Jquery $(document).ready(function () { parent.document.getEleme ...
- springboot使用hibernate validator校验,Bean Validation校验
第一个地址:springboot使用hibernate validator校验,Bean Validation校验
- Maven(五)Eclipse配置Maven插件
较新版本的Eclipse内置Maven插件 1. 设置installation 一般不适用内置的 指定核心程序的位置 2. 设置user settings 指定本地仓库的位置 1.如果setting. ...
- Python3 系列之 基础语法篇
基础数据类型 整数 python 可以处理任意大小的整数 浮点数 python 可以处理任意大小的浮点数,但是需要注意的一点是:整数运算永远是精确的(除法也是精确的),而浮点数运算则可能会有四舍五入的 ...