音视频入门-05-RGB-TO-BMP使用开源库
RGB-TO-BMP 回顾
将 RGB 数据转成 BMP 图片:
- 了解 BMP 文件格式
- 准备 BMP 文件头信息
- 准备 BMP 信息头
- BMP 存储 RGB 的顺序是 B-G-R
- BitmapInfoHeader 中的 biHeight 字段,biHeight 为正,位图自底向顶扫描,biHeight 为负,位图自顶向底扫描。
- BMP 图像四字节对齐
实际开发过程,通常会使用第三方开源库来简化开发,屏蔽一些底层的复杂度,节省大量编写代码的时间。
使用开源库的方式
libbmp (C 库)
#include <stdio.h>

#include "libbmp/libbmp.h"

// 彩虹的七种颜色

u_int32_t rainbowColors[] = {

        0XFF0000, // 红

        0XFFA500, // 橙

        0XFFFF00, // 黄

        0X00FF00, // 绿

        0X007FFF, // 青

        0X0000FF, // 蓝

        0X8B00FF  // 紫

};

int main() {

    int width = 711, height = 711;

    bmp_img img;

    bmp_img_init_df (&img, width, height);

    for (int i = 0; i < width; ++i) {

        // 当前颜色

        u_int32_t currentColor = rainbowColors[0];

        if(i < 100) {

            currentColor = rainbowColors[0];

        } else if(i < 200) {

            currentColor = rainbowColors[1];

        } else if(i < 300) {

            currentColor = rainbowColors[2];

        } else if(i < 400) {

            currentColor = rainbowColors[3];

        } else if(i < 500) {

            currentColor = rainbowColors[4];

        } else if(i < 600) {

            currentColor = rainbowColors[5];

        } else if(i < 700) {

            currentColor = rainbowColors[6];

        }

        // 当前颜色 R 分量

        u_int8_t R = (currentColor & 0xFF0000) >> 16;

        // 当前颜色 G 分量

        u_int8_t G = (currentColor & 0x00FF00) >> 8;

        // 当前颜色 B 分量

        u_int8_t B = currentColor & 0x0000FF;

        for (int j = 0; j < height; ++j) {

            bmp_pixel_init (&img.img_pixels[i][j], R, G, B);

        }

    }

    bmp_img_write (&img, "/Users/staff/Desktop/test-libbmp.bmp");

    bmp_img_free (&img);

    return 0;

}
google libbmp(C 库)
#include <stdio.h>

#include "google/libbmp/src/bmpfile.h"

// 彩虹的七种颜色

u_int32_t rainbowColors[] = {

        0XFF0000, // 红

        0XFFA500, // 橙

        0XFFFF00, // 黄

        0X00FF00, // 绿

        0X007FFF, // 青

        0X0000FF, // 蓝

        0X8B00FF  // 紫

};

int main(int argc, char **argv) {

    int width = 711, height = 711;

    bmpfile_t *bmp;

    if ((bmp = bmp_create(width, height, 24)) == NULL) {

        return -1;

    }

    for (int i = 0; i < width; ++i) {

        // 当前颜色

        u_int32_t currentColor = rainbowColors[0];

        if(i < 100) {

            currentColor = rainbowColors[0];

        } else if(i < 200) {

            currentColor = rainbowColors[1];

        } else if(i < 300) {

            currentColor = rainbowColors[2];

        } else if(i < 400) {

            currentColor = rainbowColors[3];

        } else if(i < 500) {

            currentColor = rainbowColors[4];

        } else if(i < 600) {

            currentColor = rainbowColors[5];

        } else if(i < 700) {

            currentColor = rainbowColors[6];

        }

        // 当前颜色 R 分量

        u_int8_t R = (currentColor & 0xFF0000) >> 16;

        // 当前颜色 G 分量

        u_int8_t G = (currentColor & 0x00FF00) >> 8;

        // 当前颜色 B 分量

        u_int8_t B = currentColor & 0x0000FF;

        rgb_pixel_t pixel = {B, G, R, 0};

        for (int j = 0; j < height; ++j) {

            bmp_set_pixel(bmp, j, i, pixel);

        }

    }

    bmp_save(bmp, "/Users/staff/Desktop/test-google-libbmp.bmp");

    bmp_destroy(bmp);

    return 0;

}
bmp(C 库)
#include <stdio.h>

#include "bmp/bmp.h"

// 彩虹的七种颜色

u_int32_t rainbowColors[] = {

        0XFF0000, // 红

        0XFFA500, // 橙

        0XFFFF00, // 黄

        0X00FF00, // 绿

        0X007FFF, // 青

        0X0000FF, // 蓝

        0X8B00FF  // 紫

};

int main() {

    int width = 711, height = 711;

    char bmp[BMP_SIZE(width, height)];

    bmp_init(bmp, width, height);

    for (int i = 0; i < width; ++i) {

        // 当前颜色

        u_int32_t currentColor = rainbowColors[0];

        if(i < 100) {

            currentColor = rainbowColors[0];

        } else if(i < 200) {

            currentColor = rainbowColors[1];

        } else if(i < 300) {

            currentColor = rainbowColors[2];

        } else if(i < 400) {

            currentColor = rainbowColors[3];

        } else if(i < 500) {

            currentColor = rainbowColors[4];

        } else if(i < 600) {

            currentColor = rainbowColors[5];

        } else if(i < 700) {

            currentColor = rainbowColors[6];

        }

        for (int j = 0; j < height; ++j) {

            bmp_set(bmp, j, i, currentColor);

        }

    }

    FILE *f = fopen("/Users/hubin/Desktop/test-bmp.bmp", "wb");

    fwrite(bmp, sizeof(bmp), 1, f);

    fclose(f);

    return 0;

}
qdbmp(C 库)
#include <stdio.h>

#include "qdbmp/qdbmp.h"

// 彩虹的七种颜色

u_int32_t rainbowColors[] = {

        0XFF0000, // 红

        0XFFA500, // 橙

        0XFFFF00, // 黄

        0X00FF00, // 绿

        0X007FFF, // 青

        0X0000FF, // 蓝

        0X8B00FF  // 紫

};

int main() {

    int width = 711, height = 711;

    BMP* bmp = BMP_Create(width, height, 24);

    for (int i = 0; i < width; ++i) {

        // 当前颜色

        u_int32_t currentColor = rainbowColors[0];

        if(i < 100) {

            currentColor = rainbowColors[0];

        } else if(i < 200) {

            currentColor = rainbowColors[1];

        } else if(i < 300) {

            currentColor = rainbowColors[2];

        } else if(i < 400) {

            currentColor = rainbowColors[3];

        } else if(i < 500) {

            currentColor = rainbowColors[4];

        } else if(i < 600) {

            currentColor = rainbowColors[5];

        } else if(i < 700) {

            currentColor = rainbowColors[6];

        }

        // 当前颜色 R 分量

        u_int8_t R = (currentColor & 0xFF0000) >> 16;

        // 当前颜色 G 分量

        u_int8_t G = (currentColor & 0x00FF00) >> 8;

        // 当前颜色 B 分量

        u_int8_t B = currentColor & 0x0000FF;

        for (int j = 0; j < height; ++j) {

            BMP_SetPixelRGB(bmp, j, i, R, G, B);

        }

    }

    /* Save result */

    BMP_WriteFile( bmp, "/Users/hubin/Desktop/test-qdbmp.bmp");

    BMP_CHECK_ERROR( stderr, -2 );

    /* Free all memory allocated for the image */

    BMP_Free( bmp );

    return 0;

}
easybmp(C++ 库)
#include "EasyBMP/EasyBMP.h"

using namespace std;

// 彩虹的七种颜色

u_int32_t rainbowColors[] = {

        0XFF0000, // 红

        0XFFA500, // 橙

        0XFFFF00, // 黄

        0X00FF00, // 绿

        0X007FFF, // 青

        0X0000FF, // 蓝

        0X8B00FF  // 紫

};

int main( int argc, char* argv[]) {

    int width = 711, height = 711;

    int bitDepth = 24;

    BMP bmp;

    bmp.SetSize(width, height);

    bmp.SetBitDepth(bitDepth);

    for (int i = 0; i < width; ++i) {

        // 当前颜色

        u_int32_t currentColor = rainbowColors[0];

        if(i < 100) {

            currentColor = rainbowColors[0];

        } else if(i < 200) {

            currentColor = rainbowColors[1];

        } else if(i < 300) {

            currentColor = rainbowColors[2];

        } else if(i < 400) {

            currentColor = rainbowColors[3];

        } else if(i < 500) {

            currentColor = rainbowColors[4];

        } else if(i < 600) {

            currentColor = rainbowColors[5];

        } else if(i < 700) {

            currentColor = rainbowColors[6];

        }

        // 当前颜色 R 分量

        u_int8_t R = (currentColor & 0xFF0000) >> 16;

        // 当前颜色 G 分量

        u_int8_t G = (currentColor & 0x00FF00) >> 8;

        // 当前颜色 B 分量

        u_int8_t B = currentColor & 0x0000FF;

        RGBApixel pixel;

        pixel.Red = R;

        pixel.Green = G;

        pixel.Blue = B;

        pixel.Alpha = 0;

        for (int j = 0; j < height; ++j) {

            bmp.SetPixel(j, i, pixel);

        }

    }

    bmp.WriteToFile("/Users/hubin/Desktop/test-easybmp.bmp");

    return 0;

}
bitmap(C++ 库)
#include "bitmap/bitmap_image.hpp"

using namespace std;

// 彩虹的七种颜色

u_int32_t rainbowColors[] = {

        0XFF0000, // 红

        0XFFA500, // 橙

        0XFFFF00, // 黄

        0X00FF00, // 绿

        0X007FFF, // 青

        0X0000FF, // 蓝

        0X8B00FF  // 紫

};

int main() {

    int width = 711, height = 711;

    bitmap_image image(width, height);

    image.clear();

    for (int i = 0; i < width; ++i) {

        // 当前颜色

        u_int32_t currentColor = rainbowColors[0];

        if(i < 100) {

            currentColor = rainbowColors[0];

        } else if(i < 200) {

            currentColor = rainbowColors[1];

        } else if(i < 300) {

            currentColor = rainbowColors[2];

        } else if(i < 400) {

            currentColor = rainbowColors[3];

        } else if(i < 500) {

            currentColor = rainbowColors[4];

        } else if(i < 600) {

            currentColor = rainbowColors[5];

        } else if(i < 700) {

            currentColor = rainbowColors[6];

        }

        // 当前颜色 R 分量

        u_int8_t R = (currentColor & 0xFF0000) >> 16;

        // 当前颜色 G 分量

        u_int8_t G = (currentColor & 0x00FF00) >> 8;

        // 当前颜色 B 分量

        u_int8_t B = currentColor & 0x0000FF;

        for (int j = 0; j < height; ++j) {

            image.set_pixel(j, i, R, G, B);

        }

    }

    image.save_image("/Users/hubin/Desktop/test-bitmap.bmp");

    return 0;

}
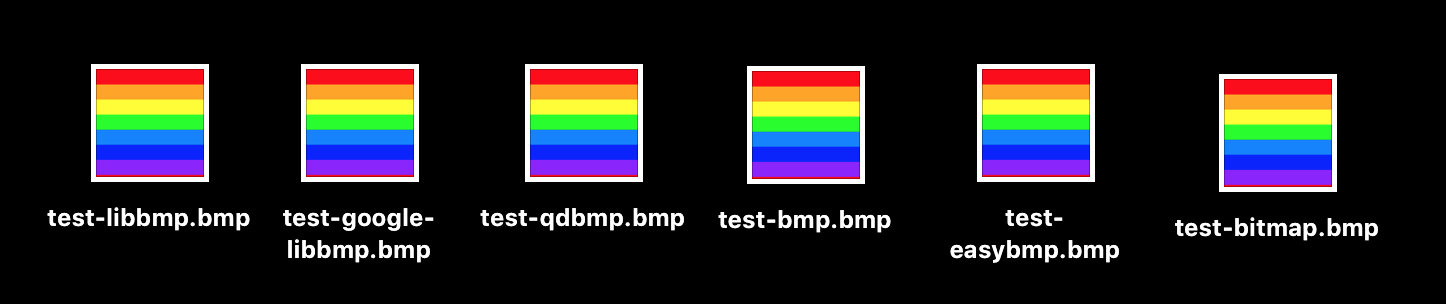
查看开源库的效果
六个开源库都可以大大减少我们的工作量!
代码:
参考资料:
内容有误?联系作者:

音视频入门-05-RGB-TO-BMP使用开源库的更多相关文章
- 音视频入门-09-RGB&YUV互转-使用开源库
* 音视频入门文章目录 * 介绍开源库 使用第三方开源库来简化开发,屏蔽一些底层的复杂度,节省大量编写代码的时间. libyuv: Google 开源的实现各种 YUV 与 RGB 之间相互转换.旋转 ...
- 音视频入门-03-RGB转成BMP图片
* 音视频入门文章目录 * BMP 文件格式解析 BMP 文件由文件头.位图信息头.颜色信息和图形数据四部分组成. 位图文件头(14个字节) 位图信息头(40个字节) 颜色信息 图形数据 文件头与信息 ...
- 音视频入门-01-认识RGB
* 音视频入门文章目录 * RGB 简介 RGB 色彩模式是工业界的一种颜色标准,是通过对红(R).绿(G).蓝(B)三个颜色通道的变化以及它们相互之间的叠加来得到各式各样的颜色的,RGB 即是代表红 ...
- 音视频入门-11-PNG文件格式详解
* 音视频入门文章目录 * PNG 文件格式解析 PNG 图像格式文件由一个 8 字节的 PNG 文件署名域和 3 个以上的后续数据块(IHDR.IDAT.IEND)组成. PNG 文件包括 8 字节 ...
- 音视频入门-10-使用libyuv对YUV数据进行缩放、旋转、镜像、裁剪、混合
* 音视频入门文章目录 * libyuv libyuv 是 Google 开源的实现各种 YUV 与 RGB 之间相互转换.旋转.缩放等的库.它是跨平台的,可在 Windows.Linux.Mac.A ...
- 音视频入门-08-RGB&YUV
* 音视频入门文章目录 * YUV & RGB 相互转换公式 YCbCr 的 Y 与 YUV 中的 Y 含义一致,Cb 和 Cr 与 UV 同样都指色彩,Cb 指蓝色色度,Cr 指红色色度,在 ...
- 音视频入门-04-BMP图像四字节对齐的问题
* 音视频入门文章目录 * BMP 图像四字节对齐 表示 BMP 位图中像素的位元是以行为单位对齐存储的,每一行的大小都向上取整为4字节(32 位 DWORD)的倍数.如果图像的高度大于 1,多个经过 ...
- 音视频入门-20-BMP、PNG、JPG、GIF静态图生成GIF动态图
* 音视频入门文章目录 * 静态图 -> 动态图 前面 [18-手动生成一张GIF图片] 和 [19-使用giflib处理GIF图片] 生成的 GIF 每一帧都是一个颜色,平时用到的 GIF 每 ...
- 音视频入门-12-手动生成一张PNG图片
* 音视频入门文章目录 * 预热 上一篇 [PNG文件格式详解]详细介绍了 PNG 文件的格式. PNG 图像格式文件由一个 8 字节的 PNG 文件署名域和 3 个以上的后续数据块(IHDR.IDA ...
随机推荐
- Jira 入门【转】
JIRA是Atlassian公司出品的项目与事务跟踪工具,被广泛应用于缺陷跟踪.客户服务.需求收集.流程审批.任务跟踪.项目跟踪和敏捷管理等工作领域.它是一个集 项目计划.任务分配.需求管理.错误跟踪 ...
- Java基础 println print 实现输出换行
JDK :OpenJDK-11 OS :CentOS 7.6.1810 IDE :Eclipse 2019‑03 typesetting :Markdown code ...
- Vue中路由的嵌套
import Vue from 'vue'; import App from './App.vue'; //引入公共的scss 注意:创建项目的时候必须用scss import './assets/c ...
- 【Mac】解决macos安装升级时报错安装所选更新时发生错误的问题
1 系统更新macjave 更新一直失败: 2 解决方法为:重新启动Mac,并按住Command+R进入恢复模式,找到Terminal后输入csrutil disable,然后重启Mac,再次下载并 ...
- 全基因组关联分析(GWAS):为何我的QQ图那么飘
前段时间有位小可爱问我,为什么她的QQ图特别飘,如果你不理解怎样算飘,请看下图: 理想的QQ图应该是这样的: 我当时的第一反应是:1)群体分层造成的:2)表型分布有问题.因此让她检查一下数据的群体分层 ...
- DB2使用MERGE INTO语句实现西虹市首富的新增及更新操作
首先我们新建一张名为XIHONGSHISHOUFU的表,这张表是评委会初步评选出的西虹市首富的候选人员,下面的SQL语句包含建表和插入数据的部分: CREATE TABLE XIHONGSHISHOU ...
- 静态站点生成器-md-mkdocs
推荐指数:
- nodejs实现一个文件存储服务
nodejs实现一个文件存储服务 模拟文件上传下载功能: PUT 上传一个文件,URL表示在服务器上待上传文件的路径. GET 下载一个文件,URL表示在服务器上待下载文件的路径.
- web端自动化——python多线程
Python通过两个标准库thread和threading提供对线程的支持.thread提供了低级别的.原始的线程以及一个简单的锁.threading基于Java的线程模型设计. 锁(Lock)条件变 ...
- 解释张量及TF的一些API
张量的定义 张量(Tensor)理论是数学的一个分支学科,在力学中有重要应用.张量这一术语起源于力学,它最初是用来表示弹性介质中各点应力状态的,后来张量理论发展成为力学和物理学的一个有力的数学工具.张 ...