【转】Ubuntu环境搭建svn服务器
记录一次使用Ubuntu环境搭建svn服务器的详细步骤
一、查看是否已经安装svn
命令:svn
如果显示以下信息,说明已安装

二、卸载已安装的svn
命令:sudo apt-get remove --purge subversion
三、安装svn
1.安装svn
更新命令:sudo apt-get update
安装svn:sudo apt-get install subversion
2.创建svn版本库
在home目录下创建svn目录,然后在svn中创建repository目录
命令:sudo mkdir /home/svn
sudo mkdir /home/svn/repository
3.修改repository文件中权限
命令:sudo chmod -R 777 /home/svn/repository
4.创建版本库
命令:sudo svnadmin create /home/svn/repository
执行完毕之后,repository目录下会有如下文件

5.切换当前目录到repository
命令:cd /home/svn/repository
6.设置db文件的权限
命令:sudo chmod -R 777 db
7.切换当前目录打破conf
命令:cd conf
8.修改配置文件svnserve.conf
命令:sudo vi svnserve.conf
修改前:
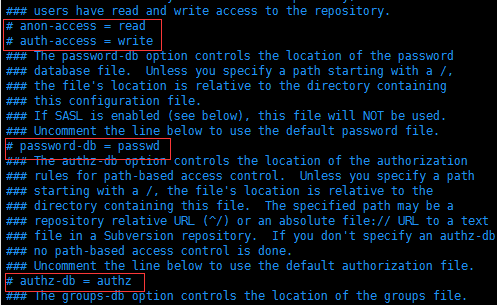
修改后:

说明:(去掉前面的#,并且顶格)
anon-access = none 匿名用户不可读
auth-access = write 权限用户可写
password-db = passwd 密码文件为passwd
authz-db = authz 权限文件为authz
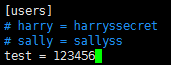
9.修改password文件,添加访问用户
命令:sudo vi passwd
新增用户格式:名字 = 密码
10.给用户test增加目录权限
命令:sudo vi authz
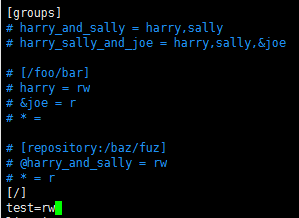
用户test拥有版本库根目录读写的权限
四、启动服务,并且监听81端口
命令:svnserve -d -r /home/svn --listen-port 81
如果提示:权限不够

切换到root权限
命令:sudo su
重试启动svn:svnserve -d -r /home/svn --listen-port 81
查看svn是否启动
命令:ps -ef | grep svnserve

五、停止服务
命令:killall svnserve
附:精确目录权限控制
[/]
A=rw
A拥有版本库根目录读写的权限
[/Android]
A=rw
B=r
A拥有Android目录读写的权限
B拥有Android目录读的权限,但没有写的权限
[/Android/Project1]
A=rw
*=r
A拥有/Android/Project1目录读写的权限
所有人都拥有/Android/Project1目录读的权限
转载于:https://www.cnblogs.com/daimengxiaoerge/p/10238503.html
六、获取当前最新修订版本号
svnlook youngest /home/svn/repository/

七、配置HTTP访问【暂时测试通不过,后面再测试】
1 安装apache
sudo apt-get install apache2
2 修改版本库权限
sudo chown -R www-data:www-data 版本库路径

例如:sudo chown -R www-data:www-data /home/svn/repository/db
3 配置apache2
sudo vi /etc/apache2/mods-available/dav_svn.conf
# dav_svn.conf - Example Subversion/Apache configuration

#

# For details and further options see the Apache user manual and

# the Subversion book.

#

# NOTE: for a setup with multiple vhosts, you will want to do this

# configuration in /etc/apache2/sites-available/*, not here.

# <Location URL> ... </Location>

# URL controls how the repository appears to the outside world.

# In this example clients access the repository as http://hostname/svn/

# Note, a literal /svn should NOT exist in your document root.

<Location /svn>  # 配置svn的http路径,如这里配置了svn后路径为http://hostname/svn/

  # Uncomment this to enable the repository

  DAV svn

  # Set this to the path to your repository

  #SVNPath /root/SVN/repo/

  # Alternatively, use SVNParentPath if you have multiple repositories under

  # under a single directory (/var/lib/svn/repo1, /var/lib/svn/repo2, ...).

  # You need either SVNPath and SVNParentPath, but not both.

  SVNParentPath /home/svn  # 当在一个父目录中有多个库时使用SVNParentPath

  SVNListParentPath On     # 显示仓库根目录

  # Access control is done at 3 levels: (1) Apache authentication, via

  # any of several methods.  A "Basic Auth" section is commented out

  # below.  (2) Apache <Limit> and <LimitExcept>, also commented out

  # below.  (3) mod_authz_svn is a svn-specific authorization module

  # which offers fine-grained read/write access control for paths

  # within a repository.  (The first two layers are coarse-grained; you

  # can only enable/disable access to an entire repository.)  Note that

  # mod_authz_svn is noticeably slower than the other two layers, so if

  # you don't need the fine-grained control, don't configure it.

  # Basic Authentication is repository-wide.  It is not secure unless

  # you are using https.  See the 'htpasswd' command to create and

  # manage the password file - and the documentation for the

  # 'auth_basic' and 'authn_file' modules, which you will need for this

  # (enable them with 'a2enmod').

  AuthType Basic                    # 基本权限验证功能

  AuthName "Subversion Repository"  # 权限名字,随便都行

  AuthUserFile /etc/apache2/dav_svn.passwd  # 保存授权用户的账户密码的文件路径

  # To enable authorization via mod_authz_svn (enable that module separately):

  #<IfModule mod_authz_svn.c>

  #AuthzSVNAccessFile /etc/apache2/dav_svn.authz

  #</IfModule>

  # The following three lines allow anonymous read, but make

  # committers authenticate themselves.  It requires the 'authz_user'

  # module (enable it with 'a2enmod').

  # 除了以下描述的GET OPTIONS操作外,其他的HTTP操作都需要授权用户才可以

  <LimitExcept GET PROPFIND OPTIONS REPORT>

    Require valid-user

  </LimitExcept>

</Location>
4、修改端口
sudo vi /etc/apache2/ports.conf
# If you just change the port or add more ports here, you will likely also

# have to change the VirtualHost statement in

# /etc/apache2/sites-enabled/000-default.conf

Listen 82

<IfModule ssl_module>

        Listen 443

</IfModule>

<IfModule mod_gnutls.c>

        Listen 443

</IfModule>
5 启动Apache服务
sudo /etc/init.d/apache2 restart
【转】Ubuntu环境搭建svn服务器的更多相关文章
- Ubuntu环境搭建svn服务器
记录一次使用Ubuntu环境搭建svn服务器的详细步骤 一.查看是否已经安装svn 命令:svn如果显示以下信息,说明已安装 二.卸载已安装的svn 命令:sudo apt-get remove ...
- ubuntu下搭建svn服务器
[ubuntu下搭建svn服务器] 1.创建目录 mkdir ~/svn/repository/ 2.创建仓库 svnadmin create repository 3.进入 repository/c ...
- Ubuntu系统搭建SVN服务器
Ubuntu系统搭建SVN服务器 参考地址:http://git.devzeng.com/blog/aliyun-ubuntu-svn-server.html 安装软件 依次在终端中执行下面的命令安装 ...
- ubuntu 如何搭建svn 服务器
1.在终端中直接输入 sudo apt-get install subversion,选择安装即可 来这个subversion同时包含了服务端和客户端. 2.(可选)看版本命令 svnserve - ...
- 【转】阿里云Ubuntu系统搭建SVN服务器
##SVN服务器相关软件安装 1.使用SSH远程服务器 (1)对于MAC OS/Liunx的用户直接打开终端输入 ssh 用户名@实例名,例如 ssh root@192.168.1.100 执行上面 ...
- ubuntu中搭建svn服务器步骤
1.安装软件包: sudo apt-get install subversion 2.建立相关文件夹(这里svn放在home文件夹中) cd /home sudo mkdir svn cd /home ...
- Ubuntu/CentOs 搭建SVN服务器
安装 CentOS : yum install subversion Ubuntu: sudo apt-get install subversion 查看Subversion版本: 使用“svn -- ...
- Ubuntu 下搭建SVN服务器
root@iZ25q0jd99eZ:~# sudo apt-get install subversion root@iZ25q0jd99eZ:/etc/subversion# mkdir /svn r ...
- ubuntu环境搭建DNS服务器
1 安装bind9 apt install bind9 2 修改 named.conf.local,添加要解析的域名及对应的域名配置文件 zone "test.cn"{ type ...
随机推荐
- 最详细的keepalived+lvs-dr配置文档
四台台机器: 分发器主:192.168.0.154 分发器备:192.168.0.171 rs_1:192.168.0.131 rs_2:192.168.0.132 keepalived安装: yum ...
- VS2012 VS2010 VTK引入设置
1.C/C++ ---> 附加包含的目录 F:/VTK61/VTK-6.1.0/SLN/Filters/Sources F:/VTK61/VTK-6.1.0/VTK-6.1.0/Filters/ ...
- HBase数据结构
1 RowKey 与nosql数据库们一样,RowKey是用来检索记录的主键.访问HBASE table中的行,只有三种方式: 1.通过单个RowKey访问 2.通过RowKey的range(正则) ...
- 【Spring】如何配置多个applicationContext.xml文件
在web.xml中通过contextConfigLocation配置spring 开发Java Web程序,使用ssh架构时,默认情况下,Spring的配置文件applicationContext.x ...
- 51Node1228序列求和 ——自然数幂和模板&&伯努利数
伯努利数法 伯努利数原本就是处理等幂和的问题,可以推出 $$ \sum_{i=1}^{n}i^k={1\over{k+1}}\sum_{i=1}^{k+1}C_{k+1}^i*B_{k+1-i}*(n ...
- 更丰富的符号工具包 Font Awesome
我时常想要在此类文档中通过一些图形符号来表达更丰富的含义或是对段落进行标注,例如使用 Emoji.然而 Emoji 在这方面仍然有存在一些不足,如: 颜色与文字风格不统一, 在不同系统的平台上显示不统 ...
- Sliding Window Matrix Maximum
Description Given an array of n * m matrix, and a moving matrix window (size k * k), move the window ...
- java 数组遍历(方法内部的代码)
//数组遍历(依次输出数组中的每一个元素)二维数组: int[][] arr={{1,2},{3,4,5},{6,7}}; for(int i=0;i<arr.length;i++){ for( ...
- tbls ci 友好的数据库文档化工具
tbls 是用golang 编写的数据库文档化工具,当前支持的数据库有pg.mysql.bigquery 此工具同时提供了变更对比.lint 校验,生成是markdown格式的 简单使用 安装 mac ...
- 开源项目 10 CSV
using Newtonsoft.Json; using System; using System.Collections.Generic; using System.Data; using Syst ...