Android控件-Fragment+ViewPager(高仿微信界面)
什么是Fragment?
Fragment是Android3.0后新增的概念,Fragment名为碎片,不过却和Activity十分相似,具有自己的生命周期,它是用来描述一些行为或一部分用户界面在一个Activity中,我们可以合并多个Fragment在一个单独的activity中建立多个UI面板,或者重用Fragment在多个activity中。
关于Fragment的生命周期,由于Fragment需要依赖Activity,也就是说当一个Activity的生命周期结束之后,那么Fragment的生命周期也自然结束。如果把一个Activiy比作一座大宅子的话,那么Fragment就可以比作大宅子里的房间,大宅子里的房间其中一间倒塌了,并不会引起整个大宅子的倒塌,但如果大宅子倒塌了,那么大宅里的房间也就都倒塌了。
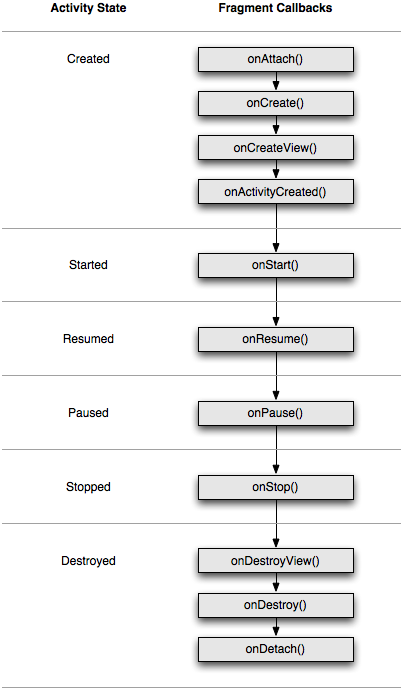
下面来看下Fragment的生命周期: Activity和Fragment生命周期对比(相似):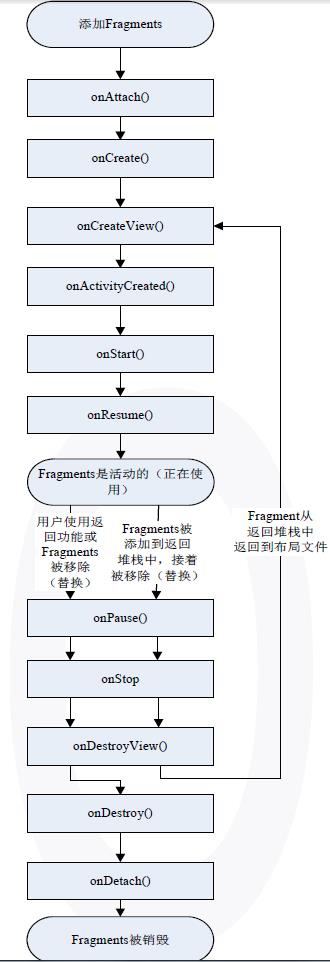
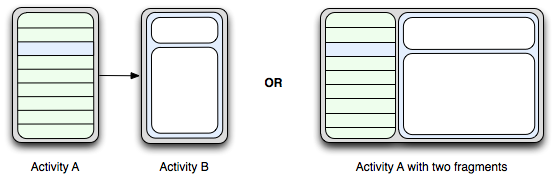
为了更好的理解Fragment,我找了下面的一张图:
看左边这张图,它是我们传统的手机界面,假设它现在呈现的是一个新闻列表页,那么当我们点击列表项中,我们将会跳转到新闻详细页中,上面是标题,下面是正文,这里是2个Activity。
再看看右边的图,左边是新闻列表页,右边是新闻详细页,我们可以动态的点击左边的列表项,使得右边的新闻详细页动态变化,这里只有1个Activity里面嵌套了2个Fragment,左边一个,右边一个。
好了,做了简单的介绍后,先来看看今天我们要实现的效果图:(高仿微信主界面)

这里我画了张界面分析图,画图永远的痛,凑合着看哈

这里的XML布局文件,我把每一部分都分开写了:
top1.xml
<RelativeLayout xmlns:android="http://schemas.android.com/apk/res/android"

    xmlns:tools="http://schemas.android.com/tools"

    android:layout_width="match_parent"

    android:layout_height="50dp"

    android:background="@drawable/bg"

    android:paddingLeft="12dp"

    android:paddingRight="12dp" >

    <LinearLayout

        android:layout_width="wrap_content"

        android:layout_height="wrap_content"

        android:layout_centerVertical="true"

        android:gravity="center"

        android:orientation="horizontal" >

        <ImageView

            android:layout_width="30dp"

            android:layout_height="30dp"

            android:src="@drawable/weixin" />

        <TextView

            android:layout_width="wrap_content"

            android:layout_height="wrap_content"

            android:layout_marginLeft="12dp"

            android:text="微信"

            android:textColor="@android:color/white"

            android:textSize="18dp" />

    </LinearLayout>

    <LinearLayout

        android:layout_width="wrap_content"

        android:layout_height="wrap_content"

        android:layout_alignParentRight="true"

        android:layout_centerVertical="true"

        android:gravity="center"

        android:orientation="horizontal" >

        <ImageView

            android:layout_width="30dp"

            android:layout_height="30dp"

            android:src="@drawable/search" />

        <ImageView

            android:layout_width="30dp"

            android:layout_height="30dp"

            android:src="@drawable/add" />

        <ImageView

            android:layout_width="30dp"

            android:layout_height="30dp"

            android:src="@drawable/more" />

    </LinearLayout>

</RelativeLayout>
top2.xml
<LinearLayout xmlns:android="http://schemas.android.com/apk/res/android"

    android:layout_width="match_parent"

    android:layout_height="40dp"

    android:orientation="vertical" >

    <LinearLayout

        android:layout_width="match_parent"

        android:layout_height="37dp"

        android:gravity="center_vertical"

        android:background="#cccccc"

        >

        <LinearLayout

            android:layout_width="wrap_content"

            android:layout_height="wrap_content"

            android:layout_weight="1"

            android:gravity="center" >

            <TextView

                android:id="@+id/tv1"

                android:layout_width="wrap_content"

                android:layout_height="wrap_content"

                android:text="聊天"

                android:textColor="#339900"/>

        </LinearLayout>

        <LinearLayout

            android:layout_width="wrap_content"

            android:layout_height="wrap_content"

            android:layout_weight="1"

            android:gravity="center" >

            <TextView

                 android:id="@+id/tv2"

                android:layout_width="wrap_content"

                android:layout_height="wrap_content"

                android:text="发现"

                android:textColor="@android:color/black"/>

        </LinearLayout>

        <LinearLayout

            android:layout_width="wrap_content"

            android:layout_height="wrap_content"

            android:layout_weight="1"

            android:gravity="center" >

            <TextView

                 android:id="@+id/tv3"

                android:layout_width="wrap_content"

                android:layout_height="wrap_content"

                android:text="通讯录"

                android:textColor="@android:color/black"/>

        </LinearLayout>

    </LinearLayout>

    <LinearLayout

        android:layout_width="match_parent"

        android:layout_height="3dp" >

        <ImageView

            android:id="@+id/tabline"

            android:layout_width="100dp"

            android:layout_height="match_parent"

            android:background="@drawable/tabline" />

    </LinearLayout>

</LinearLayout>
mywx.xml(用include包含前2个布局文件,并设置垂直排列)
<LinearLayout xmlns:android="http://schemas.android.com/apk/res/android"

    xmlns:tools="http://schemas.android.com/tools"

    android:layout_width="match_parent"

    android:layout_height="match_parent"

    android:orientation="vertical"

    tools:context="com.example.weixin_test.MyWxTest" >

    <include layout="@layout/top1" />

    <include layout="@layout/top2" />

 <android.support.v4.view.ViewPager

     android:id="@+id/viewpager"

     android:layout_width="match_parent"

     android:layout_height="wrap_content"

     android:layout_weight="1"

     >

 </android.support.v4.view.ViewPager>

</LinearLayout>
Fragment1.xml(由于Flagment的布局文件只是简单采用字符标示,布局都一样,这里只给出第一个Fragment布局文件)
<?xml version="1.0" encoding="utf-8"?>

<RelativeLayout xmlns:android="http://schemas.android.com/apk/res/android"

    android:layout_width="match_parent"

    android:layout_height="match_parent"

    >

    <TextView

        android:layout_width="wrap_content"

        android:layout_height="wrap_content"

        android:text="我是第一个界面"

        android:textSize="30dp"

        android:layout_centerInParent="true"

        />

</RelativeLayout>
接下来是JAVA代码了,注释很全(其实用法还是之前的ViewPager,只不过之前的ViewPager的数据源里存放的是view对象,而这里是Fragment)
package com.example.weixin_test;

import java.util.ArrayList;

import java.util.List;

import android.graphics.Color;

import android.os.Bundle;

import android.support.v4.app.Fragment;

import android.support.v4.app.FragmentActivity;

import android.support.v4.app.FragmentPagerAdapter;

import android.support.v4.view.ViewPager;

import android.support.v4.view.ViewPager.OnPageChangeListener;

import android.util.DisplayMetrics;

import android.util.Log;

import android.view.Display;

import android.view.ViewGroup.LayoutParams;

import android.view.Window;

import android.widget.ImageView;

import android.widget.LinearLayout;

import android.widget.TextView;

public class MyWxTest extends FragmentActivity {

    private ViewPager viewPager;// 声明一个viewpager对象

    private TextView tv1;

    private TextView tv2;

    private TextView tv3;

    private ImageView tabline;

    private List<Fragment> list;// 声明一个list集合存放Fragment(数据源)

    private int tabLineLength;// 1/3屏幕宽

    private int currentPage = 0;// 初始化当前页为0(第一页)

    @Override

    protected void onCreate(Bundle savedInstanceState) {

        super.onCreate(savedInstanceState);

        requestWindowFeature(Window.FEATURE_NO_TITLE);

        setContentView(R.layout.mywx);

        // 初始化滑动条1/3

        initTabLine();

        // 初始化界面

        initView();

    }

    private void initTabLine() {

        // 获取显示屏信息

        Display display = getWindow().getWindowManager().getDefaultDisplay();

        // 得到显示屏宽度

        DisplayMetrics metrics = new DisplayMetrics();

        display.getMetrics(metrics);

        // 1/3屏幕宽度

        tabLineLength = metrics.widthPixels / 3;

        // 获取控件实例

        tabline = (ImageView) findViewById(R.id.tabline);

        // 控件参数

        LayoutParams lp = tabline.getLayoutParams();

        lp.width = tabLineLength;

        tabline.setLayoutParams(lp);

    }

    private void initView() {

        // 实例化对象

        viewPager = (ViewPager) findViewById(R.id.viewpager);

        tv1 = (TextView) findViewById(R.id.tv1);

        tv2 = (TextView) findViewById(R.id.tv2);

        tv3 = (TextView) findViewById(R.id.tv3);

        list = new ArrayList<Fragment>();

        // 设置数据源

        Fragment1 fragment1 = new Fragment1();

        Fragment2 fragment2 = new Fragment2();

        Fragment3 fragment3 = new Fragment3();

        list.add(fragment1);

        list.add(fragment2);

        list.add(fragment3);

        // 设置适配器

        FragmentPagerAdapter adapter = new FragmentPagerAdapter(

                getSupportFragmentManager()) {

            @Override

            public int getCount() {

                return list.size();

            }

            @Override

            public Fragment getItem(int arg0) {

                return list.get(arg0);

            }

        };

        // 绑定适配器

        viewPager.setAdapter(adapter);

        // 设置滑动监听

        viewPager.setOnPageChangeListener(new OnPageChangeListener() {

            @Override

            public void onPageSelected(int position) {

                // 当页面被选择时,先讲3个textview的字体颜色初始化成黑

                tv1.setTextColor(Color.BLACK);

                tv2.setTextColor(Color.BLACK);

                tv3.setTextColor(Color.BLACK);

                // 再改变当前选择页(position)对应的textview颜色

                switch (position) {

                case 0:

                    tv1.setTextColor(Color.rgb(51, 153, 0));

                    break;

                case 1:

                    tv2.setTextColor(Color.rgb(51, 153, 0));

                    break;

                case 2:

                    tv3.setTextColor(Color.rgb(51, 153, 0));

                    break;

                }

                currentPage = position;

            }

            @Override

            public void onPageScrolled(int arg0, float arg1, int arg2) {

                Log.i("tuzi", arg0 + "," + arg1 + "," + arg2);

                // 取得该控件的实例

                LinearLayout.LayoutParams ll = (android.widget.LinearLayout.LayoutParams) tabline

                        .getLayoutParams();

                if (currentPage == 0 && arg0 == 0) { // 0->1移动(第一页到第二页)

                    ll.leftMargin = (int) (currentPage * tabLineLength + arg1

                            * tabLineLength);

                } else if (currentPage == 1 && arg0 == 1) { // 1->2移动(第二页到第三页)

                    ll.leftMargin = (int) (currentPage * tabLineLength + arg1

                            * tabLineLength);

                } else if (currentPage == 1 && arg0 == 0) { // 1->0移动(第二页到第一页)

                    ll.leftMargin = (int) (currentPage * tabLineLength - ((1 - arg1) * tabLineLength));

                } else if (currentPage == 2 && arg0 == 1) { // 2->1移动(第三页到第二页)

                    ll.leftMargin = (int) (currentPage * tabLineLength - (1 - arg1)

                            * tabLineLength);

                }

                tabline.setLayoutParams(ll);

            }

            @Override

            public void onPageScrollStateChanged(int arg0) {

                // TODO Auto-generated method stub

            }

        });

    }

}
对这个类做下说明:
1、这里的滑动屏幕下划线动态跟随的效果,其实实现方法有2种,原理是一样的
(1)可以使用ViewPager的两个子类ViewFlipper和ViewSwitche,这种方法比较简单,直接用就行。
(2)用原生代码实现,也就是动态的去控制下划线的左外边距。
这里我采用的是第2种方法,我觉得授人予鱼还不如授人予渔,其实也并不复杂,细节去理下细节就懂了。
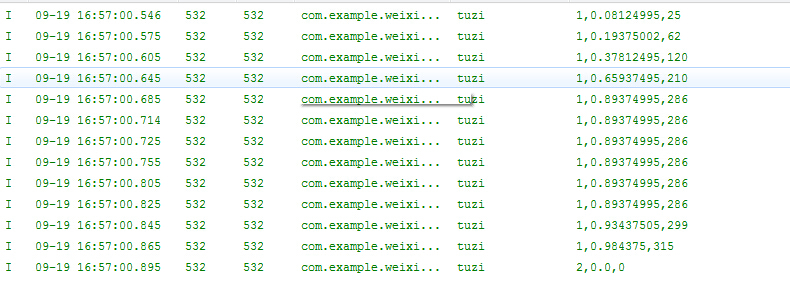
这里需要注意一个地方,我们在给ViewPager设置监听器时,这边会复写一个onPageScrolled方法,里面有3个参数,我用Log打印出它们在页面滑动时的数据变化
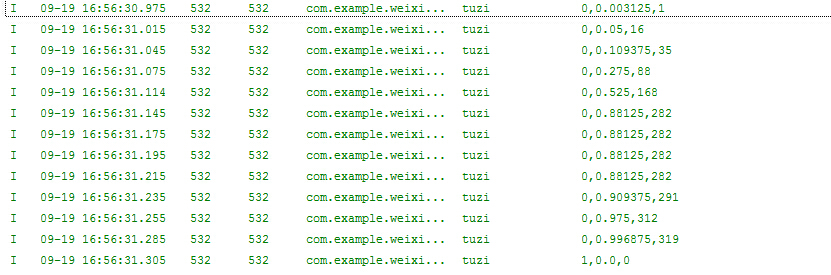
这是页面一向页面二滑动时候的数据记录:
我们可以发现第一个参数值直接从0->1,第二个参数值从0.0依次增加到0.9xx无限靠近1,然后页面到达第二页它又恢复成了0,第三个参数从1开始累积到300+(这个我们不去关注)
这是页面二向页面三滑动时候的数据记录:
我们可以发现第一个参数值直接从1->2,第二个参数值从0.0依次增加到0.9xx无限靠近1,然后页面到达第二页它又恢复成了0,第三个参数从1开始累积到300+(这个我们不去关注)
因此我们可以发现一个规律:
当ViewPager页面值为0(第一页)且当参数一为0时,页面的状态时从 第一页到第二页
当ViewPager页面值为1(第二页)且当参数一为1时,页面的状态时从 第一页到第二页
以此类推,大家可以自己打印出来看看,对这些数据比较有感觉,由于文章篇幅问题,这里就不再贴图了。
我们可以利用第二个参数从0.0推荐递增到1,这个数据来控制左外边距(在第一页时左外边距为0,第二页时左外边距为1/3屏幕宽,第三页时左外边距为2/3屏幕宽)
由此推导出的公式为:
向左滑时:当前页数*屏幕1/3宽+onPageScrolled方法第二个参数*屏幕1/3宽
向右滑时:当前页数*屏幕1/3宽-(1-onPageScrolled方法第二个参数)*屏幕1/3宽
2、由于这里使用到了Fragment,这里就不再和以往一样继承Activity,这里需要继承Activity的子类FragmentActivity。
package com.example.weixin_test;

import android.os.Bundle;

import android.support.annotation.Nullable;

import android.support.v4.app.Fragment;

import android.view.LayoutInflater;

import android.view.View;

import android.view.ViewGroup;

public class Fragment1 extends Fragment {

    @Override

    public View onCreateView(LayoutInflater inflater,

            @Nullable ViewGroup container, @Nullable Bundle savedInstanceState) {

        return inflater.inflate(R.layout.fragment1, container, false);

    }

}
来讲一下关于这个类的说明:
1、Fragment一般是作为Activity界面的一部分,它把Layout对象嵌入到了Activity之中,若要对一个Fragment提供Layout对象必须去调用一个onCreateView()方法,它的返回值是一个View对象,这个方法为我们提供了一个LayoutInflater便于我们把XML布局文件转换成View对象。
2、onCreateView()方法中:
container参数是用来存放Fragment的layout。
saveInstanceState参数是一个Bundle,跟Activity的onCreate()中Bundle差不多,用于状态恢复。
3、inflate()方法中有三个参数:
1:layout的资源id。
2:存放fragment的layout的ViewGroup。
3:这个布尔值是代表是否在创建Fragment的layout期间,把layout附加到container上,由于系统已经把layout对象存放在了ViewGroup中,所以这里为false。
由于3个Fragment的代码几乎一致,所以这里只给出Fragment1.java
Android控件-Fragment+ViewPager(高仿微信界面)的更多相关文章
- 安卓开发笔记——Fragment+ViewPager组件(高仿微信界面)
什么是ViewPager? 关于ViewPager的介绍和使用,在之前我写过一篇相关的文章<安卓开发复习笔记——ViewPager组件(仿微信引导界面)>,不清楚的朋友可以看看,这里就不再 ...
- 转-Fragment+ViewPager组件(高仿微信界面)
http://www.cnblogs.com/lichenwei/p/3982302.html 什么是ViewPager? 关于ViewPager的介绍和使用,在之前我写过一篇相关的文章<安卓开 ...
- Android ActionBar应用实战,高仿微信主界面的设计
转载请注明出处:http://blog.csdn.net/guolin_blog/article/details/26365683 经过前面两篇文章的学习,我想大家对ActionBar都已经有一个相对 ...
- Fragment+ViewPager实现仿微信点击和滑动切换界面
这是在我写的新闻App中实现的界面切换 贴出切换界面的主要代码: xml代码: <span style="font-size:14px;"> <android.s ...
- Android控件Gridview实现仿支付宝首页,Fragment底部按钮切换和登录圆形头像
此案例主要讲的是Android控件Gridview(九宫格)完美实现仿支付宝首页,包含添加和删除功能:Fragment底部按钮切换的效果,包含四个模块,登录页面圆形头像等,一个小项目的初始布局. 效果 ...
- Android 高仿微信6.0主界面 带你玩转切换图标变色
转载请标明出处:http://blog.csdn.net/lmj623565791/article/details/41087219,本文出自:[张鸿洋的博客] 1.概述 学习Android少不了模仿 ...
- Android Studio精彩案例(二)《仿微信动态点击底部tab切换Fragment》
转载本专栏文章,请注明出处,尊重原创 .文章博客地址:道龙的博客 现在很多的App要么顶部带有tab,要么就底部带有tab.用户通过点击tab从而切换不同的页面(大部分情况时去切换fragment). ...
- Android 高仿微信头像截取 打造不一样的自定义控件
转载请表明出处:http://blog.csdn.net/lmj623565791/article/details/39761281,本文出自:[张鸿洋的博客] 1.概述 前面已经写了关于检测手势识别 ...
- android高仿微信拍照、多选、预览、删除(去除相片)相冊功能
先声明授人与鱼不如授人与渔,仅仅能提供一个思路,当然须要源代码的同学能够私下有偿问我要源代码:QQ:508181017 工作了将近三年时间了,一直没正儿八经的研究系统自带的相冊和拍照,这回来个高仿微信 ...
随机推荐
- vue非父子组件间传参问题
最近在使用vue进行开发,遇到了组件之间传参的问题,此处主要是针对非父子组件之间的传参问题进行总结,方法如下:一.如果两个组件用友共同的父组件,即 FatherComponent.vue代码 < ...
- 紫书 习题 11-9 UVa 12549 (二分图最小点覆盖)
用到了二分图的一些性质, 最大匹配数=最小点覆盖 貌似在白书上有讲 还不是很懂, 自己看着别人的博客用网络流写了一遍 反正以后学白书应该会系统学二分图的,紫书上没讲深. 目前就这样吧. #includ ...
- ZOJ 1825 Compound Words
Compound Words Time Limit: 5000ms Memory Limit: 32768KB This problem will be judged on ZJU. Original ...
- hdu 4496 并查集 逆向 并查集删边
貌似某大犇说过 正难则反,,, 题目说要对这张图进行删边,然后判断联通块的个数,那么就可以先把所有边都删掉,之后从后往前加边,若加的边两端点不在同一个联通块中, 那么此时联通快个数少一,否则不变 #i ...
- Android与设计模式——单例(Singleton)模式
概念: java中单例模式是一种常见的设计模式.单例模式分三种:懒汉式单例.饿汉式单例.登记式单例三种. 单例模式有一下特点: 1.单例类仅仅能有一个实例. 2.单例类必须自己自己创建自己的唯一实例. ...
- 智课雅思词汇---十一、spect是什么意思
智课雅思词汇---十一.spect是什么意思 一.总结 一句话总结:词根:spect, speci, spec(spic, spi, spy) = to look, to see 看 1.port是什 ...
- 41.AngularJS 服务(Service)
转自:https://www.cnblogs.com/best/tag/Angular/ 什么是服务? 在 AngularJS 中,服务是一个函数或对象,可在你的 AngularJS 应用中使用. A ...
- <Sicily>数字反转
一.题目描述 给定一个整数,请将该数各个位上数字反转得到一个新数.新数也应满足整数的常见形式,即除非给定的原数为零,否则反转后得到的新数的最高位数字不应为零(参见样例2). 二.输入 输入共 1 行, ...
- mongodb 的查询深入剖析
db.表名.find({goods_id:3}); //查询出 goods_id 为 3 的数据 db.表名.find({cat_i ...
- javascript ---(常用工具类的封装)
1. type 类型判断 isString(o) { //是否字符串 return Object.prototype.toString.call(o).slice(8, -1) === 'String ...