
docker 搭建 nginx负载均衡
本文描述如何在一台机器上搭建nginx负载均衡,我将会启动3个nginx的docker,分别是1台前置nginx负责分发,后面2台负责处理请求。
首先我切换到/usr/local/docker/文件夹下,这个文件夹是专门用来做docker映射文件夹用的,docker里的重要的文件夹会映射到这里,在这里执行
mkdir nginx
mkdir nginx01
mkdir nginx02
nginx下存储的是前置nginx的文件
nginx01和nginx02负责存储后边两台nginx服务器的文件
《一、前置nginx配置以及启动》
切换到/usr/local/docker/nginx下
然后执行
mkdir -p conf html logs
切换到conf
vim nginx.conf
user nginx;

worker_processes auto;

error_log /var/log/nginx/error.log;

pid /run/nginx.pid;

# Load dynamic modules. See /usr/share/nginx/README.dynamic.

include /usr/share/nginx/modules/*.conf;

events {

    worker_connections 1024;

}

http {

    log_format  main  '$remote_addr - $remote_user [$time_local] "$request" '

                      '$status $body_bytes_sent "$http_referer" '

                      '"$http_user_agent" "$http_x_forwarded_for"';

    access_log  /var/log/nginx/access.log  main;

    sendfile            on;

    tcp_nopush          on;

    tcp_nodelay         on;

    keepalive_timeout   65;

    types_hash_max_size 2048;

    include             /etc/nginx/mime.types;

    default_type        application/octet-stream;

    # Load modular configuration files from the /etc/nginx/conf.d directory.

    # See http://nginx.org/en/docs/ngx_core_module.html#include

    # for more information.

    include /etc/nginx/conf.d/*.conf;

    server {

        listen       80 default_server;

        root         /usr/share/nginx/html;

        # Load configuration files for the default server block.

        include /etc/nginx/default.d/*.conf;

        location / {

        proxy_pass http://pic;

        }

        error_page 404 /404.html;

            location = /40x.html {

        }

        error_page 500 502 503 504 /50x.html;

            location = /50x.html {

        }

    }

    upstream pic{

                server 172.26.200.89:8088 weight=5;

                server 172.26.200.89:8089 weight=5;

    }

}
配置好以后,保存conf文件
然后启动这个前置nginx
docker run --name mynginx -d -p 82:80 -v /usr/local/docker/nginx/conf/nginx.conf:/etc/nginx/nginx.conf -v /usr/local/docker/nginx/logs:/var/log/nginx -d nginx
《二、nginx01配置以及启动》
切换到/usr/local/docker/nginx01/文件夹
执行
mkdir -p conf html logs
然后切换到conf文件夹
vim nginx.conf
user nginx;

worker_processes auto;

error_log /var/log/nginx/error.log;

pid /run/nginx.pid;

# Load dynamic modules. See /usr/share/nginx/README.dynamic.

include /usr/share/nginx/modules/*.conf;

events {

    worker_connections 1024;

}

http {

    log_format  main  '$remote_addr - $remote_user [$time_local] "$request" '

                      '$status $body_bytes_sent "$http_referer" '

                      '"$http_user_agent" "$http_x_forwarded_for"';

    access_log  /var/log/nginx/access.log  main;

    sendfile            on;

    tcp_nopush          on;

    tcp_nodelay         on;

    keepalive_timeout   65;

    types_hash_max_size 2048;

    include             /etc/nginx/mime.types;

    default_type        application/octet-stream;

    # Load modular configuration files from the /etc/nginx/conf.d directory.

    # See http://nginx.org/en/docs/ngx_core_module.html#include

    # for more information.

    include /etc/nginx/conf.d/*.conf;

    server {

    listen 8088;

    root /usr/share/nginx/html;

        index index.html index.htm;

    }

}
然后保存配置文件,退出
切换到/usr/local/docker/nginx01/html/文件夹下
vim index.html,简单写点东西,如下
8088 port nginx
然后启动docker
docker run --name mynginx01 -d -p 8088:8088 -v /usr/local/docker/nginx01/conf/nginx.conf:/etc/nginx/nginx.conf -v /usr/local/docker/nginx01/logs:/var/log/nginx -v /usr/local/docker/nginx01/html:/usr/share/nginx/html -d nginx
《三、nginx02配置以及启动》
切换到/usr/local/docker/nginx02/文件夹
执行
mkdir -p conf html logs
然后切换到conf文件夹
vim nginx.conf
user nginx;

worker_processes auto;

error_log /var/log/nginx/error.log;

pid /run/nginx.pid;

# Load dynamic modules. See /usr/share/nginx/README.dynamic.

include /usr/share/nginx/modules/*.conf;

events {

    worker_connections 1024;

}

http {

    log_format  main  '$remote_addr - $remote_user [$time_local] "$request" '

                      '$status $body_bytes_sent "$http_referer" '

                      '"$http_user_agent" "$http_x_forwarded_for"';

    access_log  /var/log/nginx/access.log  main;

    sendfile            on;

    tcp_nopush          on;

    tcp_nodelay         on;

    keepalive_timeout   65;

    types_hash_max_size 2048;

    include             /etc/nginx/mime.types;

    default_type        application/octet-stream;

    # Load modular configuration files from the /etc/nginx/conf.d directory.

    # See http://nginx.org/en/docs/ngx_core_module.html#include

    # for more information.

    include /etc/nginx/conf.d/*.conf;

    server {

    listen 8089;

    root /usr/share/nginx/html;

        index index.html index.htm;

    }

}
然后保存配置文件,退出
切换到/usr/local/docker/nginx02/html/文件夹下
vim index.html,简单写点东西,如下
8089 port nginx
然后启动docker
docker run --name mynginx02 -d -p 8089:8089 -v /usr/local/docker/nginx02/conf/nginx.conf:/etc/nginx/nginx.conf -v /usr/local/docker/nginx02/logs:/var/log/nginx -v /usr/local/docker/nginx02/html:/usr/share/nginx/html -d nginx
-------------------------------分割线-----------------------
至此,前置nginx和两台后置nginx都启动了,我们测试一下
在命令行执行
curl 127.0.0.1:82
如下图:
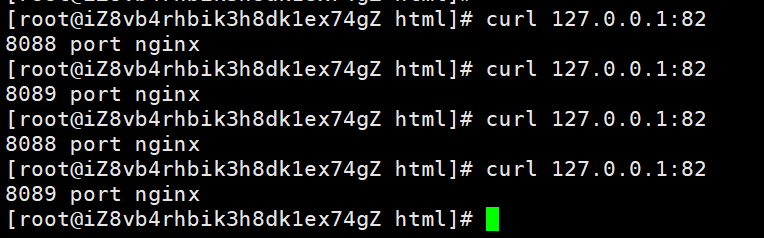
可以看到,由于我们前置nginx上的负载策略是各百分之50,所以出现了第一次请求发送到8088的nginx,第二次请求发送到8089的nginx,第三次又到8088,第四次8089。。。。。。
大家仅供参考,谢谢阅读全文。
docker 搭建 nginx负载均衡的更多相关文章
- Net分布式系统之二:CentOS系统搭建Nginx负载均衡
一.关于CentOS系统介绍 CentOS(Community Enterprise Operating System,中文意思是:社区企业操作系统)是Linux发行版之一,它是来自于Red Hat ...
- Nginx系列一:正向代理和反向代理、Nginx工作原理、Nginx常用命令和升级、搭建Nginx负载均衡
转自https://www.cnblogs.com/leeSmall/p/9351343.html 仅供个人学习 一.什么是正向代理.什么是反向代理 1. 正向代理,意思是一个位于客户端和原始服务器( ...
- Docker 安装 Nginx 负载均衡配置
Docker 安装 # 1)安装依赖包 yum install -y yum-utils device-mapper-persistent-data lvm2 # 2)添加Docker软件包源(否则d ...
- Nginx系列篇二:linux搭建Nginx负载均衡
建议先搭建好Nginx环境 可阅读--->Linux中搭建Nginx 1.准备好三台服务器[标配] 一.nginx负载均衡服务器:192.168.102.110,配置好Nginx 二.tomca ...
- Linux学习10-CentOS搭建nginx负载均衡环境
前言 当自己的web网站访问的人越来越多,一台服务器无法满足现有的业务时,此时会想到多加几台服务器来实现负载均衡. 网站的访问量越来越大,服务器的服务模式也得进行相应的升级,怎样将同一个域名的访问分散 ...
- Tomcat WEB搭建+Nginx负载均衡动静分离+DNS解析的实验
实验拓扑图: 实验环境: 在VMware workstation搭建虚拟环境,利用网络适配器的Nat和桥接模式模拟内网和外网环境. 实验过程中需要安装的工具包包括:vim unzip lrzsz ls ...
- Docker容器Nginx负载均衡配置、check及stub模块安装
Nginx是一款高性能的HTTP和反向代理.负载均衡web服务器.本次在Docker容器中部署三个tomcat,Nginx代理三个tomcat服务(以下称节点)来模拟实现负载均衡效果,配置check模 ...
- Net分布式系统之二:CentOS系统搭建Nginx负载均衡(下)
上一篇文章介绍了VMWare12虚拟机.Linux(CentOS7)系统安装.部署Nginx1.6.3代理服务做负载均衡.接下来介绍通过Nginx将请求分发到各web应用处理服务. 一.Web应用开发 ...
- Linux搭建nginx负载均衡(两台服务器之间)
负载均衡种类 第一种:通过硬件负载解决,常见的有NetScaler.F5.Radware和Array等商用的负载均衡器,价格比较昂贵 第二种:通过软件负载解决,常见的软件有LVS.Nginx.apac ...
随机推荐
- python3 处理列表嵌套字典去重
def list_dict(dictlist): def function(date): return date['ip'] dictlist_new = [] for list_dict in di ...
- php利用腾讯ip分享计划获取地理位置示例分享
<?php function getIPLoc_QQ($queryIP){ $url = 'http://ip.qq.com/cgi-bin/searchip?searchip1='.$quer ...
- openstack octavia的实现与分析(二)原理,架构与基本流程
[了解] 其实说白了,Octavia就是将用户的API请求经过逻辑处理,转换成Haproxy或者Nginx的配置参数,下发到amphora虚机中. Octavia的内部实现中,逻辑流程的处理主要使用T ...
- python基础语法1-变量
l Python基础语法1-变量
- show engine innodb status
TRANSACTIONS------------Trx id counter 2003909(当前事务号)Purge done for trx's n:o < 2003905 (清理线程完成到了 ...
- ctfhub技能树—信息泄露—git泄露—Stash
打开靶机环境 查看页面内容 使用dirsearch进行扫描 使用Githack工具处理git泄露情况 进入.git/refs目录 发现stash文件,使用notepad++打开文件 使用git dif ...
- 国人之光:大数据分析神器Apache Kylin
一.简介 Apache Kylin是一个开源的.分布式的分析型数据仓库,提供Hadoop/Spark 之上的 SQL 查询接口及多维分析(OLAP)能力以支持超大规模数据,最初由 eBay 开发并贡献 ...
- oracle动态采样导致数据库出现大量cursor pin s wait on x等待
生产库中,突然出现了大量的cursor pin s wait on x等待,第一反应是数据库出现了硬解析,查看最近的DDL语句,没有发现DDL.那么有可能这个sql是第一次进入 在OLTP高并发下产生 ...
- SAP轻松访问会话管理器等设置
对于SAP的登陆后初始界面,是有一个配置表,可以进行设置的,例如隐藏SAP的标准菜单,设置轻松访问页面右边的图片内容等等这一切的设置都可以通过维护SSM_CUST表来实现可以通过SM30来维护内容,该 ...
- 1V升压5V和1.5V升压5V的集成电路芯片
1.5V和1V输入,要升压输出5V的集成电路芯片合适? 干电池标准电压是1.5V,放电电压后面在0.9V-1V左右,如果要选用干电池1.5V升压到5V的合适的芯片,需要满足低压1V或者0.9V更好的低 ...