如何在 CentOS 7 用 cPanel 配置 Nginx 反向代理
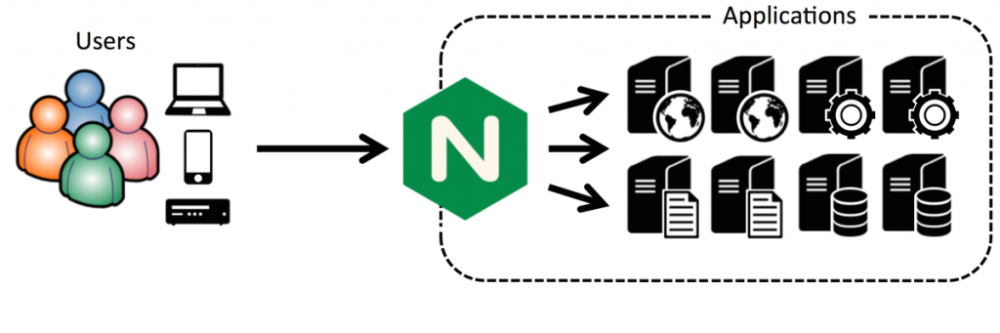
| 导读 | Nginx 是最快和最强大的 Web 服务器之一,以其高性能和低资源占用率而闻名。它既可以被安装为一个独立的 Web 服务器,也可以安装成反向代理 Web 服务器。在这篇文章,我将讨论在安装了 cPanel 管理系统的 Centos 7 服务器上安装 Nginx 作为 Apache 的反向代理服务器。Nginx 作为前端服务器用反向代理为静态文件提供服务,Apache 作为后端为动态文件提供服务。这个设置将整体提高服务器的性能。 |
让我们过一遍在已经安装好 cPanel 11.52 的 CentOS 7 x86_64 服务器上配置 Nginx 作为反向代理的安装过程。
首先,我们需要安装 EPEL 库来启动这个进程
root@server1 [/usr]# yum -y install epel-release

Loaded plugins: fastestmirror, tsflags, universal-hooks

Loading mirror speeds from cached hostfile

* EA4: 66.23.237.210

* base: mirrors.linode.com

* extras: mirrors.linode.com

* updates: mirrors.linode.com

Resolving Dependencies

--> Running transaction check

---> Package epel-release.noarch 0:7-5 will be installed

--> Finished Dependency Resolution

Dependencies Resolved

========================================================================================

    Package Arch Version Repository Size

========================================================================================

Installing:

epel-release noarch 7-5 extras 14 k
第二步: 安装 nDeploy 的 CentOS RPM 库
可以安装 nDeploy 的 CentOS RPM 库来安装我们所需的 nDeploy Web 类软件和 Nginx 插件
root@server1 [/usr]# yum -y install http://rpm.piserve.com/nDeploy-release-centos-1.0-1.noarch.rpm

Loaded plugins: fastestmirror, tsflags, universal-hooks

nDeploy-release-centos-1.0-1.noarch.rpm | 1.7 kB 00:00:00

Examining /var/tmp/yum-root-ei5tWJ/nDeploy-release-centos-1.0-1.noarch.rpm: nDeploy-release-centos-1.0-1.noarch

Marking /var/tmp/yum-root-ei5tWJ/nDeploy-release-centos-1.0-1.noarch.rpm to be installed

Resolving Dependencies

--> Running transaction check

---> Package nDeploy-release-centos.noarch 0:1.0-1 will be installed

--> Finished Dependency Resolution

Dependencies Resolved

========================================================================================

Package Arch Version Repository Size

========================================================================================

Installing:

nDeploy-release-centos noarch 1.0-1 /nDeploy-release-centos-1.0-1.noarch 110
root@server1 [/usr]# yum --enablerepo=ndeploy install nginx-nDeploy nDeploy

Loaded plugins: fastestmirror, tsflags, universal-hooks

epel/x86_64/metalink | 9.9 kB 00:00:00

epel | 4.3 kB 00:00:00

ndeploy | 2.9 kB 00:00:00

(1/4): ndeploy/7/x86_64/primary_db | 14 kB 00:00:00

(2/4): epel/x86_64/group_gz | 169 kB 00:00:00

(3/4): epel/x86_64/primary_db | 3.7 MB 00:00:02

Dependencies Resolved

========================================================================================

Package Arch Version Repository Size

========================================================================================

Installing:

nDeploy noarch 2.0-11.el7 ndeploy 80 k

nginx-nDeploy x86_64 1.8.0-34.el7 ndeploy 36 M

Installing for dependencies:

PyYAML x86_64 3.10-11.el7 base 153 k

libevent x86_64 2.0.21-4.el7 base 214 k

memcached x86_64 1.4.15-9.el7 base 84 k

python-inotify noarch 0.9.4-4.el7 base 49 k

python-lxml x86_64 3.2.1-4.el7 base 758 k

Transaction Summary

========================================================================================

Install 2 Packages (+5 Dependent packages)
通过以上这些步骤,我们完成了在我们的服务器上 Nginx 插件的安装。现在我们可以配置 Nginx 作为反向代理和为已有的 cPanel 用户账户创建虚拟主机,为此我们可以运行如下脚本。
root@server1 [/usr]# /opt/nDeploy/scripts/cpanel-nDeploy-setup.sh enable

Modifying apache http and https port in cpanel

httpd restarted successfully.

Created symlink from /etc/systemd/system/multi-user.target.wants/nginx.service to /usr/lib/systemd/system/nginx.service.

Created symlink from /etc/systemd/system/multi-user.target.wants/ndeploy_watcher.service to /usr/lib/systemd/system/ndeploy_watcher.service.

Created symlink from /etc/systemd/system/multi-user.target.wants/ndeploy_backends.service to /usr/lib/systemd/system/ndeploy_backends.service.

ConfGen:: saheetha

ConfGen:: satest
你可以看到这个脚本将修改 Apache 的端口从 80 到另一个端口来让 Nginx 作为前端 Web 服务器,并为现有的 cPanel 用户创建虚拟主机配置文件。一旦完成,确认 Apache 和 Nginx 的状态。
root@server1 [/var/run/httpd]# systemctl status httpd

● httpd.service - Apache Web Server

Loaded: loaded (/usr/lib/systemd/system/httpd.service; enabled; vendor preset: disabled)

Active: active (running) since Mon 2016-01-18 06:34:23 UTC; 12s ago

Process: 25606 ExecStart=/usr/sbin/apachectl start (code=exited, status=0/SUCCESS)

Main PID: 24760 (httpd)

CGroup: /system.slice/httpd.service

‣ 24760 /usr/local/apache/bin/httpd -k start

Jan 18 06:34:23 server1.centos7-test.com systemd[1]: Starting Apache Web Server...

Jan 18 06:34:23 server1.centos7-test.com apachectl[25606]: httpd (pid 24760) already running

Jan 18 06:34:23 server1.centos7-test.com systemd[1]: Started Apache Web Server.
root@server1 [~]# systemctl status nginx

● nginx.service - nginx-nDeploy - high performance web server

Loaded: loaded (/usr/lib/systemd/system/nginx.service; enabled; vendor preset: disabled)

Active: active (running) since Sun 2016-01-17 17:18:29 UTC; 13h ago

Docs: http://nginx.org/en/docs/

Main PID: 3833 (nginx)

CGroup: /system.slice/nginx.service

├─ 3833 nginx: master process /usr/sbin/nginx -c /etc/nginx/nginx.conf

├─25473 nginx: worker process

├─25474 nginx: worker process

└─25475 nginx: cache manager process

Jan 17 17:18:29 server1.centos7-test.com systemd[1]: Starting nginx-nDeploy - high performance web server...

Jan 17 17:18:29 server1.centos7-test.com nginx[3804]: nginx: the configuration file /etc/nginx/nginx.conf syntax is ok

Jan 17 17:18:29 server1.centos7-test.com nginx[3804]: nginx: configuration file /etc/nginx/nginx.conf test is successful

Jan 17 17:18:29 server1.centos7-test.com systemd[1]: Started nginx-nDeploy - high performance web server.
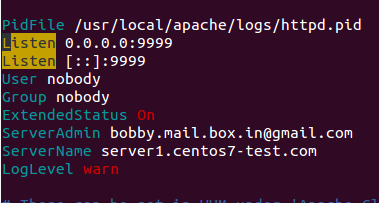
Nginx 作为前端服务器运行在 80 端口,Apache 配置被更改为监听 http 端口 9999 和 https 端口 4430。请看他们的情况:
root@server1 [/usr/local/src]# netstat -plan | grep httpd

tcp 0 0 0.0.0.0:4430 0.0.0.0:* LISTEN 17270/httpd

tcp 0 0 0.0.0.0:9999 0.0.0.0:* LISTEN 17270/httpd

tcp6 0 0 :::4430 :::* LISTEN 17270/httpd

tcp6 0 0 :::9999 :::* LISTEN 17270/httpd
root@server1 [/usr/local/src]# netstat -plan | grep nginx

tcp 0 0 127.0.0.1:80 0.0.0.0:* LISTEN 17802/nginx: master

tcp 0 0 45.79.183.73:80 0.0.0.0:* LISTEN 17802/nginx: master
为已有用户创建的虚拟主机的配置文件在 “/etc/nginx/sites-enabled”。 这个文件路径包含了 Nginx 主要配置文件。
root@server1 [/etc/nginx/sites-enabled]# ll | grep .conf

-rw-r--r-- 1 root root 311 Jan 17 09:02 saheetha.com.conf

-rw-r--r-- 1 root root 336 Jan 17 09:02 saheethastest.com.conf
server {

listen 45.79.183.73:80;

#CPIPVSIX:80;

# ServerNames

server_name saheetha.com www.saheetha.com;

access_log /usr/local/apache/domlogs/saheetha.com main;

access_log /usr/local/apache/domlogs/saheetha.com-bytes_log bytes_log;

include /etc/nginx/sites-enabled/saheetha.com.include;

}
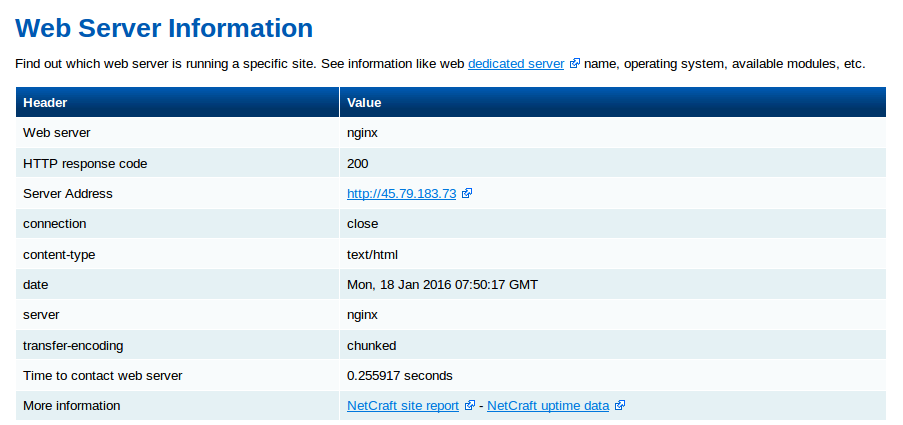
我们可以启动浏览器查看网站来确定 Web 服务器的工作状态。安装后,请阅读服务器上的 web 服务信息。
root@server1 [/home]# ip a | grep -i eth0

3: eth0: <BROADCAST,MULTICAST,UP,LOWER_UP> mtu 1500 qdisc pfifo_fast state UP qlen 1000

inet 45.79.183.73/24 brd 45.79.183.255 scope global dynamic eth0

root@server1 [/home]# nginx -v

nginx version: nginx/1.8.0
Nginx 将会为任何最新在 cPanel 中创建的账户创建虚拟主机。通过这些简单的的步骤,我们能够在一台 CentOS 7 / cPanel 的服务器上配置 Nginx 作为反向代理。
- 便于安装和配置。
- 效率高、性能好。
- 防止 Ddos 攻击。
- 支持使用 .htaccess 作为 PHP 的重写规则。
我希望这篇文章对你们有用。感谢你看它。我非常高兴收到你的宝贵意见和建议,并进一步改善。

如何在 CentOS 7 用 cPanel 配置 Nginx 反向代理的更多相关文章
- CentOS 7 学习(二) 配置Nginx反向代理
CentOS 7 学习(二) 配置Nginx反向代理 Nginx可以通过php-fpm来运行PHP程序,也可以转向apache,让apache调用php程序来运行. 不过对于Nginx来说,其反向代理 ...
- 为docker私有registry配置nginx反向代理
公司的Docker私有registry已经搭建好了,用官方的registry image很容易就搭建好了.现在就是要用nginx的反向代理把它放出来,以便在外网可以访问. 我的上一篇blog 讲了如何 ...
- 使用SSL配置Nginx反向代理的简单指南
反向代理是一个服务器,它接收通过Web发出的请求,即http和https,然后将它们发送到后端服务器(或服务器).后端服务器可以是单个或一组应用服务器,如Tomcat,wildfly或Jenkins等 ...
- 配置LANMP环境(7)-- 配置nginx反向代理,与配置apache虚拟主机
一.配置nginx反向代理 1.修改配置文件 vim /etc/nginx/nginx.conf 在35行http下添加一下内容: include /data/nginx/vhosts/*.conf; ...
- Centos 7.6配置nginx反向代理,直接yum安装
一,实验介绍 利用三台centos7虚拟机搭建简单的nginx反向代理负载集群, 三台虚拟机地址及功能介绍 192.168.2.76 nginx负载均衡器 192.168.2.82 web ...
- Centos 7.6配置nginx反向代理负载均衡集群
一,实验介绍 利用三台centos7虚拟机搭建简单的nginx反向代理负载集群, 三台虚拟机地址及功能介绍 192.168.2.76 nginx负载均衡器 192.168.2.82 web ...
- Centos 7配置nginx反向代理负载均衡集群
一,实验介绍 利用三台centos7虚拟机搭建简单的nginx反向代理负载集群, 三台虚拟机地址及功能介绍 192.168.2.76 nginx负载均衡器 192.168.2.82 web ...
- node项目发布+域名及其二级域名配置+nginx反向代理+pm2
学习node的时候也写了一些demo.但是只是限于本地测试,从来没有发布.今天尝试发布项目. 需要准备的东西 node 项目:为了突出重点,说明主要问题.我只是拿express 写了很简单的demo. ...
- [亲测]ASP.NET Core 2.0怎么发布/部署到Ubuntu Linux服务器并配置Nginx反向代理实现域名访问
前言 ASP.NET Core 2.0 怎么发布到Ubuntu服务器?又如何在服务器上配置使用ASP.NET Core网站绑定到指定的域名,让外网用户可以访问呢? 步骤 第1步:准备工作 一台Liun ...
随机推荐
- BZOJ4004: [JLOI2015]装备购买
总之就是线性基那一套贪心理论直接做就好了. 然而加强数据后很卡精度的样子. 于是重点在于这个特技:在整数模意义下搞. #include<cstdio> #include<algori ...
- 【原】http缓存与cdn相关技术
摘要:最近要做这个主题的组内分享,所以准备了一个星期,查了比较多的资料.准备的过程虽然很烦很耗时间,不过因为需要查很多的资料,因此整个过程下来,对这方面的知识影响更加深刻.来来来,接下来总结总结 一 ...
- php格式化金额函数分享
/** * 格式化金额 * * @param int $money * @param int $len * @param string $sign * @return string */ ...
- redis哨兵配置
redis哨兵配置主从 redis哨兵的启动和redis实例的启动没有关系.所以可以在任何机器上启动redis哨兵.至少要保证有两个哨兵在运行,要不然宕机后哨兵会找不到主节点. 配置步骤: 1.在 ...
- C#--网络流Stream、字节数组保存到字符串中
第一种方法: HttpWebRequest httpwebr = (HttpWebRequest)HttpWebRequest.Create(rstr); httpwebr.Method = &quo ...
- python 传递结构体指针到 c++ dll
CMakeLists.txt # project(工程名) project(xxx) # add_library(链接库名称 SHARED 链接库代码) add_library(xxx SHARED ...
- AssetBundle in Unity 5.0
http://forum.unity3d.com/threads/new-assetbundle-build-system-in-unity-5-0.293975/
- angularjs学习笔记—工具方法
angular.bind(self, fn, args) 作用:返回一个新的函数,绑定这个函数的this指向self 参数: self:新函数的上下文对象 fn:需要绑定的函数 args:传递给函数的 ...
- php构造函数连接数据库
index.php require_once("mysql.config.php"); require_once("mysql.class.php"); ech ...
- linux下解压命令大全
.tar 解包:tar xvf FileName.tar打包:tar cvf FileName.tar DirName(注:tar是打包,不是压缩!)———————————————.gz解压1:gun ...