
IOS开发---菜鸟学习之路--(十七)-利用UITableView实现个人信息界面
首先来看下我们要实现的效果
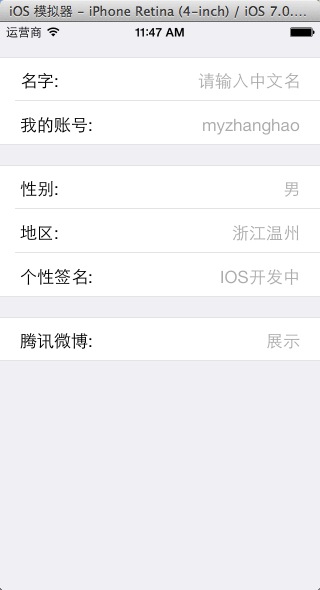
需要实现这样的效果
然后我们开始动手吧。
首先选择添加一个新的ViewController

然后打开XIB文件,添加一UITableView 并将样式设置为分组
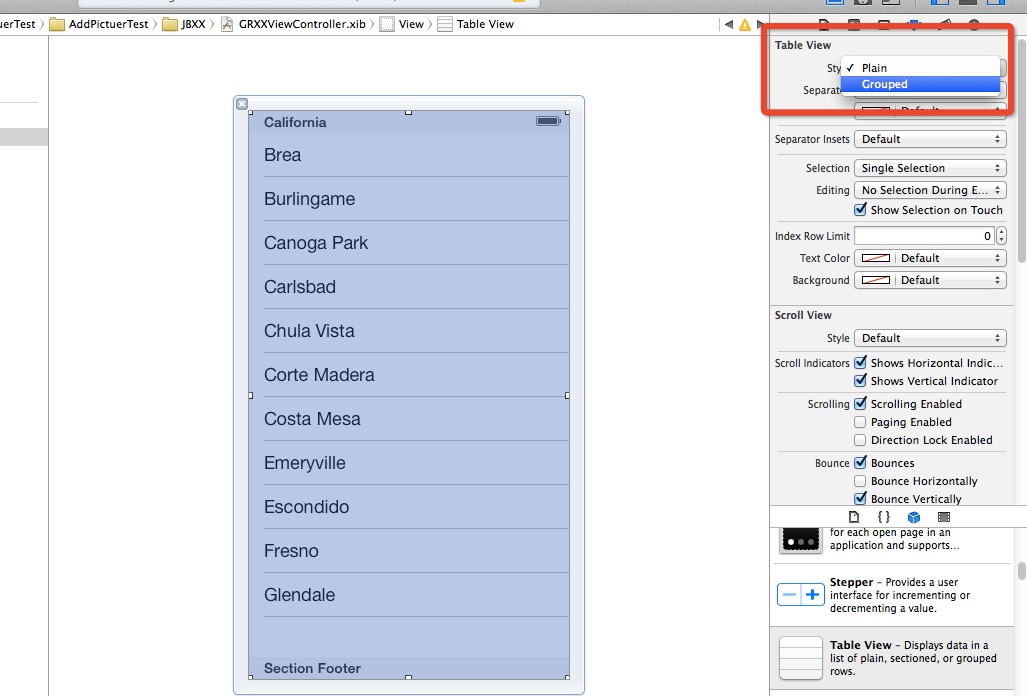
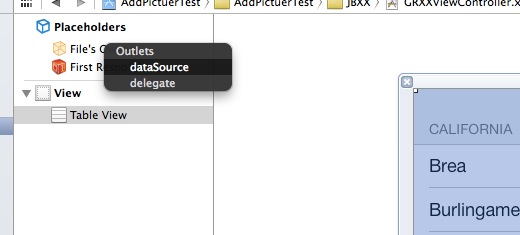
同时将按住CONTROL 链接dataSource与delegate
接着修改.H文件,具体代码如下
 #import <UIKit/UIKit.h>

 @interface GRXXViewController : UIViewController<UITableViewDataSource,UITableViewDelegate>

 {

     NSString *name;

     NSString *uid;

     NSString *sex;

     NSString *address;

     NSString *gxqm;

 }

 @property(nonatomic,retain) NSString *name;

 @property(nonatomic,retain) NSString *uid;

 @property(nonatomic,retain) NSString *sex;

 @property(nonatomic,retain) NSString *address;

 @property(nonatomic,retain) NSString *gxqm;

 @end
GRXXViewController.h
然后我们还需要自定义一个CELL来显示相关的样式
具体样式如下

并修改.h文件和.m文件 ,同时将两个label 与代码进行绑定
 #import <UIKit/UIKit.h>

 @interface infoCell : UITableViewCell

 {

     UILabel *contentlabel;

     UILabel *titilelabel;

 }

 @property(nonatomic,retain) IBOutlet UILabel *contentlabel;

 @property(nonatomic,retain) IBOutlet    UILabel *titilelabel;

 @end
infoCell.h
 #import "infoCell.h"

 @implementation infoCell

 @synthesize contentlabel;

 @synthesize titilelabel;

 - (id)initWithStyle:(UITableViewCellStyle)style reuseIdentifier:(NSString *)reuseIdentifier

 {

     self = [super initWithStyle:style reuseIdentifier:reuseIdentifier];

     if (self) {

         // Initialization code

     }

     return self;

 }

 - (void)setSelected:(BOOL)selected animated:(BOOL)animated

 {

     [super setSelected:selected animated:animated];

     // Configure the view for the selected state

 }

 @end
infoCell.m
然后 选择GRXXViewController.m 文件
完成
//定义分组数
-(NSInteger) numberOfSectionsInTableView:(UITableView *)tableView
//定义分组行数
-(NSInteger) tableView:(UITableView *)tableView numberOfRowsInSection:(NSInteger)section
//设置分组行头
-(NSString *) tableView:(UITableView *)tableView titleForHeaderInSection:(NSInteger)section
-(UITableViewCell*) tableView:(UITableView *)tableView cellForRowAtIndexPath:(NSIndexPath *)indexPath
这几个方法
直接上代码
 #import "GRXXViewController.h"

 #import "infoCell.h"

 @interface GRXXViewController ()

 @end

 @implementation GRXXViewController

 @synthesize name;

 @synthesize gxqm;

 @synthesize sex;

 @synthesize uid;

 @synthesize address;

 - (id)initWithNibName:(NSString *)nibNameOrNil bundle:(NSBundle *)nibBundleOrNil

 {

     self = [super initWithNibName:nibNameOrNil bundle:nibBundleOrNil];

     if (self) {

         // Custom initialization

     }

     return self;

 }

 - (void)viewDidLoad

 {

     name=@"请输入中文名";

     uid=@"myzhanghao";

     sex=@"男";

     address=@"浙江温州";

     gxqm=@"IOS开发中";

     [super viewDidLoad];

     // Do any additional setup after loading the view from its nib.

 }

 - (void)didReceiveMemoryWarning

 {

     [super didReceiveMemoryWarning];

     // Dispose of any resources that can be recreated.

 }

 #pragma mark -

 #pragma mark Table View Data Source Methods

 //定义分组数

 -(NSInteger) numberOfSectionsInTableView:(UITableView *)tableView{

     return ;

 }

 //定义分组行数

 -(NSInteger) tableView:(UITableView *)tableView numberOfRowsInSection:(NSInteger)section{

     if(section==)

         return ;

     else if(section==)

         return ;

     else

         return ;

 }

 //设置分组行头

 -(NSString *) tableView:(UITableView *)tableView titleForHeaderInSection:(NSInteger)section{

 //    if(section==0)

 //        return @"基本信息";

 //    else if(section==1)

 //        return @"总计";

 //    else if(section==2)

 //        return @"与互";

 //    else if(section==3)

 //        return @"查询";

 //    else

         return @"";

 }

 -(UITableViewCell*) tableView:(UITableView *)tableView cellForRowAtIndexPath:(NSIndexPath *)indexPath

 {

     if([indexPath section]==)

     {

         if([indexPath row]==)

         {

             static NSString *modifyinfoTableIdentifier=@"LookInfoModelCell";

             infoCell *cell= (infoCell *)[tableView dequeueReusableCellWithIdentifier:modifyinfoTableIdentifier];

             if(cell==nil){

                 NSArray *nib = [[NSBundle mainBundle] loadNibNamed:@"infoCell" owner:self options:nil];

                 cell = [nib objectAtIndex:];

             }

             cell.contentlabel.text=name;

             cell.titilelabel.text=@"名字:";

             return cell;

         }

         else

         {

             static NSString *modifyinfoTableIdentifier=@"LookInfoModelCell";

             infoCell *cell= (infoCell *)[tableView dequeueReusableCellWithIdentifier:modifyinfoTableIdentifier];

             if(cell==nil){

                 NSArray *nib = [[NSBundle mainBundle] loadNibNamed:@"infoCell" owner:self options:nil];

                 cell = [nib objectAtIndex:];

             }

             cell.contentlabel.text=uid;

             cell.titilelabel.text=@"我的账号:";

             return cell;

         }

      }

     else if([indexPath section]==)

     {

         if([indexPath row]==)

         {

             static NSString *modifyinfoTableIdentifier=@"LookInfoModelCell";

             infoCell *cell= (infoCell *)[tableView dequeueReusableCellWithIdentifier:modifyinfoTableIdentifier];

             if(cell==nil){

                 NSArray *nib = [[NSBundle mainBundle] loadNibNamed:@"infoCell" owner:self options:nil];

                 cell = [nib objectAtIndex:];

             }

             cell.contentlabel.text=sex;

             cell.titilelabel.text=@"性别:";

             return cell;

         }

         else if([indexPath row]==)

         {

             static NSString *modifyinfoTableIdentifier=@"LookInfoModelCell";

             infoCell *cell= (infoCell *)[tableView dequeueReusableCellWithIdentifier:modifyinfoTableIdentifier];

             if(cell==nil){

                 NSArray *nib = [[NSBundle mainBundle] loadNibNamed:@"infoCell" owner:self options:nil];

                 cell = [nib objectAtIndex:];

             }

             cell.contentlabel.text=address;

             cell.titilelabel.text=@"地区:";

             return cell;

         }

         else

         {

             static NSString *modifyinfoTableIdentifier=@"LookInfoModelCell";

             infoCell *cell= (infoCell *)[tableView dequeueReusableCellWithIdentifier:modifyinfoTableIdentifier];

             if(cell==nil){

                 NSArray *nib = [[NSBundle mainBundle] loadNibNamed:@"infoCell" owner:self options:nil];

                 cell = [nib objectAtIndex:];

             }

             cell.contentlabel.text=gxqm;

             cell.titilelabel.text=@"个性签名:";

             return cell;

         }

     }

     else

     {

         static NSString *modifyinfoTableIdentifier=@"LookInfoModelCell";

         infoCell *cell= (infoCell *)[tableView dequeueReusableCellWithIdentifier:modifyinfoTableIdentifier];

         if(cell==nil){

             NSArray *nib = [[NSBundle mainBundle] loadNibNamed:@"infoCell" owner:self options:nil];

             cell = [nib objectAtIndex:];

         }

         cell.contentlabel.text=@"展示";

         cell.titilelabel.text=@"腾讯微博:";

         return cell;

     }

 }@end
GRXXViewController.m
最后就完成拉
如果还想实现其他效果的 话 就自定义相关的CELL样式 同时在不同条件下使用不同样式就可以了,具体的请参照如何实心新闻页面那一章
IOS开发---菜鸟学习之路--(十七)-利用UITableView实现个人信息界面的更多相关文章
- IOS开发---菜鸟学习之路--(六)-UITableView几个方法的使用说明
对于UITableView的基础使用我这边就不做重复介绍了 我重点就来介绍下如何实现大部分新闻的界面.也就是第一条记录显示大图片下面加一段文字说明 然后剩下来的内容全部显示为文字图片的格式 其实要做到 ...
- IOS开发---菜鸟学习之路--(二十三)-直接利用键值对的方式来处理数据的感想
首先声明,本文纯粹只是做为本人个人新手的理解.文中的想法我知道肯定有很多地方是错的. 但是这就是我作为一个新人的使用方法,对于大牛非常欢迎指导,对于喷子请绕道而行. 由于这是早上跟我学长讨论数据处理时 ...
- IOS开发---菜鸟学习之路--(二十二)-近期感想以及我的IOS学习之路
在不知不觉当中已经写了21篇内容 其实一开始是没有想些什么东西的 只是买了Air后 感觉用着挺舒服的,每天可以躺在床上,就一台笔记本,不用网线,不用电源,不用鼠标,不用键盘,干干脆脆的就一台笔记本. ...
- IOS开发---菜鸟学习之路--(一)
PS(废话): 看了那么多的博客文章,发现大部分人都一直在强调写技术博客的重要性,索性自己也耐着性子写写看吧. 写博客的重要性之类的说明,我就不做复制黏贴的工作了.因为自己没有写过多少,所也不清楚是不 ...
- IOS开发---菜鸟学习之路--(二十一)-利用正则表达式解析URL获取其中的参数
因为项目需要解析URL当中参数的部分,在网上搜索了一下都没有相关的资料. 然后就自己写了一个 其实我就是通过正则表达式来处理URL 进行解析的 好了直接上代码吧 也是非常的简单,大家拷贝过去就可以使用 ...
- IOS开发---菜鸟学习之路--(十九)-利用NSUserDefaults存储数据
利用NSUserDefaults的可以快速的进行本地数据存储,但是支持的格式有限, 至于支持什么格式大家可以再自行脑补 我这边直接讲如何使用 NSUserDefaults 分为两部分 一个是存数据 N ...
- IOS开发---菜鸟学习之路--(十三)-利用MBProgressHUD进行异步获取数据
本章将介绍如何利用MBProgressHUD实现异步处理数据. 其实我本来只是像实现一个加载数据时提示框的效果,然后问了学长知道了这个类,然后就使用了 接着就发现了一个“BUG” 再然后就发现原来MB ...
- IOS开发---菜鸟学习之路--(十二)-利用ASIHTTPRequest进行异步获取数据
想要实现异步获取的话我这边了解过来有两个非常简单的方式 一个是利用ASIHTTPRequest来实现异步获取数据 另一个则是利用MBProgressHUD来实现异步获取数据 本章就先来讲解如何利用AS ...
- IOS开发---菜鸟学习之路--(九)-利用PullingRefreshTableView实现下拉刷新
本章主要讲解如何利用PullingRefreshTableView实现下拉(上拉)刷新的操作 PullingRefreshTableView 实现上下拉刷新的例子百度有很多,大家可以自己搜索下,先看下 ...
随机推荐
- 【干货】Html与CSS入门学习笔记1-3
从23号开始用了4天时间看完了<Head First Html与CSS>这本书,本书讲解方式深入浅出,便于理解,结合习题,便于记忆,是一本不错的入门书.下面是本书的学习笔记: 一.认识HT ...
- 私有npm下载资源
私有npm库下载资源需要用户名和密码,这个需要创建npm库的人提供. 使用方法: npm login --registry=仓库地址 Username: 用户名 Password: 密码 Email: ...
- [AngularJS] $location 服务简介
参考博客: https://www.cnblogs.com/gaoruixin/p/6070502.html 简介 $location服务解析在浏览器地址栏中的URL(基于window.locati ...
- WPF样式学习:ToolBar的使用
隐藏拖动把手: 设置ToolBar属性 ToolBarTray.IsLocked="True",可以达到隐藏拖动把手的目的 private void ToolBar_Loaded( ...
- HTTPS的加密流程(通俗易懂,不可错过)
为什么要有HTTPS 都说进技术的产生就是为了解决旧技术的一些弊端. HTTP具有相当优秀的一面,但是凡事有利也有弊,在HTTP进行高速通信的过程中可能产生以下几个问题: HTTP采用明文传输.明文传 ...
- System Center Configuration Manager 2016 域准备篇(Part2)
对于" 服务器角色",请选择" Active Directory域服务",当系统提示您添加Active Directory域服务所需的功能时,请选择" ...
- C++,C++编程,Windows编程,MFC
编程 我们日常生活中接触到的电子类产品中的应用都是由编程而来 为什么编程,偷懒 我们通过编程驱使(指挥,命令)的是电信号 为什么上面说编程是偷懒,电的发现,给人们带来了便利,人们在各个方面驱使(换成“ ...
- 使用后台程序的第一个程序hello word
1.在advanced\backend\SiteController.php中输入 2.在advanced\backend\Views文件夹下添加名字为say.php的文件,文件名必须和控制器中的视图 ...
- 平时对ES6的一些总结
1.Genertor中yield和Interator中的next方法 Genertor的yield是把这个函数变成分段的:Interator中的next也是一个一个执行的: function* f() ...
- UVALive 4727 Jump(约瑟夫环,递推)
分析: 如果问题是要求最后一个删除的数,重新编号为0到n-1,f[n]表示答案,那么f[n] = (f[n-1]+k)%n. 因为删掉下标k-1以后可以从下标k重新编号为0. 在这个问题只需要推出最后 ...