Spring与apache CXF结合实例
本文的前提是已经有一个Spring的项目,在此基础上如何跟apache CXF进行结合,开发出WebService服务和调用WebService服务。
1.开发WebService
1.引入jar包
下载最新的jar包,并引入:\apache-cxf-3.0.1\lib\*(当然里面有些是不必要的,有兴趣的可以自己删减)。
2.修改web.xml
<servlet>

        <servlet-name>cxf</servlet-name>

        <servlet-class>org.apache.cxf.transport.servlet.CXFServlet</servlet-class>

        <load-on-startup>2</load-on-startup>

    </servlet>

    <servlet-mapping>

        <servlet-name>cxf</servlet-name>

        <url-pattern>/services/*</url-pattern>

    </servlet-mapping>
3.引入单独的spring配置文件cxf-servlet.xml
<?xml version="1.0" encoding="UTF-8"?>

<!-- Licensed to the Apache Software Foundation (ASF) under one or more contributor

    license agreements. See the NOTICE file distributed with this work for additional

    information regarding copyright ownership. The ASF licenses this file to

    you under the Apache License, Version 2.0 (the "License"); you may not use

    this file except in compliance with the License. You may obtain a copy of

    the License at http://www.apache.org/licenses/LICENSE-2.0 Unless required

    by applicable law or agreed to in writing, software distributed under the

    License is distributed on an "AS IS" BASIS, WITHOUT WARRANTIES OR CONDITIONS

    OF ANY KIND, either express or implied. See the License for the specific

    language governing permissions and limitations under the License. -->

<!-- START SNIPPET: beans -->

<beans xmlns="http://www.springframework.org/schema/beans"

    xmlns:xsi="http://www.w3.org/2001/XMLSchema-instance" xmlns:jaxws="http://cxf.apache.org/jaxws"

    xsi:schemaLocation=" http://www.springframework.org/schema/beans

http://www.springframework.org/schema/beans/spring-beans.xsd

http://cxf.apache.org/jaxws http://cxf.apache.org/schemas/jaxws.xsd">

    <import resource="classpath:META-INF/cxf/cxf.xml" />

    <import resource="classpath:META-INF/cxf/cxf-servlet.xml" />

    <jaxws:endpoint id="UserService"

        implementor="cn.telchina.standard.service.user.UserServiceImpl" address="/UserService" />

</beans>

<!-- END SNIPPET: beans -->
上述代码中:
jaxsw:endpoint是关键。
在web.xml中加入配置

4.开发服务接口和服务实现类
接口类:
package cn.telchina.standard.service.user;

import javax.jws.WebService;

/**

 * 必须要有接口

 * @author Administrator

 *

 */

@WebService

public interface UserService {

    public boolean updateTheUser(String user);

    public boolean updateUsersCode(String user);

}
接口实现类:
package cn.telchina.standard.service.user;

import javax.jws.WebService;

@WebService(endpointInterface = "cn.telchina.standard.service.user.UserService")

public class UserServiceImpl implements UserService {

    @Override

    public boolean updateTheUser(String user) {

        // TODO Auto-generated method stub

        return false;

    }

    @Override

    public boolean updateUsersCode(String user) {

        // TODO Auto-generated method stub

        return false;

    }

}
此时发布程序即可:
http://localhost:8080/cxfProject/services
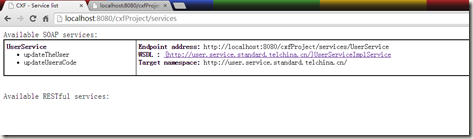
http://localhost:8080/cxfProject/services/UserService?wsdl

2.调用WebService
调用CXF服务的方式有三种:
1.配置spring bean的方式
新增配置文件:client-beans,并在web.xml中配置。

Client-beans.xml内容
<?xml version="1.0" encoding="UTF-8"?>

<beans xmlns="http://www.springframework.org/schema/beans"

    xmlns:xsi="http://www.w3.org/2001/XMLSchema-instance"

    xmlns:oxm="http://www.springframework.org/schema/oxm"

    xmlns:jaxws="http://cxf.apache.org/jaxws"

    xsi:schemaLocation="http://www.springframework.org/schema/beans

    http://www.springframework.org/schema/beans/spring-beans-3.0.xsd

    http://www.springframework.org/schema/oxm

    http://www.springframework.org/schema/oxm/spring-oxm-3.0.xsd

    http://cxf.apache.org/jaxws

    http://cxf.apache.org/schemas/jaxws.xsd">

        <jaxws:client id="client"

        address="http://localhost:8080/cxfProject/services/UserService"

        serviceClass="cn.telchina.standard.service.user.UserService" />

</beans>
java代码:
public static void invokeBySpring(){

        // TODO Auto-generated method stub

                ClassPathXmlApplicationContext context = new ClassPathXmlApplicationContext(

                        new String[] { "client-beans.xml" });

                UserService client = (UserService) context.getBean("client");

                boolean response = client.updateTheUser("Joe");

                System.out.println("Response: " + response);

    }
2.CXF的方式
public static void invokeService(){

            JaxWsProxyFactoryBean factory = new JaxWsProxyFactoryBean();

            factory.setServiceClass(UserService.class);

            factory.setAddress("http://localhost:8080/cxfProject/services/UserService");

            UserService service = (UserService) factory.create();

            boolean response = service.updateTheUser("Joe");

            System.out.println("#############"+response+"##############");

    }
3.RPC方式
public static void invokeService2() throws Exception{

         //这个是用cxf 客户端访问cxf部署的webservice服务

        //千万记住,访问cxf的webservice必须加上namespace ,否则通不过

        //现在又另外一个问题,传递过去的参数服务端接收不到

        JaxWsDynamicClientFactory dcf = JaxWsDynamicClientFactory.newInstance();

        org.apache.cxf.endpoint.Client client = dcf.createClient("http://localhost:8080/cxfProject/services/UserService?wsdl");

        //url为调用webService的wsdl地址

        QName name=new QName("http://user.service.standard.telchina.cn/","updateTheUser");

        //namespace是命名空间,methodName是方法名

        String xmlStr = "name";

        //paramvalue为参数值

        Object[] objects=client.invoke(name,xmlStr);

        //调用web Service//输出调用结果

        System.out.println(objects[0].toString());

    }
PS:
cxf的类库和axis2的类库不能放到一个项目中,否者会报错:
Invocation of init method failed; nested exception is java.lang.NoSuchFieldError: REFLECTION
Spring与apache CXF结合实例的更多相关文章
- Apache CXF实现Web Service(4)——Tomcat容器和Spring实现JAX-RS(RESTful) web service
准备 我们仍然使用 Apache CXF实现Web Service(2)——不借助重量级Web容器和Spring实现一个纯的JAX-RS(RESTful) web service 中的代码作为基础,并 ...
- Spring 4 集成Apache CXF开发JAX-RS Web Service
什么是JAX-RS 在JSR-311规范中定义,即Java API for RESTful Web Services,一套Java API,用于开发 RESTful风格的Webservice. 工程概 ...
- Apache CXF实现Web Service(3)——Tomcat容器和不借助Spring的普通Servlet实现JAX-RS(RESTful) web service
起步 参照这一系列的另外一篇文章: Apache CXF实现Web Service(2)——不借助重量级Web容器和Spring实现一个纯的JAX-RS(RESTful) web service 首先 ...
- Apache CXF实现Web Service(2)——不借助重量级Web容器和Spring实现一个纯的JAX-RS(RESTful) web service
实现目标 http://localhost:9000/rs/roomservice 为入口, http://localhost:9000/rs/roomservice/room为房间列表, http: ...
- Spring 3 整合Apache CXF WebService[转]
http://www.cnblogs.com/hoojo/archive/2012/07/13/2590593.html 在CXF2版本中,整合Spring3发布CXF WebService就更加简单 ...
- apache cxf笔记之Spring客户端访问和调用webservice服务
继续上次的spring服务的问题,这边介绍一种spring配置客户端的方法. 1.src目录下新建client-beans.xml文件 <?xml version="1.0" ...
- 使用Apache CXF和Spring集成创建Web Service(zz)
使用Apache CXF和Spring集成创建Web Service 您的评价: 还行 收藏该经验 1.创建HelloWorld 接口类 查看源码 打印? 1 package ...
- Apache CXF实现Web Service(1)——不借助重量级Web容器和Spring实现一个纯的JAX-WS web service
废话少说,先在Eclipse中新建一个Java Project (可以不是WTP的Dynamic Web Project) 选择Java Project 再看pom.xml 我们使用cxf 3.1.4 ...
- spring boot 集成 Apache CXF 调用 .NET 服务端 WebService
1. pom.xml加入 cxf 的依赖 <dependency> <groupId>org.apache.cxf</groupId> <artifactId ...
随机推荐
- synchronized的重入
/** * synchronized的重入 * */ public class SyncDubbo1 { public synchronized void method1(){ System.out. ...
- [原]打造Python开发环境之Python环境
人生苦短,我用Python 一.升级到python2.7 开发环境的系统是centos 6.0, 默认的python版本是2.6.6, 由于线上环境是python2.7,为了防止版本差异产生的问题,所 ...
- 通过Sql语句控制SQLite数据库增删改查
person类属性有Intenger id,String name,Intenger age,相应的构造方法和set get方法. package com.xh.tx.dao; import jav ...
- SQL 查询优化
优化方法论: 分析实例级的等待. 联系等待和队列. 确定方案. 细化到数据/文件级. 细化到进程级. 优化索引/查询.
- Noise,Error,wighted pocket Algorithm
错误衡量(Error Measure) 有两种错误计算方法: 第一种叫0/1错误,只要[预测≠目标]则认为犯错,通常用于分类:通常选择,错误比较大的值作为y˜的值 第二种叫平方错误,它衡量[预测与目标 ...
- vim之旅
本人是今年的毕业生, 大学很莫名的选择了一个电子商务专业. 由于专业没有实质性的东西可学,加上对电商不敢兴趣, 于是乎我有了大量的时间在宿舍里折腾电脑. 折腾了几年大三决定转业, 大四在还没找工作之前 ...
- Python pexpect出现错误‘module have no attribute "spawn" 解决办法
今天我遇到了这个错误,现在将错误总结如下: 1.首先查询一下自己的操作系统,pexpect中的spawn()和run()仅仅运行在POSIX系统上,在WINDOWS下是没有这两个东西的,在官网http ...
- DrawerLayout带有侧滑功能的布局类(1)
DrawerLayout: DrawerLayout顾名思义就是一个管理布局的.使用方式可以与其它的布局类类似. DrawerLayout带有滑动的功能.只要按照drawerLayout的规定布局方式 ...
- hdu 1429 胜利大逃亡(续)
题目连接 http://acm.hdu.edu.cn/showproblem.php?pid=1429 胜利大逃亡(续) Description Ignatius再次被魔王抓走了(搞不懂他咋这么讨魔王 ...
- struts2传递参数值的3中方式
在使用struts2的时候,当要传递的参数不多的时候,我们会选择使用属性来传参,而当要传递的参数很多的时候,或者多个action会有共用的参数时,我们会使用另外两种传参方式. 注意:使用Model D ...