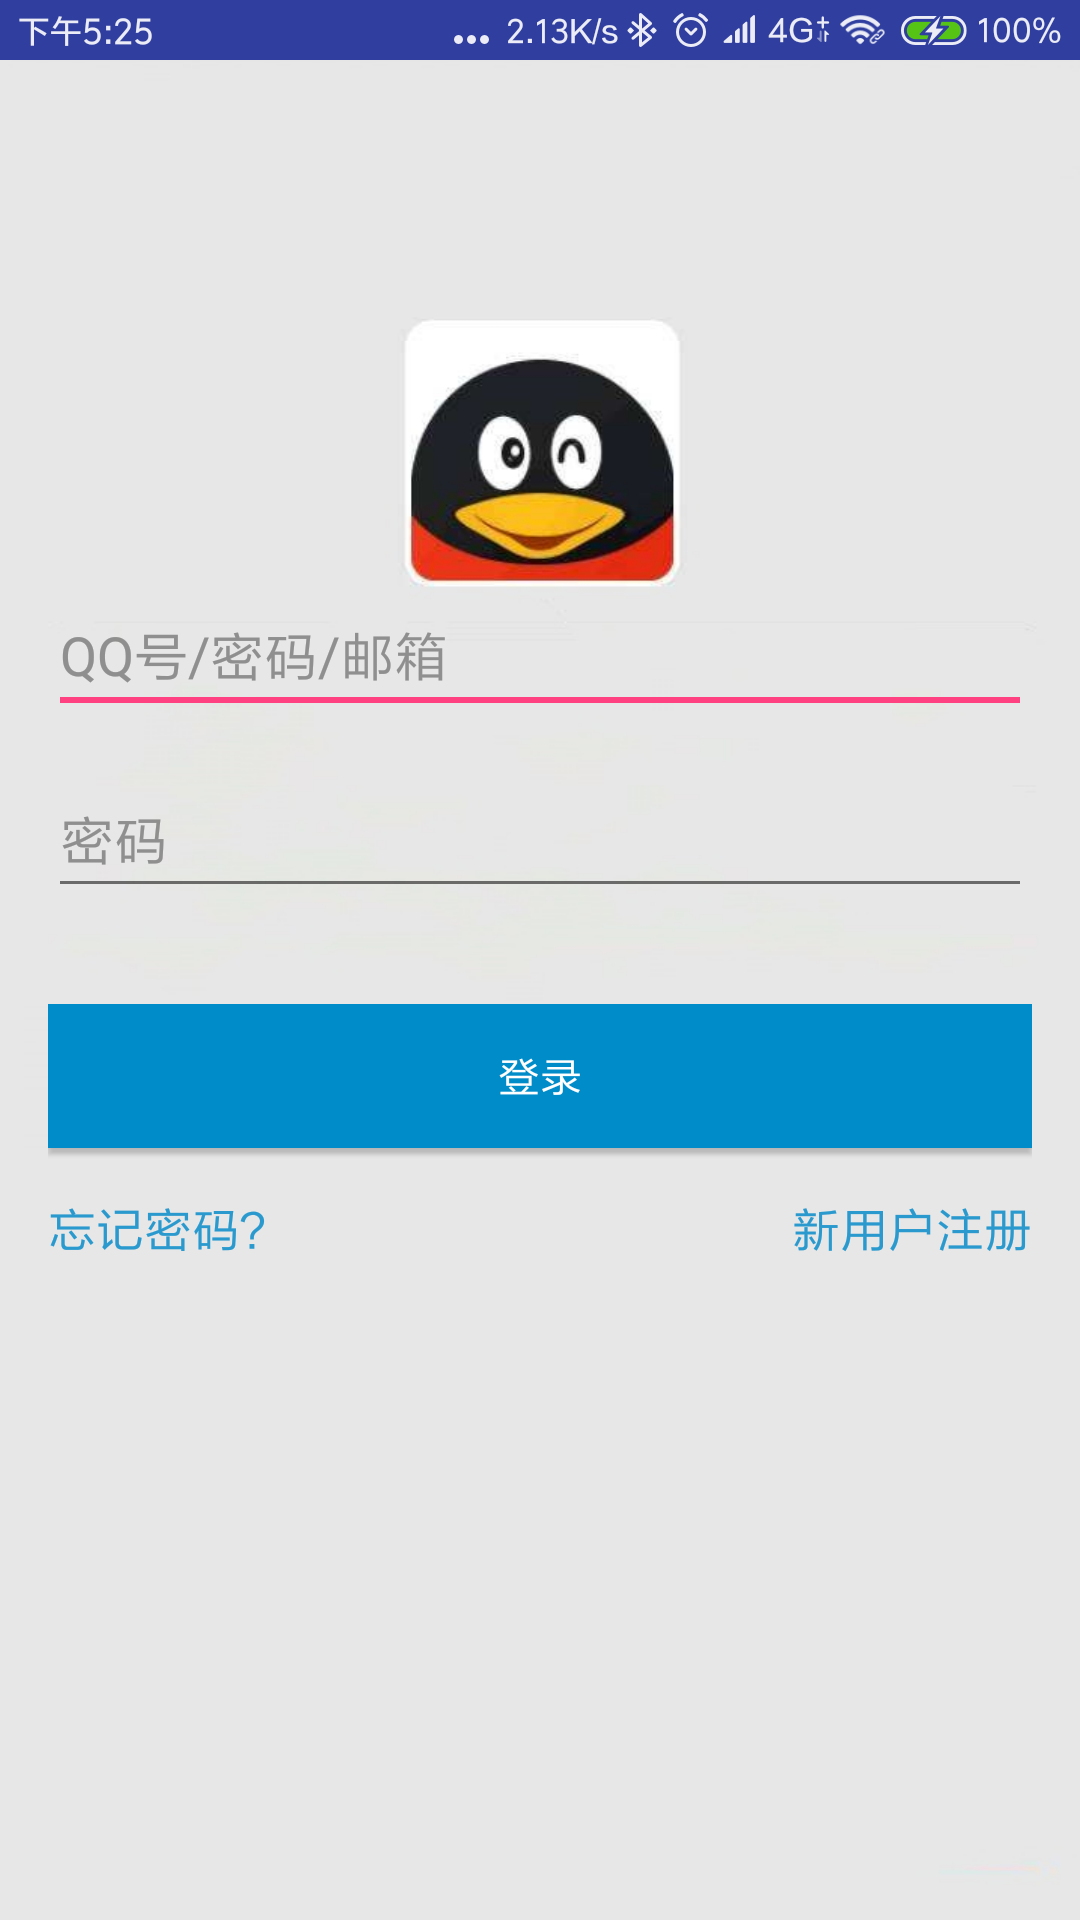
安卓开发学习笔记(七):仿写腾讯QQ登录注册界面
这段代码的关键主要是在我们的相对布局以及线性布局上面,我们首先在总体布局里设置为线性布局,然后再在里面设置为相对布局,这是一个十分常见的XML布局模式。
废话不多说,直接上代码:
一.activity.xml
<?xml version="1.0" encoding="utf-8"?>

<LinearLayout xmlns:android="http://schemas.android.com/apk/res/android"

    android:layout_width="match_parent"

    android:layout_height="match_parent"

    android:orientation="vertical"

    android:background="@drawable/bg2"

    >

    <!--头部内容-->

    <RelativeLayout

        android:layout_width="match_parent"

        android:layout_height="160dp"

        android:padding="16dp"

        android:layout_margin="0dp"

        >

    </RelativeLayout>

    <!--输入框-->

    <RelativeLayout

        android:layout_width="match_parent"

        android:layout_height="wrap_content"

        android:padding="16dp"

        android:layout_margin="0dp"

        >

        <EditText

            android:id="@+id/account"

            android:layout_width="match_parent"

            android:layout_height="wrap_content"

            android:layout_marginBottom="16dp"

            android:hint="QQ号/密码/邮箱"/>

        />

        <EditText

            android:layout_below="@id/account"

            android:id="@+id/password"

            android:layout_width="match_parent"

            android:layout_height="wrap_content"

            android:password="true"

            android:hint="密码"/>

        />

    </RelativeLayout>

    <RelativeLayout

        android:layout_width="match_parent"

        android:layout_height="33dp"

        android:padding="0dp"

        android:layout_margin="0dp"

        >

        <CheckBox

            android:id="@+id/remember_pass"

            android:layout_width="wrap_content"

            android:layout_height="wrap_content"

            android:text="记住密码"/>

    </RelativeLayout>

    <!--密码功能-->

    <RelativeLayout

        android:layout_width="match_parent"

        android:layout_height="wrap_content"

        android:layout_margin="16dp">

        <Button

            android:id="@+id/login"

            android:layout_width="match_parent"

            android:layout_height="wrap_content"

            android:text="登录"

            android:textColor="#fff"

            android:background="#008cc9"/>

        <Button

            android:id="@+id/forget_pwd"

            android:layout_below="@id/login"

            android:layout_width="wrap_content"

            android:layout_height="wrap_content"

            android:background="@null"

            android:textColor="#2999ce"

            android:gravity="start"

            android:layout_marginTop="16dp"

            android:textSize="16dp"

            android:text="忘记密码?"/>

        <Button

            android:id="@+id/register"

            android:layout_below="@id/login"

            android:layout_width="wrap_content"

            android:layout_height="wrap_content"

            android:background="@null"

            android:textColor="#2999ce"

            android:gravity="end"

            android:text="新用户注册"

            android:layout_marginTop="16dp"

            android:textSize="16dp"

            android:layout_alignParentRight="true"/>

    </RelativeLayout>

<RelativeLayout

    android:layout_width="match_parent"

    android:layout_height="80dp"

    android:padding="16dp"

    android:layout_margin="0dp">

 <TextView

     android:layout_width="wrap_content"

     android:layout_height="wrap_content" />

</RelativeLayout>

</LinearLayout>
二.main.java
package com.example.lenovo.fqq;

import android.content.Intent;

import android.support.v7.app.ActionBar;

import android.support.v7.app.AppCompatActivity;

import android.os.Bundle;

import android.view.View;

import android.widget.Button;

public class Main3Activity extends AppCompatActivity {

    @Override

    protected void onCreate(Bundle savedInstanceState) {

        super.onCreate(savedInstanceState);

        setContentView(R.layout.activity_main3);

        Button button=(Button) findViewById(R.id.login);

        button.setOnClickListener(new View.OnClickListener() {

            @Override

            public void onClick(View v) {

                Intent intent=new Intent(Main3Activity.this,Main2Activity.class);

                startActivity(intent);

            }

        });

        ActionBar a=getSupportActionBar();

        if(a!=null)

        {

            a.hide();

        }

    }

}
其中的代码:
 ActionBar a=getSupportActionBar();

        if(a!=null)

        {

            a.hide();

        }

    }

}
主要是为了能够将我们的标题栏隐藏,不然的话就会显示出标题栏,达不到我们仿写的效果了。
Button button=(Button) findViewById(R.id.login);

        button.setOnClickListener(new View.OnClickListener() {

            @Override

            public void onClick(View v) {

                Intent intent=new Intent(Main3Activity.this,Main2Activity.class);

                startActivity(intent);

            }

        });
上面这一段代码主要是用到了活动的跳转,不然登录是登录不进去的!这里因为我们直接使用了java当中活动的跳转。点击登录就会立刻跳转到下一个界面进行登录,当然
TextView简介:
TextView,是View的直接子类。它是一个文本显示控件,提供了基本的显示文本的功能,并且是大部分UI控件的父类,因为大部分UI控件都需要展示信息。
如果仅仅是展示文本,那么TextView的作用就太小了,所以它还预定义了一些类似于HTML的标签,通过这些标签可以使TextView控件显示不同的颜色、大小、字体、图片、链接。这些HTML标签都需要android.text.Html类的支持,但是并不包括所有的HTML标签。
常用的可以再TextView中设定的标签有:
- <font>:设置颜色和字体。
- <big>:设置字体大号
- <small>:设置字体小号
- <i>\<b>:斜体\粗体
- <a>:连接网址
- <img>:图片
使用这些标签可以用Html.fromHtml方法将这些标签的字符串转换成CharSequence接口,然后在TextView.setText()中进行设置。如果需要响应设置的HTML标签进行响应,需要设置TextView.setMovementMethod(LinkMovementMethod.getInstance())。
CharSequence为接口类型,大家可能对其有点陌生,但是它的子类肯定会让大家有熟悉的感觉,String、StringBuffer、StringBuilder、SpannableString、SpannableStringBuilder都是其子类,它包括了字符串的所有类,因为面向对象的多态性,在这里把他理解成字符串类的抽象即可。
除了使用HTML标签的方式设定显示文本中的URL地址、邮箱地址、电话等产生超链接出发相应的服务,可以使用android:autoLink属性来设置,以下是android:autoLink属性的介绍:
- None:默认的,不匹配任何连接。
- web:网址。
- email:邮箱。
- phone:电话号码。
- map:匹配映射网址。
- all:匹配所有连接。
最终搞定,实现具体效果如下:
安卓开发学习笔记(七):仿写腾讯QQ登录注册界面的更多相关文章
- 安卓开发学习笔记(三):Android Stuidio无法引用Intent来创建对象,出现cannot resolve xxx
笔者在进行安卓开发时,发现自己的代码语法完全没有问题.尤其是创建intent对象的时候,语法完全是正确的,但是Android Stuidio却显示报错,Intent类显示为红色,如图所示: 代码如下所 ...
- 安卓开发学习笔记(五):史上最简单且华丽地实现Android Stutio当中Webview控件https/http协议的方法
一.我们先在XML当中自定义一个webview(Second_layout.xml) 代码如下: <?xml version="1.0" encoding="utf ...
- 安卓开发学习笔记(四):Android Stuidio无法实现隐式Intent是为什么?
一.首先检查我们的代码: FirstActivity.java(主活动程序当中的代码):Button3监听器后面的代码就是我们隐式Intent的业务逻辑所在了,大家可以往下面看看,大概在代码的第57行 ...
- 安卓开发学习笔记(二):如何用Android Stuidio在res资源下创建xml视图文件
笔者在看了相关的教程之后发现教程当中的资源已经过时了.当我们在创建了一个新的空白的工程之后,会发现其文件夹下面的分文件夹目录和官方的教程文件结构完全不同,因此会引起很多误解.笔者使用的是最新版的And ...
- 安卓开发学习笔记(一):如何用Android Stuidio导出apk文件?
一,首先,我们在菜单栏上找到这一栏: 然后点击build,再点击generate apk,然后出现以下界面: 由于之前我们并没有进行apk文件的生成,因此需要这个apk key做一个验证,以防您的ap ...
- Bootstrap学习笔记(9)--模态框(登录/注册弹框)
说明: 1. 上来一个ul先把登录和注册两个链接扔进去,ul的类nav,navbar-nav是导航条,navbar-right让他固定在右侧.每个li的里面,data-toggle="mod ...
- 步步为营 SharePoint 开发学习笔记系列总结
转:http://www.cnblogs.com/springyangwc/archive/2011/08/03/2126763.html 概要 为时20多天的sharepoint开发学习笔记系列终于 ...
- 《MFC游戏开发》笔记七 游戏特效的实现(一):背景滚动
本系列文章由七十一雾央编写,转载请注明出处. http://blog.csdn.net/u011371356/article/details/9344721 作者:七十一雾央 新浪微博:http:// ...
- python3.4学习笔记(七) 学习网站博客推荐
python3.4学习笔记(七) 学习网站博客推荐 深入 Python 3http://sebug.net/paper/books/dive-into-python3/<深入 Python 3& ...
随机推荐
- Motivation
觉得一个需求不错,却没有意愿去做,唯一可能的意愿就是生活需要.可这并不能很好的带动起来什么,除了让自己觉得在逼自己. 后来在这个需求的基础上,延伸出新的需求,可能更适应生活.仍然没有意愿去动手,虽然生 ...
- 个人版整理APP测试流程
2016.1.5 我的笔记 一 .APP测试基本流程 1.1 测试周期 测试周期可按项目的开发周期来确定测试时间,一般测试时间为两三周(即15个工作日),根据项目情况以及版本质量可适当缩短或延长测试 ...
- 定义一个javascript方法,实现对数组集合的正向排序
function sortArr (arr) { var newArr = arr.map(val => parseInt(val)).sort((a, b) => a-b); newAr ...
- 将字符串转json时,保持顺序
jo_tmp = json.loads(content.decode('utf-8'), object_pairs_hook=collections.OrderedDict)jo = json.dum ...
- python实现JWT
python实现JWT 一.常见的几种实现认证的方法 1.1basic auth 1.2cookie 1.3token json web token--一种基于token的json格式web认证方法. ...
- h5解决键盘谈起,输入框失去焦点
- .net基础学java系列(五)慢性自杀 之 沉沦在IDE中
最近在慢学习IDEA,总是喜欢与Visual Studio! 其实,对于Visual Studio,它的官方(https://docs.microsoft.com/zh-cn/visualstudio ...
- [原创]Xilinx Vivado 2017.4/2018.3/2016.4/2015.4/ISE14.7下载及其安装
最新版本Vivado 2018.3下载地址 链接:https://pan.baidu.com/s/17aE-vICRQYN27bD2sXCLxg提取码:ilg5 由于工程需要,下载VIVADO2018 ...
- Flink on yarn的配置及执行
1. 写在前面 Flink被誉为第四代大数据计算引擎组件,即可以用作基于离线分布式计算,也可以应用于实时计算.Flink可以自己搭建集群模式已提供为庞大数据的计算.但在实际应用中.都是计算hdfs上的 ...
- linux su失败:无法设置用户ID:资源暂时不可用
环境 linux RHEP 7.+ su - user 提示 :无法设置用户ID,资源暂时不可用 检查 cat /etc/security/limits.d/90-nproc.conf * soft ...