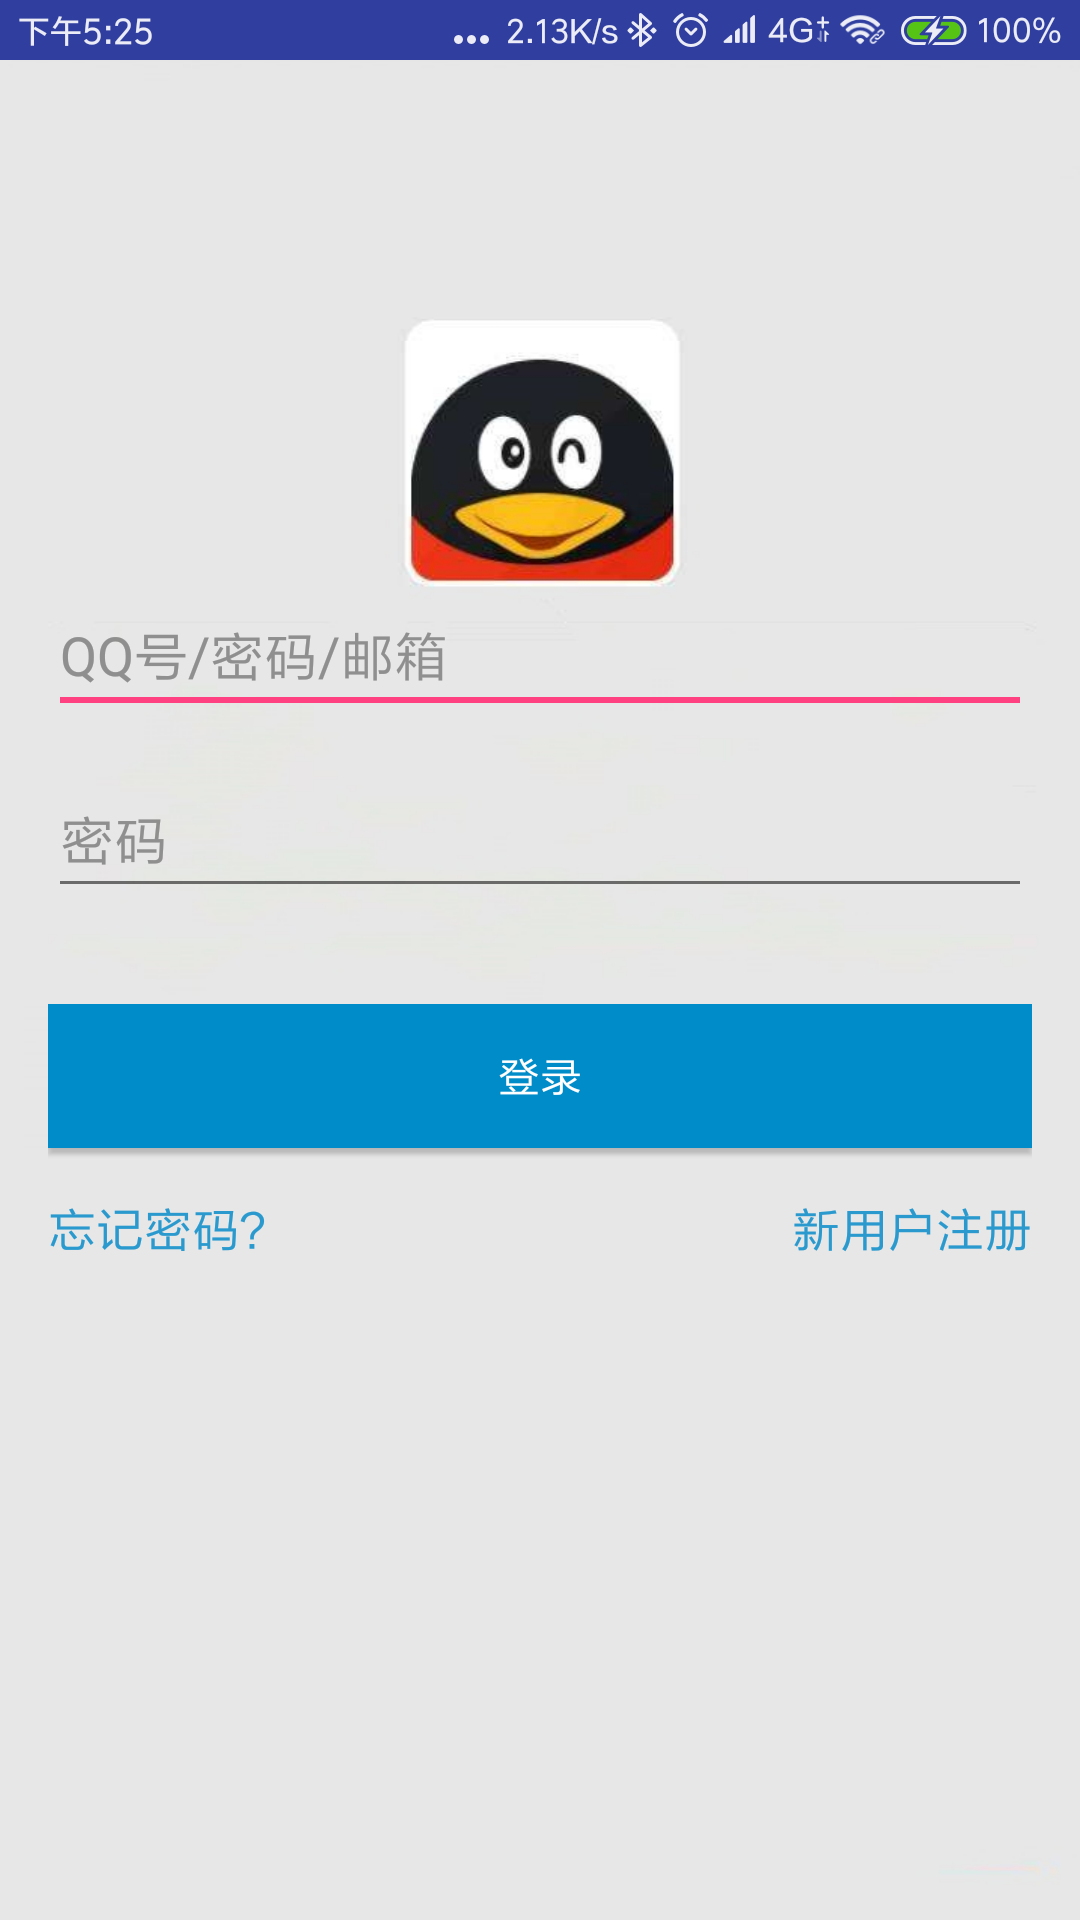
安卓开发学习笔记(七):仿写腾讯QQ登录注册界面
这段代码的关键主要是在我们的相对布局以及线性布局上面,我们首先在总体布局里设置为线性布局,然后再在里面设置为相对布局,这是一个十分常见的XML布局模式。
废话不多说,直接上代码:
一.activity.xml
<?xml version="1.0" encoding="utf-8"?>

<LinearLayout xmlns:android="http://schemas.android.com/apk/res/android"

    android:layout_width="match_parent"

    android:layout_height="match_parent"

    android:orientation="vertical"

    android:background="@drawable/bg2"

    >

    <!--头部内容-->

    <RelativeLayout

        android:layout_width="match_parent"

        android:layout_height="160dp"

        android:padding="16dp"

        android:layout_margin="0dp"

        >

    </RelativeLayout>

    <!--输入框-->

    <RelativeLayout

        android:layout_width="match_parent"

        android:layout_height="wrap_content"

        android:padding="16dp"

        android:layout_margin="0dp"

        >

        <EditText

            android:id="@+id/account"

            android:layout_width="match_parent"

            android:layout_height="wrap_content"

            android:layout_marginBottom="16dp"

            android:hint="QQ号/密码/邮箱"/>

        />

        <EditText

            android:layout_below="@id/account"

            android:id="@+id/password"

            android:layout_width="match_parent"

            android:layout_height="wrap_content"

            android:password="true"

            android:hint="密码"/>

        />

    </RelativeLayout>

    <RelativeLayout

        android:layout_width="match_parent"

        android:layout_height="33dp"

        android:padding="0dp"

        android:layout_margin="0dp"

        >

        <CheckBox

            android:id="@+id/remember_pass"

            android:layout_width="wrap_content"

            android:layout_height="wrap_content"

            android:text="记住密码"/>

    </RelativeLayout>

    <!--密码功能-->

    <RelativeLayout

        android:layout_width="match_parent"

        android:layout_height="wrap_content"

        android:layout_margin="16dp">

        <Button

            android:id="@+id/login"

            android:layout_width="match_parent"

            android:layout_height="wrap_content"

            android:text="登录"

            android:textColor="#fff"

            android:background="#008cc9"/>

        <Button

            android:id="@+id/forget_pwd"

            android:layout_below="@id/login"

            android:layout_width="wrap_content"

            android:layout_height="wrap_content"

            android:background="@null"

            android:textColor="#2999ce"

            android:gravity="start"

            android:layout_marginTop="16dp"

            android:textSize="16dp"

            android:text="忘记密码?"/>

        <Button

            android:id="@+id/register"

            android:layout_below="@id/login"

            android:layout_width="wrap_content"

            android:layout_height="wrap_content"

            android:background="@null"

            android:textColor="#2999ce"

            android:gravity="end"

            android:text="新用户注册"

            android:layout_marginTop="16dp"

            android:textSize="16dp"

            android:layout_alignParentRight="true"/>

    </RelativeLayout>

<RelativeLayout

    android:layout_width="match_parent"

    android:layout_height="80dp"

    android:padding="16dp"

    android:layout_margin="0dp">

 <TextView

     android:layout_width="wrap_content"

     android:layout_height="wrap_content" />

</RelativeLayout>

</LinearLayout>
二.main.java
package com.example.lenovo.fqq;

import android.content.Intent;

import android.support.v7.app.ActionBar;

import android.support.v7.app.AppCompatActivity;

import android.os.Bundle;

import android.view.View;

import android.widget.Button;

public class Main3Activity extends AppCompatActivity {

    @Override

    protected void onCreate(Bundle savedInstanceState) {

        super.onCreate(savedInstanceState);

        setContentView(R.layout.activity_main3);

        Button button=(Button) findViewById(R.id.login);

        button.setOnClickListener(new View.OnClickListener() {

            @Override

            public void onClick(View v) {

                Intent intent=new Intent(Main3Activity.this,Main2Activity.class);

                startActivity(intent);

            }

        });

        ActionBar a=getSupportActionBar();

        if(a!=null)

        {

            a.hide();

        }

    }

}
其中的代码:
 ActionBar a=getSupportActionBar();

        if(a!=null)

        {

            a.hide();

        }

    }

}
主要是为了能够将我们的标题栏隐藏,不然的话就会显示出标题栏,达不到我们仿写的效果了。
Button button=(Button) findViewById(R.id.login);

        button.setOnClickListener(new View.OnClickListener() {

            @Override

            public void onClick(View v) {

                Intent intent=new Intent(Main3Activity.this,Main2Activity.class);

                startActivity(intent);

            }

        });
上面这一段代码主要是用到了活动的跳转,不然登录是登录不进去的!这里因为我们直接使用了java当中活动的跳转。点击登录就会立刻跳转到下一个界面进行登录,当然
TextView简介:
TextView,是View的直接子类。它是一个文本显示控件,提供了基本的显示文本的功能,并且是大部分UI控件的父类,因为大部分UI控件都需要展示信息。
如果仅仅是展示文本,那么TextView的作用就太小了,所以它还预定义了一些类似于HTML的标签,通过这些标签可以使TextView控件显示不同的颜色、大小、字体、图片、链接。这些HTML标签都需要android.text.Html类的支持,但是并不包括所有的HTML标签。
常用的可以再TextView中设定的标签有:
- <font>:设置颜色和字体。
- <big>:设置字体大号
- <small>:设置字体小号
- <i>\<b>:斜体\粗体
- <a>:连接网址
- <img>:图片
使用这些标签可以用Html.fromHtml方法将这些标签的字符串转换成CharSequence接口,然后在TextView.setText()中进行设置。如果需要响应设置的HTML标签进行响应,需要设置TextView.setMovementMethod(LinkMovementMethod.getInstance())。
CharSequence为接口类型,大家可能对其有点陌生,但是它的子类肯定会让大家有熟悉的感觉,String、StringBuffer、StringBuilder、SpannableString、SpannableStringBuilder都是其子类,它包括了字符串的所有类,因为面向对象的多态性,在这里把他理解成字符串类的抽象即可。
除了使用HTML标签的方式设定显示文本中的URL地址、邮箱地址、电话等产生超链接出发相应的服务,可以使用android:autoLink属性来设置,以下是android:autoLink属性的介绍:
- None:默认的,不匹配任何连接。
- web:网址。
- email:邮箱。
- phone:电话号码。
- map:匹配映射网址。
- all:匹配所有连接。
最终搞定,实现具体效果如下:
安卓开发学习笔记(七):仿写腾讯QQ登录注册界面的更多相关文章
- 安卓开发学习笔记(三):Android Stuidio无法引用Intent来创建对象,出现cannot resolve xxx
笔者在进行安卓开发时,发现自己的代码语法完全没有问题.尤其是创建intent对象的时候,语法完全是正确的,但是Android Stuidio却显示报错,Intent类显示为红色,如图所示: 代码如下所 ...
- 安卓开发学习笔记(五):史上最简单且华丽地实现Android Stutio当中Webview控件https/http协议的方法
一.我们先在XML当中自定义一个webview(Second_layout.xml) 代码如下: <?xml version="1.0" encoding="utf ...
- 安卓开发学习笔记(四):Android Stuidio无法实现隐式Intent是为什么?
一.首先检查我们的代码: FirstActivity.java(主活动程序当中的代码):Button3监听器后面的代码就是我们隐式Intent的业务逻辑所在了,大家可以往下面看看,大概在代码的第57行 ...
- 安卓开发学习笔记(二):如何用Android Stuidio在res资源下创建xml视图文件
笔者在看了相关的教程之后发现教程当中的资源已经过时了.当我们在创建了一个新的空白的工程之后,会发现其文件夹下面的分文件夹目录和官方的教程文件结构完全不同,因此会引起很多误解.笔者使用的是最新版的And ...
- 安卓开发学习笔记(一):如何用Android Stuidio导出apk文件?
一,首先,我们在菜单栏上找到这一栏: 然后点击build,再点击generate apk,然后出现以下界面: 由于之前我们并没有进行apk文件的生成,因此需要这个apk key做一个验证,以防您的ap ...
- Bootstrap学习笔记(9)--模态框(登录/注册弹框)
说明: 1. 上来一个ul先把登录和注册两个链接扔进去,ul的类nav,navbar-nav是导航条,navbar-right让他固定在右侧.每个li的里面,data-toggle="mod ...
- 步步为营 SharePoint 开发学习笔记系列总结
转:http://www.cnblogs.com/springyangwc/archive/2011/08/03/2126763.html 概要 为时20多天的sharepoint开发学习笔记系列终于 ...
- 《MFC游戏开发》笔记七 游戏特效的实现(一):背景滚动
本系列文章由七十一雾央编写,转载请注明出处. http://blog.csdn.net/u011371356/article/details/9344721 作者:七十一雾央 新浪微博:http:// ...
- python3.4学习笔记(七) 学习网站博客推荐
python3.4学习笔记(七) 学习网站博客推荐 深入 Python 3http://sebug.net/paper/books/dive-into-python3/<深入 Python 3& ...
随机推荐
- ollydbg入门记录
1.软件窗口说明 OllyDBG 中各个窗口的名称如下图.简单解释一下各个窗口的功能, 反汇编窗口:显示被调试程序的反汇编代码,标题栏上的地址.HEX 数据.反汇编.注释可以通过在窗口中右击出现的菜单 ...
- layUI实现可选项 弹框
需求描述:点击插入,会让选择,插入的类型,选择之后,点击确定,执行后续的一些操作.先摆效果图. 代码: //html代码<style> #imp{ display: none; }< ...
- python实现常见排序算法
#coding=utf-8from collections import deque #冒泡排序def bubblesort(l):#复杂度平均O(n*2) 最优O(n) 最坏O(n*2) for i ...
- 2018-2019-2 20165206 网络攻防技术 Exp5 MSF基础应用
- 2018-2019-2 20165206<网络攻防技术>Exp5 MSF基础应用 - 实验任务 1.1一个主动攻击实践,如ms08_067; (1分) 1.2 一个针对浏览器的攻击,如 ...
- Redis数据类型Set
Redis的SET是无序的String集合,它里面的元素是不会重复的. SADD,SMEMBERS SADD命令会添加新元素到SET,可以看到一次性可以添加一个或多个元素.SMEMBERS可以获取se ...
- Angular动画——路由动画及高阶动画函数
一.路由动画 路由动画需要在host元数据中指定触发器.动画注意不要过多,否则适得其反. 内容优先,引导用户去注意到某个内容.动画只是辅助手段. 定义一个进场动画,一个离场动画. 因为进场动画和离场动 ...
- Taro音频createVideoContext组件无法调用方法
用createVideoContext的时候,是在一个组件中 声明后这个实例的方法全部都不能使用了 Taro.createVideoContext('myVideo', this) 需要加上第二个参数 ...
- 局域网IP地址
A类: 10.X.X.X是私有地址(私有地址就是在互联网上不使用,而被用在局域网络中的地址). 127.X.X.X是保留地址,用做循环测试用的. B类: 172.16.0.0---172.31.255 ...
- Hbase API 简单封装
>>>>>>>>>>>>>>>>>>>>>>>>> ...
- 作用域链和函数内部this指向问题以及bind、call、apply方法
作用域链和函数内部this指向问题以及bind.call.apply方法 作用域链 作用域是相对于变量而言的, 其意义就在与查找变量(确定变量的来处, 变量是否可以访问到, 确定变量在当前位置是否可以 ...