UEditor调用上传图片、上传文件等模块
来源:https://www.cnblogs.com/lhm166/articles/6079973.html
说到百度富文本编辑器ueditor(下面简称ue),我不得不给它一个大大的赞。我们在网站建设、前端开发时,网站的内容管理就使用了它。对于它的多图片上传和附件上传,个人感觉很好用,我就琢磨着是否可以外部调用多图上传和附件上传组件为自己所用,并封装成一个插件,节省单独开发的成本。
有了这个想法后,着手操作,理下实现思路,得出实现的关键在于监听这两个组件在编辑器里的插入动作。打开源码,苦心研究,皇天不负苦心人,终于摸索出解决方法,现在分享出来,给拥有同样想法的小伙伴,为网站建设届尽一份力。
注:本文基于UEditor1.4.3.3版本。
1、引入ue相关文件,写好初始代码
为了更好的封装整一个单独的插件,这里我们要做到示例化ue后隐藏网页中的编辑窗口,并移除焦点。
<!doctype html>

<html lang="zh-cn">

<head>

    <meta charset="UTF-8">

    <title>外部调用UEditor的多图上传和附件上传</title>

    <script type="text/javascript" charset="utf-8" src="ueditor.config.js"></script>

    <script type="text/javascript" charset="utf-8" src="ueditor.all.js"></script>

    <style>

            ul{display: inline-block;width: 100%;margin: 0;padding: 0;}

            li{list-style-type: none;margin: 5px;padding: 0;}

        </style>

</head>

<body>

<h1>外部调用UEditor的多图上传和附件上传示例</h1>

<button type="button" id="j_upload_img_btn">多图上传</button>

<ul id="upload_img_wrap"></ul>

<button type="button" id="j_upload_file_btn">附件上传</button>

<ul id="upload_file_wrap"></ul>

<!-- 加载编辑器的容器 -->

<textarea id="uploadEditor" style="display: none;"></textarea>

<!-- 使用ue -->

<script type="text/javascript">

    // 实例化编辑器,这里注意配置项隐藏编辑器并禁用默认的基础功能。

 var uploadEditor = UE.getEditor("uploadEditor", {

        isShow: false,

        focus: false,

        enableAutoSave: false,

        autoSyncData: false,

        autoFloatEnabled:false,

        wordCount: false,

        sourceEditor: null,

        scaleEnabled:true,

        toolbars: [["insertimage", "attachment"]]

    });

    // todo::some code

</script>

</body>

</html>
2、监听多图上传和上传附件组件的插入动作
uploadEditor.ready(function () {

    // 监听插入图片

    uploadEditor.addListener("beforeInsertImage", _beforeInsertImage);

    // 监听插入附件

    uploadEditor.addListener("afterUpfile",_afterUpfile);

});
3、自定义按钮绑定触发多图上传和上传附件对话框的事件
我们对id="j_upload_img_btn"和id="j_upload_file_btn"的两个button绑定触发ue多图上传和上传附件对话框的事件,这样我们才能够操作ue。
document.getElementById('j_upload_img_btn').onclick = function () {

    var dialog = uploadEditor.getDialog("insertimage");

    dialog.title = '多图上传';

    dialog.render();

    dialog.open();

};

document.getElementById('j_upload_file_btn').onclick = function () {

    var dialog = uploadEditor.getDialog("attachment");

    dialog.title = '附件上传';

    dialog.render();

    dialog.open();

};
4、多图上传
多图上传的核心在于“beforeInsertImage”动作,此动作返回已选图片的信息集合。
function _beforeInsertImage(t, result) {

    var imageHtml = '';

    for(var i in result){

        imageHtml += '<li><img src="'+result[i].src+'" alt="'+result[i].alt+'" height="150"></li>';

    }

    document.getElementById('upload_img_wrap').innerHTML = imageHtml;

}
5、新增“afterUpfile”动作
对于附件上传,ue源码中并未提供插入动作的相关事件,所以这里我们手动添加一个触发动作“afterUpfile”。
打开“ueditor.all.js”,搜索代码:
me.execCommand('insertHtml', html);   //在此代码后插入以下代码

me.fireEvent('afterUpfile', filelist);
这样我们就新增了“afterUpfile”事件。
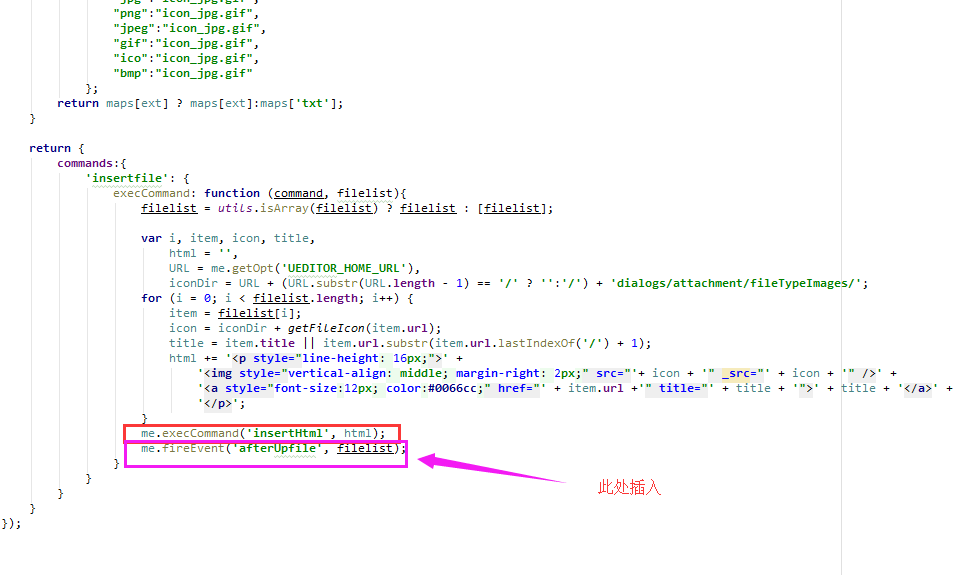
这里核心在于 “fireEvent”。
6、附件上传
上一步中我们新增了“afterUpfile”动作,这里直接监听就可以了。
function _afterUpfile(t, result) {

    var fileHtml = '';

    for(var i in result){

        fileHtml += '<li><a href="'+result[i].url+'" target="_blank">'+result[i].url+'</a></li>';

    }

    document.getElementById('upload_file_wrap').innerHTML = fileHtml;

}
以下是完整代码:
注:本文基于UEditor1.4.3.3版本。
<!doctype html>

<html lang="zh-cn">

<head>

    <meta charset="UTF-8">

    <title>外部调用UEditor的多图上传和附件上传</title>

    <script type="text/javascript" charset="utf-8" src="ueditor.config.js"></script>

    <script type="text/javascript" charset="utf-8" src="ueditor.all.js"></script>

    <style>

        ul{display: inline-block;width: 100%;margin: 0;padding: 0;}

        li{list-style-type: none;margin: 5px;padding: 0;}

    </style>

</head>

<body>

<h1>外部调用UEditor的多图上传和附件上传示例</h1>

<button type="button" id="j_upload_img_btn">多图上传</button>

<ul id="upload_img_wrap"></ul>

<button type="button" id="j_upload_file_btn">附件上传</button>

<ul id="upload_file_wrap"></ul>

<!-- 加载编辑器的容器 -->

<textarea id="uploadEditor" style="display: none;"></textarea>

<!-- 使用ue -->

<script type="text/javascript">

    // 实例化编辑器,这里注意配置项隐藏编辑器并禁用默认的基础功能。

 var uploadEditor = UE.getEditor("uploadEditor", {

        isShow: false,

        focus: false,

        enableAutoSave: false,

        autoSyncData: false,

        autoFloatEnabled:false,

        wordCount: false,

        sourceEditor: null,

        scaleEnabled:true,

        toolbars: [["insertimage", "attachment"]]

    });

    // 监听多图上传和上传附件组件的插入动作

 uploadEditor.ready(function () {

        uploadEditor.addListener("beforeInsertImage", _beforeInsertImage);

        uploadEditor.addListener("afterUpfile",_afterUpfile);

    });

    // 自定义按钮绑定触发多图上传和上传附件对话框事件

 document.getElementById('j_upload_img_btn').onclick = function () {

        var dialog = uploadEditor.getDialog("insertimage");

        dialog.title = '多图上传';

        dialog.render();

        dialog.open();

    };

    document.getElementById('j_upload_file_btn').onclick = function () {

        var dialog = uploadEditor.getDialog("attachment");

        dialog.title = '附件上传';

        dialog.render();

        dialog.open();

    };

    // 多图上传动作

 function _beforeInsertImage(t, result) {

        var imageHtml = '';

        for(var i in result){

            imageHtml += '<li><img src="'+result[i].src+'" alt="'+result[i].alt+'" height="150"></li>';

        }

        document.getElementById('upload_img_wrap').innerHTML = imageHtml;

    }

    // 附件上传

 function _afterUpfile(t, result) {

        var fileHtml = '';

        for(var i in result){

            fileHtml += '<li><a href="'+result[i].url+'" target="_blank">'+result[i].url+'</a></li>';

        }

        document.getElementById('upload_file_wrap').innerHTML = fileHtml;

    }

</script>

</body>

</html>
UEditor调用上传图片、上传文件等模块的更多相关文章
- Shell脚本调用ftp上传文件
Shell脚本调用ftp上传文件 1.脚本如下 ftp -n<<! open x.x.x.x ###x.x.x.x为ftp地址 user username password ###user ...
- Django和Ueditor自定义存储上传文件的文件名
django台后默认上传文件名 在不使用分布式文件存储系统等第三方文件存储时,django使用默认的后台ImageField和FileField上传文件名默认使用原文件名,当出现同名时会在后面追加下随 ...
- 教你如何调用百度编辑器ueditor的上传图片、上传文件等模块
出于兴趣爱好,前段时间自己尝试写了一个叫simple的cms,里面使用了百度ueditor编辑器,发现它的多图片上传模块很不错,用起来很方便,又可以选择已经上传好的图片.正好我又是个懒人,发现有现成的 ...
- 图片上传和显示——上传图片——上传文件)==ZJ
http://www.cnblogs.com/yc-755909659/archive/2013/04/17/3026409.html aspx上传 http://www.cnblogs.com/mq ...
- 使用RestTemplate调用接口上传文件
场景 接口接受一个文件,缓存在本地,验证文件的完整性及内容,然后将文件上传至云服务器: 下面只写利用RestTemplate将文件上传至云服务器,至于文件上传以及缓存在本地可以参考:JAVA文件上传: ...
- JAVA调用FTP上传文件
import java.io.File; import java.io.FileInputStream; import org.apache.commons.net.ftp.FTP; import o ...
- 最近上传图片上传文件报413错误及仅Https下报413问题,IIS高版本的配置方案及Web.config配置全解
IIS文件上传大小限制30M,C盘中有的IIS_schema.xml文件 C:\Windows\System32\inetsrv\config\schema\ 但是考虑到安全等问题,而且这个文件默认是 ...
- ueditor浏览器 无法上传文件.问题
dll也都引用了 路径绝对tmd没问题 最后 我一点一点的调试发现了问题 草tmd百度程序员 */UE.ajax = function() { //创建一个ajaxRequest对象 var fnSt ...
- C# HttpClient Post 参数同时上传文件 上传图片 调用接口
// 调用接口上传文件 using (var client = new HttpClient()) { using (var multipartFormDataContent = new Multip ...
随机推荐
- 需求规格说明书(SRS)特点
需求说明书的7大特征: 完整性 正确性 可行性 必要性 划分优先级 无二义性 可验证性 每条需求规格说明书的4大特点: 完整性 一致性 可修改性 可跟踪性 需求管理就是一种获取.组织并记录系统需求的系 ...
- [已决解]关于Hadoop start-all.sh启动问题
问题一:出现Attempting to operate on hdfs namenode as root 写在最前注意: 1.master,slave都需要修改start-dfs.sh,stop-df ...
- eclipse换工作空间站快捷键失效解决
1.找到你可以用快捷键的eclipse的空间所在目录.2.复制.metadata文件.3.找到不可用快捷键的空间目录,把之前复制的文件夹覆盖到现在的.4.重启eclipse.
- Google Chrome等浏览器不允许关闭点击跟踪??
hrome.Safari.Opera 和 Microsoft Edge 的新版本将不再允许用户关闭“链接审计( hyperlink auditing)”的功能.链接审计是一项 HTML 标准,被用于跟 ...
- android9.0系统适配遇到的问题
一.apk在9.0以下的系统上安装运行,没有问题.但是在9.0系统上运行会弹出一个框 解决办法: private void closeAndroidPDialog() { try { Class aC ...
- Linux内存管理 (26)内存相关工具
1. vmstat 参照<Linux CPU占用率监控工具小结-vmstat> 2. memstat memstat可以通过sudo apt install memstat安装,安装包括两 ...
- java常识
什么是java语言? java语言是美国Sun公司,在1995年推出的高级编程语言.所谓编程语言,是计算机的语言,人们可以使用编程语言对计算机下达命令,让计算机完成人们需要的功能. java语言发展历 ...
- 关于h5绘制canvas生成图片的注意点!
1.第一个是关于移动端自适应的问题: 答:如果是最后只要一张canvas生成的图片,而不是要绘制的canvas的图形,则不需要考虑自适应,绘制canvas的时候的宽高,可以直接写成UI提供的图的大小, ...
- Kubernetes的本质
在前面的四篇文章中,我以 Docker 项目为例,一步步剖析了 Linux 容器的具体实现方式.通过这 些讲解你应该能够明白:一个“容器”,实际上是一个由 Linux Namespace.Linux ...
- uni-app 引入ecart
https://blog.csdn.net/CherryLee_1210/article/details/83016706(copy) 1.首先在uni-app中不支持包下载所以得自己先新建一个项目, ...