springboot整合ueditor 前后端分离
1.下载ueditor,百度搜索ueditor,下载

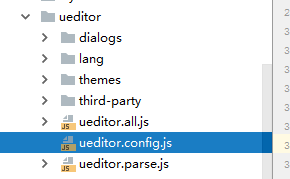
前端用的是Jsp版,导入文件如下
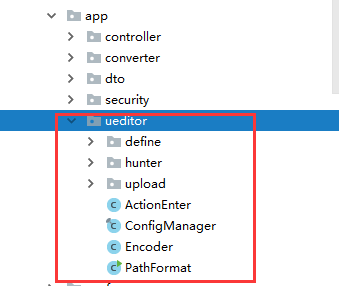
由于要修改部分源码,所以后端用的源码版,导入文件如下
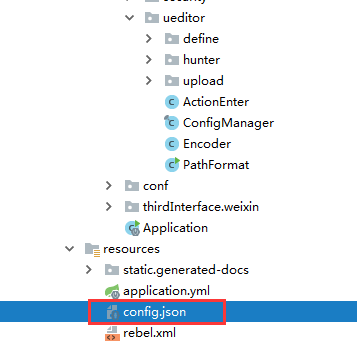
2.配置路径,用来找到json文件
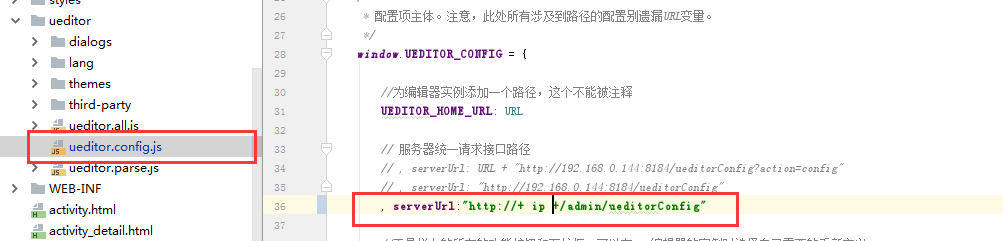
配置前端ueditor.config.js,用来找到Controller
新建 UeditorController,指定路径rootPath 用来找到config.json文件
@RestController

public class UeditorController {

    @RequestMapping("/ueditorConfig")

    public void getUEditorConfig(HttpServletResponse response,HttpServletRequest request){

        String rootPath = "此处配置项目中config.json文件路径";

        try {

            String exec = new ActionEnter(request, rootPath).exec();

            PrintWriter writer = response.getWriter();

            writer.write(exec);

            writer.flush();

            writer.close();

        } catch (IOException | JSONException e) {

            e.printStackTrace();

        }

    }

}
3.配置上传路径

4.修改BinaryUploader源码(https://blog.csdn.net/qq_33745799/article/details/70031641)
package com.baidu.ueditor.upload;

import com.baidu.ueditor.PathFormat;

import com.baidu.ueditor.define.AppInfo;

import com.baidu.ueditor.define.BaseState;

import com.baidu.ueditor.define.FileType;

import com.baidu.ueditor.define.State;

import org.apache.commons.fileupload.servlet.ServletFileUpload;

import org.springframework.web.multipart.MultipartFile;

import org.springframework.web.multipart.MultipartHttpServletRequest;

import javax.servlet.http.HttpServletRequest;

import java.io.IOException;

import java.io.InputStream;

import java.util.Arrays;

import java.util.List;

import java.util.Map;

public class BinaryUploader {

	public static final State save(HttpServletRequest request,

			Map<String, Object> conf) {

		// FileItemStream fileStream = null;

		// boolean isAjaxUpload = request.getHeader( "X_Requested_With" ) != null;

		if (!ServletFileUpload.isMultipartContent(request)) {

			return new BaseState(false, AppInfo.NOT_MULTIPART_CONTENT);

		}

        // ServletFileUpload upload = new ServletFileUpload(

			// 	new DiskFileItemFactory());

        //

        // if ( isAjaxUpload ) {

        //     upload.setHeaderEncoding( "UTF-8" );

        // }

		try {

			// FileItemIterator iterator = upload.getItemIterator(request);

            //

			// while (iterator.hasNext()) {

			// 	fileStream = iterator.next();

            //

			// 	if (!fileStream.isFormField())

			// 		break;

			// 	fileStream = null;

			// }

            //

			// if (fileStream == null) {

			// 	return new BaseState(false, AppInfo.NOTFOUND_UPLOAD_DATA);

			// }

			MultipartHttpServletRequest multipartRequest = (MultipartHttpServletRequest) request;

			MultipartFile multipartFile = multipartRequest.getFile(conf.get("fieldName").toString());

			if(multipartFile==null){

				return new BaseState(false, AppInfo.NOTFOUND_UPLOAD_DATA);

			}

			String savePath = (String) conf.get("savePath");

			//String originFileName = fileStream.getName();

			String originFileName = multipartFile.getOriginalFilename();

			String suffix = FileType.getSuffixByFilename(originFileName);

			originFileName = originFileName.substring(0,

					originFileName.length() - suffix.length());

			savePath = savePath + suffix;

			long maxSize = ((Long) conf.get("maxSize")).longValue();

			if (!validType(suffix, (String[]) conf.get("allowFiles"))) {

				return new BaseState(false, AppInfo.NOT_ALLOW_FILE_TYPE);

			}

			savePath = PathFormat.parse(savePath, originFileName);

			String physicalPath = (String) conf.get("rootPath") + savePath;

			//InputStream is = fileStream.openStream();

			InputStream is = multipartFile.getInputStream();

			State storageState = StorageManager.saveFileByInputStream(is,

					physicalPath, maxSize);

			is.close();

			if (storageState.isSuccess()) {

				storageState.putInfo("url", PathFormat.format(savePath));

				storageState.putInfo("type", suffix);

				storageState.putInfo("original", originFileName + suffix);

			}

			return storageState;

		// } catch (FileUploadException e) {

		// 	return new BaseState(false, AppInfo.PARSE_REQUEST_ERROR);

		} catch (IOException e) {

		}

		return new BaseState(false, AppInfo.IO_ERROR);

	}

	private static boolean validType(String type, String[] allowTypes) {

		List<String> list = Arrays.asList(allowTypes);

		return list.contains(type);

	}

}
springboot整合ueditor 前后端分离的更多相关文章
- Ueditor 前后端分离实现文件上传到独立服务器
关于Ueditor 前后端分离实现文件上传到独立服务器,在网上搜索确实遇到大坑,不过还好遇到了 虚若影 最终实现了,在此感谢!虚若影的原文博客网址:http://www.cnblogs.com/hpn ...
- springboot2.0整合springsecurity前后端分离进行自定义权限控制
在阅读本文之前可以先看看springsecurity的基本执行流程,下面我展示一些核心配置文件,后面给出完整的整合代码到git上面,有兴趣的小伙伴可以下载进行研究 使用maven工程构建项目,首先需要 ...
- springboot+vue的前后端分离与合并方案
pringboot和vue结合的方案网络上的主要有以下两种: 1. [不推荐]在html中直接使用script标签引入vue和一些常用的组件,这种方式和以前传统的开发是一样的,只是可以很爽的使用vue ...
- shiro,基于springboot,基于前后端分离,从登录认证到鉴权,从入门到放弃
这个demo是基于springboot项目的. 名词介绍: ShiroShiro 主要分为 安全认证 和 接口授权 两个部分,其中的核心组件为 Subject. SecurityManager. Re ...
- SpringBoot 和Vue前后端分离入门教程(附源码)
作者:梁小生0101 juejin.im/post/5c622fb5e51d457f9f2c2381 推荐阅读(点击即可跳转阅读) 1. SpringBoot内容聚合 2. 面试题内容聚合 3. 设计 ...
- springboot集成shiro 前后端分离
前后端分离情况下 首先考虑是否跨域,如果没有跨域是可以使用shiro原生的session+cookie,无需特别处理. 如果涉及到跨域则需要考虑cookie问题(本质上也是重写shiro获取JESSI ...
- springboot集成shiro 前后端分离 统一处理shiro异常
在前后端分离的情况下,shiro一些权限异常处理会返回401之类的结果,这种结果不好统一管理.我们希望的结果是统一管理,所有情况都受我们控制 就算权限验证失败,我们也希望返回200,并且返回我们定义的 ...
- 一套基于SpringBoot+Vue+Shiro 前后端分离 开发的代码生成器
一.前言 最近花了一个月时间完成了一套基于Spring Boot+Vue+Shiro前后端分离的代码生成器,目前项目代码已基本完成 止步传统CRUD,进阶代码优化: 该项目可根据数据库字段动态生成 c ...
- Spring Boot Security JWT 整合实现前后端分离认证示例
前面两章节我们介绍了 Spring Boot Security 快速入门 和 Spring Boot JWT 快速入门,本章节使用 JWT 和 Spring Boot Security 构件一个前后端 ...
随机推荐
- Thinkphp5.0 多图上传名称重复BUG
- 用shell统计表格数据
今天有个人问了这样一个问题,图片是原题,在这个题的基础上写了一个实现方法 首先日志存到a.txt文本里,如下 Zhangsan|lisi1|0|Zhangsan|lisi2|10|Zhangsan|l ...
- R语言查看栅格值
有这么一个需求,知道栅格上的坐标,想看看这个坐标上的栅格值是多少.坐标长这个样子 那么这样的坐标下的栅格值该怎么看 cellFromXY(the.stack$t1,c( -1505000,683500 ...
- leecode第二百三十一题(2的幂)
class Solution { public: bool isPowerOfTwo(int n) { bool is_flag=false; ) { ==)//如果为1,看是不是第一个1 { if( ...
- CF Manthan, Codefest 16 B. A Trivial Problem
数学技巧真有趣,看出规律就很简单了 wa 题意:给出数k 输出所有阶乘尾数有k个0的数 这题来来回回看了两三遍, 想的方法总觉得会T 后来想想 阶乘 emmm 1*2*3*4*5*6*7*8*9 ...
- (转)关于request.getServletPath(),request.getContextPath()的总结
文章完全转载自 : https://blog.csdn.net/qq_27770257/article/details/79438987 最近对于request中的几种“路径”有点混淆,查找网上资源都 ...
- postman(十):配置jenkins自动发送邮件(邮件包含测试报告)
继续说一下jenkins与postman的集成 上一篇通过jenkins远程执行postman导出的脚本,并把html报告指定输出到了jenkins对应的job工作空间,接下来配置一下当jenkins ...
- Java /C# 实现文件压缩
纯粹为了记录. 参考了 https://www.cnblogs.com/zeng1994/p/7862288.html import java.util.List; import java.util. ...
- kindle 安卓 app下载的电子书放在什么文件夹?
They are buried in: /sdcard/Android/data/com.amazon.kindle/files/
- sql字符串根据日期产生日期+自增长标志
select Convert(varchar(6), '20180614 20:19:04', 12) + SubString('0000' + Convert(varchar(6), 1 + 1), ...