
day 47 Django 4的简单应用 创建简单的图书管理 (单表的增删改查)
前情提要
Django 已经学了大半.. 很多东西已经能够使用在生产环境当中
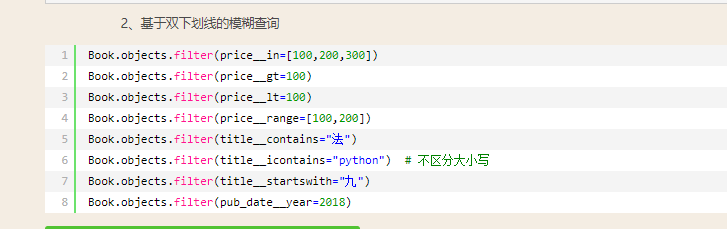
一:模糊查询
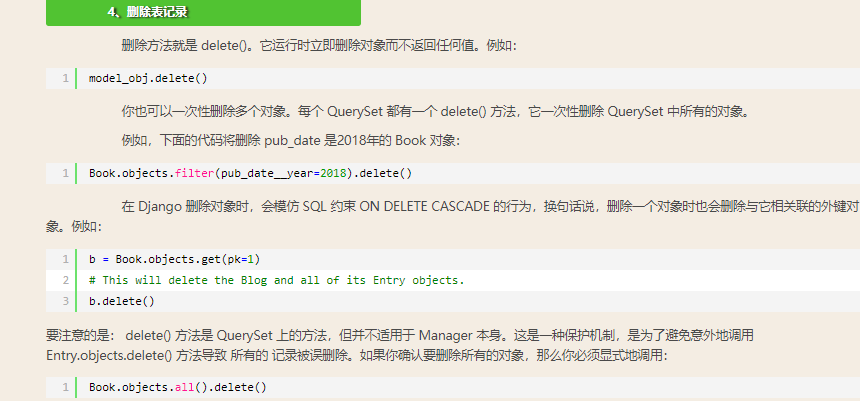
二:单表删除
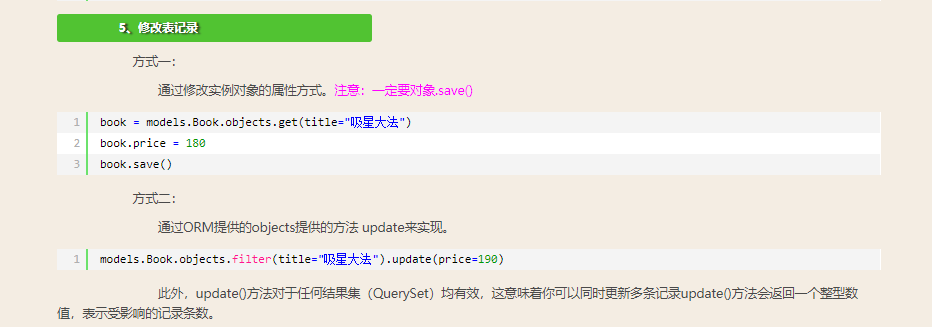
三:单表修改
四:图书管理
图书管理操作
视图结构
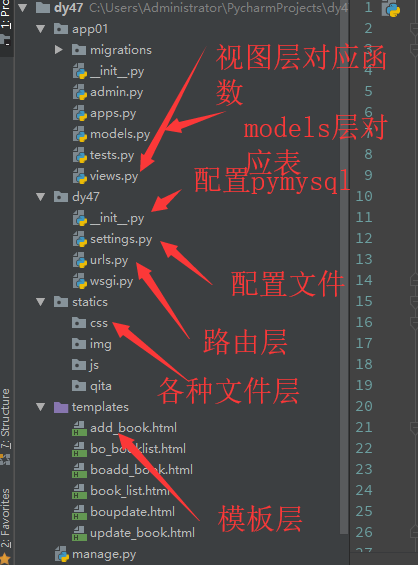
A:路由层
A :配置路由文件
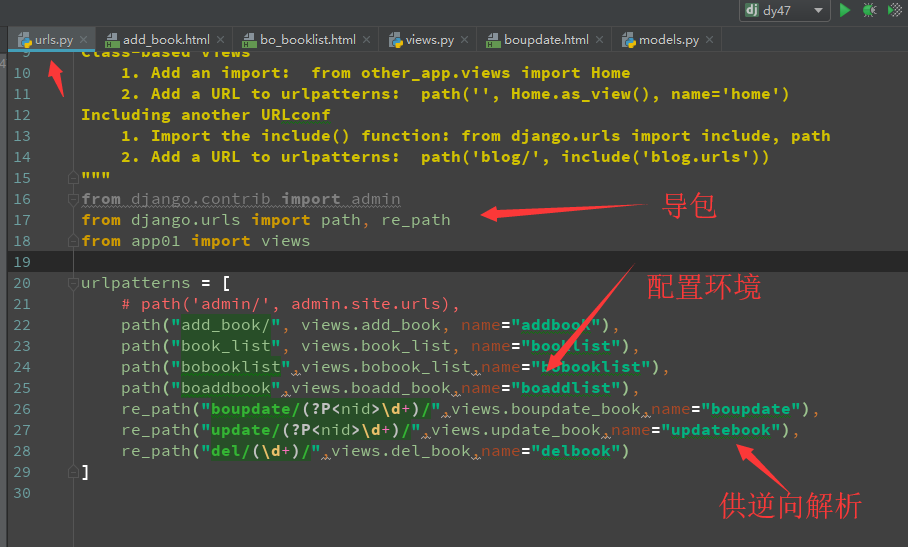
参数解析:
B :视图层
from django.shortcuts import render, HttpResponse, redirect

from django.urls import reverse

from app01 import models

# Create your views here.

def book_list(request):

    if request.method == "GET":

        book_list = models.Book.objects.all()

        # print(book_list)

        return render(request, "book_list.html", {

            "booklist": book_list

        })

    else:

        add_title1 = request.POST.get("title1")

        add_price1 = request.POST.get("price1")  # price

        add_publish1 = request.POST.get("publish1")

        add_date1 = request.POST.get("date1")

        models.Book.objects.create(title=add_title1,

                                   price=add_price1,

                                   publish=add_publish1,

                                   pub_date=add_date1)

        print(add_title1, add_price1, add_publish1, )

        return render(request, "book_list.html")

def bobook_list(request):

    if request.method == "GET":

        book_list = models.Book.objects.all()

        # print(book_list)

        return render(request, "bo_booklist.html", {

            "booklist": book_list

        })

    else:

        add_title1 = request.POST.get("title1")

        add_price1 = request.POST.get("price1")  # price

        add_publish1 = request.POST.get("publish1")

        add_date1 = request.POST.get("date1")

        models.Book.objects.create(title=add_title1,

                                   price=add_price1,

                                   publish=add_publish1,

                                   pub_date=add_date1)

        print(add_title1, add_price1, add_publish1, )

        return render(request, "bo_booklist.html")

def add_book(request):

    if request.method == "GET":

        return render(request, "add_book.html")

    else:

        add_title = request.POST.get("title")  # title

        add_price = request.POST.get("price")  # price

        add_publish = request.POST.get("publish")

        add_date = request.POST.get("pub_date")

        models.Book.objects.create(title=add_title,

                                   price=add_price,

                                   publish=add_publish,

                                   pub_date=add_date)

        return redirect(reverse("booklist"))

def boadd_book(request):

    if request.method == "GET":

        return render(request, "boadd_book.html")

    else:

        add_title = request.POST.get("title")  # title

        add_price = request.POST.get("price")  # price

        add_publish = request.POST.get("publish")

        add_date = request.POST.get("pub_date")

        models.Book.objects.create(title=add_title,

                                   price=add_price,

                                   publish=add_publish,

                                   pub_date=add_date)

        return redirect(reverse("bobooklist"))

def update_book(request, nid):

    if request.method == "GET":

        book = models.Book.objects.filter(nid=nid).first()

        # print(book.title)

        return render(request, "update_book.html", {"book": book})

    else:

        data = request.POST.dict()

        del data['csrfmiddlewaretoken']

        print(data)

        models.Book.objects.filter(nid=nid).update(**data)

        return redirect(reverse("booklist"))

def boupdate_book(request, nid):

    if request.method == "GET":

        book = models.Book.objects.filter(nid=nid).first()

        # print(book.title)

        return render(request, "boupdate.html", {"book": book})

    else:

        data = request.POST.dict()

        del data['csrfmiddlewaretoken']

        print(data)

        models.Book.objects.filter(nid=nid).update(**data)

        return redirect(reverse("bobooklist"))

def del_book(request,sid):

    models.Book.objects.filter(nid=sid).delete()

    return redirect(reverse("bobooklist"))
主要是单表练习.运用了跳转,. 逆向解析. 从html 获取内容,,,,将内容放到html,,从数据库获取内容,,将内容放到数据库,,
C模板层:
book_list
<!DOCTYPE html>
<html lang="en">
<head>
<meta charset="UTF-8">
<title>Title</title>
</head>
<body>
<h1> 三味书屋</h1>
<button><a href="{% url "addbook" %}">新增书籍</a></button>
<table border="">
<tr>
<th>序号</th>
<th>书名</th>
<th>价格</th>
<th>出版商</th>
<th>日期</th>
<th>操作</th> </tr>
{% for book in booklist %}
<tr>
<td>{{forloop.counter}}</td>
<td>{{book.title}}</td>
<td>{{book.price}}</td>
<td>{{book.publish}}</td>
<td>{{ book.pub_date |date:"Y-m-d"}}</td>
<td><button value="" name=""><a href="{% url "updatebook" nid=book.nid %}">编辑</a></button>
<button value="" name=""><a href="{% url "delbook" book.nid %}">删除</a></button>
</td> </tr>
{% endfor %}
</table> <div>
<form action="{% url "booklist" %}" method="post">
{% csrf_token %}
<div> <span>书名 </span> <input type="text" name="title1" placeholder="请输入书名"><br>
<span>价格 </span> <input type="text" name="price1" placeholder="请输入价格"><br>
<span>出版商</span> <input type="text" name="publish1" placeholder="请输入出版商"><br>
<span>日期 </span> <input type="date" name="date1" placeholder="请输入日期"><br>
</div>
<div>
<button type="submit"><a href="">新增提交</a></button>
</div>
</form>
</div> </body>
</html>
add_book
<!DOCTYPE html>
<html lang="en">
<head>
<meta charset="UTF-8">
<title>add_book</title>
</head>
<body>
<div>
<form action="" method="post">
{%csrf_token %}
<div> <span>书名 </span> <input type="text" name="title" placeholder="请输入书名"><br>
<span>价格 </span> <input type="text" name="price" placeholder="请输入价格"><br>
<span>出版商</span> <input type="text" name="publish" placeholder="请输入出版商"><br>
<span>日期 </span> <input type="date" name="pub_date" placeholder="请输入日期"><br>
</div>
<div>
<button type="submit" name=""><a href="">新增提交</a></button>
</div>
</form>
</div> </body>
</html>
update_book
<!DOCTYPE html>

<html lang="en">

<head>

    <meta charset="UTF-8">

    <title>Title</title>

</head>

<body>

<form action="" method="post">

    {% csrf_token %}

<p>书名 <input type="text" placeholder="{{book.title}}" value="" name="title"></p>

<p>价格 <input type="text" placeholder="{{book.price}}" value="" name="price"></p>

<p>出版商 <input type="text" placeholder="{{book.publish}}" value="" name="publish"></p>

<p>日期 <input type="date" placeholder="{{book.pub_date}}" value="" name="pub_date"></p>

<button type="submit">修改</button>

</form>

</body>

</html>
D: 参数文件配置
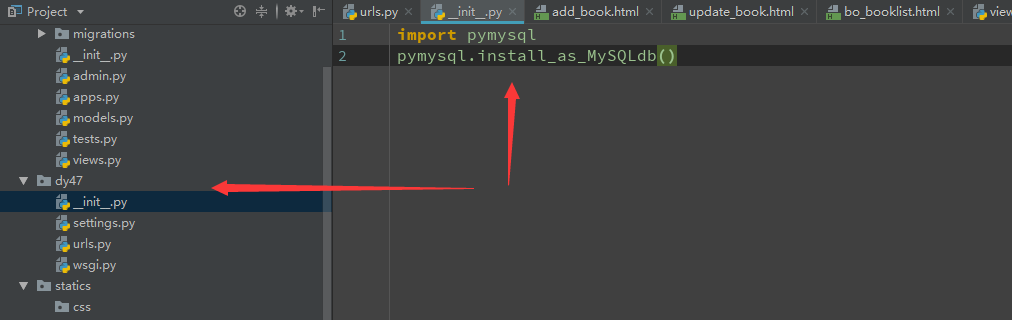
setting
"""

Django settings for dy47 project.

Generated by 'django-admin startproject' using Django 2.1..

For more information on this file, see

https://docs.djangoproject.com/en/2.1/topics/settings/

For the full list of settings and their values, see

https://docs.djangoproject.com/en/2.1/ref/settings/

"""

import os

# Build paths inside the project like this: os.path.join(BASE_DIR, ...)

BASE_DIR = os.path.dirname(os.path.dirname(os.path.abspath(__file__)))

# Quick-start development settings - unsuitable for production

# See https://docs.djangoproject.com/en/2.1/howto/deployment/checklist/

# SECURITY WARNING: keep the secret key used in production secret!

SECRET_KEY = '($z1^$1*b9gi7ydy(=tr7n85v^v7&ks5_pb_kxj)6u3ef12qi@'

# SECURITY WARNING: don't run with debug turned on in production!

DEBUG = True

ALLOWED_HOSTS = []

# Application definition

INSTALLED_APPS = [

    'django.contrib.admin',

    'django.contrib.auth',

    'django.contrib.contenttypes',

    'django.contrib.sessions',

    'django.contrib.messages',

    'django.contrib.staticfiles',

    'app01.apps.App01Config',

]

MIDDLEWARE = [

    'django.middleware.security.SecurityMiddleware',

    'django.contrib.sessions.middleware.SessionMiddleware',

    'django.middleware.common.CommonMiddleware',

    'django.middleware.csrf.CsrfViewMiddleware',

    'django.contrib.auth.middleware.AuthenticationMiddleware',

    'django.contrib.messages.middleware.MessageMiddleware',

    'django.middleware.clickjacking.XFrameOptionsMiddleware',

]

ROOT_URLCONF = 'dy47.urls'

TEMPLATES = [

    {

        'BACKEND': 'django.template.backends.django.DjangoTemplates',

        'DIRS': [os.path.join(BASE_DIR, 'templates')]

        ,

        'APP_DIRS': True,

        'OPTIONS': {

            'context_processors': [

                'django.template.context_processors.debug',

                'django.template.context_processors.request',

                'django.contrib.auth.context_processors.auth',

                'django.contrib.messages.context_processors.messages',

            ],

        },

    },

]

WSGI_APPLICATION = 'dy47.wsgi.application'

# Database

# https://docs.djangoproject.com/en/2.1/ref/settings/#databases

DATABASES = {

    'default': {

        'ENGINE': 'django.db.backends.mysql',

        "NAME": "book2",

        "HOST": "127.0.0.1",

        "PROT": ,

        "USER": "root",

        "PASSWORD": ""

    }

}

# Password validation

# https://docs.djangoproject.com/en/2.1/ref/settings/#auth-password-validators

AUTH_PASSWORD_VALIDATORS = [

    {

        'NAME': 'django.contrib.auth.password_validation.UserAttributeSimilarityValidator',

    },

    {

        'NAME': 'django.contrib.auth.password_validation.MinimumLengthValidator',

    },

    {

        'NAME': 'django.contrib.auth.password_validation.CommonPasswordValidator',

    },

    {

        'NAME': 'django.contrib.auth.password_validation.NumericPasswordValidator',

    },

]

# Internationalization

# https://docs.djangoproject.com/en/2.1/topics/i18n/

LANGUAGE_CODE = 'en-us'

TIME_ZONE = 'UTC'

USE_I18N = True

USE_L10N = True

USE_TZ = True

# Static files (CSS, JavaScript, Images)

# https://docs.djangoproject.com/en/2.1/howto/static-files/

STATIC_URL = '/static/'

STATICFILES_DIRS = [

    os.path.join(BASE_DIR, "statics")

]
day 47 Django 4的简单应用 创建简单的图书管理 (单表的增删改查)的更多相关文章
- python全栈开发day61-django简单的出版社网站展示,添加,删除,编辑(单表的增删改查)
day61 django内容回顾: 1. 下载: pip install django==1.11.14 pip install -i 源 django==1.11.14 pycharm 2. 创建项 ...
- Django学习笔记(10)——Book单表的增删改查页面
一,项目题目:Book单表的增删改查页面 该项目主要练习使用Django开发一个Book单表的增删改查页面,通过这个项目巩固自己这段时间学习Django知识. 二,项目需求: 开发一个简单的Book增 ...
- django模型层 关于单表的增删改查
关于ORM MTV或者MVC框架中包括一个重要的部分,就是ORM,它实现了数据模型与数据库的解耦,即数据模型的设计不需要依赖于特定的数据库, 通过简单的配置就可以轻松更换数据库,这极大的减轻了开发人员 ...
- Django中对单表的增删改查
之前的简单预习,重点在后面 方式一: # create方法的返回值book_obj就是插入book表中的python葵花宝典这本书籍纪录对象 book_obj=Book.objects.creat ...
- django 利用ORM对单表进行增删改查
牛小妹上周末,一直在尝试如何把数据库的数据弄到界面上.毕竟是新手,搞不出来,文档也看不懂.不过没关系,才刚上大学.今晚我们就来解释下,要把数据搞到界面的第一步.先把数据放到库里,然后再把数据从库里拿出 ...
- Django学习笔记--数据库中的单表操作----增删改查
1.Django数据库中的增删改查 1.添加表和字段 # 创建的表的名字为app的名称拼接类名 class User(models.Model): # id字段 自增 是主键 id = models. ...
- $Django 模板层(模板导入,继承)、 单表*详(增删改查,基于双下划线的查询)、static之静态文件配置
0在python脚本中使用django环境 import osif __name__ == '__main__': os.environ.setdefault("DJANGO_SETT ...
- Django之单表的增删改查
books/urls.py """books URL Configuration The `urlpatterns` list routes URLs to vi ...
- Django --- 单表的增删改查
随机推荐
- hadoop 学习(一)ubuntu14.04 hadoop 安装
1.创建用户组 sudo addgroup hadoop 2.创建用户 sudo adduser -ingroup hadoop hadoop 回车之后会提示输入密码,输入自己要设定的密码然后一路回车 ...
- C山寨C++
#include <stdio.h> #include <string.h> #include <malloc.h> typedef struct Aclass_s ...
- linux下 C程序 参数和内存
#include <stdio.h> int main(argc, argv) int argc;char *argv[]; { printf("argc=%d \n&q ...
- 内建类型,与用户自定义类型,返回值为const
1对内建类型来说,按值返回的是否为const,是无关紧要的,因为编译器已经不让它成为一个坐直,因为它总是一个值,而不是一个变量(thing in c++ page192) 2当处理用户自定义的类型时, ...
- 情境领导II
情境领导理论认为,领导者的行为要与被领导者的准备程度相适应,才能取得有效的领导效果,也就是说领导风格不是一成不变的,而要根据环境及员工的变化而改变. 三大技巧分别为诊断.弹性与约定领导型态.诊断是评估 ...
- list集合如何对里面的元素进行排序
Collections 是集合的公共类,提供各种工具,其中提供了排序方法. Collections.sort(),方法两个参数,1,要排序的集合,2.排序方式 下面是匿名内部类,实现了排序借口,你也可 ...
- HDU 1106 排序 (排序+处理字符串)
题意:略. 析:按照题目说的,把字符串分割,然后把字符串转成十进制,存起来,可以用数组,我用的向量, 排序一下就OK了.注意的是,要考虑多个5相邻的时候,刚开始没考虑WA了一次. 代码如下: #inc ...
- css3美化滚动条样式
1.改变浏览器默认的滚动条样式 ::-webkit-scrollbar-track-piece { //滚动条凹槽的颜色,还可以设置边框属性 background-color:#f8f8f8; } : ...
- WCF客户端第一请求server特别慢,解决办法
最近开发WCF应用的客户端,第一连接WCF后,请求数据返回的速度特别慢,不知道原因如何.最后改了下系统生成的APP.Config文件就好了,原来没有useDefaultWebProxy的选项,没有的时 ...
- 制作一个导航卫星绕地球转动的3D Flash动画
为便于了解卫星发射以及绕地球运转的过程,制作此动画.