MVC登陆认证简单设置
首先,弄个基类
 /// <summary>

    /// 所有控制器基类,里面重写了OnActionExecuted方法

    /// </summary>

    public class BaseController : Controller

    {

        /// <summary>

        /// 是否需要校验

        /// </summary>

        public bool IsCheckLogin { get; set; } = true;

        /// <summary>

        /// 已登陆的用户信息

        /// </summary>

        public UserInfo LoginUser { get; set; }

        /// <summary>

        /// 在方法执行之前调用

        /// </summary>

        /// <param name="filterContext"></param>

        protected override void OnActionExecuting(ActionExecutingContext filterContext)

        {

            base.OnActionExecuting(filterContext);

            //如果页面需要校验

            if (IsCheckLogin)

            {

                #region Session方式

                ////校验用户是否登陆

                //if (filterContext.HttpContext.Session["LoginUser"] == null)

                //{

                //    //为空,则跳转到登陆

                //    filterContext.HttpContext.Response.Redirect("/UserLogin/Index");

                //}

                //else

                //{

                //    //不为空,则将用户登陆信息存储

                //    LoginUser = filterContext.HttpContext.Session["LoginUser"] as UserInfo;

                //    //将信息存入viewBag中

                //    ViewBag.UserInfo = LoginUser;

                //}

                #endregion

                #region 缓存方式

                //校验用户是否登陆

                //获取cookie中的信息

                if (Request.Cookies["userLoginGuid"] == null)

                {

                    //为空,则跳转到登陆

                    filterContext.HttpContext.Response.Redirect("/UserLogin/Index");

                    return;

                }

                string guidUser = Request.Cookies["userLoginGuid"].Value;

                UserInfo userInfo = CacheHelper.getCache<UserInfo>(guidUser);

                if (userInfo == null)

                {

                    //用户长时间不操作,超时

                    filterContext.HttpContext.Response.Redirect("/UserLogin/Index");

                    return;

                }

                //不为空,则将用户登陆信息存储

                LoginUser = userInfo;

                //将信息存入viewBag中

                if (LoginUser == null)

                {

                    ViewBag.UserInfo = "";

                }

                else

                {

                    ViewBag.UserInfo = LoginUser;

                }

                //滑动窗口机制

                CacheHelper.SetCache(guidUser, userInfo, DateTime.Now.AddMinutes());

                #endregion

            }

        }

    }
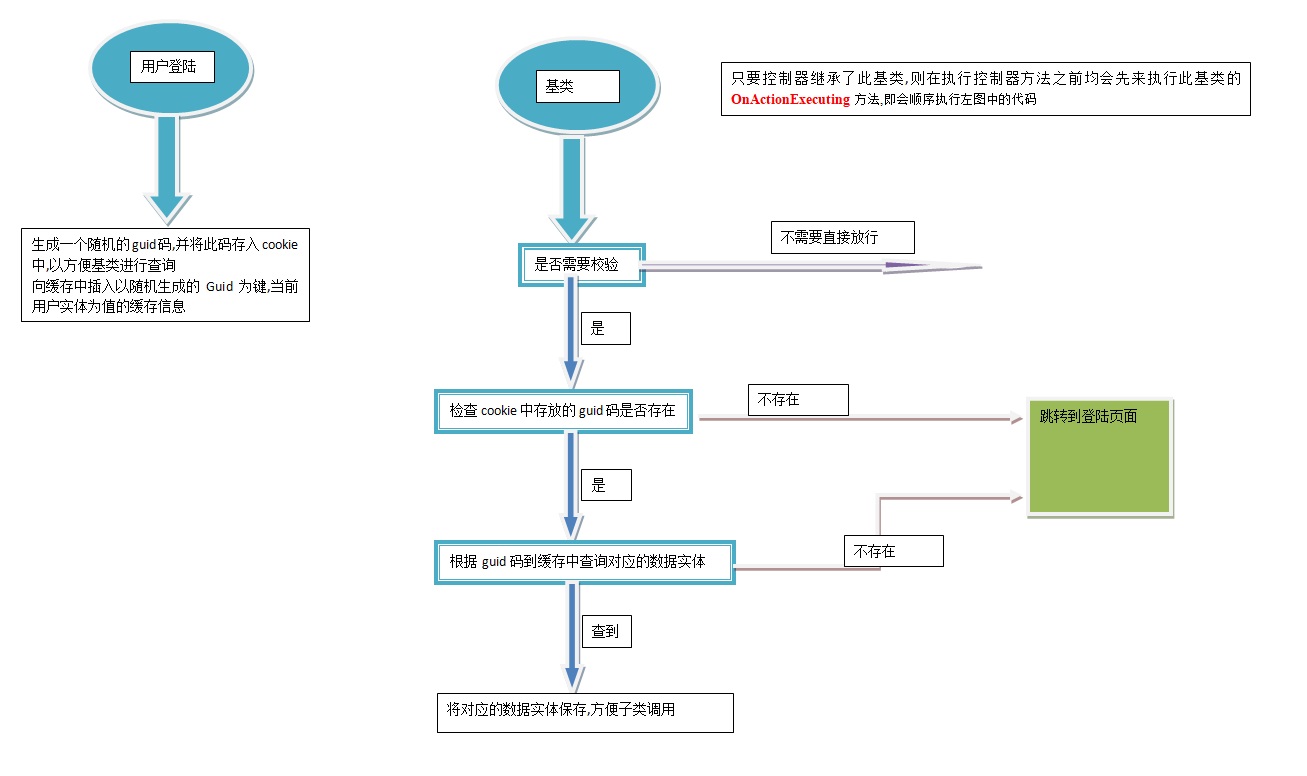
,这个基类中有两个属性,
一个是IsCheckLogin,默认为true,该属性主要在子类的构造函数中进行初始化,确定子类是否需要进行登陆认证,一般登陆控制器应设为false
一个是LoginUser,主要记录当前登陆成功用户的实体类
在重写OnActionExecuting的方法中,首先校验IsCheckLogin是否为true,如是,则说明需要登陆校验
此时从cookie中找到登陆时随机生成的guid码,如果没有找到,则直接返回到登陆界面
如果找到,则依据此guid码从缓存中寻找对应的用户实体,如果没有找到一样返回登陆界面,
如果找到则将用户实体放入LoginUser中,以便子类需要.
最后设置缓存的过期时间
其中还用到缓存,缓存类的代码如下
 public interface ICacheWrite

    {

        bool AddCache(string key, object value);

        bool AddCache(string key, object value, DateTime exprity);

        object GetCache(string key);

        T getCache<T>(string key);

        void SetCache(string key, object value, DateTime exprity);

        void SetCache(string key, object value);

    }
缓存的接口类
public class HttpRuntimeCacheWriter : ICacheWrite

    {

        public bool AddCache(string key, object value)

        {

            HttpRuntime.Cache.Insert(key, value);

            return true;

        }

        public bool AddCache(string key, object value, DateTime exprity)

        {

            HttpRuntime.Cache.Insert(key, value, null, exprity, TimeSpan.Zero);

            return true;

        }

        public object GetCache(string key)

        {

            return HttpRuntime.Cache.Get(key);

        }

        public T getCache<T>(string key)

        {

            return (T)HttpRuntime.Cache[key];

        }

        public void SetCache(string key, object value)

        {

            HttpRuntime.Cache.Remove(key);

            AddCache(key, value);

        }

        public void SetCache(string key, object value, DateTime exprity)

        {

            throw new NotImplementedException();

        }

    }
运用HttpRuntime缓存
public class CacheHelper

    {

        //这里应该用注入,因为可能更改为其它实现了ICacheWrite的对象

        public static ICacheWrite write { get; set; } = new HttpRuntimeCacheWriter(); //new MemcacheWriter();

        public static bool AddCache(string key, object value)

        {

            return write.AddCache(key, value);

        }

        public static bool AddCache(string key, object value, DateTime exprity)

        {

            return write.AddCache(key, value, exprity);

        }

        public static object GetCache(string key)

        {

            return write.GetCache(key);

        }

        public static T getCache<T>(string key)

        {

            return write.getCache<T>(key);

        }

        public static void SetCache(string key, object value)

        {

            write.SetCache(key, value);

        }

        public static void SetCache(string key, object value, DateTime exprity)

        {

            write.SetCache(key, value, exprity);

        }

    }
缓存帮助类
然后前台调用示例
public class LoginController : BaseController

    {

        //得到用户服务层对象

        IUserInfoSerivce userSerivce = new UserInfoSerivce();

        public LoginController()

        {

            this.IsCheckLogin = false;

        }

        // GET: Login

        public ActionResult Login()

        {

            return View();

        }

        /// <summary>

        /// 进行简单登陆检验

        /// </summary>

        /// <param name="uid"></param>

        /// <param name="pwd"></param>

        /// <returns></returns>

        public ActionResult Check(string uid,string pwd)

        {

            if (!Checked(uid,pwd))

            {

                var user = userSerivce.GetEntities(u => u.Uid == uid && u.pwd == pwd).FirstOrDefault();

                if (user!=null)

                {

                    //立即分配一个标志,Guid,把标志作为key(并写入cookie中),把用户放到value中

                    string userLoginGuid = Guid.NewGuid().ToString();

                    Response.Cookies["userLoginGuid"].Value = userLoginGuid;

                    //将用户登陆信息存到缓存中

                    CacheHelper.AddCache(userLoginGuid, user, DateTime.Now.AddMinutes());

                    return Content("ok");

                }

            }

            return Content("ok");

        }

        /// <summary>

        /// 检查用户名密码是否正确

        /// </summary>

        /// <param name="uid"></param>

        /// <param name="pwd"></param>

        /// <returns></returns>

        private bool Checked(string uid,string pwd)

        {

            bool reslut = string.IsNullOrEmpty(uid) || string.IsNullOrEmpty(pwd);

            return reslut;

        }

    }
其它控制器只用继承基类即可
 public class DefaultController : BaseController

    {

        IBLL.IFriendInfoSerivce friendSerivce = new BLL.FriendInfoSerivce();

        // GET: Default

        public ActionResult Index()

        {

            ViewData.Model = friendSerivce.GetEntities(f => !f.DelFlag);

            return View();

        }

    }
粗略画个图表示下

MVC登陆认证简单设置的更多相关文章
- 【配置】检测到在集成的托管管道模式下不适用的ASP.NET设置的解决方法(非简单设置为【经典】模式)。
× 检测到在集成的托管管道模式下不适用的ASP.NET设置的解决方法(非简单设置为[经典]模式). 我们将ASP.NET程序从IIS6移植到IIS7,可能运行提示以下错误: HTTP 错误 5 ...
- Spring Boot确保Web应用安全(登陆认证)
Spring Boot官方提供了一个登陆认证的清晰易懂的 例子 , 我们在次以此例展开演示Spring Boot是如何实现登陆认证的. 首先我们去 https://start.spring.io/ 下 ...
- 批量实现SSH无密码登陆认证脚本
批量实现SSH无密码登陆认证脚本 问题背景 使用为了让linux之间使用ssh不需要密码,可以采用了数字签名RSA或者DSA来完成.主要使用ssh-key-gen实现. 1.通过 ssh-key-ge ...
- 批量SSH key-gen无密码登陆认证脚本 附件脚本
# 批量实现SSH无密码登陆认证脚本 ## 问题背景 使用为了让linux之间使用ssh不需要密码,可以采用了数字签名RSA或者DSA来完成.主要使用ssh-key-gen实现. 1.通过 ssh-k ...
- ASP.NET MVC 3 入门级常用设置、技巧和报错
1.ASP.NET MVC 3 如何去除默认验证 这个默认验证是在web.config配置文件中设置的 <add key="ClientValidationEnabled&quo ...
- spring-security 登陆认证之初次探究
首先,希望还对 spring-security框架完全不懂的新手 下载下Git源码. 引入到项目中.这个短文就是边看源码边聊的.也会启动下项目验证自己的推想. 一.登陆认证的登陆配置项 <for ...
- 使用TT模板+mvc+wcf实现简单查询
今天是除夕,小编的这篇博客是掐着点儿发的,在此,祝各位小伙伴新年快乐,身体健康,万事如意:喜从天降,欣喜若狂:喜气盈门,好事成双:好人好运,金玉满堂:神采飞扬,如愿以偿,财源滚滚来,福如东海长:伴随着 ...
- Spring集成shiro做登陆认证
一.背景 其实很早的时候,就在项目中有使用到shiro做登陆认证,直到今天才又想起来这茬,自己抽空搭了一个spring+springmvc+mybatis和shiro进行集成的种子项目,当然里面还有很 ...
- {Django基础九之中间件} 一 前戏 二 中间件介绍 三 自定义中间件 四 中间件的执行流程 五 中间件版登陆认证
Django基础九之中间件 本节目录 一 前戏 二 中间件介绍 三 自定义中间件 四 中间件的执行流程 五 中间件版登陆认证 六 xxx 七 xxx 八 xxx 一 前戏 我们在前面的课程中已经学会了 ...
随机推荐
- WPF制作表示透明区域的马赛克画刷
最近在用WPF制作一款软件,需要像ps一样表示透明区域,于是制作了一个马赛克背景的style.实现比较简单,那么过程和思路就不表了,直接上代码 <DrawingBrush TileMode=&q ...
- qt linux下配置安装
linux版本: qt卸载: 1. 先找到qt的安装位置: 2.然后执行其下面的文件MaintenanceTool: 3. 然后会出现图形界面: 卸载完成. 安装qt 下载地址: https://ww ...
- requirejs的插件介绍与制作
本文由作者郑海波授权网易云社区发布. 前言 我这里就不介绍requirejs了, 简而言之: requirejs是支持AMD规范的模块加载器, 事实上它也是AMD的最直接推动者. 现在可供挑选的开源模 ...
- 使用Spring Boot,Spring Cloud和Docker实现微服务架构
https://github.com/sqshq/PiggyMetrics Microservice Architecture with Spring Boot, Spring Cloud a ...
- jzoj5996
我們可以枚舉每一個串的最短回文後綴,這樣一定不會算重. 雖然一個字符串可能會有多個回文後綴,但是答案只會在最短的後綴被計算 記f[i]表示長度為i回文串中,沒有長度>1的回文後綴的個數,將總個數 ...
- Kafka迁移与扩容工具用法
1.迁移topic到新增的node上 假如现在一个kafka集群运行三个broker,broker.id依次为101,102,103,后来由于业务数据突然暴增,需要新增三个broker,broker. ...
- mysql编写存储过程(1)
存储过程:其实就是存储在数据库中,有一些逻辑语句与SQL语句组成的函数.由于是已经编译好的语句,所以执行速度快,而且也安全. 打开mysql的控制台,开始编写存储过程. 实例1: 编写存储过程: 执行 ...
- Python爬虫之关于登录那些事
常见的登录方式有以下两种: 查看登录页面,csrf,cookie;授权:cookie 直接发送post请求,获取cookie 上面只是简单的描述,下面是详细的针对两种登录方式的时候爬虫的处理方法 第一 ...
- 在vue-cli建的vue项目中使用sass
前面已使用vue-cli新建了一个vue项目,参考 使用命令行创建一个vue项目的全部命令及结果 首先看下新建项目的页面和代码,有部分修改,可忽视,如下图: 然后我们在页面添加sass的代码 ...
- Jasmine入门(下)
上一篇 Jasmine入门(上) 介绍了Jasmine以及一些基本的用法,本篇我们继续研究Jasmine的其他一些特性及其用法(注:本篇中的例子均来自于官方文档). Spy Spy用来追踪函数的调用历 ...