4 伪ajax:jsonp、cors 跨域请求
一、同源策略
https://www.cnblogs.com/yuanchenqi/articles/7638956.html
同源策略(Same origin policy)是一种约定,它是浏览器最核心也最基本的安全功能,如果缺少了同源策略,则浏览器的正常功能可能都会受到影响。可以说Web是构建在同源策略基础之上的,浏览器只是针对同源策略的一种实现。
1、同源效果

2、非同源
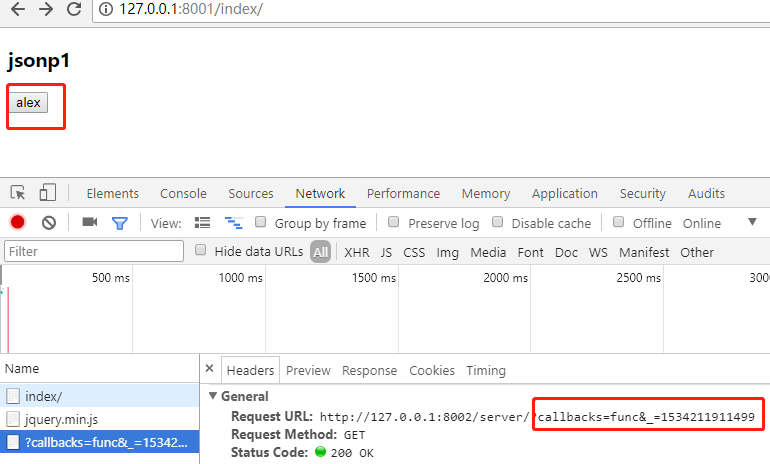
注意:url:'http://127.0.0.1:8002/service/ 跨域访问,浏览器拦截了!!
其实/8002/service.... 已经访问了,但是由于 浏览器的同源策略 给拦截了!!


3、code
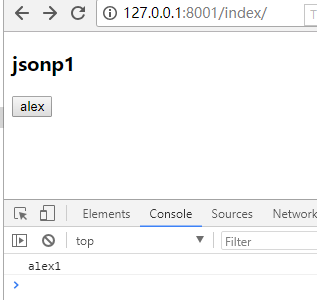
127.0.0.1:8001:JsonpDemo1
from django.contrib import admin

from django.urls import path, re_path

from app01 import views

urlpatterns = [

    path('admin/', admin.site.urls),

    re_path(r'index/', views.index),

    re_path(r'server/', views.server),

]
<!DOCTYPE html>

<html lang="en">

<head>

    <meta charset="UTF-8">

    <title>Title</title>

</head>

<body>

<h3>jsonp1</h3>

<button class="get_server">alex</button>

<script src="http://libs.baidu.com/jquery/2.0.0/jquery.js"></script>

<script type="text/javascript">

    $('.get_server').click(function () {

        $.ajax({

            url:'http://127.0.0.1:8002/server/',

            success:function (data) {

                console.log(data)

            }

        })

    })

</script>

</body>

</html>
from django.shortcuts import render,HttpResponse

# Create your views here.

def index(request):

    return render(request, 'index.html')

def server(request):

    return HttpResponse("alex1")
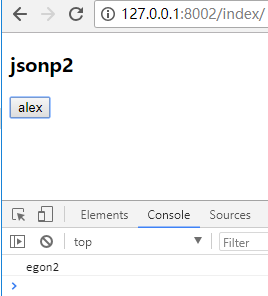
127.0.0.1:8002:jsonDemo2
from django.contrib import admin

from django.urls import path,re_path

from app01 import views

urlpatterns = [

    path('admin/', admin.site.urls),

    re_path(r'index/',views.index),

    re_path(r'server/',views.server),

]
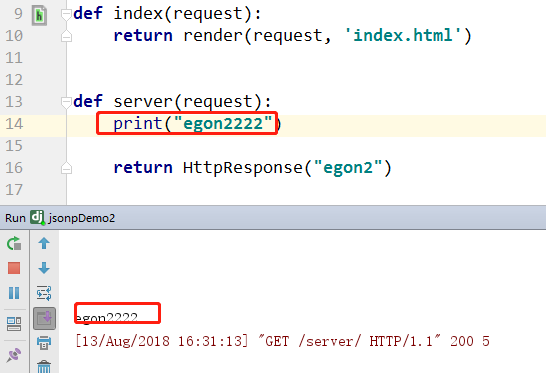
from django.shortcuts import render

# Create your views here.

from django.shortcuts import render,HttpResponse

# Create your views here.

def index(request):

    return render(request, 'index.html')

def server(request):

    print("egon2222")

    return HttpResponse("egon2")
<!DOCTYPE html>

<html lang="en">

<head>

    <meta charset="UTF-8">

    <title>Title</title>

</head>

<body>

<h3>jsonp2</h3>

<button class="get_server">alex</button>

</body>

<script src="http://libs.baidu.com/jquery/2.0.0/jquery.js"></script>

<script type="text/javascript">

    $('.get_server').click(function () {

        $.ajax({

            url:'/server/',

            success:function (data) {

                console.log(data)

            }

        })

    })

</script>

</html>
二、jsonp
这其实就是JSONP的简单实现模式,或者说是JSONP的原型:创建一个回调函数,然后在远程服务上调用这个函数并且将JSON 数据形式作为参数传递,完成回调。
将JSON数据填充进回调函数,这就是JSONP的JSON+Padding的含义。
一般情况下,我们希望这个script标签能够动态的调用,而不是像上面因为固定在html里面所以没等页面显示就执行了,很不灵活。我们可以通过javascript动态的创建script标签,这样我们就可以灵活调用远程服务了。
1、版本1:借助script标签,实现跨域请求
jsonp是json用来跨域的一个东西。原理是通过script标签的跨域特性来绕过同源策略。
那这是,怎么回事呢? 这也是跨域呀!!
<script src="https://apps.bdimg.com/libs/jquery/2.1.4/jquery.min.js"></script>

8001 .html
<!DOCTYPE html>
<html lang="en">
<head>
<meta charset="UTF-8">
<title>Title</title>
</head>
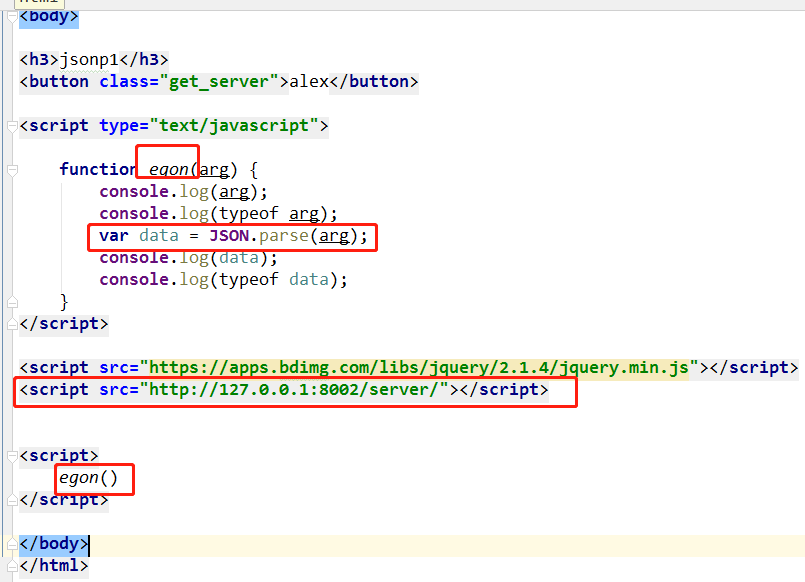
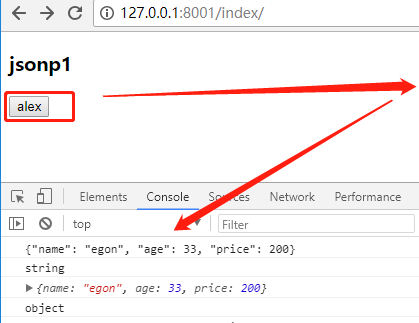
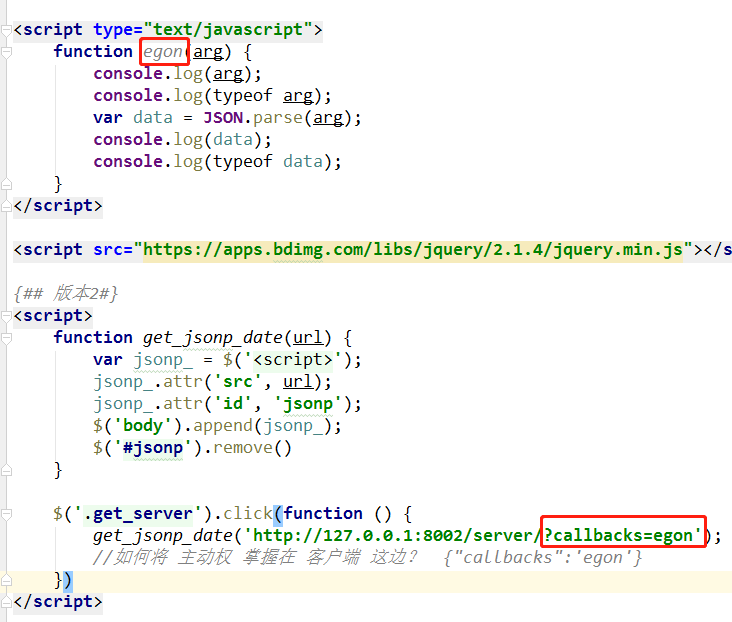
<body> <h3>jsonp1</h3>
<button class="get_server">alex</button> <script type="text/javascript"> function egon(arg) {
console.log(arg);
console.log(typeof arg);
var data = JSON.parse(arg);
console.log(data);
console.log(typeof data);
}
</script> <script src="https://apps.bdimg.com/libs/jquery/2.1.4/jquery.min.js"></script>
<script src="http://127.0.0.1:8002/server/"></script> <script>
egon()
</script> </body>
</html>
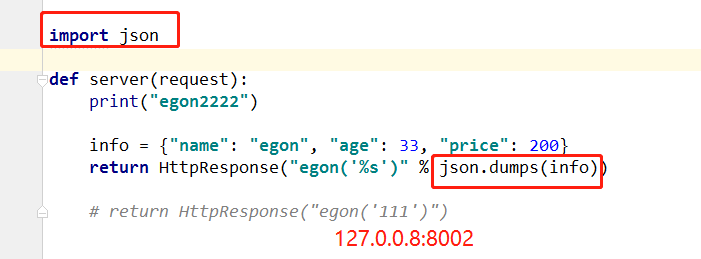
8002 view
from django.shortcuts import render

# Create your views here.

from django.shortcuts import render, HttpResponse

# Create your views here.

def index(request):

    return render(request, 'index.html')

import json

def server(request):

    print("egon2222")

    info = {"name": "egon", "age": 33, "price": 200}

    return HttpResponse("egon('%s')" % json.dumps(info))

    # return HttpResponse("egon('111')")
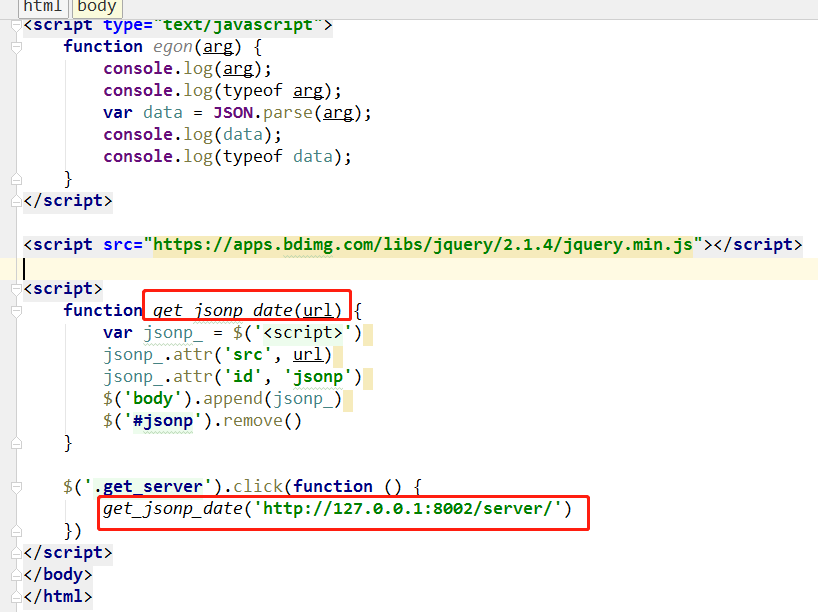
2、版本2:动态创建script标签
注意:
function func(arg) {} 必须和 8005的 HttpResponse("func('%s')"%json.dumps(info)) 保持一致!
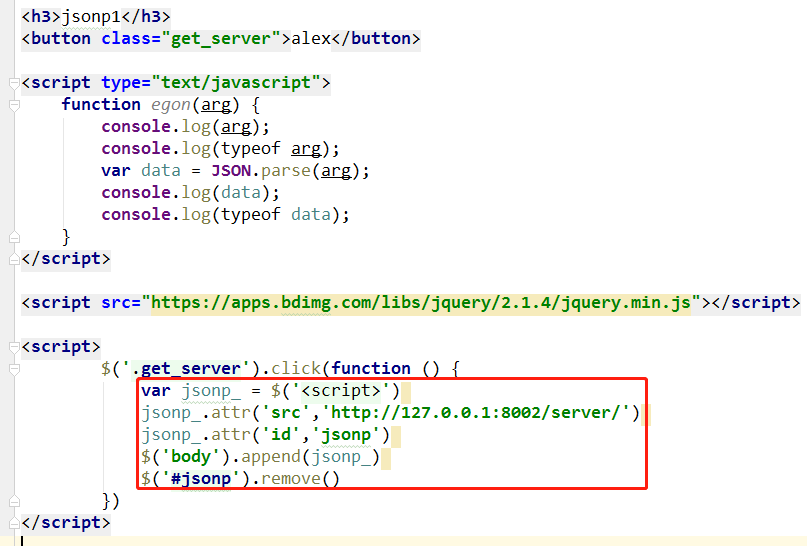
BUT:
如何将 主动权 掌握在 客户端 这边?

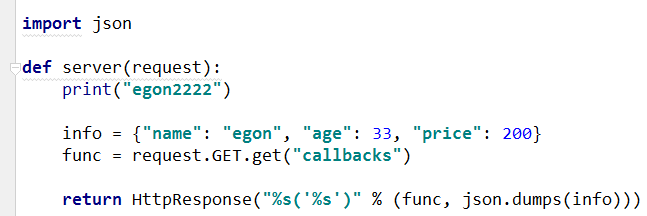
8002 views
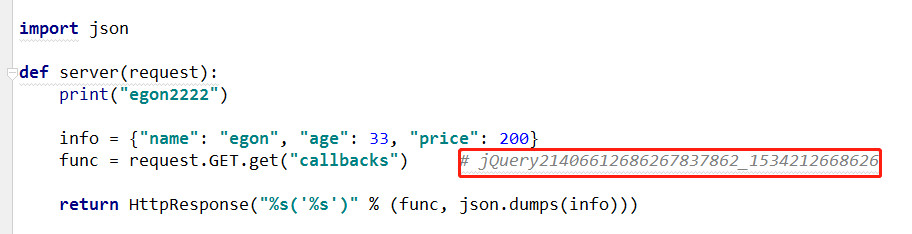
import json

def server(request):

    print("egon2222")

    info = {"name": "egon", "age": 33, "price": 200}

    func = request.GET.get("callbacks")

    return HttpResponse("%s('%s')" % (func, json.dumps(info)))

    # return HttpResponse("egon('111')")
8001 html
<!DOCTYPE html>

<html lang="en">

<head>

    <meta charset="UTF-8">

    <title>Title</title>

</head>

<body>

<h3>jsonp1</h3>

<button class="get_server">alex</button>

<script type="text/javascript">

    function egon(arg) {

        console.log(arg);

        console.log(typeof arg);

        var data = JSON.parse(arg);

        console.log(data);

        console.log(typeof data);

    }

</script>

<script src="https://apps.bdimg.com/libs/jquery/2.1.4/jquery.min.js"></script>

{## 版本2#}

<script>

    function get_jsonp_date(url) {

        var jsonp_ = $('<script>');

        jsonp_.attr('src', url);

        jsonp_.attr('id', 'jsonp');

        $('body').append(jsonp_);

        $('#jsonp').remove()

    }

    $('.get_server').click(function () {

        get_jsonp_date('http://127.0.0.1:8002/server/?callbacks=egon');

        //如何将 主动权 掌握在 客户端 这边?  {"callbacks":'egon'}

    })

</script>
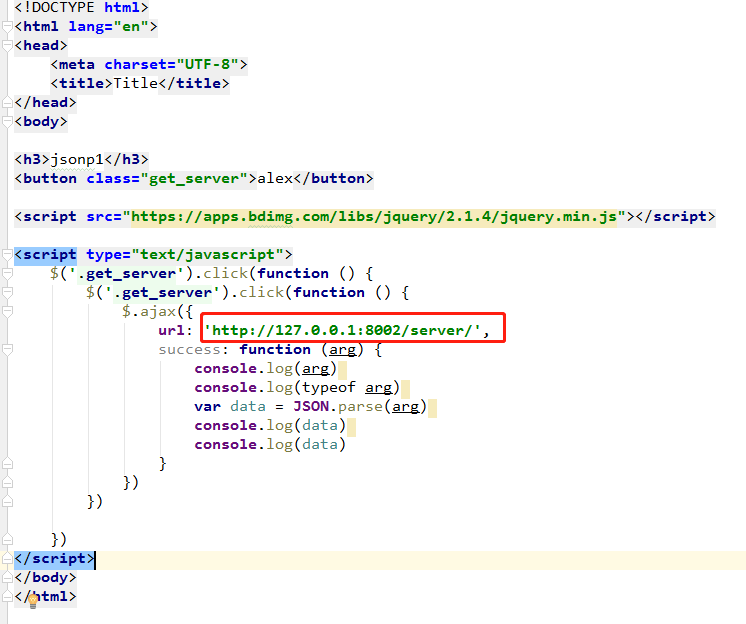
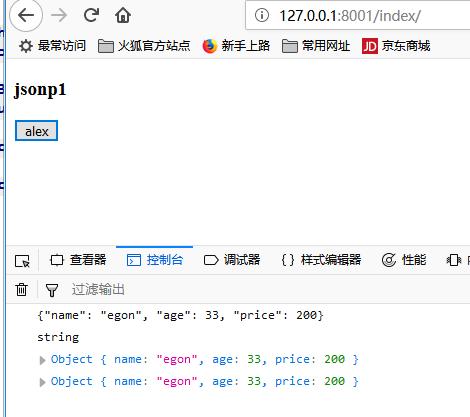
3、版本3:jquery对jsonp的实现
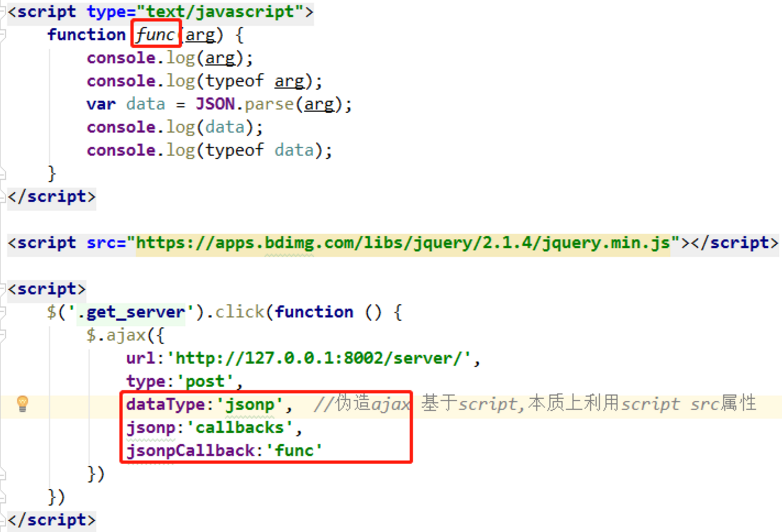
func 不用单独定义一个函数 ?? 其实,jqeury会自动生成随机 str,不用我们管!!


code
8001 html
<!DOCTYPE html>

<html lang="en">

<head>

    <meta charset="UTF-8">

    <title>Title</title>

</head>

<body>

<h3>jsonp1</h3>

<button class="get_server">alex</button>

<script type="text/javascript">

    function func(arg) {

        console.log(arg);

        console.log(typeof arg);

        var data = JSON.parse(arg);

        console.log(data);

        console.log(typeof data);

    }

</script>

<script src="https://apps.bdimg.com/libs/jquery/2.1.4/jquery.min.js"></script>

# 版本3

<script>

    $('.get_server').click(function () {

        $.ajax({

            url:'http://127.0.0.1:8002/server/',

            type:'post',

            dataType:'jsonp',  //伪造ajax 基于script,本质上利用script src属性

            jsonp:'callbacks',

            // jsonpCallback:'func'

            success:function (arg) {

                console.log(arg)

                console.log(typeof arg)

                var data = JSON.parse(arg)

                console.log(arg)

                console.log(typeof arg)

            }

        })

    })

</script>

</body>

</html>
8002 同上
4、版本4:jsonp应用


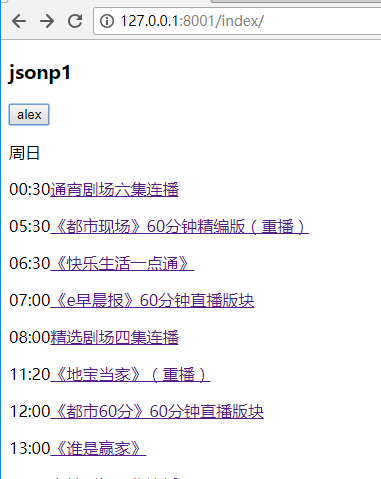
code
<!DOCTYPE html>
<html lang="en">
<head>
<meta charset="UTF-8">
<title>Title</title>
</head>
<body> <h3>jsonp1</h3>
<button class="get_server">alex</button> <script type="text/javascript">
function func(arg) {
console.log(arg);
console.log(typeof arg);
var data = JSON.parse(arg);
console.log(data);
console.log(typeof data);
}
</script> <script src="https://apps.bdimg.com/libs/jquery/2.1.4/jquery.min.js"></script> <script> $(".get_server").click(function () {
$.ajax({
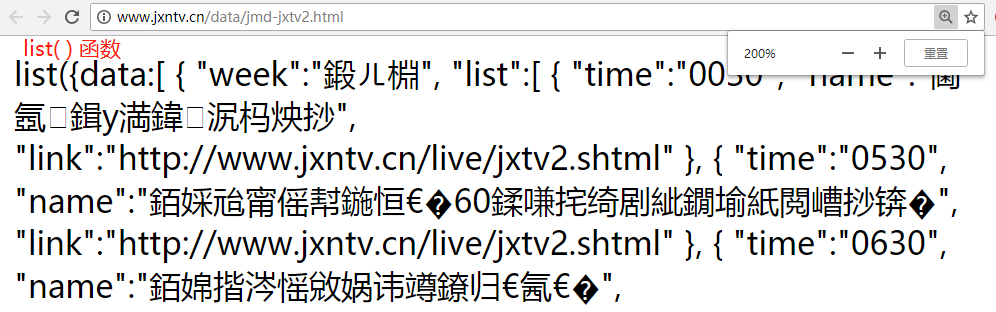
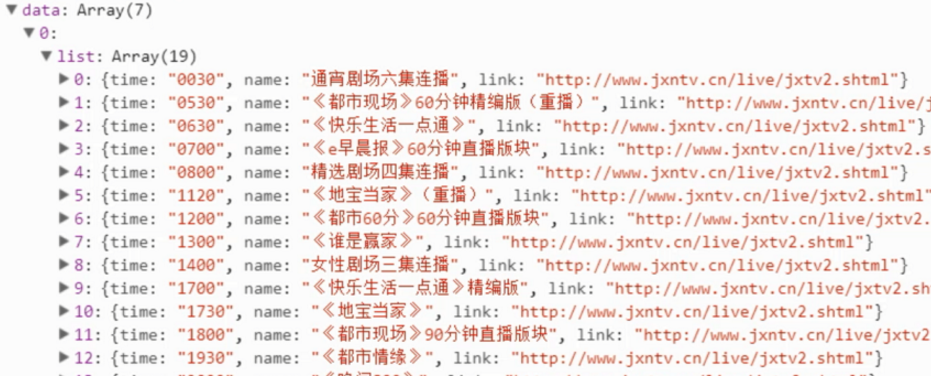
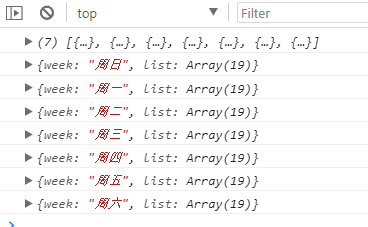
url: 'http://www.jxntv.cn/data/jmd-jxtv2.html',
dataType: 'jsonp',
jsonp: 'callbacks',
jsonpCallback: 'list',
success: function (arg) {
console.log(arg.data); var html = "";
$.each(arg.data, function (i, weekday) {
console.log(weekday.week); // {week: "周日", list: Array(19)}
html += '<p>' + weekday.week + '</p>'; $.each(weekday.list, function (j, show) {
console.log(show);
html += '<p><span>' + show.time.slice(0, 2) + ':' + show.time.slice(2, 4) +
'</span><a href=' + show.link + '>' + show.name + '</a></p>'
})
}); $('body').append(html)
}
})
})
</script> </body>
</html>
5、版本5:cors跨域请求
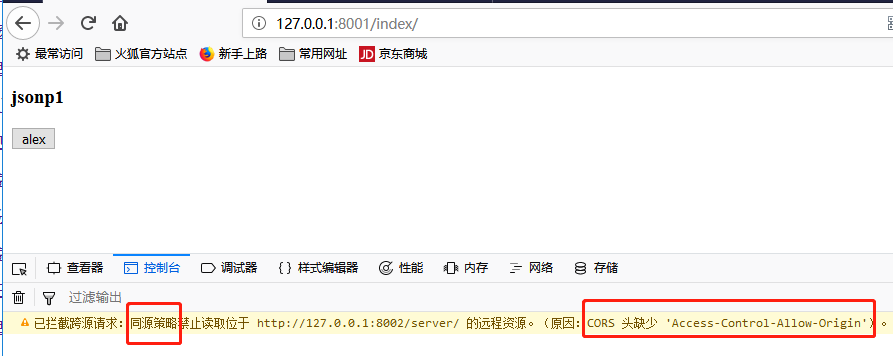

code
8002 server
from django.shortcuts import render, HttpResponse

def index(request):

    return render(request, 'index.html')

import json

def server(request):

    info = {"name": "egon", "age": 33, "price": 200}

    response = HttpResponse(json.dumps(info))

    # 告诉浏览器你别拦截了

    response['Access-Control-Allow-Origin'] = "http://127.0.0.1:8001"

    # response['Access-Control-Allow-Origin'] = "*"  # 所有的ip

    return response
8001 html
<!DOCTYPE html>

<html lang="en">

<head>

    <meta charset="UTF-8">

    <title>Title</title>

</head>

<body>

<h3>jsonp1</h3>

<button class="get_server">alex</button>

<script src="https://apps.bdimg.com/libs/jquery/2.1.4/jquery.min.js"></script>

<script type="text/javascript">

    $('.get_server').click(function () {

        $('.get_server').click(function () {

            $.ajax({

                url: 'http://127.0.0.1:8002/server/',

                success: function (arg) {

                    console.log(arg)

                    console.log(typeof arg)

                    var data = JSON.parse(arg)

                    console.log(data)

                    console.log(data)

                }

            })

        })

    })

</script>

</body>

</html>
6、补充cors - 简单请求,复杂请求
https://www.cnblogs.com/yuanchenqi/articles/7638956.html#_label7
http://www.cnblogs.com/wupeiqi/articles/5703697.html
CORS是一种允许当前域(domain)的资源(比如html/js/web service)被其他域(domain)的脚本请求访问的机制,通常由于同域安全策略(the same-origin security policy)浏览器会禁止这种跨域请求。
一、简介
CORS需要浏览器和服务器同时支持。目前,所有浏览器都支持该功能,IE浏览器不能低于IE10。
整个CORS通信过程,都是浏览器自动完成,不需要用户参与。对于开发者来说,CORS通信与同源的AJAX通信没有差别,代码完全一样。浏览器一旦发现AJAX请求跨源,就会自动添加一些附加的头信息,有时还会多出一次附加的请求,但用户不会有感觉。
因此,实现CORS通信的关键是服务器。只要服务器实现了CORS接口,就可以跨源通信。
二、两种请求
浏览器将CORS请求分成两类:简单请求(simple request)和非简单请求(not-so-simple request)。
只要同时满足以下两大条件,就属于简单请求。
(1) 请求方法是以下三种方法之一:

HEAD

GET

POST

(2)HTTP的头信息不超出以下几种字段:

Accept

Accept-Language

Content-Language

Last-Event-ID

Content-Type:只限于三个值application/x-www-form-urlencoded、multipart/form-data、text/plain
凡是不同时满足上面两个条件,就属于非简单请求。
浏览器对这两种请求的处理,是不一样的。
* 简单请求和非简单请求的区别?

   简单请求:一次请求

   非简单请求:两次请求,在发送数据之前会先发一次请求用于做“预检”,只有“预检”通过后才再发送一次请求用于数据传输。

* 关于“预检”

- 请求方式:OPTIONS

- “预检”其实做检查,检查如果通过则允许传输数据,检查不通过则不再发送真正想要发送的消息

- 如何“预检”

     => 如果复杂请求是PUT等请求,则服务端需要设置允许某请求,否则“预检”不通过

        Access-Control-Request-Method

     => 如果复杂请求设置了请求头,则服务端需要设置允许某请求头,否则“预检”不通过

        Access-Control-Request-Headers
支持跨域,简单请求
服务器设置响应头:Access-Control-Allow-Origin = '域名' 或 '*'
支持跨域,复杂请求
由于复杂请求时,首先会发送“预检”请求,如果“预检”成功,则发送真实数据。
- “预检”请求时,允许请求方式则需服务器设置响应头:Access-Control-Request-Method
- “预检”请求时,允许请求头则需服务器设置响应头:Access-Control-Request-Headers
    简单请求 复杂请求

            条件:

                1、请求方式:HEAD、GET、POST

                2、请求头信息:

                    Accept

                    Accept-Language

                    Content-Language

                    Last-Event-ID

                    Content-Type 对应的值是以下三个中的任意一个

                                            application/x-www-form-urlencoded

                                            multipart/form-data

                                            text/plain

                注意:同时满足以上两个条件时,则是简单请求,否则为复杂请求

                如果是复杂请求:

                    options请求进行预检,通过之后才能发送POST请求
遇到跨域,简单请求 复杂请求
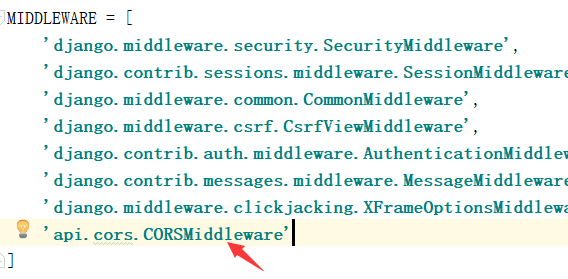
写一个中间件:
cors.py:
from django.utils.deprecation import MiddlewareMixin

class CORSMiddleware(MiddlewareMixin):

    def process_response(self,request,response):

        # 允许你的域名来访问

        response['Access-Control-Allow-Origin'] = "*"

        if request.method == 'OPTIONS':

            # 允许你携带 Content-Type 请求头 不能写*

            response['Access-Control-Allow-Headers'] = 'Content-Type'

            # 允许你发送 DELETE PUT请求

            response['Access-Control-Allow-Methods'] = 'DELETE,PUT'

        return response
4 伪ajax:jsonp、cors 跨域请求的更多相关文章
- ajax jsonp的跨域请求
1.页面ajax的请求 $.ajax({ async: false, url: 'http://localhost:8080/downloadVideos',//跨域的dns/document!sea ...
- PHP AJAX JSONP实现跨域请求使用实例
在之前我写过“php返回json数据简单实例”,“php返回json数据中文显示的问题”和“在PHP语言中使用JSON和将json还原成数组”.有兴趣的童鞋可以看看 今天我写的是PHP AJAX JS ...
- Spring Boot Web应用开发 CORS 跨域请求支持:
Spring Boot Web应用开发 CORS 跨域请求支持: 一.Web开发经常会遇到跨域问题,解决方案有:jsonp,iframe,CORS等等CORS与JSONP相比 1. JSONP只能实现 ...
- js中ajax如何解决跨域请求
js中ajax如何解决跨域请求,在讲这个问题之前先解释几个名词 1.跨域请求 所有的浏览器都是同源策略,这个策略能保证页面脚本资源和cookie安全 ,浏览器隔离了来自不同源的请求,防上跨域不安全的操 ...
- 使用jsonp进行跨域请求
使用jsonp进行跨域请求 在实际的业务中很多时候需要用到跨域请求,然而jsonp为我们提供了一种非常方便的跨域请求的方式,具体实现代码如下: $.ajax({ type:"get" ...
- CORS跨域请求总结
CORS跨域请求分为简单请求和复杂请求. 1. 简单请求: 满足一下两个条件的请求. (1) 请求方法是以下三种方法之一: HEAD GET POST (2)HTTP的头信息不超出以下几种字段: Ac ...
- CORS跨域请求规则以及在Spring中的实现
CORS: 通常情况下浏览器禁止AJAX从外部获取资源,因此就衍生了CORS这一标准体系,来实现跨域请求. CORS是一个W3C标准,全称是"跨域资源共享"(Cross-origi ...
- 关于使用Jsonp做跨域请求
今天在使用Jsonp做跨域请求的练习时碰上这样一个问题 代码如下 <!DOCTYPE html> <html> <head> <meta charset=&q ...
- Nginx反向代理、CORS、JSONP等跨域请求解决方法总结
由于 Javascript 同源策略的存在使得一个源中加载来自其它源中资源的行为受到了限制.即会出现跨域请求禁止. 通俗一点说就是如果存在协议.域名.端口或者子域名不同服务端,或一者为IP地址,一者为 ...
随机推荐
- python基础_特殊符号
#\n 回车符 #\r 换行符 #\s 空格 #\t tab符号,不知道?开个txt文本,然后按电脑的tab键,就是caps lock上面那个,卧槽,看到一个大长空格(也可能是个超短空格),这个就是t ...
- 铁乐学Python_day06-整数和字符串小数据池
python小数据池(内存地址) 今天来学习认识一下python中的小数据池. 我们都知道 ==是用来作比较,要是两个变量的数值相等, 用==比较返回的bool值会是True: a = 1000 b ...
- Zabbix日常监控(触发器表达式、远程执行命令、宏简等)简单记录
主机的工作基本流程 Host group --> Host --> Application --> Item --> Trigger(OK-->PROBLEM,trigg ...
- November 10th 2016 Week 46th Thursday
Live like you were dying, love because you do. 生如将逝,爱自本心. When faced with our darkest hour, hope is ...
- IKVM.NET入门(1)
IKVM.NET是一个针对Mono和微软.net框架的java实现,其设计目的是在.NET平台上运行java程序.本文将比较详细的介绍这个工具的原理.使用入门(如何java应用转换为.NET应用.如何 ...
- VM下,装centos7系统,配置nginx的问题
一.流程 1.先安装nginx依赖的包 (1)yum install gcc-c++ (2)yum install -y pcre pcre-devel (3)yum install -y zlib ...
- Golang channel 用法简介
channel 是 golang 里相当有趣的一个功能,大部分时候 channel 都是和 goroutine 一起配合使用.本文主要介绍 channel 的一些有趣的用法. 通道(channel), ...
- 1001. [BJOI2006]狼抓兔子【最小割】
Description 现在小朋友们最喜欢的"喜羊羊与灰太狼",话说灰太狼抓羊不到,但抓兔子还是比较在行的, 而且现在的兔子还比较笨,它们只有两个窝,现在你做为狼王,面对下面这样一 ...
- IPython学习笔记(二)-魔术命令
.魔术命令:以%为前缀的命令,是ipython的特殊命令,方便完成常见的任务.,常见的魔术命令有:%run,%paste,%cpaste,%timeit,%reset,%hist,%debug,%bo ...
- Ubuntu14.04更换阿里云源
步骤很简单一共三步,如下所示: 第一.备份源文件(防止万一) sudo cp /etc/apt/sources.list /etc/apt/sources.list.bak 第二.修改源文件(这里的源 ...