react-native布局篇
原文链接:http://www.ncloud.hk/%E6%8A%80%E6%9C%AF%E5%88%86%E4%BA%AB/react-native%E5%B8%83%E5%B1%80/
一、宽度和像素密度:
(1)首先你我们需要了解iPhone的各个尺寸:iphone 4s 3.5Screen、iphone 5 4Screen、iphone 6 4.7Screen、iphone 6 Plus 5.5 Screen
这个刚开始的时候对布局规划不是很好,没有考虑到兼容什么的,导致到最后浪费了好些时间(一般初学者都会忽略这些屏幕适配的问题)。
具体:var DimenSions=require('Dimensions');
var windowSize=Dimensions.get('window')
<View style={{width:windowSize.width,height:windowSize.height}}>
<Text>....</Text>
</View>
二、Flex的简单布局
(1)flex布局定义?
flex布局是flexible box 的缩写,意为"弹性布局",用来为盒状模型提供最大的灵活性。
(2)适用条件:任何一个容器都可以指定为flex布局(比如你要做一个表格,那么就需要均等分配,这个时候你就可以使用flex布局)。
View style={styles.border1}>
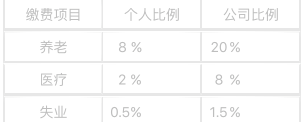
<View style={{flexDirection:'row',flex1,borderColor:'#e7e7e7',borderWidth:1}}> <View style={{flex:1, justifyContent:'center', alignItems:'center',borderColor:'#e7e7e7',borderWidth:1}}> <Text style={styles.color1}>缴费项目</Text> </View> <View style={{flex:1, justifyContent:'center', alignItems:'center',borderColor:'#e7e7e7',borderWidth:1}}> <Text style={styles.color1}>个人比例</Text> </View> <View style={{flex:1, justifyContent:'center', alignItems:'center',borderColor:'#e7e7e7',borderWidth:1}}> <Text style={styles.color1}>公司比例</Text> </View> </View>
(3)flex中子布局与父布局的关系:子布局依赖与父布局 |
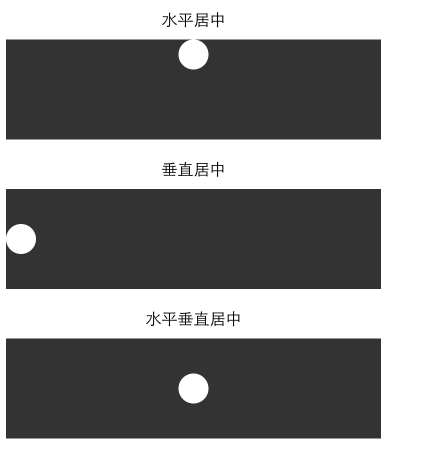
三、水平与垂直居中(alignItems、justifyContent)
<Text style={[styles.text, styles.header]}>
水平居中
</Text>
<View style={{height: 100, backgroundColor: '#333333', alignItems: 'center'}}>
<View style={{backgroundColor: '#fefefe', width: 30, height: 30, borderRadius: 15}}/>
</View>
<Text style={[styles.text, styles.header]}>
垂直居中
</Text>
<View style={{height: 100, backgroundColor: '#333333', justifyContent: 'center'}}>
<View style={{backgroundColor: '#fefefe', width: 30, height: 30, borderRadius: 15}}/>
</View>
<Text style={[styles.text, styles.header]}>
水平垂直居中
</Text>
<View style={{height: 100, backgroundColor: '#333333', alignItems: 'center', justifyContent: 'center'}}>
<View style={{backgroundColor: '#fefefe', width: 30, height: 30, borderRadius: 15}}/>
</View>
四、图片布局:
|
图片布局有一个stretchMode.通过Image.resizeMode进行访问 var keys=Objec.keys(Image.resizeMode).join(''); 使用图片资源的两种方式 (1)使用本地的资源 <Image source={require('./my-icon.png')}> 但是有人也这样写 <Image source={require(images!my-icon.png)}>两者都可以。 (2)使用网络图片 <Image source={{uri:'图片的链接地址'}}> 可以通过设置图片的Style属性来对图片进行设置 var style=StyleSheet.create({ width: height: flex: }) |
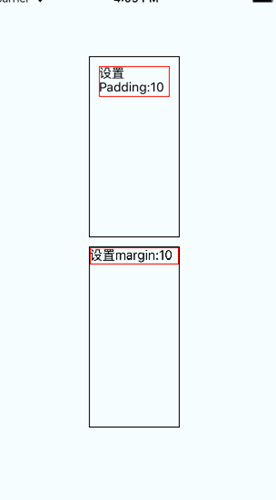
五、padding和margin
padding的语法结构:padding:10 , paddingLeft,paddingTop
margin的语法跟Padding一样;marginLeft:10,marginRight:10,marginTop
我们很多时候都在纠结于到底是用margin还是Padding,这两者之间有有什么区别:
1.padding 是属性定义的元素边框与元素之间的控件(指的是内边距)
2.margin指的是外边距
example:
(1)分别在文本上设置margin:10和padding:10:
|
<View style={styles.container}> <View style={{width:100,height:200,borderColor:'black',borderWidth:1}}> <Text style={{padding:10,borderColor:'red',borderWidth:1}}>设置Padding:10 </Text> </View> <View style={{width:100,height:200,borderColor:'black',borderWidth:1}}> <Text style={{margin:10,borderColor:'red',borderWidth:1}}>设置margin:10 </Text> </View> </View>
|
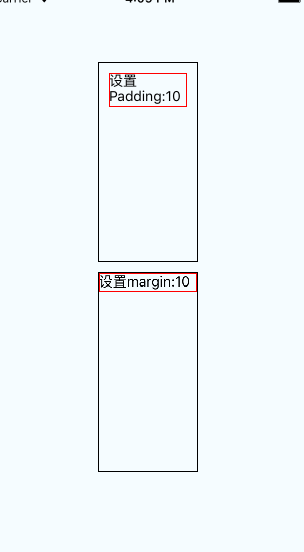
(2)分别在View上设置margin:10和padding:10
<View style={styles.container}>
<View style={{padding:10,width:100,height:200,borderColor:'black',borderWidth:1}}>
<Text style={{borderColor:'red',borderWidth:1}}>设置Padding:10 </Text>
</View>
<View style={{margin:10,width:100,height:200,borderColor:'black',borderWidth:1}}>
<Text style={{borderColor:'red',borderWidth:1}}>设置margin:10 </Text>
</View>
</View>
react-native布局篇的更多相关文章
- 从web移动端布局到react native布局
在web移动端通常会有这样的需求,实现上中下三栏布局(上下导航栏位置固定,中间部分内容超出可滚动),如下图所示: 实现方法如下: HTML结构: <div class='container'&g ...
- react native 布局注意点
一.react native中很多是ES6语法. 1行.表示是js的严格模式. 'use strict';严格模式中变量必须先声明,然后赋值.定义等:还有就是this的绑定. 2行到8行.导入依赖,可 ...
- React Native布局
一款好的APP离不了一个漂亮的布局,本文章将向大家分享React Native中的布局方式FlexBox. 在React Native中布局采用的是FleBox(弹性框)进行布局. FlexBox提供 ...
- React Native 入门篇
React Native 英文官网:https://facebook.github.io/react-native/ React Native 中文官网:http://reactnative.cn/ ...
- React Native布局实践:开发京东client首页(三)——轮播图的实现
上篇文章中,我们一起构建了京东client的TabBar.在本文中.将继续向大家介绍京东client首页轮播图及其下发功能button的开发方法,如今就让我们開始吧! 1.相关控件调研 眼下在Gith ...
- React Native布局详解
Flexbox 布局 Flex有两个属性:Container 和 Item flex是Flexible Box的缩写,意为"弹性布局",用来为盒状模型提供最大的灵活性.采用fle ...
- React Native初探
前言 很久之前就想研究React Native了,但是一直没有落地的机会,我一直认为一个技术要有落地的场景才有研究的意义,刚好最近迎来了新的APP,在可控的范围内,我们可以在上面做任何想做的事情. P ...
- React Native指南汇集了各类react-native学习资源、开源App和组件
来自:https://github.com/ele828/react-native-guide React Native指南汇集了各类react-native学习资源.开源App和组件 React-N ...
- react native学习资料
一:基础学习: react-native中文文档(react native中文网,人工翻译,官网完全同步)http://react-native.cn/docs/getting-started.htm ...
- React Native资料汇总
React Native 官方文档中文版翻译 http://wiki.jikexueyuan.com/project/react-native/homepage.html REACT NATIVE开发 ...
随机推荐
- 反向代理负载均衡之APACHE
反向代理负载均衡之APACHE 一.反向代理1.1 介绍反响代理 反向代理(Reverse Proxy)方式是指以代理服务器来接受internet上的连接请求,然后将请求转发给内部网络上的服务器,并将 ...
- Ex 6_12 凸多边形的最优三角剖分..._第六次作业
假设顶点的总数为n,从0到n-1. 从序号为0的顶点开始以逆时针方向排序,对于 令子问题A[i,j]为包含顶点i,i+1, . . . j的凸多边形的最小三角剖分代价,dist(i,j)为顶点i到顶点 ...
- Android Menu用法全面讲解
说明:本文只介绍Android3.0及以上的Menu知识点. 菜单的分类 菜单是Android应用中非常重要且常见的组成部分,主要可以分为三类:选项菜单.上下文菜单/上下文操作模式以及弹出菜单.它们的 ...
- IntelliJ IDEA配置Tomcat 与安装Tomcat失败原因
1.jdk中jre损坏,无法提供运行环境:重新下载jre安装并配置
- ORACLE与SQLSERVER数据转换
前言: 将SQLServer数据库中的表和数据全量导入到Oracle数据库,通过Microsoft SqlServer Management Studio工具,直接导入到oracle数据库,免去了生成 ...
- Neural style transfer
网络风格迁移 作者:无用 本文通过学习吴恩达视频所做笔记 目录 简介 可视化卷积层 构建风格迁移网络 一.网络风格迁移简介 二.可视化卷积层 可视化深层卷积网络???这个问题我看过一篇文章,我会在后补 ...
- python 全栈开发,Day103(微信消息推送,结算中心业务流程)
昨日内容回顾 第一部分:考试题(Python基础) 第二部分:路飞相关 1. 是否遇到bug?难解决的技术点?印象深刻的事? - orm操作费劲 - 最开始学习路由系统时候,匹配规则: 答案一: 有, ...
- 步步为营-73-asp.net的简单练习(根据美工提供静态页面,编写后台代码)
说明:实际企业中开发分工是很明确,往往程序员根据美工提供的UI界面进行后台代码的编写. 1.1 原始HTML页面 1.2 使用aspx进行修改 这里使用到了三层架构 using System; usi ...
- HDU1536 S-Nim(sg函数变换规则)
S-Nim Time Limit: 5000/1000 MS (Java/Others) Memory Limit: 65536/32768 K (Java/Others) Total Subm ...
- 统计uv(转)
UV是unique visitor的简写,是指通过互联网访问.浏览这个网页的自然人.在同一天内,uv只记录第一次进入网站的具有独立IP的访问者,在同一天内再次访问该网站则不计数.独立IP访问者提供了一 ...