
react-native-image-picker iOS设置
效果图,因为我用的是模拟器,所以拍照功能没有效果,不过可从相册选择,下面是具体的效果图
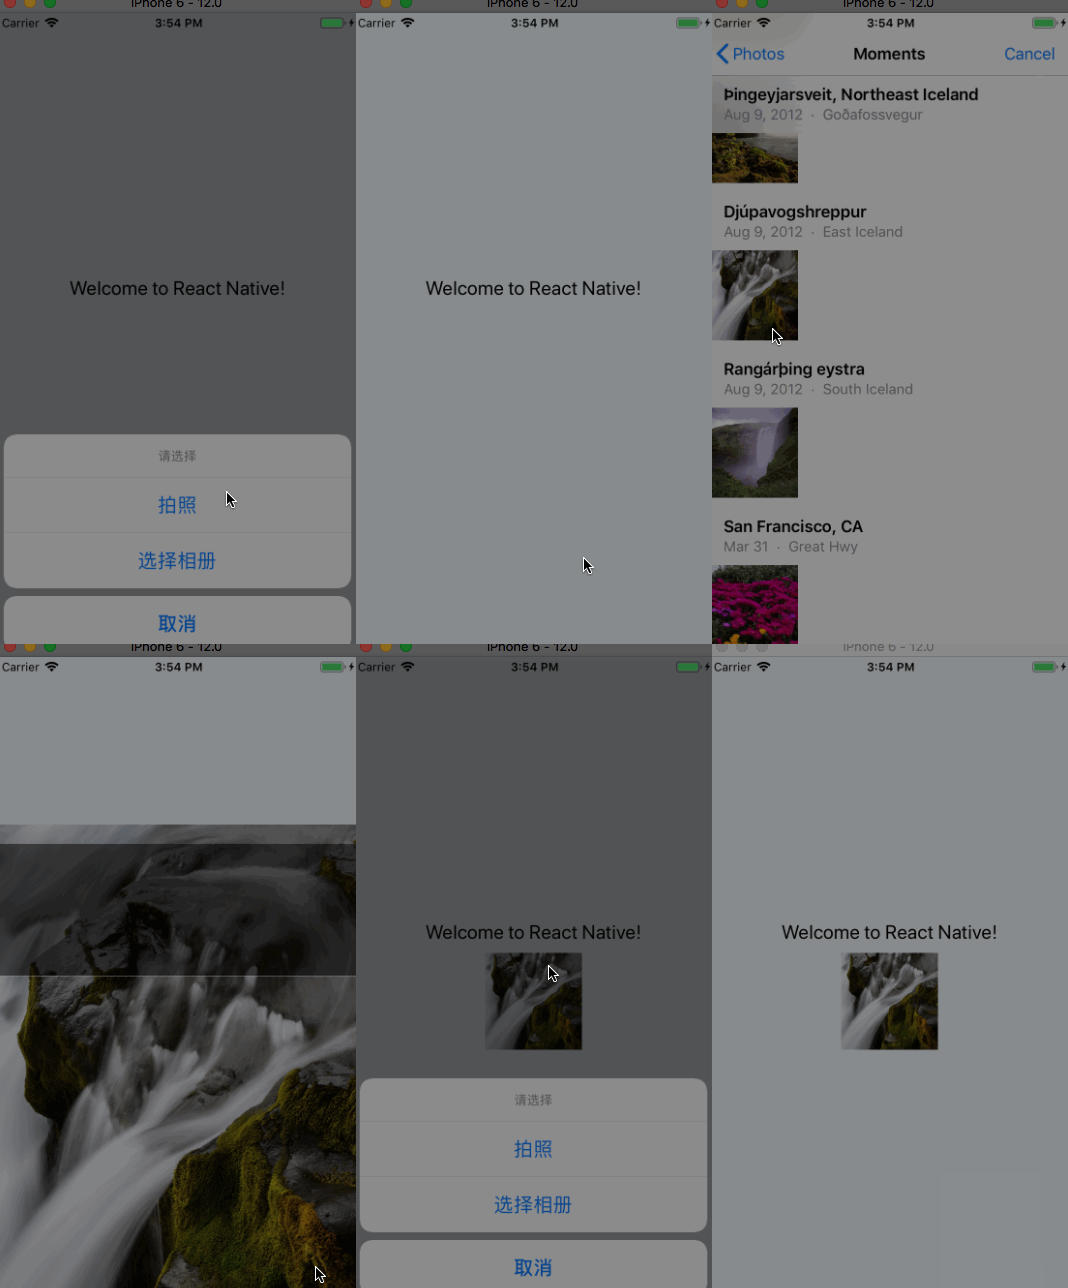
把react-native-image-picker添加到项目
yarn add react-native-image-picker
plist文件设置
<key>NSPhotoLibraryUsageDescription</key>

    <string>$(PRODUCT_NAME) would like access to your photo gallery</string>

    <key>NSCameraUsageDescription</key>

    <string>$(PRODUCT_NAME) would like to use your camera</string>

    <key>NSPhotoLibraryAddUsageDescription</key>

    <string>$(PRODUCT_NAME) would like to save photos to your photo gallery</string>

    <key>NSMicrophoneUsageDescription</key>

    <string>$(PRODUCT_NAME) would like to your microphone (for videos)</string>
xcode设置:
1.In the XCode's "Project navigator", right click on your project's Libraries folder ➜ Add Files to <...>.

2.Go to node_modules ➜ react-native-image-picker ➜ ios ➜ select RNImagePicker.xcodeproj.

Add RNImagePicker.a to Build Phases -> Link Binary With Libraries.
代码集成步骤:
/**

 * Sample React Native App

 * https://github.com/facebook/react-native

 * @flow

 */

import React, {Component} from 'react';

import {

    AppRegistry,

    StyleSheet,

    Text,

    View, TouchableOpacity,Image

} from 'react-native';

import ImagePicker from 'react-native-image-picker';

export default class MyApp extends Component {

    constructor(props){

        super(props)

        this.state={

            avatarSource:null

        }

    }

    render() {

        const photoOptions = {

            title: '请选择',

            quality: 0.8,

            cancelButtonTitle: '取消',

            takePhotoButtonTitle: '拍照',

            chooseFromLibraryButtonTitle: '选择相册',

            allowsEditing: true,

            noData: false,

            storageOptions: {

                skipBackup: true,

                path: 'images'

            }

        };

        return (

            <View style={styles.container}>

                <TouchableOpacity onPress = {()=>{

                    ImagePicker.showImagePicker(photoOptions, (response) => {

                        console.log('Response = ', response);

                        if (response.didCancel) {

                            console.log('User cancelled image picker');

                        }

                        else if (response.error) {

                            console.log('ImagePicker Error: ', response.error);

                        }

                        else if (response.customButton) {

                            console.log('User tapped custom button: ', response.customButton);

                        }

                        else {

                            let source = { uri: response.uri };

                            // You can also display the image using data:

                            // let source = { uri: 'data:image/jpeg;base64,' + response.data };

                            this.setState({

                                avatarSource: source

                            });

                        }

                    });

                }}>

                    <Text style={styles.welcome}>

                        Welcome to React Native!

                    </Text>

                </TouchableOpacity>

                <Image source={this.state.avatarSource} style={{width:100,height:100}}/>

            </View>

        );

    }

}

const styles = StyleSheet.create({

    container: {

        flex: 1,

        justifyContent: 'center',

        alignItems: 'center',

        backgroundColor: '#F5FCFF',

    },

    welcome: {

        fontSize: 20,

        textAlign: 'center',

        margin: 10,

    },

    instructions: {

        textAlign: 'center',

        color: '#333333',

        marginBottom: 5,

    },

});

AppRegistry.registerComponent('MyApp', () => MyApp);
react-native-image-picker iOS设置的更多相关文章
- 如何用 React Native 创建一个iOS APP?(三)
前两部分,<如何用 React Native 创建一个iOS APP?>,<如何用 React Native 创建一个iOS APP (二)?>中,我们分别讲了用 React ...
- 如何用 React Native 创建一个iOS APP?(二)
我们书接上文<如何用 React Native 创建一个iOS APP?>,继续来讲如何用 React Native 创建一个iOS APP.接下来,我们会涉及到很多控件. 1 AppRe ...
- 如何用 React Native 创建一个iOS APP?
诚然,React Native 结合了 Web 应用和 Native 应用的优势,可以使用 JavaScript 来开发 iOS 和 Android 原生应用.在 JavaScript 中用 Reac ...
- React Native之(支持iOS与Android)自定义单选按钮(RadioGroup,RadioButton)
React Native之(支持iOS与Android)自定义单选按钮(RadioGroup,RadioButton) 一,需求与简单介绍 在开发项目时发现RN没有给提供RadioButton和Rad ...
- 封装 React Native 原生组件(iOS / Android)
封装 React Native 原生组件(iOS / Android) 在 React Native中,有很多种丰富的组件了,例如 ScrollView.FlatList.SectionList.Bu ...
- React Native热更新(iOS)-Pushy
React Native的出现,使的开发iOS代码出现了更便捷的方式.由于RN是使用脚本语言编写的,实现了"解释执行"的方式,而这种执行方式的修改只需替换脚步即可,不需要重新发布程 ...
- React Native项目集成iOS原生模块
今天学习一下怎么在React Native项目中集成iOS原生模块,道理和在iOS原生项目中集成React Native模块类似.他们的界面跳转靠的都是iOS原生的UINavigationContro ...
- React Native环境搭建(iOS、Mac)
http://reactnative.cn/docs/0.42/getting-started.html#content 1.安装Homebrew Homebrew, Mac系统的包管理器,用于安装N ...
- React Native 组建之IOS和Android通用抽屉
/** * Sample React Native App * https://github.com/facebook/react-native * @flow *npm:https://www.np ...
- React Native区分安卓/iOS平台
import { Platform, } from 'react-native'; alert(JSON.stringify(Platform)): android手机弹出:{"OS&quo ...
随机推荐
- 仿迅雷播放器教程 -- 提取exe资源(12)
既然选择了一个界面库,那么咱们就开始吧! 既然是仿迅雷播放器,那当然要把迅雷播放器的资源提取出来啦,但是很多小伙伴可能不知道怎么提取,所以这里就教大家一些方法: 一.传统的资源提取器 ...
- Puppet软件资源管理
1.实现的功能: 管理那些软件包被安装,那些软件包被卸载 管理软件包是否更新 要求系统配置yum源(RedHat系统).zypper源(Suse系统)等等 2.可用参数: en ...
- Linux Platform驱动模型(三) _platform+cdev
平台总线是一种实现设备信息与驱动方法相分离的方法,利用这种方法,我们可以写出一个更像样一点的字符设备驱动,即使用cdev作为接口,平台总线作为分离方式: xjkeydrv_init():模块加载函数 ...
- 源码安装git工具,显示/usr/local/lib64/libcrypto.a(dso_dlfcn.o) undefined reference to `dlopen'
/usr/local/lib64/libcrypto.a(dso_dlfcn.o): In function `dlfcn_globallookup':dso_dlfcn.c:(.text+0x30) ...
- NFS使用autofs自动挂载
NFS自动挂载设置在/etc/fstab和/etc/rc.local可能挂载不成功,假如是服务端NFS宕机还可能导致客户端无法启动,可以使用autofs实现自动挂载 安装autofs yum -y i ...
- 温故KMP算法
最近由于某些原因,又回顾了一次KMP算法.上一次回顾KMP算法还是在刷题的时候遇到的: http://blog.csdn.net/dacc123/article/details/50994611 在我 ...
- 不存在具有键“test”的“IEnumerable<SelectListItem>”类型的 ViewData 项。
x 很简单的一个问题,有时候提示语已经写得很清楚了, 但是自己那时候就是"鬼迷心窍"了吧··· 解决方案 public PartialViewResult Edit() { vie ...
- Eonasdan bootstrap datetimepicker 使用记录
开始用的 bootstrap日期选择控件是 bootstrap-datepicker : $('#visit_date').datepicker({ todayHighlight: true, sta ...
- c# 串口关闭死机
用C#编写的wince串口通信程序基本大功告成了,与之前用API函数和线程来做串口通信不同,这次直接使用SerialPort控件来做,原本以为使用控件做会简单和方便许多,没成想,还遇到了很多麻烦. 通 ...
- Windows环境下安装Linux
怎样实现在现有的Windows系统上安装Linux,实现双系统启动