神经网络 (2)- Alexnet Training on MNIST
Win10 Anaconda下配置tensorflow+jupyter notebook环境
1.安装anaconda
到Anaconda官网下载,我是用的是Anaconda3-4.8.0版本(Python3对应的是Anaconda3,Python2对应的是Anaconda2),根据需要下载即可。下载好之后点击exe文件安装没什么好讲的。
唯一需要特别说明的是,安装的过程中要把添加路径到环境中选项选中!安装完成之后到命令行输入命令验证是否成功安装:
conda --version
- 安装tensorflow 官方步骤创建环境,
If you installed a TensorFlow as it said in official documentation: https://www.tensorflow.org/versions/r0.10/get_started/os_setup.html#overview
I mean creating an environment called tensorflow and tested your installation in python, but TensorFlow can not be imported in jupyter, you have to install jupyter in your tensorflow environment too:
conda install jupyter notebook
After that I run a jupyter and it can import TensorFlow too:
jupyter notebook
AlexNet 识别MNIST
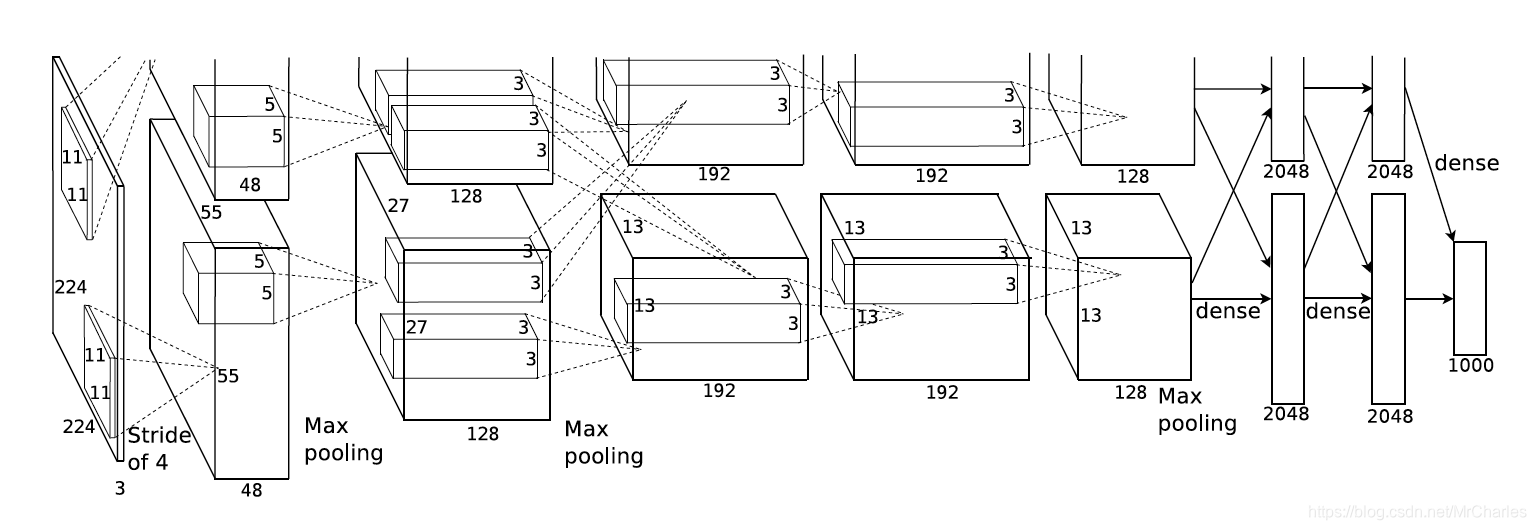
以上是AlexNet的结构,上下其实是一样的,共同用一套参数。 Similar structure to LeNet, AlexNet has more filters per layer, deeper and stacked. There are 5 convolutional layers, 3 fully connected layers and with Relu applied after each of them, and dropout applied before the first and second fully connected layer.AlexNet是2012年ImageNet比赛的冠军,虽然过去了很长时间,但是作为深度学习中的经典模型,AlexNet不但有助于我们理解其中所使用的很多技巧,而且非常有助于提升我们使用深度学习工具箱的熟练度。
from tensorflow.examples.tutorials.mnist import input_data

mnist = input_data.read_data_sets("/tmp/data/", one_hot=True)

import tensorflow as tf

#

learning_rate = 0.001

training_iters = 200000

batch_size = 64

display_step = 20

#

n_input = 784 #

n_classes = 10 #

dropout = 0.8 # Dropout

#

x = tf.placeholder(tf.float32, [None, n_input])

y = tf.placeholder(tf.float32, [None, n_classes])

keep_prob = tf.placeholder(tf.float32)

#

def conv2d(name, l_input, w, b):

    return tf.nn.relu(tf.nn.bias_add(tf.nn.conv2d(l_input, w, strides=[1, 1, 1, 1], padding='SAME'),b), name=name)

#

def max_pool(name, l_input, k):

    return tf.nn.max_pool(l_input, ksize=[1, k, k, 1], strides=[1, k, k, 1], padding='SAME', name=name)

#

def norm(name, l_input, lsize=4):

    return tf.nn.lrn(l_input, lsize, bias=1.0, alpha=0.001 / 9.0, beta=0.75, name=name)

#

def alex_net(_X, _weights, _biases, _dropout):

    #

    _X = tf.reshape(_X, shape=[-1, 28, 28, 1])

    #

    conv1 = conv2d('conv1', _X, _weights['wc1'], _biases['bc1'])

    #

    pool1 = max_pool('pool1', conv1, k=2)

    #

    norm1 = norm('norm1', pool1, lsize=4)

    # Dropout

    norm1 = tf.nn.dropout(norm1, _dropout)

    #

    conv2 = conv2d('conv2', norm1, _weights['wc2'], _biases['bc2'])

    #

    pool2 = max_pool('pool2', conv2, k=2)

    #

    norm2 = norm('norm2', pool2, lsize=4)

    # Dropout

    norm2 = tf.nn.dropout(norm2, _dropout)

    #

    conv3 = conv2d('conv3', norm2, _weights['wc3'], _biases['bc3'])

    conv4 = conv2d('conv4', conv3, _weights['wc4'], _biases['bc4'])

    conv5 = conv2d('conv5', conv4, _weights['wc5'], _biases['bc5'])

    pool5 = max_pool('pool5', conv5, k=2)

    #

    norm5 = norm('norm5', pool5, lsize=4)

    # Dropout

    norm5 = tf.nn.dropout(norm5, _dropout)

    #

    dense1 = tf.reshape(norm5, [-1, _weights['wd1'].get_shape().as_list()[0]])

    dense1 = tf.nn.relu(tf.matmul(dense1, _weights['wd1']) + _biases['bd1'], name='fc1')

    #

    dense2 = tf.nn.relu(tf.matmul(dense1, _weights['wd2']) + _biases['bd2'], name='fc2') # Relu activation

    #

    out = tf.matmul(dense2, _weights['out']) + _biases['out']

    return out

#

weights = {

    'wc1': tf.Variable(tf.random_normal([11, 11, 1, 64])),

    'wc2': tf.Variable(tf.random_normal([5, 5, 64, 192])),

    'wc3': tf.Variable(tf.random_normal([3, 3, 192, 384])),

    'wc4': tf.Variable(tf.random_normal([3, 3, 384, 256])),

    'wc5': tf.Variable(tf.random_normal([3, 3, 256, 256])),

    'wd1': tf.Variable(tf.random_normal([4*4*256, 1024])),

    'wd2': tf.Variable(tf.random_normal([1024, 1024])),

    'out': tf.Variable(tf.random_normal([1024, 10]))

}

biases = {

    'bc1': tf.Variable(tf.random_normal([64])),

    'bc2': tf.Variable(tf.random_normal([192])),

    'bc3': tf.Variable(tf.random_normal([384])),

    'bc4': tf.Variable(tf.random_normal([256])),

    'bc5': tf.Variable(tf.random_normal([256])),

    'bd1': tf.Variable(tf.random_normal([1024])),

    'bd2': tf.Variable(tf.random_normal([1024])),

    'out': tf.Variable(tf.random_normal([n_classes]))

}

#

pred = alex_net(x, weights, biases, keep_prob)

#

cost = tf.reduce_mean(tf.nn.softmax_cross_entropy_with_logits(logits=pred, labels=y))

optimizer = tf.train.AdamOptimizer(learning_rate=learning_rate).minimize(cost)

#

correct_pred = tf.equal(tf.argmax(pred,1), tf.argmax(y,1))

accuracy = tf.reduce_mean(tf.cast(correct_pred, tf.float32))

#

init = tf.initialize_all_variables()

#

with tf.Session() as sess:

    sess.run(init)

    step = 1

    # Keep training until reach max iterations

    while step * batch_size < training_iters:

        batch_xs, batch_ys = mnist.train.next_batch(batch_size)

        #

        sess.run(optimizer, feed_dict={x: batch_xs, y: batch_ys, keep_prob: dropout})

        if step % display_step == 0:

            #

            acc = sess.run(accuracy, feed_dict={x: batch_xs, y: batch_ys, keep_prob: 1.})

            #

            loss = sess.run(cost, feed_dict={x: batch_xs, y: batch_ys, keep_prob: 1.})

            print ("Iter " + str(step*batch_size) + ", Minibatch Loss= " + "{:.6f}".format(loss) + ", Training Accuracy= " + "{:.5f}".format(acc))

        step += 1

    print ("Optimization Finished!")

    #

    print ("Testing Accuracy:", sess.run(accuracy, feed_dict={x: mnist.test.images[:256], y: mnist.test.labels[:256], keep_prob: 1.}))
神经网络 (2)- Alexnet Training on MNIST的更多相关文章
- 利用CNN神经网络实现手写数字mnist分类
题目: 1)In the first step, apply the Convolution Neural Network method to perform the training on one ...
- 第十六节,卷积神经网络之AlexNet网络实现(六)
上一节内容已经详细介绍了AlexNet的网络结构.这节主要通过Tensorflow来实现AlexNet. 这里做测试我们使用的是CIFAR-10数据集介绍数据集,关于该数据集的具体信息可以通过以下链接 ...
- 卷积神经网络之AlexNet
由于受到计算机性能的影响,虽然LeNet在图像分类中取得了较好的成绩,但是并没有引起很多的关注. 知道2012年,Alex等人提出的AlexNet网络在ImageNet大赛上以远超第二名的成绩夺冠,卷 ...
- 第十五节,卷积神经网络之AlexNet网络详解(五)
原文 ImageNet Classification with Deep ConvolutionalNeural Networks 下载地址:http://papers.nips.cc/paper/4 ...
- 卷积神经网络之AlexNet网络模型学习
ImageNet Classification with Deep Convolutional Neural Networks 论文理解 在ImageNet LSVRC-2010上首次使用大型深度卷 ...
- 吴裕雄 PYTHON 神经网络——TENSORFLOW 无监督学习处理MNIST手写数字数据集
# 导入模块 import numpy as np import tensorflow as tf import matplotlib.pyplot as plt # 加载数据 from tensor ...
- TensorFlow实战:Chapter-4(CNN-2-经典卷积神经网络(AlexNet、VGGNet))
转载自:http://blog.csdn.net/u011974639/article/details/76146822 项目:https://www.cs.toronto.edu/~frossard ...
- 学习笔记TF057:TensorFlow MNIST,卷积神经网络、循环神经网络、无监督学习
MNIST 卷积神经网络.https://github.com/nlintz/TensorFlow-Tutorials/blob/master/05_convolutional_net.py .Ten ...
- 卷积神经网络CNN识别MNIST数据集
这次我们将建立一个卷积神经网络,它可以把MNIST手写字符的识别准确率提升到99%,读者可能需要一些卷积神经网络的基础知识才能更好的理解本节的内容. 程序的开头是导入TensorFlow: impor ...
随机推荐
- KMP概念上小结
kmp算法的时间复杂度是O(m+n) 主要作用: 1.最长公共前后缀问题 2.原串中含有几个模式串问题 3.循环节问题
- 转载:vue-cli 脚手架 安装
声明:本文转载自https://www.cnblogs.com/loveyaxin/p/7094089.html 一. node安装 1)如果不确定自己是否安装了node,可以在命令行工具内执行: n ...
- 绿盟-WEB应用漏洞扫描系统
************************************************** WEB应用漏洞扫描系统 一.工具的介绍与使用 ************************** ...
- MySQL 建库建表规范
1.约束 1.PrimaryKey(PK)主键 特点:唯一 + 非空,一张表中只能有一个主键约束,一般是一个数字列,最好是无意义的. 2.NOT NULL 非空 特点:不能为空,建议在MySQL中,业 ...
- spring boot下WebSocket消息推送
WebSocket协议 WebSocket是一种在单个TCP连接上进行全双工通讯的协议.WebSocket通信协议于2011年被IETF定为标准RFC 6455,并由RFC7936补充规范.WebSo ...
- Windows下Cython使用(VS2017)
收到公众号推送文章“利用Cython为Python代码加速”后尝试在Windows平台下使用Cython,环境为Python3.5 + VS2017. 1. 简单尝试 1)新建hello.pyx文件, ...
- canvas的基础入门
canvas是定义在浏览器上的画布.它不仅仅是一个标签元素更是一个编程工具是一套编程的接口.利用它可以开发出很多东西,比如动画,游戏,动态的图表等富有变现力和感染力的应用.还可以开发出绚丽的3D动态效 ...
- 2018-10-31-WPF-在触摸线程等待主线程窗口关闭会让主线程和触摸线程相互等待
title author date CreateTime categories WPF 在触摸线程等待主线程窗口关闭会让主线程和触摸线程相互等待 lindexi 2018-10-31 9:30:9 + ...
- TRUNCATE - 清空一个表
SYNOPSIS TRUNCATE [ TABLE ] name DESCRIPTION 描述 TRUNCATE 快速地从一个表中删除所有行.它和无条件的 DELETE 有同样的效果,不过因为它不做表 ...
- unicode_stop - 撤销控制台unicode模式(例如, 回到8-bit模式).
总览 unicode_stop 描述 unicode_stop 撤销以前 unicode_start(1) 命令的效果, 将显示屏和键盘设回到 8-bit 模式.