神经网络 (2)- Alexnet Training on MNIST
Win10 Anaconda下配置tensorflow+jupyter notebook环境
1.安装anaconda
到Anaconda官网下载,我是用的是Anaconda3-4.8.0版本(Python3对应的是Anaconda3,Python2对应的是Anaconda2),根据需要下载即可。下载好之后点击exe文件安装没什么好讲的。
唯一需要特别说明的是,安装的过程中要把添加路径到环境中选项选中!安装完成之后到命令行输入命令验证是否成功安装:
conda --version
- 安装tensorflow 官方步骤创建环境,
If you installed a TensorFlow as it said in official documentation: https://www.tensorflow.org/versions/r0.10/get_started/os_setup.html#overview
I mean creating an environment called tensorflow and tested your installation in python, but TensorFlow can not be imported in jupyter, you have to install jupyter in your tensorflow environment too:
conda install jupyter notebook
After that I run a jupyter and it can import TensorFlow too:
jupyter notebook
AlexNet 识别MNIST
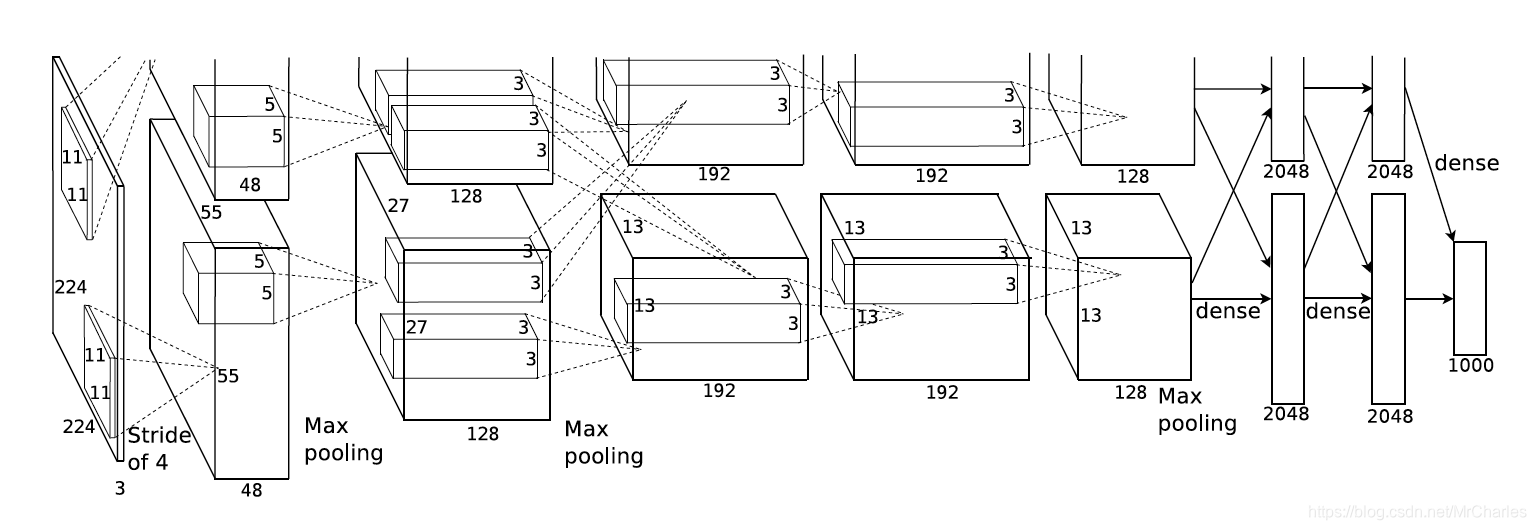
以上是AlexNet的结构,上下其实是一样的,共同用一套参数。 Similar structure to LeNet, AlexNet has more filters per layer, deeper and stacked. There are 5 convolutional layers, 3 fully connected layers and with Relu applied after each of them, and dropout applied before the first and second fully connected layer.AlexNet是2012年ImageNet比赛的冠军,虽然过去了很长时间,但是作为深度学习中的经典模型,AlexNet不但有助于我们理解其中所使用的很多技巧,而且非常有助于提升我们使用深度学习工具箱的熟练度。
from tensorflow.examples.tutorials.mnist import input_data

mnist = input_data.read_data_sets("/tmp/data/", one_hot=True)

import tensorflow as tf

#

learning_rate = 0.001

training_iters = 200000

batch_size = 64

display_step = 20

#

n_input = 784 #

n_classes = 10 #

dropout = 0.8 # Dropout

#

x = tf.placeholder(tf.float32, [None, n_input])

y = tf.placeholder(tf.float32, [None, n_classes])

keep_prob = tf.placeholder(tf.float32)

#

def conv2d(name, l_input, w, b):

    return tf.nn.relu(tf.nn.bias_add(tf.nn.conv2d(l_input, w, strides=[1, 1, 1, 1], padding='SAME'),b), name=name)

#

def max_pool(name, l_input, k):

    return tf.nn.max_pool(l_input, ksize=[1, k, k, 1], strides=[1, k, k, 1], padding='SAME', name=name)

#

def norm(name, l_input, lsize=4):

    return tf.nn.lrn(l_input, lsize, bias=1.0, alpha=0.001 / 9.0, beta=0.75, name=name)

#

def alex_net(_X, _weights, _biases, _dropout):

    #

    _X = tf.reshape(_X, shape=[-1, 28, 28, 1])

    #

    conv1 = conv2d('conv1', _X, _weights['wc1'], _biases['bc1'])

    #

    pool1 = max_pool('pool1', conv1, k=2)

    #

    norm1 = norm('norm1', pool1, lsize=4)

    # Dropout

    norm1 = tf.nn.dropout(norm1, _dropout)

    #

    conv2 = conv2d('conv2', norm1, _weights['wc2'], _biases['bc2'])

    #

    pool2 = max_pool('pool2', conv2, k=2)

    #

    norm2 = norm('norm2', pool2, lsize=4)

    # Dropout

    norm2 = tf.nn.dropout(norm2, _dropout)

    #

    conv3 = conv2d('conv3', norm2, _weights['wc3'], _biases['bc3'])

    conv4 = conv2d('conv4', conv3, _weights['wc4'], _biases['bc4'])

    conv5 = conv2d('conv5', conv4, _weights['wc5'], _biases['bc5'])

    pool5 = max_pool('pool5', conv5, k=2)

    #

    norm5 = norm('norm5', pool5, lsize=4)

    # Dropout

    norm5 = tf.nn.dropout(norm5, _dropout)

    #

    dense1 = tf.reshape(norm5, [-1, _weights['wd1'].get_shape().as_list()[0]])

    dense1 = tf.nn.relu(tf.matmul(dense1, _weights['wd1']) + _biases['bd1'], name='fc1')

    #

    dense2 = tf.nn.relu(tf.matmul(dense1, _weights['wd2']) + _biases['bd2'], name='fc2') # Relu activation

    #

    out = tf.matmul(dense2, _weights['out']) + _biases['out']

    return out

#

weights = {

    'wc1': tf.Variable(tf.random_normal([11, 11, 1, 64])),

    'wc2': tf.Variable(tf.random_normal([5, 5, 64, 192])),

    'wc3': tf.Variable(tf.random_normal([3, 3, 192, 384])),

    'wc4': tf.Variable(tf.random_normal([3, 3, 384, 256])),

    'wc5': tf.Variable(tf.random_normal([3, 3, 256, 256])),

    'wd1': tf.Variable(tf.random_normal([4*4*256, 1024])),

    'wd2': tf.Variable(tf.random_normal([1024, 1024])),

    'out': tf.Variable(tf.random_normal([1024, 10]))

}

biases = {

    'bc1': tf.Variable(tf.random_normal([64])),

    'bc2': tf.Variable(tf.random_normal([192])),

    'bc3': tf.Variable(tf.random_normal([384])),

    'bc4': tf.Variable(tf.random_normal([256])),

    'bc5': tf.Variable(tf.random_normal([256])),

    'bd1': tf.Variable(tf.random_normal([1024])),

    'bd2': tf.Variable(tf.random_normal([1024])),

    'out': tf.Variable(tf.random_normal([n_classes]))

}

#

pred = alex_net(x, weights, biases, keep_prob)

#

cost = tf.reduce_mean(tf.nn.softmax_cross_entropy_with_logits(logits=pred, labels=y))

optimizer = tf.train.AdamOptimizer(learning_rate=learning_rate).minimize(cost)

#

correct_pred = tf.equal(tf.argmax(pred,1), tf.argmax(y,1))

accuracy = tf.reduce_mean(tf.cast(correct_pred, tf.float32))

#

init = tf.initialize_all_variables()

#

with tf.Session() as sess:

    sess.run(init)

    step = 1

    # Keep training until reach max iterations

    while step * batch_size < training_iters:

        batch_xs, batch_ys = mnist.train.next_batch(batch_size)

        #

        sess.run(optimizer, feed_dict={x: batch_xs, y: batch_ys, keep_prob: dropout})

        if step % display_step == 0:

            #

            acc = sess.run(accuracy, feed_dict={x: batch_xs, y: batch_ys, keep_prob: 1.})

            #

            loss = sess.run(cost, feed_dict={x: batch_xs, y: batch_ys, keep_prob: 1.})

            print ("Iter " + str(step*batch_size) + ", Minibatch Loss= " + "{:.6f}".format(loss) + ", Training Accuracy= " + "{:.5f}".format(acc))

        step += 1

    print ("Optimization Finished!")

    #

    print ("Testing Accuracy:", sess.run(accuracy, feed_dict={x: mnist.test.images[:256], y: mnist.test.labels[:256], keep_prob: 1.}))
神经网络 (2)- Alexnet Training on MNIST的更多相关文章
- 利用CNN神经网络实现手写数字mnist分类
题目: 1)In the first step, apply the Convolution Neural Network method to perform the training on one ...
- 第十六节,卷积神经网络之AlexNet网络实现(六)
上一节内容已经详细介绍了AlexNet的网络结构.这节主要通过Tensorflow来实现AlexNet. 这里做测试我们使用的是CIFAR-10数据集介绍数据集,关于该数据集的具体信息可以通过以下链接 ...
- 卷积神经网络之AlexNet
由于受到计算机性能的影响,虽然LeNet在图像分类中取得了较好的成绩,但是并没有引起很多的关注. 知道2012年,Alex等人提出的AlexNet网络在ImageNet大赛上以远超第二名的成绩夺冠,卷 ...
- 第十五节,卷积神经网络之AlexNet网络详解(五)
原文 ImageNet Classification with Deep ConvolutionalNeural Networks 下载地址:http://papers.nips.cc/paper/4 ...
- 卷积神经网络之AlexNet网络模型学习
ImageNet Classification with Deep Convolutional Neural Networks 论文理解 在ImageNet LSVRC-2010上首次使用大型深度卷 ...
- 吴裕雄 PYTHON 神经网络——TENSORFLOW 无监督学习处理MNIST手写数字数据集
# 导入模块 import numpy as np import tensorflow as tf import matplotlib.pyplot as plt # 加载数据 from tensor ...
- TensorFlow实战:Chapter-4(CNN-2-经典卷积神经网络(AlexNet、VGGNet))
转载自:http://blog.csdn.net/u011974639/article/details/76146822 项目:https://www.cs.toronto.edu/~frossard ...
- 学习笔记TF057:TensorFlow MNIST,卷积神经网络、循环神经网络、无监督学习
MNIST 卷积神经网络.https://github.com/nlintz/TensorFlow-Tutorials/blob/master/05_convolutional_net.py .Ten ...
- 卷积神经网络CNN识别MNIST数据集
这次我们将建立一个卷积神经网络,它可以把MNIST手写字符的识别准确率提升到99%,读者可能需要一些卷积神经网络的基础知识才能更好的理解本节的内容. 程序的开头是导入TensorFlow: impor ...
随机推荐
- svn向服务器添加新建文件夹
tip: 1)提交文件分为两步,先将要提交的文件加入缓存区,然后将文件提交 2)add:添加的意思.commit:提交的意思 第一步:加入缓存区(如图) 1)选择要提交的文件 2)右键svn---&g ...
- 用注解实现SpringMvc
在第一次完成spirngmvc代码的基础上: 开始时代码 index.jsp <%@ page contentType="text/html;charset=UTF-8" l ...
- Linux SSH证书登陆
创建证书 ssh-keygen -t rsa -b 4096 -C "your_email@example.com" 证书导入以后,执行 eval "$(ssh-agen ...
- Redis数据结构之跳跃表-skiplist
在Redis中,zset是一个复合结构: 使用hash来存储value和score的映射关系 使用跳跃表来提供按照score进行排序的功能,同时可以指定score范围来获取value列表 结构 zse ...
- Python 内置函数&filter()&map()&reduce()&sorted()
常用内置函数 Python 2.x 返回列表,Python 3.x 返回迭代器 在进行筛选或映射时,输出的结果是一个数组,需要list帮助. 如:print(list(map(lambda x:x+1 ...
- 1、如何在列表,字典,集合种根据条件筛选数据?2、如何为元组中的每个元素命名,提高程序的可读性3、如何统计出序列中元素出现的频度4、如何根据字典中value的大小,对字典的key进行排序
一.数据筛选: 处理方式: 1.filter函数在py3,返回的是个生成式. from random import randint data = [randint(-100,100) for i in ...
- linux6查看时间同步服务器的匹配源
当服务器时间与设定好的同步时间源的时间有差异的时候,一般都需要先查看本机的时间同步服务功能是否在正常的运转,以及同步的时间源是哪里,在这里为大家提供一个检查时间用的命令. linux/centos 6 ...
- 关于print()里面的sep和end参数的使用
print('hello', 'world') #默认用空格隔开 #hello world print('hello', 'world', sep='wuli') #sep=''可以用来设置连接的字符 ...
- Maven pom配置(Spring+SpringMvc+mybaties)
<?xml version="1.0" encoding="UTF-8"?><project xmlns="http://maven ...
- js数据访问的艺术
数据访问js无时不刻所要做的事情,提高对数据的访问效率对一般的小的程序来说,对性能并不会有明显的改善.但是对像淘宝这样项目巨大,访问量巨大的网站来说,一个数据访问效率的提高对性能来说可能产生很大提升. ...