
android——相对布局,表格布局
1.相对布局
RelativeLayout 又称作相对布局,也是一种非常常用的布局。和LinearLayout 的排列规则不同,RelativeLayout 显得更加随意一些,它可以通过相对定位的方式让控件出现在布局的任何位置。也正因为如此,RelativeLayout 中的属性非常多,不过这些属性都是有规律可循的,其实并不难理解和记忆。
<RelativeLayout xmlns:android="http://schemas.android.com/apk/res/android"

android:layout_width="match_parent"

android:layout_height="match_parent" >

<Button

android:id="@+id/button1"

android:layout_width="wrap_content"

android:layout_height="wrap_content"

android:layout_alignParentLeft="true"

android:layout_alignParentTop="true"

android:text="Button 1" />

<Button

android:id="@+id/button2"

android:layout_width="wrap_content"

android:layout_height="wrap_content"

android:layout_alignParentRight="true"

android:layout_alignParentTop="true"

android:text="Button 2" />

<Button

android:id="@+id/button3"

android:layout_width="wrap_content"

android:layout_height="wrap_content"

android:layout_centerInParent="true"

android:text="Button 3" />

<Button

android:id="@+id/button4"

android:layout_width="wrap_content"

android:layout_height="wrap_content"

android:layout_alignParentBottom="true"

android:layout_alignParentLeft="true"

android:text="Button 4" />

<Button

android:id="@+id/button5"

android:layout_width="wrap_content"

android:layout_height="wrap_content"

android:layout_alignParentBottom="true"

android:layout_alignParentRight="true"

android:text="Button 5" />

</RelativeLayout>
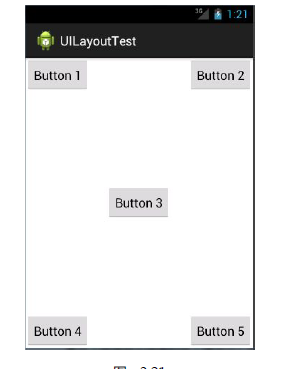
效果图为
2.表格布局
TableLayout 允许我们使用表格的方式来排列控件,这种布局也不是很常用,你只需要了解一下它的基本用法就可以了。既然是表格,那就一定会有行和列,在设计表格时我们尽量应该让每一行都拥有相同的列数,这样的表格也是最简单的。不过有时候事情并非总会顺从我们的心意,当表格的某行一定要有不相等的列数时,就需要通过合并单元格的方式来应对。
 <TableLayout xmlns:android="http://schemas.android.com/apk/res/android"

     xmlns:tools="http://schemas.android.com/tools"

     android:layout_width="match_parent"

     android:layout_height="match_parent"

     android:stretchColumns="*"

     tools:context="com.calc.minicalculator.MainActivity" >

          <TextView

         android:id="@+id/textView1"

         android:layout_width="match_parent"

         android:layout_height="109dp"

         android:layout_gravity="center_horizontal|top"

         android:gravity="right|center_vertical"

         android:text=""

         android:textSize="40dp"

         android:textStyle="bold" />

          <TableRow

              android:layout_weight="1"

              android:id="@+id/tableRow1"

              android:layout_width="wrap_content"

              android:layout_height="match_parent" >

              <Button

                  android:id="@+id/button1"

                  android:layout_width="wrap_content"

                  android:layout_height="match_parent"

                  android:text="清屏" />

              <Button

                  android:id="@+id/button2"

                  android:layout_width="wrap_content"

                  android:layout_height="match_parent"

                  android:text="space" />

              <Button

                  android:id="@+id/button3"

                  android:layout_width="wrap_content"

                  android:layout_height="match_parent"

                  android:text="+" />

              <Button

                  android:id="@+id/button4"

                  android:layout_width="wrap_content"

                  android:layout_height="match_parent"

                  android:text="-" />

          </TableRow>

          <TableRow

              android:layout_weight="1"

              android:id="@+id/tableRow2"

              android:layout_width="wrap_content"

              android:layout_height="match_parent" >

              <Button

                  android:id="@+id/button5"

                  android:layout_width="wrap_content"

                  android:layout_height="match_parent"

                  android:text="7" />

              <Button

                  android:id="@+id/button6"

                  android:layout_width="wrap_content"

                  android:layout_height="match_parent"

                  android:text="8" />

              <Button

                  android:id="@+id/button7"

                  android:layout_width="wrap_content"

                  android:layout_height="match_parent"

                  android:text="9" />

              <Button

                  android:id="@+id/button8"

                  android:layout_width="wrap_content"

                  android:layout_height="match_parent"

                  android:text="*" />

          </TableRow>

          <TableRow

              android:layout_weight="1"

              android:id="@+id/tableRow3"

              android:layout_width="wrap_content"

              android:layout_height="match_parent" >

              <Button

                  android:id="@+id/button9"

                  android:layout_width="wrap_content"

                  android:layout_height="match_parent"

                  android:text="4" />

              <Button

                  android:id="@+id/button10"

                  android:layout_width="wrap_content"

                  android:layout_height="match_parent"

                  android:text="5" />

              <Button

                  android:id="@+id/button11"

                  android:layout_width="wrap_content"

                  android:layout_height="match_parent"

                  android:text="6" />

              <Button

                  android:id="@+id/button12"

                  android:layout_width="wrap_content"

                  android:layout_height="match_parent"

                  android:text="/" />

          </TableRow>

          <TableRow

              android:layout_weight="1"

              android:id="@+id/tableRow4"

              android:layout_width="wrap_content"

              android:layout_height="match_parent" >

              <Button

                  android:id="@+id/button13"

                  android:layout_width="wrap_content"

                  android:layout_height="match_parent"

                  android:text="1" />

              <Button

                  android:id="@+id/button14"

                  android:layout_width="wrap_content"

                  android:layout_height="match_parent"

                  android:text="2" />

              <Button

                  android:id="@+id/button15"

                  android:layout_width="wrap_content"

                  android:layout_height="match_parent"

                  android:text="3" />

              <Button

                  android:id="@+id/button19"

                  android:layout_width="wrap_content"

                  android:layout_height="match_parent"

                  android:text="." />

          </TableRow>

          <TableRow

              android:layout_weight="1"

              android:id="@+id/tableRow5"

              android:layout_width="wrap_content"

              android:layout_height="match_parent"

           >

              <Button

                  android:id="@+id/button17"

                  android:layout_width="wrap_content"

                  android:layout_height="match_parent"

                  android:text="0"

                 android:layout_span="2"

                  />

              <Button

                  android:id="@+id/button16"

                  android:layout_width="wrap_content"

                  android:layout_height="match_parent"

                  android:text="="

                   android:layout_span="2"/>

          </TableRow>

 </TableLayout>
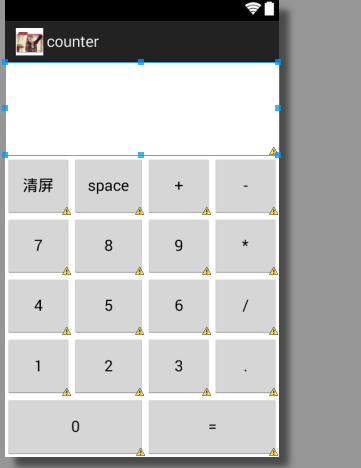
效果图:
android——相对布局,表格布局的更多相关文章
- 第24讲 UI_布局 之帧布局 表格布局 绝对布局
第24讲 UI_布局 之帧布局 表格布局 绝对布局 3. FrameLayout(帧布局) 帧布局是从屏幕的左上角(0,0)坐标开始布局,多个组件层叠排序,后一个组件总会将前一个组件所覆盖,除非最后一 ...
- Android布局— — —表格布局
表格布局 以表格的形式来显示界面中的控件,表格的每一行为一个TableRow,每当一个控件添加到TableRow中,就生成一个单元格. 语法格式: <TableLayout xmlns:andr ...
- .Net程序猿玩转Android开发---(8)表格布局TableLayout
表格布局TableLayout是Android中比較经常使用的一个布局控件,既然是表格,肯定有行和列,TableLayout中的行有TableRow组成.列依据每行控件的数量来确定 假如第一行有3个控 ...
- Android 自学之表格布局 TableLayout
表格布局(TableLayout),表格布局采用行.列的形式来管理UI组件,TableLayout并不需要明确的声明多少行,多少列,而是通过TableRow.其他组件来控制表格的行数和列数. 每次想T ...
- Android中的表格布局TableLayout
表格布局最基本的三个属性: XML代码实例: <?xml version="1.0" encoding="utf-8"?> <LinearLa ...
- Android笔记(十) Android中的布局——表格布局
TableLayout运行我们使用表格的方式来排列控件,它的本质依然是线性布局.表格布局采用行.列的形式来管理控件,TableLayout并不需要明确的声明包含多少行多少列,而是通过添加TableRo ...
- Android之TableLayout表格布局
1.相关属性 1.1.常用属性 android:collapseColumns 设置需要被隐藏的列的序列号 android:shrinkColumns 设置允许被收缩的列的序列号 android:st ...
- android:TableLayout表格布局详解
1.TableLayout简介2.TableLayout行列数的确定3.TableLayout可设置的属性详解4.一个包含4个TableLayout布局的实例及效果图一.Tablelayout简介 ...
- Android开发-之五大布局
在html中大家都知道布局是什么意思了,简单来说就是将页面划分模块,比如html中的div.table等.那么Android中也是这样的.Android五大布局让界面更加美化,开发起来也更加方便.当然 ...
- 【转】TableLayout(表格布局)
转自:http://www.cnblogs.com/zhangs1986/archive/2013/01/17/2864536.html TableLayout(表格布局) 表格布局模型以行列的形式管 ...
随机推荐
- hbase 的体系结构
hbase的服务体系遵从的是主从结构,由HRegion(服务器)-HRegionServer(服务器集群)-HMaster(主服务器)构成, 从图中能看出多个HRegion 组成一个HRegionSe ...
- 手把手教你玩转nginx负载均衡(二)----安装虚拟机操作系统
引言 在上一篇,我们组装好了虚拟机的硬件部分,那么现在我们就要把操作系统装上了,既然是服务器,那么安装linux操作系统是个比较好的选择,如果你喜欢的话,安装windows也是没有任何问题的 我这里选 ...
- 两种方式testng dataprovider结合csv做测试驱动
方式一: 第一.读取csv数据源码 import java.io.BufferedReader; import java.io.File; import java.io.FileInputStream ...
- java中的集合/容器的数据结构
最近双11在网上买了本 数据结构和算法--java语言实现,正在啃,同时在慕课网上的学习进度来到了集合框架这一类,对于这一块算是刚刚了解,本科的时候数据结构学习的是严蔚敏老师的那本数据结构,代码的实现 ...
- POCO库——Foundation组件之缓存Cache
缓存Cache:内部提供多种缓存Cache机制,并对不同机制的管理缓存策略不同实现: ValidArgs.h :ValidArgs有效键参数类,模板参数实现,_key:键,_isValid:是否有效, ...
- 解决MVC4 时间验证Bug
MVC验证时间控件(my97,时间格式:yyyy-MM-dd HH:mm:ss) 在谷歌浏览器上一切正常.但在火狐和IE 上一直验证不通过 (错误信息:日期格式不对) 猜想是 时间格式的问题..日期 ...
- 7 Container With Most Water_Leetcode
Given n non-negative integers a1, a2, ..., an, where each represents a point at coordinate (i, ai). ...
- Kinect开发随笔①——红外扫描仪(Kinect 数据源)
来源于 MVA 的 快速入门:Kinect for Windows v2 开发 的学习随笔 具体内容为上图所示章节内容 章节内全部代码:GitHub地址点我(链接失效,待补档) <Page &l ...
- MySQL数据库1067 问题
1.MySql1067错误解决方法 http://blog.csdn.net/mhmyqn/article/details/17043921 MySql 1045解决方法 my.ini mysq ...
- jquery中的ajax方法参数总是记不住,这里记录一下。
1.url: 要求为String类型的参数,(默认为当前页地址)发送请求的地址. 2.type: 要求为String类型的参数,请求方式(post或get)默认为get.注意其他http请求方法,例如 ...