spring5 源码深度解析----- AOP目标方法和增强方法的执行(100%理解AOP)
上一篇博文中我们讲了代理类的生成,这一篇主要讲解剩下的部分,当代理类调用时,目标方法和代理方法是如何执行的,我们还是接着上篇的ReflectiveMethodInvocation类Proceed方法来看
public Object proceed() throws Throwable {

    // 首先,判断是不是所有的interceptor(也可以想像成advisor)都被执行完了。

    // 判断的方法是看currentInterceptorIndex这个变量的值,增加到Interceptor总个数这个数值没有,

    // 如果到了,就执行被代理方法(invokeJoinpoint());如果没到,就继续执行Interceptor。

    if (this.currentInterceptorIndex == this.interceptorsAndDynamicMethodMatchers.size() - 1) {

        return invokeJoinpoint();

    }

    // 如果Interceptor没有被全部执行完,就取出要执行的Interceptor,并执行。

    // currentInterceptorIndex先自增

     Object interceptorOrInterceptionAdvice = this.interceptorsAndDynamicMethodMatchers.get(++this.currentInterceptorIndex);

    // 如果Interceptor是PointCut类型

    if (interceptorOrInterceptionAdvice instanceof InterceptorAndDynamicMethodMatcher) {

        InterceptorAndDynamicMethodMatcher dm = (InterceptorAndDynamicMethodMatcher) interceptorOrInterceptionAdvice;

        // 如果当前方法符合Interceptor的PointCut限制,就执行Interceptor

        if (dm.methodMatcher.matches(this.method, this.targetClass, this.arguments)) {

           // 这里将this当变量传进去,这是非常重要的一点

            return dm.interceptor.invoke(this);

        }

        // 如果不符合,就跳过当前Interceptor,执行下一个Interceptor

        else {

            return proceed();

        }

    }

    // 如果Interceptor不是PointCut类型,就直接执行Interceptor里面的增强。

    else {

        return ((MethodInterceptor) interceptorOrInterceptionAdvice).invoke(this);

    }

}
我们先来看一张方法调用顺序图
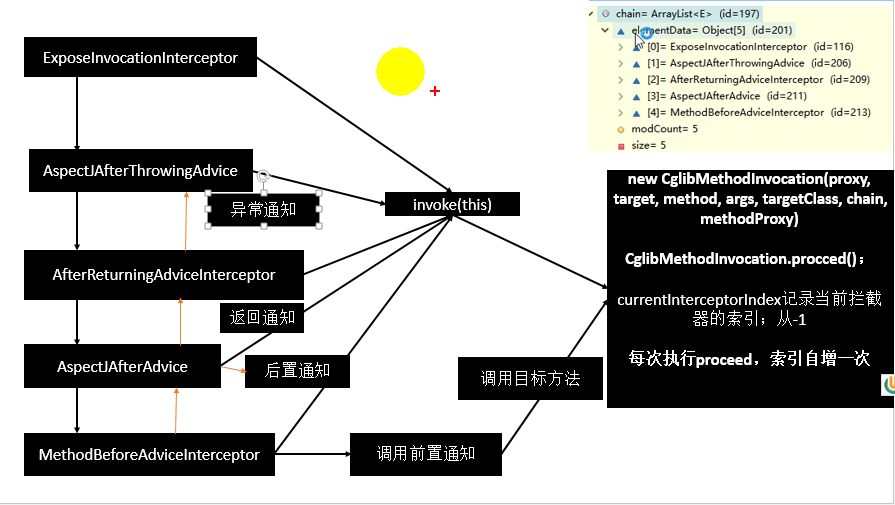
我们看到链中的顺序是AspectJAfterThrowingAdvice、AfterReturningAdviceInterceptor、AspectJAfterAdvice、MethodBeforeAdviceInterceptor,这些拦截器是按顺序执行的,那我们来看看第一个拦截器AspectJAfterThrowingAdvice中的invoke方法
AspectJAfterThrowingAdvice
 @Override

 public Object invoke(MethodInvocation mi) throws Throwable {

     try {

         //直接调用MethodInvocation的proceed方法

         //从proceed()方法中我们知道dm.interceptor.invoke(this)传过来的参数就是ReflectiveMethodInvocation执行器本身

         //这里又直接调用了ReflectiveMethodInvocation的proceed()方法

         return mi.proceed();

     }

     catch (Throwable ex) {

         if (shouldInvokeOnThrowing(ex)) {

             invokeAdviceMethod(getJoinPointMatch(), null, ex);

         }

         throw ex;

     }

 }
第一个拦截器AspectJAfterThrowingAdvice的invoke方法中,直接调用mi.proceed();,从proceed()方法中我们知道dm.interceptor.invoke(this)传过来的参数就是ReflectiveMethodInvocation执行器本身,所以又会执行proceed()方法,拦截器下标currentInterceptorIndex自增,获取下一个拦截器AfterReturningAdviceInterceptor,并调用拦截器中的invoke方法,,此时第一个拦截器在invoke()方法的第七行卡住了,接下来我们看第二个拦截器的执行
AfterReturningAdviceInterceptor
 @Override

 public Object invoke(MethodInvocation mi) throws Throwable {

     //直接调用MethodInvocation的proceed方法

     Object retVal = mi.proceed();

     this.advice.afterReturning(retVal, mi.getMethod(), mi.getArguments(), mi.getThis());

     return retVal;

 }
AfterReturningAdviceInterceptor还是直接调用mi.proceed(),又回到了ReflectiveMethodInvocation的proceed()方法中,此时AfterReturningAdviceInterceptor方法卡在第四行,接着回到ReflectiveMethodInvocation的proceed()方法中,拦截器下标currentInterceptorIndex自增,获取下一个拦截器AspectJAfterAdvice,并调用AspectJAfterAdvice中的invoke方法
AspectJAfterAdvice
 @Override

 public Object invoke(MethodInvocation mi) throws Throwable {

     try {

         //直接调用MethodInvocation的proceed方法

         return mi.proceed();

     }

     finally {

         invokeAdviceMethod(getJoinPointMatch(), null, null);

     }

 }
AspectJAfterAdvice还是直接调用mi.proceed(),又回到了ReflectiveMethodInvocation的proceed()方法中,此时AspectJAfterAdvice方法卡在第五行,接着回到ReflectiveMethodInvocation的proceed()方法中,拦截器下标currentInterceptorIndex自增,获取下一个拦截器MethodBeforeAdviceInterceptor,并调用MethodBeforeAdviceInterceptor中的invoke方法
MethodBeforeAdviceInterceptor
 @Override

 public Object invoke(MethodInvocation mi) throws Throwable {

     //终于开始做事了,调用增强器的before方法,明显是通过反射的方式调用

     //到这里增强方法before的业务逻辑执行

     this.advice.before(mi.getMethod(), mi.getArguments(), mi.getThis());

     //又调用了调用MethodInvocation的proceed方法

     return mi.proceed();

 }
第5行代码终于通过反射调用了切面里面的before方法,接着又调用mi.proceed(),我们知道这是最后一个拦截器了,此时this.currentInterceptorIndex == this.interceptorsAndDynamicMethodMatchers.size() - 1应该为true了,那么就会执行 return invokeJoinpoint();,也就是执行bean中的目标方法,接着我们来看看目标方法的执行
@Nullable

protected Object invokeJoinpoint() throws Throwable {

    return AopUtils.invokeJoinpointUsingReflection(this.target, this.method, this.arguments);

}

    @Nullable

public static Object invokeJoinpointUsingReflection(@Nullable Object target, Method method, Object[] args)

        throws Throwable {

    // Use reflection to invoke the method.

    try {

        ReflectionUtils.makeAccessible(method);

        //直接通过反射调用目标bean中的method

        return method.invoke(target, args);

    }

    catch (InvocationTargetException ex) {

        // Invoked method threw a checked exception.

        // We must rethrow it. The client won't see the interceptor.

        throw ex.getTargetException();

    }

    catch (IllegalArgumentException ex) {

        throw new AopInvocationException("AOP configuration seems to be invalid: tried calling method [" +

                method + "] on target [" + target + "]", ex);

    }

    catch (IllegalAccessException ex) {

        throw new AopInvocationException("Could not access method [" + method + "]", ex);

    }

}
before方法执行完后,就通过反射的方式执行目标bean中的method,并且返回结果,接下来我们想想程序该怎么执行呢?
1 、MethodBeforeAdviceInterceptor执行完了后,开始退栈,AspectJAfterAdvice中invoke卡在第5行的代码继续往下执行, 我们看到在AspectJAfterAdvice的invoke方法中的finally中第8行有这样一句话 invokeAdviceMethod(getJoinPointMatch(), null, null);,就是通过反射调用AfterAdvice的方法,意思是切面类中的 @After方法不管怎样都会执行,因为在finally中
2、AspectJAfterAdvice中invoke方法发执行完后,也开始退栈,接着就到了AfterReturningAdviceInterceptor的invoke方法的第4行开始恢复,但是此时如果目标bean和前面增强器中出现了异常,此时AfterReturningAdviceInterceptor中第5行代码就不会执行了,直接退栈;如果没有出现异常,则执行第5行,也就是通过反射执行切面类中@AfterReturning注解的方法,然后退栈
3、AfterReturningAdviceInterceptor退栈后,就到了AspectJAfterThrowingAdvice拦截器,此拦截器中invoke方法的第7行开始恢复,我们看到在 catch (Throwable ex) { 代码中,也就是第11行 invokeAdviceMethod(getJoinPointMatch(), null, ex);,如果目标bean的method或者前面的增强方法中出现了异常,则会被这里的catch捕获,也是通过反射的方式执行@AfterThrowing注解的方法,然后退栈
总结
这个代理类调用过程,我们可以看到是一个递归的调用过程,通过ReflectiveMethodInvocation类中Proceed方法递归调用,顺序执行拦截器链中AspectJAfterThrowingAdvice、AfterReturningAdviceInterceptor、AspectJAfterAdvice、MethodBeforeAdviceInterceptor这几个拦截器,在拦截器中反射调用增强方法
spring5 源码深度解析----- AOP目标方法和增强方法的执行(100%理解AOP)的更多相关文章
- spring5 源码深度解析----- @Transactional注解的声明式事物介绍(100%理解事务)
面的几个章节已经分析了spring基于@AspectJ的源码,那么接下来我们分析一下Aop的另一个重要功能,事物管理. 事务的介绍 1.数据库事物特性 原子性多个数据库操作是不可分割的,只有所有的操作 ...
- spring5 源码深度解析----- 被面试官给虐懵了,竟然是因为我不懂@Configuration配置类及@Bean的原理
@Configuration注解提供了全新的bean创建方式.最初spring通过xml配置文件初始化bean并完成依赖注入工作.从spring3.0开始,在spring framework模块中提供 ...
- spring5 源码深度解析----- AOP代理的生成
在获取了所有对应bean的增强后,便可以进行代理的创建了.回到AbstractAutoProxyCreator的wrapIfNecessary方法中,如下所示: protected static fi ...
- spring5 源码深度解析----- AOP的使用及AOP自定义标签
我们知道在面向对象OOP编程存在一些弊端,当需要为多个不具有继承关系的对象引入同一个公共行为时,例如日志,安全检测等,我们只有在每个对象里引入公共行为,这样程序中就产生了大量的重复代码,所以有了面向对 ...
- spring5 源码深度解析----- Spring事务 是怎么通过AOP实现的?(100%理解Spring事务)
此篇文章需要有SpringAOP基础,知道AOP底层原理可以更好的理解Spring的事务处理. 自定义标签 对于Spring中事务功能的代码分析,我们首先从配置文件开始人手,在配置文件中有这样一个配置 ...
- spring5 源码深度解析----- 创建AOP代理之获取增强器
在上一篇的博文中我们讲解了通过自定义配置完成了对AnnotationAwareAspectJAutoProxyCreator类型的自动注册,那么这个类到底做了什么工作来完成AOP的操作呢?首先我们看看 ...
- spring5 源码深度解析----- 事务增强器(100%理解事务)
上一篇文章我们讲解了事务的Advisor是如何注册进Spring容器的,也讲解了Spring是如何将有配置事务的类配置上事务的,实际上也就是用了AOP那一套,也讲解了Advisor,pointcut验 ...
- spring5 源码深度解析-----ApplicationContext容器refresh过程
在之前的博文中我们一直以BeanFactory接口以及它的默认实现类XmlBeanFactory为例进行分析,但是Spring中还提供了另一个接口ApplicationContext,用于扩展Bean ...
- spring5 源码深度解析----- 事务的回滚和提交(100%理解事务)
上一篇文章讲解了获取事务,并且通过获取的connection设置只读.隔离级别等,这篇文章讲解剩下的事务的回滚和提交 回滚处理 之前已经完成了目标方法运行前的事务准备工作,而这些准备工作最大的目的无非 ...
随机推荐
- CF1028C Rectangles 思维
Rectangles time limit per test 2 seconds memory limit per test 256 megabytes input standard input o ...
- Shiro实现用户对动态资源细粒度的权限校验
前言 在实际系统应用中,普遍存在这样的一种业务场景,需要实现用户对要访问的资源进行动态权限校验. 譬如,在某平台的商家系统中,存在商家.品牌.商品等业务资源.它们之间的关系为:一个商家可以拥有多个品牌 ...
- android日志搜集原理及方案比较
说明: 本文只讨论Log日志,而不是应用的埋点日志. Android 日志架构 用一张图来了解Android Log的架构: 这里涉及到三个进程: APP进程: 调用Log的接口打日志,最终通过soc ...
- 阿里《JAVA实习生入职测试题—2019最新》之答案详解(连载一)
力争清晰完整准确(逐步完善,持续更新) 1.String类为什么是final的 首先分析String的源码: public final class String implements java.io. ...
- m6A甲基化及预测方法工具总结
DNA.RNA和蛋白三个层面的可逆修饰示意图(Fu et al. Nature Reviews Genetics, 2014) DNA和蛋白存在各种修饰,RNA也不例外,目前已知的RNA修饰已经超过上 ...
- MyBatis的发展和选型
xlecho编辑整理,欢迎转载,转载请声明文章来源.欢迎添加echo微信(微信号:t2421499075)交流学习. 百战不败,依不自称常胜,百败不颓,依能奋力前行.--这才是真正的堪称强大!! 参考 ...
- 上海地铁游移动APP需求分析
人们在现实的生活中会遇到各种各样的问题,有不同的需求,我们需要加以解决,开发一个软件是一个很好的方法去解决这些需求和问题.那么,作为一个软件团队如何才能准确而全面地找到这些需求呢?主要有一下几个步骤. ...
- dart 大文件读取
dart 中不可避免会出现文件读取的情况, 甚至是很大的文件, 比如 200M 的文件 如果一次性读入内存,虽然也行得通, 但是如果在 flutter 中开启个 200M 大小的字节数组, 一不小心可 ...
- TLC5615
#include <reg51.h> #include "TLC5615.c" code uchar seven_seg[] = {0xc0, 0xf9, 0xa4, ...
- Vue路由(vue-router)详细讲解指南
中文文档:https://router.vuejs.org/zh/ Vue Router 是 Vue.js 官方的路由管理器.它和 Vue.js 的核心深度集成,让构建单页面应用变得易如反掌.路由实际 ...