十一、springboot 配置log4j2以及打包成zip文件
前言
其实我们前面已经配置了日志,但是最近总感觉日志日志格式看的不舒服,并且每次打包都是一个jar 文件,lib都包含在jar 中,每次做很小的修改都需要重新替换jar文件,jar文件会比较大,传输起来比较慢。所以做一些改进。
配置log4j2
好了,废话不多说了,先来在Springboot中配置log4j2吧。
pom.xml
springboot 项目默认的是使用logback 的,所以我们想要使用log4j ,需要将原来的logback 框架屏蔽掉,再引入log4j.
首先我们在pom.xml 文件中加入
 <dependency>

            <groupId>org.springframework.boot</groupId>

            <artifactId>spring-boot-starter-web</artifactId>

            <exclusions><!-- 去掉默认配置 -->

                <exclusion>

                    <groupId>org.springframework.boot</groupId>

                    <artifactId>spring-boot-starter-logging</artifactId>

                </exclusion>

            </exclusions>

        </dependency>

        <dependency>

            <groupId>org.springframework.boot</groupId>

            <artifactId>spring-boot-starter-log4j2</artifactId>

        </dependency>
编写log4j2.xml
<Configuration status="WARN" monitorInterval="300" packages="cn.mastercom.cat">

    <properties>

        <property name="MtnoWebRoot" >${sys:user.dir}/logs</property>

        <property name="INFO_FILE">zlflovemm_log</property>

        <property name="ERROR_FILE">zlflovemm__error</property>

    </properties>

    <Appenders>

        <Console name="Console" target="SYSTEM_OUT">

            <ThresholdFilter level="ALL" onMatch="ACCEPT" onMismatch="DENY"/>

            <PatternLayout pattern="%d{HH:mm:ss.SSS} [%t] %-5level %logger{36} - %msg%n" />

        </Console>

        <RollingRandomAccessFile name="infolog"

                                 fileName="${MtnoWebRoot}/${INFO_FILE}.log"

                                 filePattern="${MtnoWebRoot}/${INFO_FILE}-%d{yyyy-MM-dd}-%i.log">

            <PatternLayout

                    pattern="%d{yyyy-MM-dd HH:mm:ss.SSS} [%t] [%X{sessionID}] [%X{imei}] %-5level %logger{36} - %msg%n" />

            <!--  -->

            <Policies>

                <TimeBasedTriggeringPolicy interval="1" modulate="true" />

                <SizeBasedTriggeringPolicy size="2MB" />

            </Policies>

            <DefaultRolloverStrategy max="1000">

                <Delete basePath="${MtnoWebRoot}" maxDepth="1">

                    <IfFileName glob="${INFO_FILE}*.log" />

                    <IfLastModified age="30d" />

                </Delete>

            </DefaultRolloverStrategy>

        </RollingRandomAccessFile>

        <RollingRandomAccessFile name="errorlog"

                                 fileName="${MtnoWebRoot}/${ERROR_FILE}.log"

                                 filePattern="${MtnoWebRoot}/${ERROR_FILE}-%d{yyyy-MM-dd}-%i.log">

            <PatternLayout

                    pattern="%d{yyyy-MM-dd HH:mm:ss.SSS} [%t] %-5level %logger{36} - %msg%n" />

            <Policies>

                <TimeBasedTriggeringPolicy interval="1" modulate="true" />

                <SizeBasedTriggeringPolicy size="200MB" />

            </Policies>

            <DefaultRolloverStrategy max="1000">

                <Delete basePath="${MtnoWebRoot}" maxDepth="1">

                    <IfFileName glob="${INFO_FILE}*.log" />

                    <IfLastModified age="30d" />

                </Delete>

            </DefaultRolloverStrategy>

        </RollingRandomAccessFile>

        <Async name="Async">

            <AppenderRef ref="infolog"/>

            <AppenderRef ref="errorlog"/>

        </Async>

    </Appenders>

    <Loggers>

        <asyncRoot level="INFO">

            <AppenderRef ref="infolog"/>

            <AppenderRef ref="errorlog" level="error"/>

            <AppenderRef ref="Console" />

        </asyncRoot>

    </Loggers>

</Configuration>
上面配置的是生成日志的格式,大家可以自行修改。以及配置了单个日志文件最大为200M ,只保留最近30天的文件。
application.properties 配置
#日志配置

logging.config=classpath:log4j2.xml

debug=false
实现上面这三步,就轻松的在项目中使用log4j日志啦。
打包外置配置文件
上面配置的日志,先不测试了,等这个打包的配置也配置好了,再来一起测试。
如果我们直接使用自带的mvn package 的话,会将我们依赖的jar 包已经配置文件统统打包成可运行的jar 文件。这样虽然方便,但是这样的话每次都需要重新打包,并且传输起来比较麻烦,所以我们就需要将lib 和配置文件从jar 文件中分离。这样项目修改了,只需要替换一下比较小的部分就可以了。
pom.xml 修改
打开我们的pom.xml 文件,最下面我们的中我们加入如下代码。因为我们的项目之前加入了打包成docker 镜像,所以整个的都贴出来,不需要打包成docker的可以去掉。
<build>
<!--打包后的项目名称-->
<resources>
<resource>
<directory>src/main/resources</directory>
<targetPath>${project.build.directory}${file.separator}classes</targetPath>
</resource>
<resource>
<directory>src/main/java</directory>
<includes>
<!--这里必须包含.xml否则Mybatis的xml无法打包-->
<include>**/*.xml</include>
</includes>
<filtering>true</filtering>
</resource>
</resources>
<plugins>
<!--java编译插件-->
<plugin>
<groupId>org.apache.maven.plugins</groupId>
<artifactId>maven-compiler-plugin</artifactId>
<configuration>
<source>1.8</source>
<target>1.8</target>
<encoding>UTF-8</encoding>
<fork>true</fork>
</configuration>
</plugin>
<!--打jar包的插件-->
<plugin>
<groupId>org.apache.maven.plugins</groupId>
<artifactId>maven-jar-plugin</artifactId>
<configuration>
<archive>
<manifest>
<addClasspath>true</addClasspath>
<classpathPrefix>lib</classpathPrefix>
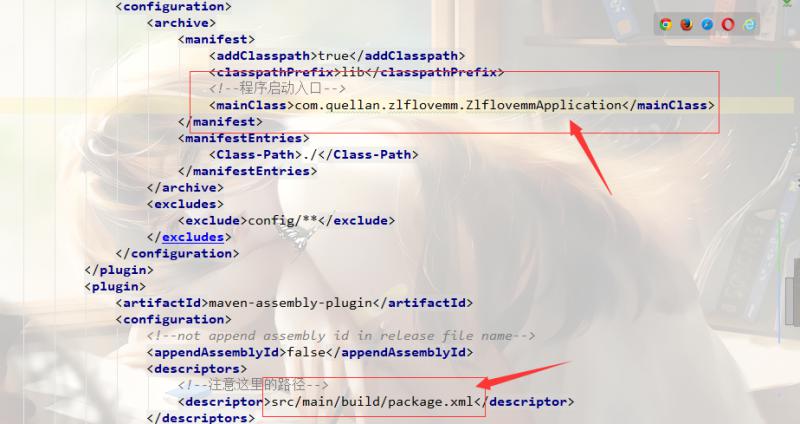
<!--程序启动入口-->
<mainClass>com.quellan.zlflovemm.ZlflovemmApplication</mainClass>
</manifest>
<manifestEntries>
<Class-Path>./</Class-Path>
</manifestEntries>
</archive>
<excludes>
<exclude>config/**</exclude>
</excludes>
</configuration>
</plugin>
<plugin>
<artifactId>maven-assembly-plugin</artifactId>
<configuration>
<!--not append assembly id in release file name-->
<appendAssemblyId>false</appendAssemblyId>
<descriptors>
<!--注意这里的路径-->
<descriptor>src/main/build/package.xml</descriptor>
</descriptors>
</configuration>
<executions>
<execution>
<id>make-assembly</id>
<phase>package</phase>
<goals>
<goal>single</goal>
</goals>
</execution>
</executions>
</plugin>
<!-- Docker -->
<plugin>
<groupId>com.spotify</groupId>
<artifactId>docker-maven-plugin</artifactId>
<version>1.0.0</version>
<!-- 将插件绑定在某个phase执行 -->
<executions>
<execution>
<id>build-image</id>
<!-- 用户只需执行mvn package ,就会自动执行mvn docker:build -->
<phase>package</phase>
<goals>
<goal>build</goal>
</goals>
</execution>
</executions>
<configuration>
<!-- 指定生成的镜像名 -->
<imageName>${docker.image.prefix}/${project.artifactId}:${project.version}</imageName>
<!-- 指定标签 -->
<imageTags>
<imageTag>${project.version}</imageTag>
</imageTags>
<!-- 指定 Dockerfile 路径 -->
<dockerDirectory>src/main/docker</dockerDirectory>
<!-- 指定远程 docker api地址 -->
<dockerHost>http://127.0.0.1:2375</dockerHost>
<resources>
<resource>
<targetPath>/</targetPath>
<!-- jar包所在的路径此处配置的对应target目录 -->
<directory>${project.build.directory}</directory>
<!-- 需要包含的jar包,这里对应的是Dockerfile中添加的文件名 -->
<include>${project.build.finalName}.jar</include>
</resource>
</resources>
</configuration>
</plugin>
</plugins>
</build>
需要注意的是,如下两个地方,第一个di地方需要需改成我们自己项目的启动类。第二个地方需要配置我们的package.xml 文件路径。内容我们待会讲。
package.xml
我们在pom.xml 中配置好了后,我们在src/main 目录下创建一个build 包,早build 目录下创建package.xml 文件。路径就是上面配置的,大家可以按照自己的喜好来。
内容如下:
<?xml version="1.0" encoding="UTF-8"?>

<assembly xmlns="http://maven.apache.org/plugins/maven-assembly-plugin/assembly/1.1.3" xmlns:xsi="http://www.w3.org/2001/XMLSchema-instance"

  xsi:schemaLocation="http://maven.apache.org/plugins/maven-assembly-plugin/assembly/1.1.3 http://maven.apache.org/xsd/assembly-1.1.3.xsd">

    <id>package</id>

    <formats>

        <format>zip</format>

    </formats>

    <!-- 改为false不会出现两层相同的目录 -->

    <includeBaseDirectory>false</includeBaseDirectory>

    <fileSets>

        <fileSet>

            <directory>bin</directory>

            <outputDirectory>${file.separator}</outputDirectory>

        </fileSet>

        <fileSet>

            <directory>src/main/resources</directory>

            <outputDirectory>${file.separator}</outputDirectory>

            <excludes>

            	<exclude>static/**</exclude>

            	<exclude>templates/**</exclude>

            </excludes>

        </fileSet>

        <fileSet>

            <directory>${project.build.directory}</directory>

            <outputDirectory>${file.separator}</outputDirectory>

            <includes>

                <include>*.jar</include>

            </includes>

        </fileSet>

    </fileSets>

    <dependencySets>

        <dependencySet>

    <useProjectArtifact>true</useProjectArtifact>

            <outputDirectory>lib</outputDirectory>

            <scope>runtime</scope>

            <!--<unpack>false</unpack> -->

            <excludes>

                <!--<exclude>${project.name}-${project.version}</exclude> -->

                <exclude>${groupId}:${artifactId}</exclude>

            </excludes>

        </dependencySet>

    </dependencySets>

</assembly>
测试
好啦,上面的已经配置好啦,我们来测试一下。
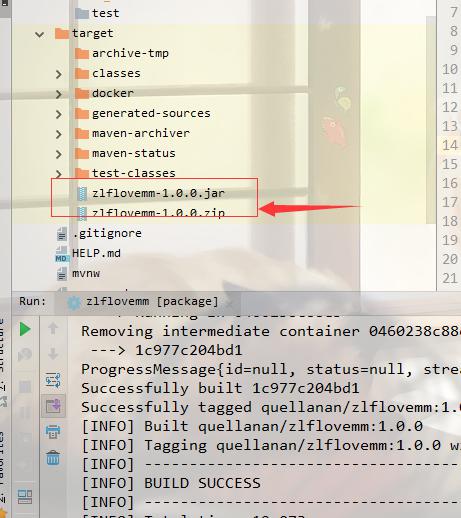
直接mvn package成功后会生成如下文件,包含jar 和zip 文件。
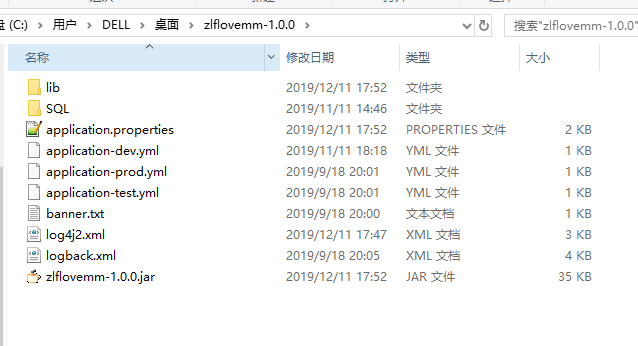
zip 文件解压后,就是我们第一次部署的文件,后面修改代码只用替换jar文件就可以了。
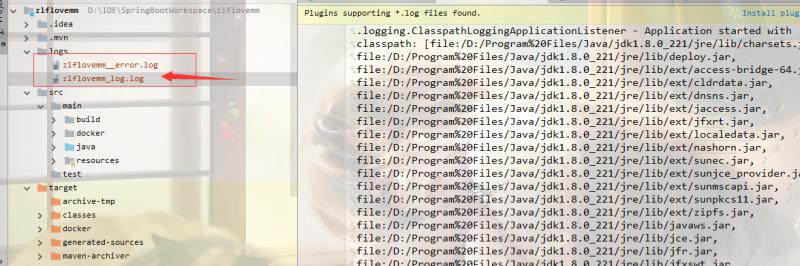
我们生成的日志文件
番外
好了,就说这么多啦
代码上传到github:
https://github.com/QuellanAn/zlflovemm
后续加油♡
欢迎大家关注个人公众号 "程序员爱酸奶"
分享各种学习资料,包含java,linux,大数据等。资料包含视频文档以及源码,同时分享本人及投递的优质技术博文。
如果大家喜欢记得关注和分享哟❤

十一、springboot 配置log4j2以及打包成zip文件的更多相关文章
- eclipse通过maven建立java se工程配置log4j,打包成zip,将jar包和配置文件分开,并以bat和sh文件启动java程序
一.新建maven的java工程 1.eclipse里file-new-other,选择maven Project 2.选中 Use default Workspace location,然后 nex ...
- php将文件夹打包成zip文件
function addFileToZip($path,$zip){ $handler=opendir($path); //打开当前文件夹由$path指定. while(($filenam ...
- c# 把网络图片http://....png 打包成zip文件
思路: 1.把网络图片下载到服务器本地. 2.读取服务器图片的文件流 3.使用zip帮助类,把图片文件流写进zip文件流. 4.如果是文件服务器,把zip文件流 推送文件服务器,生成zip的下载url ...
- 【原】Python用例:将指定文件或目录打包成zip文件
#This Demo is used to compress files to .zip file #Base on Windows import os import time #The files ...
- PHP将多级目录打包成zip文件
最近接触PHP,需要用到zip压缩,在网上搜索的一大堆,发现代码都不低于50行. 而且调用还很费事(基础太少看不懂).让我收获的是Php提供有一个ZipArchive类,并有如下方法. bool a ...
- Vue -- webpack 项目自动打包压缩成zip文件
这段时间用 Vue2.0 开发项目,每次打包都会用到 npm run build 命令,但是每次部署时给后端发包都要手动zip压缩,这样一两次还行,但遇到项目板块测试和临时加急功能测试的时候,一天可能 ...
- springboot中使用freemarker生成word文档并打包成zip下载(简历)
一.设计出的简历模板图以及给的简历小图标切图 二.按照简历模板图新建简历word文件 :${字段名},同时将图片插入到word中,并将建好的word文件另存为xml文件: 三.直 ...
- Springboot生成二维码并下载图片png支持打包成zip
pom.xml <!--二维码--> <dependency> <groupId>com.google.zxing</groupId> <arti ...
- 将多张图片打包成zip包,一起上传
1.前端页面 <div class="mod-body" id="showRW" style="text-align: center;font- ...
随机推荐
- 转:java 看好的一些书
地址 : http://www.cnblogs.com/xrq730/p/4994545.html
- Hibernate一对多、多对一的关系表达
一.关系表达: 1.一对多.多对一表的关系: 学生表: 班级表: 在学生表中,学生的学号是主键.在班级表中,班级号是主键,因此,学生表的外键是classno.因此,班级对应学生是一对多,学生对应班级是 ...
- maven配置nexus私有仓库
<?xml version="1.0" encoding="UTF-8"?> <settings xmlns="http://mav ...
- ASP.NET Core 1.0: API的输入参数
Web API是需要接受参数的,譬如,通常用于创建数据的POST method需要接受输入数据,而用于GET method也需要接受一些可选参数,譬如:为了性能起见,控制返回数据的数量是至关重要的. ...
- vue 封装方法
个我这个是局部引入方法,下次有需要全局在补上(全局:在main.js文件引入封装的方法js文件,然后用Vue.prototype) 一.新建一个js文件loading.js 二.编辑loading.j ...
- [java] 笔记 from黑马
1. 关于String的创建. PS:String的底层是用字节数组来实现的. 2.字符串常量池的笔记 具体指向是如下图的, 注意看0x666和0x999这两个地址. 3.原因如下: 4. 5. ...
- [spark程序]统计人口平均年龄(HDFS文件)(详细过程)
一.题目描述 (1)请编写Spark应用程序,该程序可以在分布式文件系统HDFS中生成一个数据文件peopleage.txt,数据文件包含若干行(比如1000行,或者100万行等等)记录,每行记录只包 ...
- nyoj 1071-不可以!(a*b + fabs(a*b))
1071-不可以! 内存限制:64MB 时间限制:1000ms 特判: No 通过数:10 提交数:18 难度:1 题目描述: 判断:两个数x.y的正负性. 要求:不可以使用比较运算符,即" ...
- 使用POI导出EXCEL工具类并解决导出数据量大的问题
POI导出工具类 工作中常常会遇到一些图表需要导出的功能,在这里自己写了一个工具类方便以后使用(使用POI实现). 项目依赖 <dependency> <groupId>org ...
- firefox浏览器window.event is undefined问题
获取鼠标坐标,IE下window.event.clientX和window.event.clientY就可以获取x,y的座标了.但是firefox却不行,浏览器报错window.event is un ...