
nagios监控的安装
本文中,物理机IP 192.168.1.105
虚拟linux主机ip 192.168.1.10
安装apache和php
Apache 和Php 不是安装nagios 所必须的,但是nagios提供了web监控界面,通过web监控界面可以清晰的看到被监控主机、资源的运行状态,
因此,安装一个web服务是很必要的。
需要注意的是,nagios在nagios3.1.x版本以后,配置web监控界面时需要php的支持。
这里我们下载的nagios版本为nagios-3.4.3,因此在编译安装完成apache后,还需要编译php模块,
这里选取的php版本为php5.4.10。

[root@rhel6 ~]# tar xjf httpd-2.2.32.tar.bz2

[root@rhel6 ~]# cd httpd-2.2.32
[root@rhel6 httpd-2.2.32]# ./configure --prefix=/usr/local/apache2

checking for chosen layout... Apache

checking for working mkdir -p... yes

checking build system type... x86_64-unknown-linux-gnu

checking host system type... x86_64-unknown-linux-gnu

checking target system type... x86_64-unknown-linux-gnu

Configuring Apache Portable Runtime library ...

checking for APR... reconfig

configuring package in srclib/apr now

checking build system type... x86_64-unknown-linux-gnu

checking host system type... x86_64-unknown-linux-gnu

checking target system type... x86_64-unknown-linux-gnu

Configuring APR library

Platform: x86_64-unknown-linux-gnu

checking for working mkdir -p... yes

APR Version: 1.5.2

checking for chosen layout... apr

checking for gcc... no

checking for cc... no

checking for cl.exe... no

configure: error: in `/root/httpd-2.2.32/srclib/apr':

configure: error: no acceptable C compiler found in $PATH

See `config.log' for more details

configure failed for srclib/apr
#上面安装记录我们发现,是缺少依赖组件,这里我们检查nagios所需要的支持套件的安装情况,没有安装的全部进行yum安装

[root@rhel6 httpd-2.2.32]# rpm -q gcc glibc glibc-common gd gd-devel xinetd openssl-devel

[root@rhel6 httpd-2.2.32]# rpm -q gcc glibc glibc-common gd gd-devel xinetd openssl-devel

package gcc is not installed

glibc-2.12-1.132.el6.x86_64

glibc-common-2.12-1.132.el6.x86_64

package gd is not installed

package gd-devel is not installed

package xinetd is not installed

package openssl-devel is not installed

[root@rhel6 httpd-2.2.32]# yum install -y gcc gd gd-devel xinetd openssl-devel
#编译安装

[root@rhel6 httpd-2.2.32]# ./configure --prefix=/usr/local/apache2

[root@rhel6 httpd-2.2.32]# make && make install
测试配置文件和启动(service httpd start)

[root@rhel6 apache2]# /usr/local/apache2/bin/apachectl -t

[root@rhel6 apache2]# /usr/local/apache2/bin/apachectl
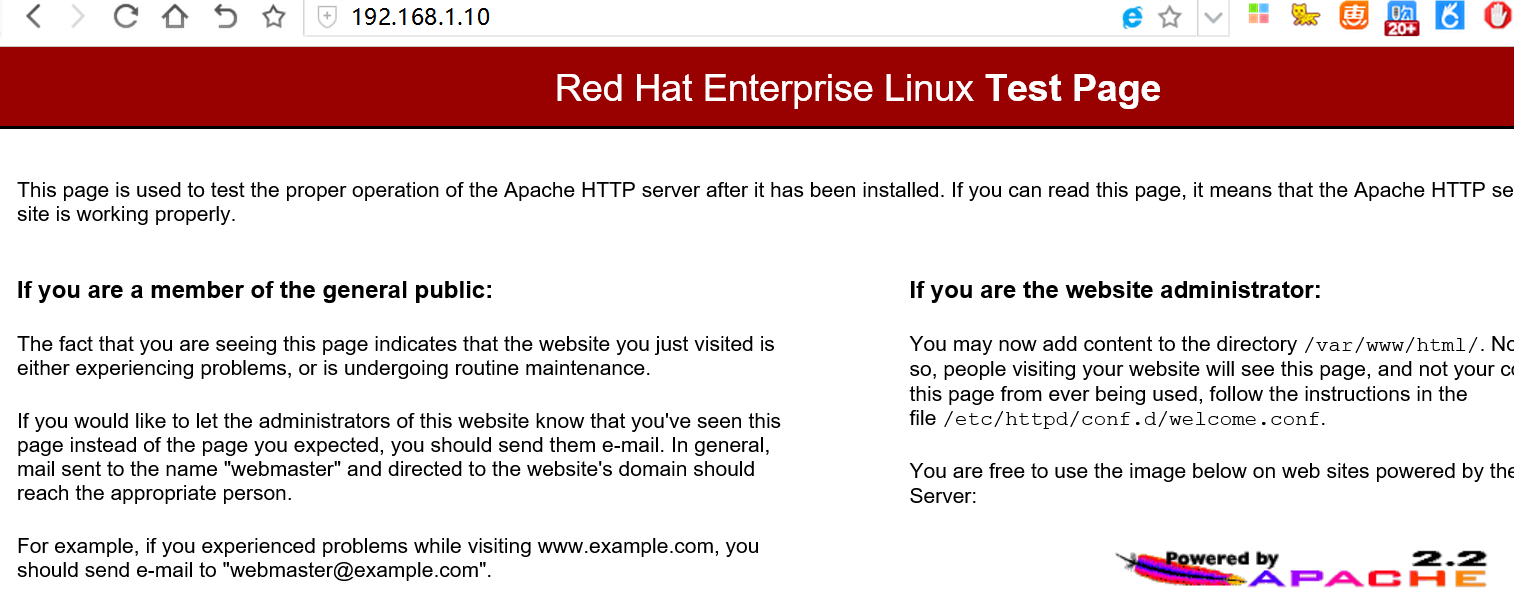
##使用其他主机访问一定要注意关闭防火墙!或者配置好防火墙策略,要不是访问不了的!

[root@rhel6 apache2]# service iptables status

[root@rhel6 apache2]# service iptables stop

到此apache安装完成!

z设置开机自启动
chkconfig --add httpd
chkconfig httpd --level 345 on
安装Php
# wget http://cn2.php.net/distributions/php-5.5.10.tar.gz
# tar zxvf php-5.5.10.tar.gz
# cd php-5.5.10
# ./configure --prefix=/usr/local/php --with-apxs2=/usr/local/apache2/bin/apxs
有报错如下
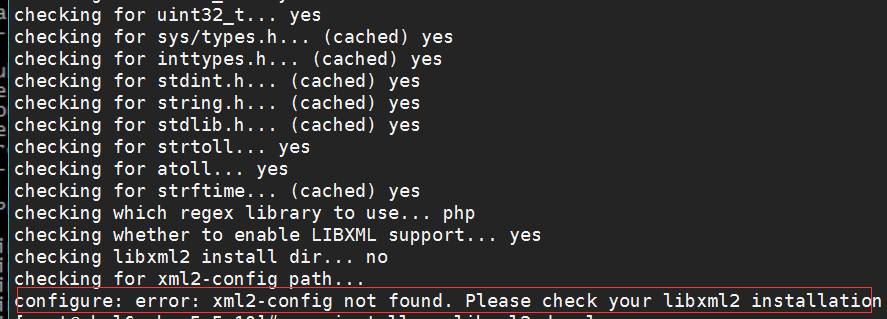
[root@rhel6 php-5.5.10]# yum install -y libxml2-devel libxml2
# ./configure --prefix=/usr/local/php --with-apxs2=/usr/local/apache2/bin/apxs
# make && make install
配置apache
找到apache 的配置文件/usr/local/apache2/conf/httpd.conf
找到:
User daemon

Group daemon
修改为
User nagios

Group nagios
然后找到
<IfModule dir_module>

  DirectoryIndex index.html

</IfModule>
修改为
<IfModule dir_module>

  DirectoryIndex index.html index.php

</IfModule>
接着增加如下内容:
AddType application/x-httpd-php .php
为了安全起见,一般情况下要让nagios 的web 监控页面必须经过授权才能访问,这需要增加验证配置,即在httpd.conf 文件最后添加如下信息:
#setting for nagios

ScriptAlias /nagios/cgi-bin "/usr/local/nagios/sbin"

<Directory "/usr/local/nagios/sbin">

     AuthType Basic

     Options ExecCGI

     AllowOverride None

     Order allow,deny

     Allow from all

     AuthName "Nagios Access"

     AuthUserFile /usr/local/nagios/etc/htpasswd.users

     Require valid-user

</Directory>

Alias /nagios "/usr/local/nagios/share"

<Directory "/usr/local/nagios/share">

     AuthType Basic

     Options None

     AllowOverride None

     Order allow,deny

     Allow from all

     AuthName "nagios Access"

     AuthUserFile /usr/local/nagios/etc/htpasswd.users

     Require valid-user

</Directory>
2.nagios安装配置
#安装nagios前准备工作

[root@rhel6 ~]# groupadd nagios

[root@rhel6 ~]# useradd nagios -g nagios -s /sbin/nologin

[root@rhel6 ~]# mkdir /usr/local/nagios

[root@rhel6 ~]# chown -R nagios:nagios /usr/local/nagios
[root@rhel6 ~]# tar xzvf nagios-3.2.0.tar.gz

[root@rhel6 nagios-3.2.0]# ./configure --prefix=/usr/local/nagios --with-nagios-user=nagios --with-nagios-group=nagios

*** Configuration summary for nagios 3.2.0 08-12-2009 ***:

 General Options:

 -------------------------

        Nagios executable:  nagios

        Nagios user/group:  nagios,nagios

       Command user/group:  nagios,nagios

            Embedded Perl:  no

             Event Broker:  yes

        Install ${prefix}:  /usr/local/nagios

                Lock file:  ${prefix}/var/nagios.lock

   Check result directory:  ${prefix}/var/spool/checkresults

           Init directory:  /etc/rc.d/init.d

  Apache conf.d directory:  /etc/httpd/conf.d

             Mail program:  /bin/mail

                  Host OS:  linux-gnu

 Web Interface Options:

 ------------------------

                 HTML URL:  http://localhost/nagios/

                  CGI URL:  http://localhost/nagios/cgi-bin/

 Traceroute (used by WAP):  /bin/traceroute

Review the options above for accuracy.  If they look okay,

type 'make all' to compile the main program and CGIs.

[root@rhel6 nagios-3.2.0]# make all

[root@rhel6 nagios-3.2.0]# make install

[root@rhel6 nagios-3.2.0]# make install-init  生成init启动脚本
 [root@rhel6 nagios-3.2.0]# make install-config 生成一些模板配置文件

[root@rhel6 nagios-3.2.0]# make install-commandmode 设置相应的权限
 [root@rhel6 nagios-3.2.0]# make install-webconf

为Nagios设置Web验证的密码账号nagiosadmin
[root@rhel6 nagios-3.2.0]/usr/local/apache2/bin/htpasswd -c /usr/local/nagios/etc/htpasswd.users nagiosadmin

设置nagios开机自启动
[root@rhel6 nagios-3.2.0]# chkconfig --add nagios
[root@rhel6 nagios-3.2.0]# chkconfig nagios --level 345 on
3.nagios-plugin安装
[root@rhel6 ~]# tar xzvf nagios-plugins-1.4.14.tar.gz

[root@rhel6 ~]# cd nagios-plugins-1.4.14

[root@rhel6 nagios-plugins-1.4.14]# ./configure --prefix=/usr/local/nagios --with-nagios-user=nagios --with-nagios-group=nagios

[root@rhel6 nagios-plugins-1.4.14]# make && make install
4.重新启动Apache和nagios
service httpd restart
service nagios restart
检查配置文件
[root@rhel6 ~]# /usr/local/nagios/bin/nagios -v /usr/local/nagios/etc/nagios.cfg
Nagios Core 3.2.0
Copyright (c) 2009 Nagios Core Development Team and Community Contributors
Copyright (c) 1999-2009 Ethan Galstad
Last Modified: 08-12-2009
License: GPL
Website: http://www.nagios.org
Reading configuration data...
Read main config file okay...
Processing object config file '/usr/local/nagios/etc/objects/commands.cfg'...
Processing object config file '/usr/local/nagios/etc/objects/contacts.cfg'...
Processing object config file '/usr/local/nagios/etc/objects/timeperiods.cfg'...
Processing object config file '/usr/local/nagios/etc/objects/templates.cfg'...
Processing object config file '/usr/local/nagios/etc/objects/localhost.cfg'...
Read object config files okay...
Running pre-flight check on configuration data...
Checking services...
Checked 8 services.
Checking hosts...
Checked 1 hosts.
Checking host groups...
Checked 1 host groups.
Checking service groups...
Checked 0 service groups.
Checking contacts...
Checked 1 contacts.
Checking contact groups...
Checked 1 contact groups.
Checking service escalations...
Checked 0 service escalations.
Checking service dependencies...
Checked 0 service dependencies.
Checking host escalations...
Checked 0 host escalations.
Checking host dependencies...
Checked 0 host dependencies.
Checking commands...
Checked 24 commands.
Checking time periods...
Checked 5 time periods.
Checking for circular paths between hosts...
Checking for circular host and service dependencies...
Checking global event handlers...
Checking obsessive compulsive processor commands...
Checking misc settings...
Total Warnings: 0
Total Errors: 0
Things look okay - No serious problems were detected during the pre-flight check
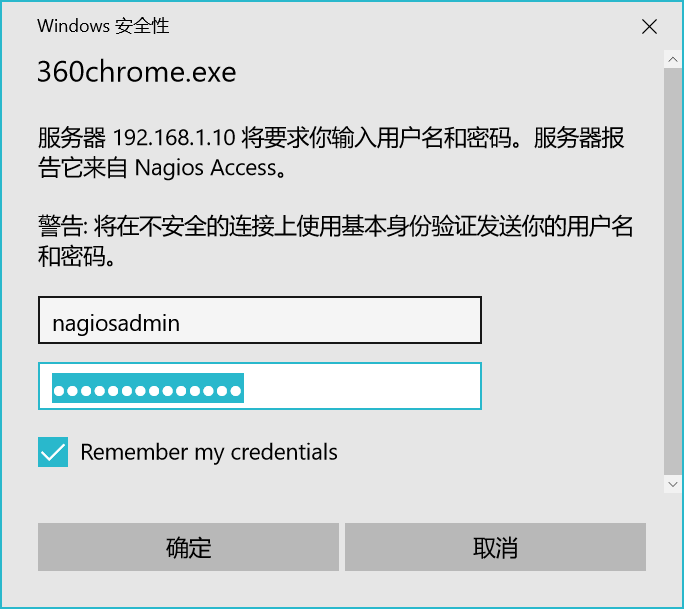
我在做这个的时候遇到这样问题,web界面登陆用户名和密码确认都对,就是一直登陆不进去,后来资料研究发现是上图橙色文字/usr/local/nagios/etc/htpasswd.users路径错写成/usr/local/nagios/etc/htpasswd导致,具体为啥会这样我也说不清,希望大神看到解毒,修改后可以登陆。
但是此时又出现了另外一个问题 You don't have permission to access /nagios/ on this server
出现这个问题原因很多种
1.php是否正确安装,可用php -v看下,如未安装可用使用yum一键安装 yum -y install php

2.httpd配置文件是否正确
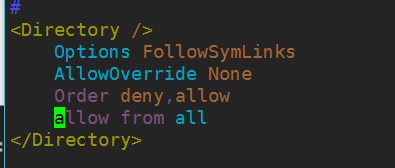
下图中的配置如果是deny from all是万不能行的,我就是深受其害,改为allow from all,
http服务重启 service httpd restart
到此一切就能正确访问啦,欢迎大家伙沟通交流。

nagios监控的安装的更多相关文章
- 在Nginx中搭建Nagios监控平台
本文只做Nginx下Nagiox安装的说明,其它关于Nagios监控的详细配置请参考我的另一篇文章[Ubuntu 10.04下构建Nagios监控平台] Nagios依赖PHP环境和perl环境.由于 ...
- smartmontools的安装使用和实现对磁盘的Nagios监控
安装 首先从sourceforge下载最新的安装版本. 解压编译 $ tar -zxvf smartmontools-6.4.tar.gz $ cd smartmontools-6.4 $ ./con ...
- Nagios+pnp4nagios+rrdtool 安装配置nagios被监控端NRPE配置(二)
NRPE监控插件基础 NRPE总共由两部分组成: (1).check_nrpe插件,运行在监控主机上. (2).NRPE daemon,运行在远程的linux主机上(通常就是被监控机) 整个的监控过程 ...
- 自动安装脚本-------------基于LVMP搭建Nagios 监控
Mysql初始化参数(mysql-5.6.31) /usr/local/mysql/scripts/mysql_install_db --user=mysql --basedir=/usr/local ...
- Nagios 系统监控基本安装配置过程详解
Nagios 是一款免费的开源 IT 基础设施监控系统,功能强大,灵活性强,能有效监控 Windows.Linux.VMware 和 Unix 主机状态,交换机.路由器等网络设置等.一旦主机或服务状态 ...
- CentOS 7.4 下安装部署Nagios监控系统详细攻略(三)
Nagios是一个流行的电脑系统和网络监控程序,它检测主机和服务,当异常发生和解除时能提醒用户.它是基于GPLv2开发的开源软件,可免费获得及使用. nagios工作原理 nagios的功能是监控服务 ...
- Nagios监控平台搭建
Nagios是一款开源的免费网络监视工具,能有效监控Windows.Linux和Unix的主机状态,交换机路由器等网络设置,打印机等.在系统或服务状态异常时发出邮件或短信报警第一时间通知网站运维人员, ...
- 一步步实现Nagios监控linux主机及飞信报警
一步步实现Nagios监控linux主机及飞信报警 上篇文章介绍了在linux主机上架设nagios监控服务,并对windows主机进行服务状态变化的监控,这次我们继续上次内容. 首先实现n ...
- centos shell编程6一些工作中实践脚本 nagios监控脚本 自定义zabbix脚本 mysql备份脚本 zabbix错误日志 直接送给bc做计算 gzip innobackupex/Xtrabackup 第四十节课
centos shell编程6一些工作中实践脚本 nagios监控脚本 自定义zabbix脚本 mysql备份脚本 zabbix错误日志 直接送给bc做计算 gzip innobacku ...
随机推荐
- mvc_1_ex_stu_manage
Mvc第一遍结束综合练习:带权限的学生管理系统程序的设计应该根据功能来进行.先来设想一下本练习的程序功能:学生信息管理.登录用户区分权限.出错应该给出提示.由此可以设想,完成以后的程序是下图的样子:主 ...
- web技术栈开发原生应用-多端共用一套代码
weex: vuejs开发原生应用 nativescript: vuejs开发原生应用 ReactNative = reactjs开发原生应用 ionic = angularjs 开发原生应用
- element-UI级联选择器(Cascader)获取label值 ,this.$refs['新组件名'].currentLabels 在2.7版本给移除了,新的解决方法。
原文参考:https://blog.csdn.net/lijiabinbbg/article/details/97396812 遇到的新的问题是如果设置了ref,那么v-model绑定的值不会动态更新 ...
- OpenGL 中的三维纹理操作
#define _CRT_SECURE_NO_WARNINGS #include <gl/glut.h> #include <stdio.h> #include <std ...
- Workerman启动与停止相关命令
start.php为入口文件 一.启动 1.以debug(调试)方式启动 php start.php start 2.以daemon(守护进程)方式启动 php start.php start -d ...
- Java 控制流程 之 循环语句
循环:循环语句可以在满足循环条件的情况下,反复执行某一段代码,这段被重复执行的代码被称为循环体语句,当反复 执行这个循环体时,需要在合适的时候把循环判断条件修改为false,从而结束循环,否则循环将一 ...
- Kubernetes学习之原理
Kubernetes基本概念 一.Label selector在kubernetes中的应用场景 1.kube-controller-manager的replicaSet通过定义的label 来筛选要 ...
- MySQL安装和使用
1.MySQL安装: 1).到MySQL官网https://dev.mysql.com/downloads/installer/,下载MySQL 5.7版本:(注:现在官网上最新版本已经变成8.0.1 ...
- efcore 关联插入
出现这个错误: at Microsoft.EntityFrameworkCore.DbContext.SaveChanges(Boolean acceptAllChangesOnSuccess) Mi ...
- ad批量上传
import pandas as pd import requests import arrow from collections import deque import json campaign_ ...