Mycat分布式数据库架构解决方案--Mycat实现数据库分表
echo编辑整理,欢迎转载,转载请声明文章来源。欢迎添加echo微信(微信号:t2421499075)交流学习。 百战不败,依不自称常胜,百败不颓,依能奋力前行。——这才是真正的堪称强大!!!
准备工作:
- 请先在服务器上面安装Mycat,安装教程:https://blog.csdn.net/xlecho/article/details/102755484
- 了解一下他的核心配置文件:Server.xml详解、schema.xml详解、rule.xml详解
- 准备三台服务器,都需要安装mysql
- 搭建一主两从的MySQL读写分离环境:Mycat分布式数据库架构解决方案--搭建MySQL读写分离环境--一主多从
- 下载一份Mycat的原码(在服务器上面编写不方便,本地更改好,替换服务器配置文件更方便)Mycat下载
如果前面的准备工作都做好了,并且有配置Mycat实现读写分离,就能很快的上手Mycat实现数据库分库分表。Mycat实现读写分离请参考:https://blog.csdn.net/xlecho/article/details/102897050
由于我们的Mycat实现读写分离配置好了登录用户名和密码,所以配置Mycat实现数据库分库分表的工作就不在需要去配置server.mxl了,但是我们使用分表规则的时候,要涉及两个新的配置文件
- rule.xml
- autopartition-long.txt
配置schema
实现数据库分库分表它和读写分离最大的不同就是dataHost该标签的配置,读写分离,只需要一个dataHost即可。但是dataHost如果只配置一个,就没有办法实现多库读写。我们要实现分表,当然要考虑每一个库对应的表都需要能够读写。所以我们在配置table的时候,对应的每一个库,就需要对应到每一个可以写的库。同时和读写分离不同的是,我们既然要分库分表就需要分表的规则,这里新增了分表规则auto-sharding-long
<?xml version="1.0"?>

<!DOCTYPE mycat:schema SYSTEM "schema.dtd">

<mycat:schema xmlns:mycat="http://io.mycat/">

    <schema name="userDB" checkSQLschema="true" sqlMaxLimit="100">

        <table name="user" dataNode="dn1,dn2,dn3" primaryKey="id" rule="auto-sharding-long"/>

    </schema>

    <dataNode name="dn1" dataHost="testNode1" database="test"/>

    <dataNode name="dn2" dataHost="testNode2" database="test"/>

    <dataNode name="dn3" dataHost="testNode3" database="test"/>

    <dataHost name="testNode1" maxCon="1000" minCon="10" balance="1" writeType="0" dbType="mysql" dbDriver="native" switchType="-1" slaveThreshold="100">

        <heartbeat>select user()</heartbeat>

        <writeHost host="hostM1" url="192.168.222.132:3306" user="root" password="123456" />

    </dataHost>

    <dataHost name="testNode2" maxCon="1000" minCon="10" balance="1" writeType="0" dbType="mysql" dbDriver="native" switchType="-1" slaveThreshold="100">

        <heartbeat>select user()</heartbeat>

        <writeHost host="hostM2" url="192.168.222.133:3306" user="root" password="123456" />

    </dataHost>

    <dataHost name="testNode3" maxCon="1000" minCon="10" balance="1" writeType="0" dbType="mysql" dbDriver="native" switchType="-1" slaveThreshold="100">

        <heartbeat>select user()</heartbeat>

        <writeHost host="hostM3" url="192.168.222.134:3306" user="root" password="123456" />

    </dataHost>

</mycat:schema>
配置rule.xml
我们在schema中配置了auto-sharding-long的规则就需要在rule.xml中配置对应的规则。(Mycat原始的rule配置文件中就已经有了我们需要配置的规则,所以我们这里不需要改动,但是auto-sharding-long对应的autopartition-long.txt文档,由于演示需要,我们更改一下)
<?xml version="1.0" encoding="UTF-8"?>

<!-- - - Licensed under the Apache License, Version 2.0 (the "License");

        - you may not use this file except in compliance with the License. - You

        may obtain a copy of the License at - - http://www.apache.org/licenses/LICENSE-2.0

        - - Unless required by applicable law or agreed to in writing, software -

        distributed under the License is distributed on an "AS IS" BASIS, - WITHOUT

        WARRANTIES OR CONDITIONS OF ANY KIND, either express or implied. - See the

        License for the specific language governing permissions and - limitations

        under the License. -->

<!DOCTYPE mycat:rule SYSTEM "rule.dtd">

<mycat:rule xmlns:mycat="http://io.mycat/">

    <tableRule name="rule1">

        <rule>

            <columns>id</columns>

            <algorithm>func1</algorithm>

        </rule>

    </tableRule>

    <tableRule name="rule2">

        <rule>

            <columns>user_id</columns>

            <algorithm>func1</algorithm>

        </rule>

    </tableRule>

    <tableRule name="sharding-by-intfile">

        <rule>

            <columns>sharding_id</columns>

            <algorithm>hash-int</algorithm>

        </rule>

    </tableRule>

    <tableRule name="auto-sharding-long">

        <rule>

            <columns>id</columns>

            <algorithm>rang-long</algorithm>

        </rule>

    </tableRule>

    <tableRule name="mod-long">

        <rule>

            <columns>id</columns>

            <algorithm>mod-long</algorithm>

        </rule>

    </tableRule>

    <tableRule name="sharding-by-murmur">

        <rule>

            <columns>id</columns>

            <algorithm>murmur</algorithm>

        </rule>

    </tableRule>

    <tableRule name="crc32slot">

        <rule>

            <columns>id</columns>

            <algorithm>crc32slot</algorithm>

        </rule>

    </tableRule>

    <tableRule name="sharding-by-month">

        <rule>

            <columns>create_time</columns>

            <algorithm>partbymonth</algorithm>

        </rule>

    </tableRule>

    <tableRule name="latest-month-calldate">

        <rule>

            <columns>calldate</columns>

            <algorithm>latestMonth</algorithm>

        </rule>

    </tableRule>

    <tableRule name="auto-sharding-rang-mod">

        <rule>

            <columns>id</columns>

            <algorithm>rang-mod</algorithm>

        </rule>

    </tableRule>

    <tableRule name="jch">

        <rule>

            <columns>id</columns>

            <algorithm>jump-consistent-hash</algorithm>

        </rule>

    </tableRule>

    <function name="murmur" class="io.mycat.route.function.PartitionByMurmurHash">

        <property name="seed">0</property><!-- 默认是0 -->

        <property name="count">2</property><!-- 要分片的数据库节点数量,必须指定,否则没法分片 -->

        <property name="virtualBucketTimes">160</property><!-- 一个实际的数据库节点被映射为这么多虚拟节点,默认是160倍,也就是虚拟节点数是物理节点数的160倍 -->

        <!-- <property name="weightMapFile">weightMapFile</property> 节点的权重,没有指定权重的节点默认是1。以properties文件的格式填写,以从0开始到count-1的整数值也就是节点索

引为key,以节点权重值为值。所有权重值必须是正整数,否则以1代替 -->

        <!-- <property name="bucketMapPath">/etc/mycat/bucketMapPath</property>

                用于测试时观察各物理节点与虚拟节点的分布情况,如果指定了这个属性,会把虚拟节点的murmur hash值与物理节点的映射按行输出到这个文件,没有默认值,如果不指定,就不>会输出任何东西 -->

    </function>

    <function name="crc32slot" class="io.mycat.route.function.PartitionByCRC32PreSlot">

        <property name="count">2</property><!-- 要分片的数据库节点数量,必须指定,否则没法分片 -->

    </function>

    <function name="hash-int"

        class="io.mycat.route.function.PartitionByFileMap">

        <property name="mapFile">partition-hash-int.txt</property>

    </function>

    <function name="rang-long"

        class="io.mycat.route.function.AutoPartitionByLong">

        <property name="mapFile">autopartition-long.txt</property>

    </function>

    <function name="mod-long" class="io.mycat.route.function.PartitionByMod">

        <!-- how many data nodes -->

        <property name="count">3</property>

    </function>

    <function name="func1" class="io.mycat.route.function.PartitionByLong">

        <property name="partitionCount">8</property>

        <property name="partitionLength">128</property>

    </function>

    <function name="latestMonth" class="io.mycat.route.function.LatestMonthPartion">

        <property name="splitOneDay">24</property>

    </function>

    <function name="partbymonth"

        class="io.mycat.route.function.PartitionByMonth">

        <property name="dateFormat">yyyy-MM-dd</property>

        <property name="sBeginDate">2015-01-01</property>

    </function>

    <function name="rang-mod" class="io.mycat.route.function.PartitionByRangeMod">

        <property name="mapFile">partition-range-mod.txt</property>

    </function>

    <function name="jump-consistent-hash" class="io.mycat.route.function.PartitionByJumpConsistentHash">

        <property name="totalBuckets">3</property>

    </function>

</mycat:rule>
配置autopartition-long.txt
该配置文件的原本配置是M为单位,这样的数据太大,测试的时候,计算麻烦,我们更改配置如下:
0-2000=0 # 代表id的大小在0-2000中间就是用dn1服务器

2000-4000=1 # 代表id的大小在2000-4000中间就是用dn2服务器

4000-8000=2 # 代表id的大小在4000-8000中间就是用dn3服务器
我们有三个节点,相当于一个有一个服务器集合,每台服务器都是根据下标来对应的,都是从0开始计数,0就代表我们的dn1
测试:
插入三条数据,根据我们配置的规则进行插入
INSERT INTO `user`(`id`, `user_name`, `pass_word`) VALUES (1000, 'a', '123456');

INSERT INTO `user`(`id`, `user_name`, `pass_word`) VALUES (3000, 'b', '123456');

INSERT INTO `user`(`id`, `user_name`, `pass_word`) VALUES (6000, 'c', '123456');
插入完成之后,我们连接Mycat查看数据,如下图:
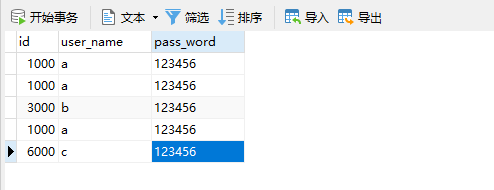
这里我们有3条1000的数据原因是因为我们id等于1000,所以插入到dn1服务里面,但是dn1是我们对应的MySQL主从复制的主服务器132,所以,插入该服务器之后,另外两台从服务器133/134都会直接将数据复制过去。
验证
服务器dn1,应该id=1000的三台服务器都有,id=3000在我们的133从服务器上,id=6000在我们134服务器上
- 主服务器132

- 从服务器133
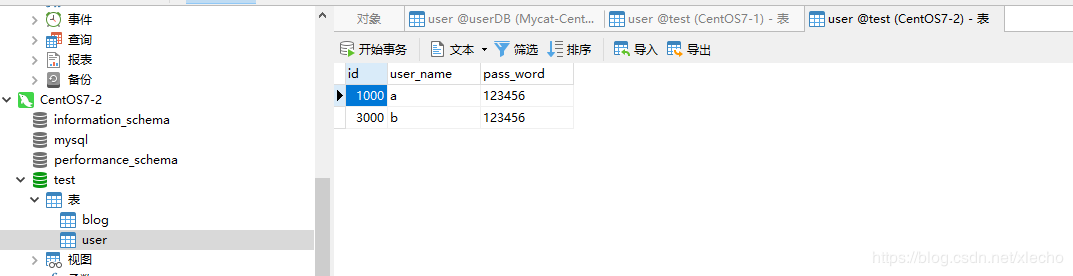
- 从服务器134

做一个有底线的博客主
Mycat分布式数据库架构解决方案--Mycat实现数据库分表的更多相关文章
- Mycat分布式数据库架构解决方案--Mycat实现读写分离
echo编辑整理,欢迎转载,转载请声明文章来源.欢迎添加echo微信(微信号:t2421499075)交流学习. 百战不败,依不自称常胜,百败不颓,依能奋力前行.--这才是真正的堪称强大!!! 安装完 ...
- Mycat分布式数据库架构解决方案--Mycat的介绍
echo编辑整理,欢迎转载,转载请声明文章来源.欢迎添加echo微信(微信号:t2421499075)交流学习. 百战不败,依不自称常胜,百败不颓,依能奋力前行.--这才是真正的堪称强大!!! 如果我 ...
- Mycat分布式数据库架构解决方案--schema.xml详解
echo编辑整理,欢迎转载,转载请声明文章来源.欢迎添加echo微信(微信号:t2421499075)交流学习. 百战不败,依不自称常胜,百败不颓,依能奋力前行.--这才是真正的堪称强大!!! 该文件 ...
- Mycat分布式数据库架构解决方案--rule.xml详解
echo编辑整理,欢迎转载,转载请声明文章来源.欢迎添加echo微信(微信号:t2421499075)交流学习. 百战不败,依不自称常胜,百败不颓,依能奋力前行.--这才是真正的堪称强大!!! 该文件 ...
- Mycat分布式数据库架构解决方案--Server.xml详解
echo编辑整理,欢迎转载,转载请声明文章来源.欢迎添加echo微信(微信号:t2421499075)交流学习. 百战不败,依不自称常胜,百败不颓,依能奋力前行.--这才是真正的堪称强大!!! 该文件 ...
- Mycat安装并实现mysql读写分离,分库分表
Mycat安装并实现mysql读写分离,分库分表 一.安装Mycat 1.1 创建文件夹 1.2 下载 二.mycat具体配置 2.1 server.xml 2.2 schema.xml 2.3 se ...
- Mycat读写分离、主从切换、分库分表的操作记录
系统开发中,数据库是非常重要的一个点.除了程序的本身的优化,如:SQL语句优化.代码优化,数据库的处理本身优化也是非常重要的.主从.热备.分表分库等都是系统发展迟早会遇到的技术问题问题.Mycat是一 ...
- Mycat分布式数据库架构解决方案--Linux安装运行Mycat
echo编辑整理,欢迎转载,转载请声明文章来源.欢迎添加echo微信(微信号:t2421499075)交流学习. 百战不败,依不自称常胜,百败不颓,依能奋力前行.--这才是真正的堪称强大!!! Myc ...
- Mycat分布式数据库架构解决方案--配置defaultAccount属性报错解决方案
echo编辑整理,欢迎转载,转载请声明文章来源.欢迎添加echo微信(微信号:t2421499075)交流学习. 百战不败,依不自称常胜,百败不颓,依能奋力前行.--这才是真正的堪称强大!!! 该文章 ...
随机推荐
- HLOJ1366 Candy Box 动态规划(0-1背包改)
题目描述: 给出N个盒子(N<=100),每个盒子有一定数量的糖果(每个盒子的糖果数<=100),现在有q次查询,每次查询给出两个数k,m,问的是,如果从N个盒子中最多打开k个盒子(意思是 ...
- 常用dos命令(2)
文件管理 type 显示文本文件的内容. copy 将一份或多份文件复制到另一个位置. del 删除一个或数个文件. move 移动文件并重命名文件和目录.(Windows XP Home Editi ...
- 将HashMap转换为List
背景 SpringBoot中,使用@RquestBody注解 hashMap 接收多个参数的json字符串数据,包括一个数组和一个int值.数组中为一个个的对象组成. 问题 使用 map.ge ...
- ESA2GJK1DH1K基础篇: 测试APP扫描Air202上面的二维码绑定通过MQTT控制设备(兼容SIM800)
前言 此程序兼容SIM800 如果想绑定SIM800,请把其IMEI号,生成二维码,用手机APP扫描. 实现功能概要 APP通过扫描二维码获取GPRS设备的IMEI号,然后设置订阅的主题:device ...
- PATA1028 List Sorting
Excel can sort records according to any column. Now you are supposed to imitate this function. Input ...
- uname 命令简介
[root@localhost root]# uname --help Usage: uname [OPTION]... Print certain system information. With ...
- Java 抽象类 抽象方法 接口
#抽象类 在面向对象的概念中,所有的对象都是通过类来描绘的,但是反过来,并不是所有的类都是用来描绘对象的,如果一个类中没有包含足够的信息来描绘一个具体的对象,这样的类就是抽象类. 抽象类除了不能实例化 ...
- 二维码解析(编译zxing-cpp)
二维码解析使用的类库是zxing(官网 https://github.com/zxing/zxing). 这个类库是谷歌的,原来有c++版本,后来的更新去掉了,zxing介绍了目前基于zxing的其他 ...
- JVM 发生内存溢出的 8 种原因、及解决办法
阅读本文大概需要 2.3 分钟. 出处:割肉机 cnblogs.com/williamjie/p/11164572.html Java 堆空间 GC 开销超过限制 请求的数组大小超过虚拟机限制 Per ...
- React-native 导航插件React Navigation 4.x的使用
React-native 导航插件React Navigation 4.x的使用 文档 英文水平可以的话,建议直接阅读英文文档 简单使用介绍 安装插件 yarn add react-navigatio ...