【高可用HA】Nginx (1) —— Mac下配置Nginx Http负载均衡(Load Balancer)之101实例
【高可用HA】Nginx (1) —— Mac下配置Nginx Http负载均衡(Load Balancer)之101实例
nginx版本: nginx-1.9.8
参考来源:
【高可用HA】Apache (2) —— Mac下安装多个Apache Tomcat实例
Nginx on Mac OS X Snow Leopard in 2 Minutes
iteye:图文解说:Nginx+tomcat配置集群负载均衡
安装
首先
从nginx官方网站下载
编译配置
执行命令
$ ./configure --prefix=/Users/Richard/Documents/Dev/servers/cluster/nginx/node-a --with-http_ssl_module
执行结果末尾几行
 ...

 nginx error log file: "/Users/Richard/Documents/Dev/servers/cluster/nginx/node-a/logs/error.log"

 nginx http access log file: "/Users/Richard/Documents/Dev/servers/cluster/nginx/node-a/logs/access.log"

 nginx http client request body temporary files: "client_body_temp"

 nginx http proxy temporary files: "proxy_temp"

 nginx http fastcgi temporary files: "fastcgi_temp"

 nginx http uwsgi temporary files: "uwsgi_temp"

 nginx http scgi temporary files: "scgi_temp"
执行命令
$ make
执行结果末尾几行
 ...

 objs/src/http/modules/ngx_http_upstream_zone_module.o \

 objs/ngx_modules.o \

 -lpcre -lssl -lcrypto -lz

 /Library/Developer/CommandLineTools/usr/bin/make -f objs/Makefile manpage

 sed -e "s|%%PREFIX%%|/Users/Richard/Documents/Dev/servers/cluster/nginx/node-a|" \

 -e "s|%%PID_PATH%%|/Users/Richard/Documents/Dev/servers/cluster/nginx/node-a/logs/nginx.pid|" \

 -e "s|%%CONF_PATH%%|/Users/Richard/Documents/Dev/servers/cluster/nginx/node-a/conf/nginx.conf|" \

 -e "s|%%ERROR_LOG_PATH%%|/Users/Richard/Documents/Dev/servers/cluster/nginx/node-a/logs/error.log|" \

 < man/nginx.8 > objs/nginx.8
执行命令
$ sudo make install
执行结果末尾几行
 test -d '/Users/Richard/Documents/Dev/servers/cluster/nginx/node-a/logs' 		|| mkdir -p '/Users/Richard/Documents/Dev/servers/cluster/nginx/node-a/logs'

 test -d '/Users/Richard/Documents/Dev/servers/cluster/nginx/node-a/logs' || 		mkdir -p '/Users/Richard/Documents/Dev/servers/cluster/nginx/node-a/logs'

 test -d '/Users/Richard/Documents/Dev/servers/cluster/nginx/node-a/html' 		|| cp -R html '/Users/Richard/Documents/Dev/servers/cluster/nginx/node-a'

 test -d '/Users/Richard/Documents/Dev/servers/cluster/nginx/node-a/logs' || 		mkdir -p '/Users/Richard/Documents/Dev/servers/cluster/nginx/node-a/logs'
修改服务器启动配置
将端口修改成85(与其他文章中httpd的端口区分),并修改location配置Proxy
server {
listen 85;
server_name localhost;#charset koi8-r; #access_log logs/host.access.log main; # location / {
# root html;
# index index.html index.htm;
# } location / {
proxy_connect_timeout 3;
proxy_send_timeout 30;
proxy_read_timeout 30;
proxy_pass http://localhost;
}
...
增加转发路由的配置,并指向之前配好的两台Tomcat服务器
  upstream localhost {

  	#根据ip计算将请求分配各那个后端tomcat,许多人误认为可以解决session问题,其实并不能。

  	#同一机器在多网情况下,路由切换,ip可能不同

  	#ip_hash;

  	server localhost:8081;

  	server localhost:8082;

  }
运行
执行命令
$ ./sbin/nginx
提示错误
nginx: [alert] could not open error log file: open() "/Users/Richard/Documents/Dev/servers/cluster/nginx/node-a/logs/error.log" failed (13: Permission denied)

2015/12/09 16:26:55 [emerg] 16550#0: mkdir() "/Users/Richard/Documents/Dev/servers/cluster/nginx/node-a/client_body_temp" failed (13: Permission denied)
*这是因为nginx没有相应的权限
运行命令授权或者以sudo运行
$ sudo ./sbin/nginx
启动
$ sudo ./sbin/nginx -s stop
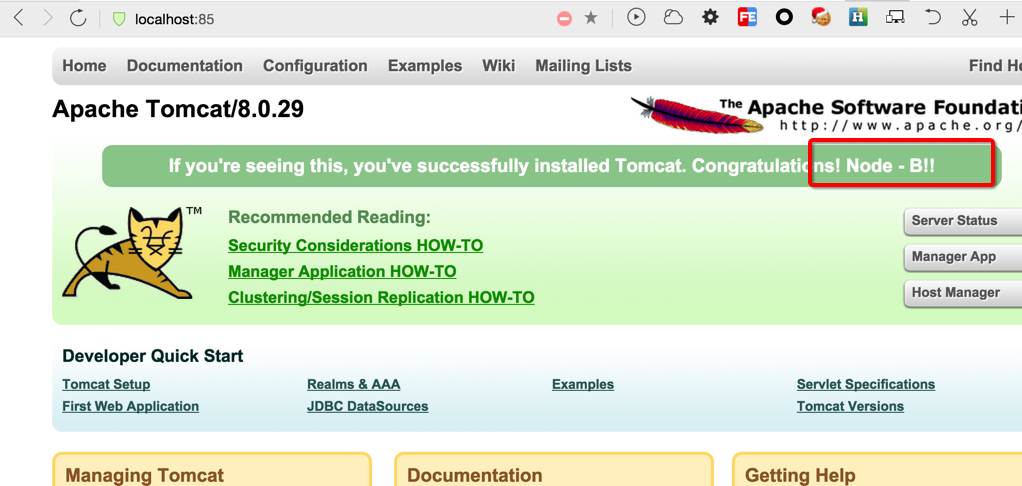
测试
用浏览器访问localhost:85,页面中会交替出现"Node-A!!"和"Node-B!!"
结束
【高可用HA】Nginx (1) —— Mac下配置Nginx Http负载均衡(Load Balancer)之101实例的更多相关文章
- 【高可用HA】Apache (4) —— Mac下配置Apache Httpd负载均衡(Load Balancer)之mod_jk
Mac下配置Apache Httpd负载均衡(Load Balancer)之mod_jk httpd版本: httpd-2.4.17 jk版本: tomcat-connectors-1.2.41 参考 ...
- 【高可用HA】Apache (3) —— Mac下配置Apache Httpd负载均衡(Load Balancer)之mod_proxy
Mac下配置Apache Httpd负载均衡(Load Balancer)之mod_proxy httpd版本: httpd-2.4.17 参考来源: Apache (1) -- Mac下安装Apac ...
- Hadoop 高可用(HA)的自动容灾配置
参考链接 Hadoop 完全分布式安装 ZooKeeper 集群的安装部署 0. 说明 在 Hadoop 完全分布式安装 & ZooKeeper 集群的安装部署的基础之上进行 Hadoop 高 ...
- Mac下配置Nginx负载均衡
1.首先在Mac下安装Nginx(可参考我的另一篇随笔http://www.cnblogs.com/malcolmfeng/p/6896703.html). 2.安装Tomcat,下载后,解压,bin ...
- mac下配置nginx
nginx是一个高性能的HTTP和反向代理服务器,也是一个IMAP/POP3/SMTP服务器,下面我们来了解下nginx的用法. 安装nginx 使用brew安装nginx brew install ...
- mysql高可用架构方案之二(keepalived+lvs+读写分离+负载均衡)
mysql主从复制与lvs+keepalived实现负载高可用 文件夹 1.前言 4 2.原理 4 2.1.概要介绍 4 2.2.工作原理 4 2.3.实际作用 4 3方 ...
- Nginx 在windows下配合iis搭建负载均衡过程 [转]
因为项目遇到大量图片存储问题,虽然现在我们图片还不是很多(目前在1T上下,预计增长速度每年1.3倍的增长速度),自己在思考如何有效地存储大量图片时,查找一些资料,看到了,有人使用 Nginx搭建服务器 ...
- Mac 下配置Nginx安装环境配置详细说明
环境信息: Mac OS X 10.11.1 Homebrew 0.9.5 正文 一.安装 Nginx 1.终端执行: ? 1 2 brew search nginx brew install ng ...
- mac下配置nginx php
修改 php-fpm 文件 1.执行命令: sudo cp /private/etc/php-fpm.conf.default /private/etc/php-fpm.conf 2.找到目录下的 p ...
随机推荐
- IntelliJ Idea解决Could not autowire. No beans of 'xxxx' type found的错误提示
本文转自:http://blog.csdn.net/u012453843/article/details/54906905 1.问题描述 在Idea的spring工程里,经常会遇到Could not ...
- 一般web典型的项目目录结构
本文转自:http://blog.sina.com.cn/s/blog_4758a28b0100l3lp.html WebRoot- -common (系统框架公用jsp 如foote ...
- 将form表单转化为json数据
参考地址:https://github.com/hongymagic/jQuery.serializeObject
- eclipse容易卡死或者较慢的解决方案
http://blog.sina.com.cn/s/blog_5c6c4dc90100lg8n.html 问题: Eclipse经常卡住或Building workspace等待,感觉很不爽,很多朋友 ...
- 利用腾讯云免费证书打造全https站
什么是https? 超文本传输安全协议(Hypertext Transfer Protocol Secure,缩写为HTTPS)是一种网络安全传输协议http是HTTP协议运行在TCP之上,所有传输的 ...
- AP_建立银行信息总行、分行、账户(设定)
2014-06-04 Created By BaoXinjian
- Android中如何实现文件下载
最近做一个项目需要从服务器下载图片到本地sdcard,上网查找了一些例子,下面这个比较合适,原文内容如下: 我们在开发中经常需要从服务器下载文件,下载的内容可能有交换的信息,缓存的图片,程 ...
- Linux时间子系统(十七) ARM generic timer驱动代码分析
一.前言 关注ARM平台上timer driver(clocksource chip driver和clockevent chip driver)的驱动工程师应该会注意到timer硬件的演化过程.在单 ...
- uploadify上传图片
1.实现源代码 <%@ page language="java" import="java.util.*" pageEncoding="UTF- ...
- 目的可疑,但方法非常值得学习的书——leo鉴书56
书中提到写作手法绝对值得学习,为此能够打四颗星. 作者是个买直销产品的.靠写字让别人买自己的东西.当中特别强调了卖的多是太空时代的产品,意思就是读者非常可能并不须要,多半是被眼花缭乱的广告词儿骗了 ...