
linux下PPTP Server测试环境搭建
1.1 服务器软件安装
安裝PPTP Server 所需的软件:
- 安装PPTP:
sudo apt-get install pptpd
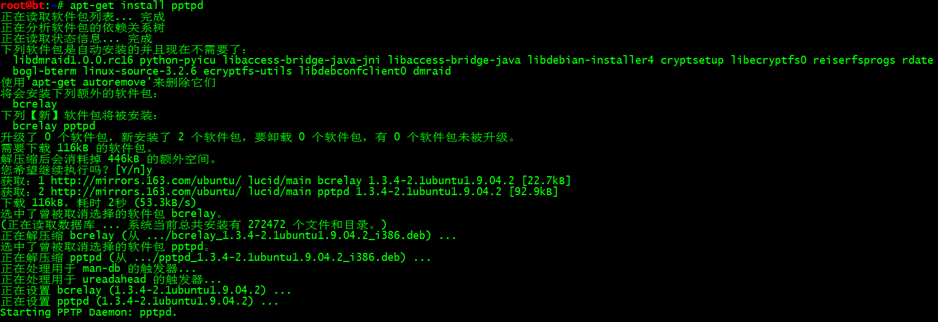
PPTP Server的软件安装很简单,只需要安装pptpd就可以了。
1.2 配置
- 执行命令vi /etc/pptpd.conf配置pptpd.conf文件,增加修改如下:
------------------/etc/pptpd.conf-----------------------------
……#省略部分打印
# 3. No shortcuts in ranges! ie. 234-8 does not mean 234 to 238,
# you must type 234-238 if you mean this.
#
# 4. If you give a single localIP, that's ok - all local IPs will
# be set to the given one. You MUST still give at least one remote
# IP for each simultaneous client.
#
# (Recommended)
#localip 192.168.0.1
#remoteip 192.168.0.234-238,192.168.0.245
localip 66.66.66.1 #server端地址
remoteip 66.66.66.2-100 #client端可分配地址段
-------------------------------------------------------------------
- 执行命令vi /etc/ppp/pptpd-options配置pptpd-option文件,编辑修改如下:
------------------/etc/ppp/pptpd-options-----------------------------
……#省略部分打印
# (must match the second field in /etc/ppp/chap-secrets entries)
name 192.168.10.99 #修改用于认证的本机名,可直接使用IP地址
# Optional: domain name to use for authentication
# domain mydomain.net
# Strip the domain prefix from the username before authentication.
# (applies if you use pppd with chapms-strip-domain patch)
#chapms-strip-domain
# Encryption
# Debian: on systems with a kernel built with the package
# kernel-patch-mppe >= 2.4.2 and using ppp >= 2.4.2, ...
# {{{
#refuse-pap
#refuse-chap
#refuse-mschap #注释掉默认拒绝的方式
# Require the peer to authenticate itself using MS-CHAPv2 [Microsoft
# Challenge Handshake Authentication Protocol, Version 2] authentication.
#require-mschap-v2 #注释掉默认允许的方式
# Require MPPE 128-bit encryption
# (note that MPPE requires the use of MSCHAP-V2 during authentication)
#require-mppe-128
require-chap #添加允许的方式
# }}}
# Network and Routing
# If pppd is acting as a server for Microsoft Windows clients, this
# option allows pppd to supply one or two DNS (Domain Name Server)
# addresses to the clients. The first instance of this option
# specifies the primary DNS address; the second instance (if given)
# specifies the secondary DNS address.
# Attention! This information may not be taken into account by a Windows
# client. See KB311218 in Microsoft's knowledge base for more information.
#ms-dns 10.0.0.1
#ms-dns 10.0.0.2
ms-dns 202.106.0.20
ms-dns 6.6.6.6 #添加server端为client分配的dns
……#省略部分打印
-------------------------------------------------------------------
- 添加用户,编辑chap-secrets文件增加用户名密码:
---------------/etc/ppp/chap-secrets------------------
# Secrets for authentication using CHAP
# client server secret IP addresses
test-pptp * 123456 *
-----------------------------------------------------------
//*表示不指定服务器和IP地址

1.3 启动和关闭服务器
执行如下命令可以启动、停止或重启pptp server:
# /etc/init.d/pptpd start
# /etc/init.d/pptpd stop
# /etc/init.d/pptpd restart
可以查看进程检查服务器是否已启动:

1.4 启用服务器数据转发
通过前面的配置,pptp客户端应该已经可以正常拨号并获取地址,但是如果不启用服务器的数据转发,client即使拿到IP地址,流量也只能到达server而无法转发出去,可通过以下步骤启用服务器的数据转发。
- 修改sysctl.conf文件启用forward:
# vi /etc/sysctl.conf
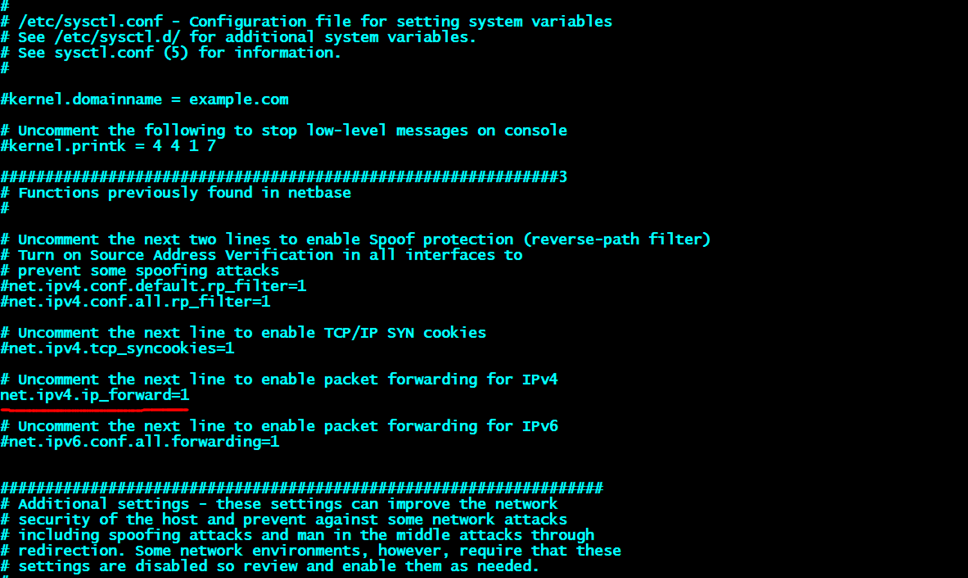
执行命令sysctl –p让修改生效:

- 使用iptables规则
iptables -A INPUT -i eth0 -s 66.66.66.0/24 -j DROP
iptables -t nat -A POSTROUTING -s 66.66.66.0/24 -j SNAT --to-source 192.168.10.99 //192.168.10.99为服务器上实际网络出口的地址
1.5 测试
本处使用win7系统进行测试:
创建新的网络连接
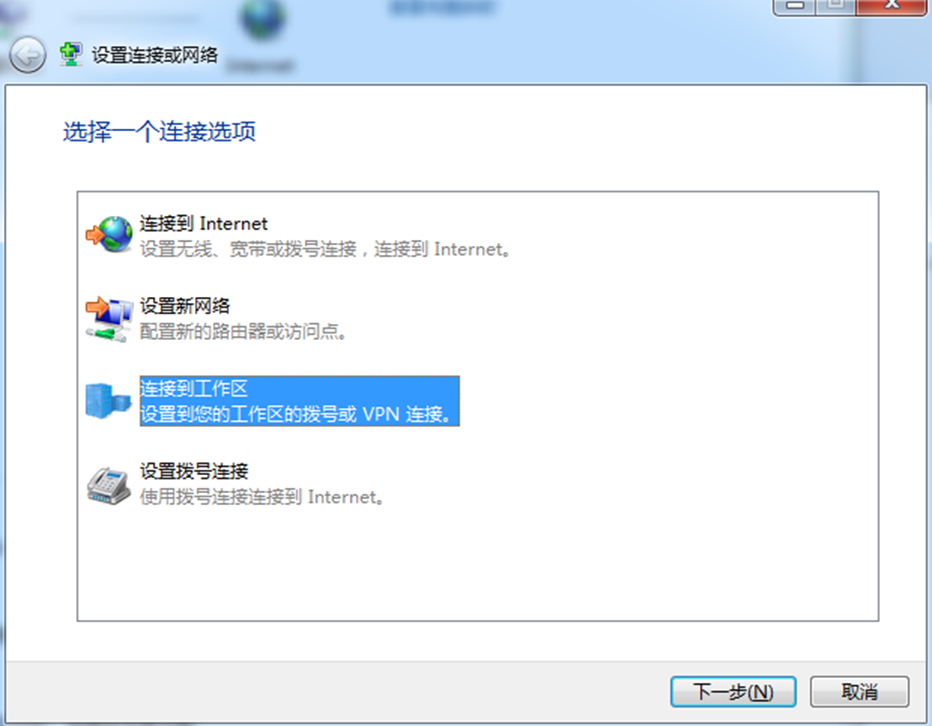
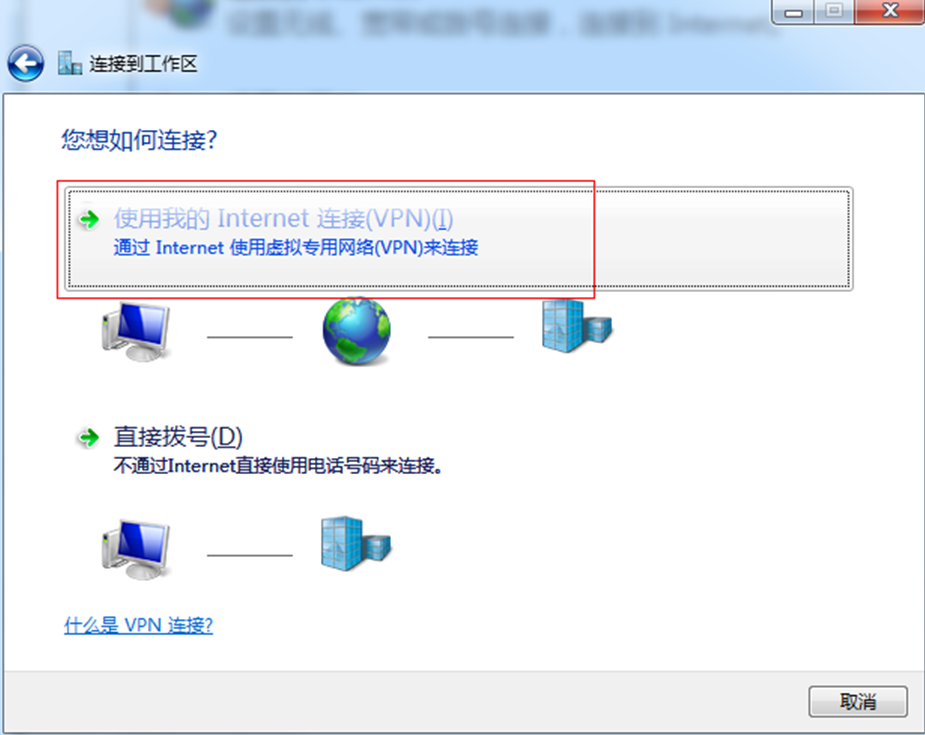
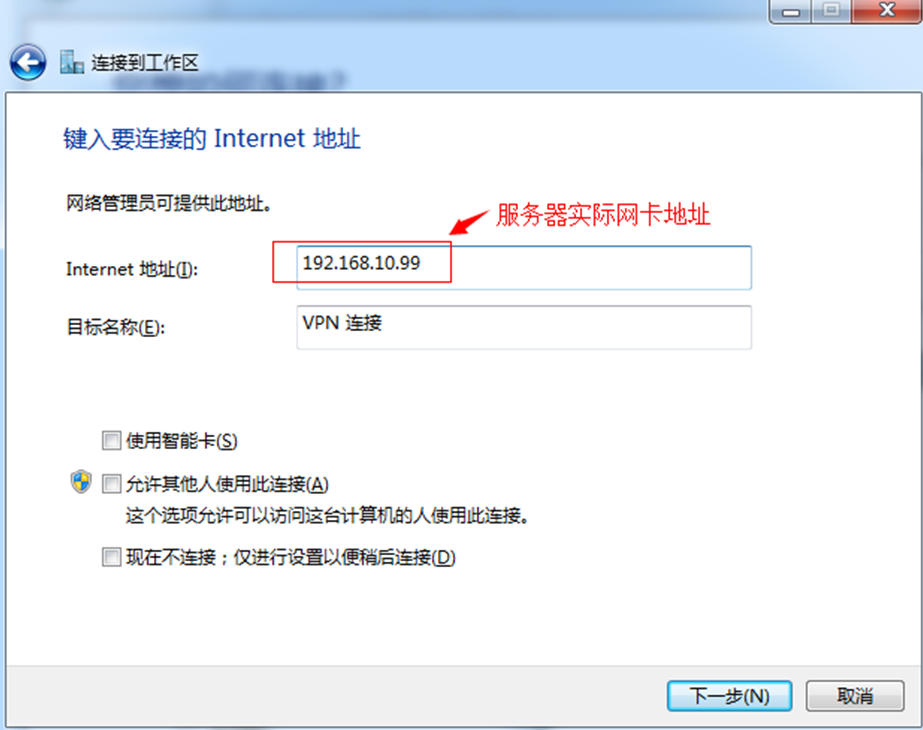
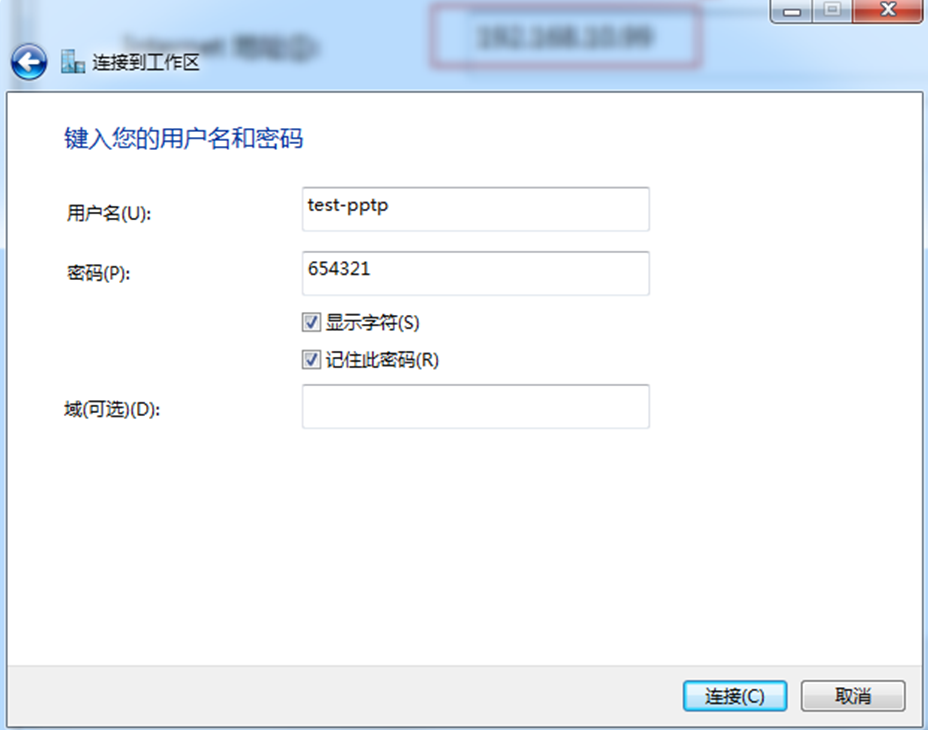
创建完成后,修改VPN类型为PPTP:

拨号连接则可以正常从服务器上获取地址并连接网络:

查看获取到的地址和DNS:

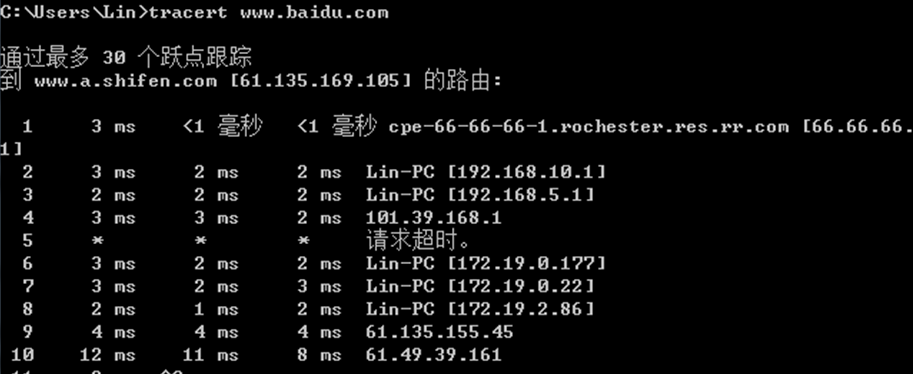
路由跟踪可以看到所有访问外部网络的数据均经过pptp server进行转发:
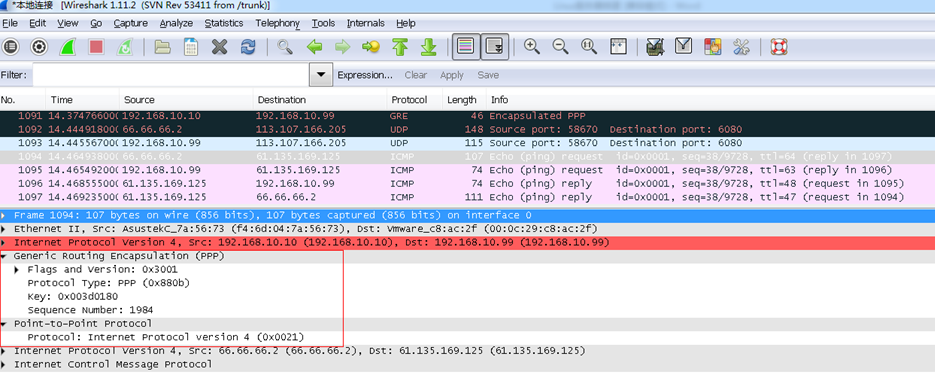
电脑上抓包可以看到数据包已进行ppp和gre封装:
Server端:

linux下PPTP Server测试环境搭建的更多相关文章
- Linux下PPPoE Server测试环境搭建
1.1 服务器软件安装 安裝PPPoE Server 所需的软件: 安装ppp模块: sudo apt-get install ppp //一般默认下已安装 安装rp-pppoe,从网络上下载安 ...
- 2019-9-16:渗透测试,基础学习,Linux下软件安装,环境搭建,笔记
Centos linux下软件安装yum 通过分析rpm包头数据后,自动解决依赖关系,直接云端下载软件,根据不同版本系统获取不同软件信息,按顺序下载rpm包,安装软件yum search 软件名:搜索 ...
- Linux下分布式项目部署环境搭建与使用(druid-1.0.25.jar)数据库连接加密
一.JDK安装 1.执行命令:cd Downloads/ 2.上 传:jdk-8u111-linux-x64.tar.gz 到Downloads 3.执行命令:tar -zxvf jdk-8u111- ...
- linux下安卓编译apk环境搭建
ubuntu下linux安卓编译环境搭建. 配置好编译环境 (前提是已经安装了jdk,可以用java -verison 命令查看) 一.设置环境变量 用vi ~/.bashrc 打开编译环境 JA ...
- Linux下.Net Core+Nginx环境搭建小白教程
前言 对于接触.Net Core的我们来说之前从未接触过Linux,出于资源和性能及成本的考虑我们可能要将我们的环境搬到Linux下,这对于我们从未接触过Linux的童鞋们来说很棘手,那么我今天将带你 ...
- Linux下的ssh实验环境搭建与管理
实验环境[size=10.5000pt]1:网桥模式[size=10.5000pt]2:安装好vmtoos[size=10.5000pt]3:安装好yum[size=10.5000pt]4:安装好ss ...
- linux下solr5.0.0环境搭建
1解压 linux下解压命令 tar -zxvf solr-5.0.0.tgz 2启动 linux 系统 直接切换solr-5.0.0\bin 文件夹 执行 solr star -p 8983 (如果 ...
- linux下系统编程C环境搭建
一.系统安装 我使用的是VMware8下的ubuntu12.04,这是培训老师说的,12.04相对来说,比较新,而且是5年长期支持版,不容易过时.对于系统的安装,我不想说很多,只是希望大家主义这几点: ...
- 【redis】 linux 下redis 集群环境搭建
Redis集群 (要让集群正常工作至少需要3个主节点,在这里我们要创建6个redis节点,其中三个为主节点,三个为从节点,对应的redis节点的ip和端口对应关系如下) 127.0.0.1:63791 ...
随机推荐
- svn回到历史的某个版本
svn回到历史的某个版本 分类: linux大类2011-08-05 10:25 7468人阅读 评论(0) 收藏 举报 svntortoisesvn svn回到历史的某个版本在代码的编写过程中,难免 ...
- myeclipse 8.6安装SVN插件
方法二: 安装subclipse, SVN 插件 1.从官网下载site-1.6.9.zip文件,网址是:subclipse.tigris.org, 2.从中解压出features与plug ...
- bash: crontab: command not found
操作步骤 1. 确认crontab是否安装: 执行 crontab 命令如果报 command not found,就表明没有安装 2. 安装 crontab 执行 yum install -y vi ...
- 源代码管理工具GIT
01.GIT简介 svn是集中式的源代码管理工具,必须联网才能操作 git是分布式的. 有两中:一个是本地代码仓库,一个是远程代码仓库 分布式源代码管理工具 02.GIT - 本地代码仓库使用流程 1 ...
- ['1' for i in range(4)]
' for i in range(4)]) 结果: [']
- 关于使用java执行shell脚本获取centos的硬盘序列号和mac地址
1.获取硬盘序列号: 新建shell脚本文件: identifier.sh, 内容为: diskdata=`fdisk -l` diskleft=${diskdata#*"identifie ...
- Jquery 之deferred
一.概述 在jquery中有种对象称之为延时对象,可以由 http请求方法$.get(), $.ajax(), $.post() 产生, 内置方法如下 也可以有jquery的延时方法 $.when( ...
- C# Web页面打印网页
<style media=print type="text/css"> .noprint{display:none} </style> 在打印时 ...
- SpringMVC分页查询无法直接将对象转换成json的解决办法(报org.springframework.http.converter.HttpMessageNotWritableException: No converter found for return value of type:错)
在用ajax获得分页数据时,无法将获取的值赋值给input标签,在修改用户信息时不显示用户已经注册的信息,百度可知 springmvc处理分页数据返回的对象时,无法直接将对象转换成json,会报org ...
- header的参数不能带下划线
移动端把一些公共参数放在了 header 了, 在 laravel 中使用 use \Illuminate\Http\Request; //这个是获取所有header信息Request::header ...