httpd配置文件详解及实例
httpd配置文件详解及实例
作者:尹正杰
版权声明:原创作品,谢绝转载!否则将追究法律责任。
 [root@yinzhengjie ~]# cat /etc/redhat-release

 CentOS release 6.6 (Final)

 [root@yinzhengjie ~]#

 [root@yinzhengjie ~]# rpm -q httpd

 httpd-2.2.-.el6.centos.x86_64

 [root@yinzhengjie ~]#

 [root@yinzhengjie ~]# rpm -ql httpd | head

 /etc/httpd                ------>运行目录;

 /etc/httpd/conf            ------>主配置目录;

 /etc/httpd/conf.d/*.conf    ------->扩展配置目录;

 /etc/logrotate.d/httpd    ------>日志滚动目录;

 /usr/sbin/httpd            ------>可执行命令目录;

 /var/www/html/            ------>文档根目录,所有需要请求的文件都放在该目录下;

 /var/www/cgi-bin/        ------>CGI目录;

 /etc/httpd/logs            ----->日志目录,其实他是一个链接;

 /etc/httpd/modules        ------>存放各种不同模块的目录,其实它也是一个链接;

 /etc/httpd/run            ------>保存运行的pid;

 /etc/sysconfig/httpd        ------->脚本的配置文件;

 /etc/init.d/httpd            ------->服务启动脚本;

 ..........

 [root@yinzhengjie ~]#

 [root@yinzhengjie ~]# cd /etc/httpd/

 [root@yinzhengjie httpd]# ll

 total 8

 drwxr-xr-x. 2 root root 4096 Sep 18 07:34 conf

 drwxr-xr-x. 2 root root 4096 Sep 18 07:34 conf.d

 lrwxrwxrwx. 1 root root   19 Sep 18 07:34 logs -> ../../var/log/httpd

 lrwxrwxrwx. 1 root root   29 Sep 18 07:34 modules -> ../../usr/lib64/httpd/modules

 lrwxrwxrwx. 1 root root   19 Sep 18 07:34 run -> ../../var/run/httpd

 [root@yinzhengjie httpd]#
[root@yinzhengjie ~]# service httpd configtest
 [root@yinzhengjie ~]# httpd -l

 Compiled in modules:

   core.c        --------->核心模块

   prefork.c    --------->支持的MPM,早httpd2.2版本编译时,有且只能有指定一种MPM。

   http_core.c    --------->http的核心模块

   mod_so.c    --------->支持DSO的机制

 [root@yinzhengjie ~]#
 [root@yinzhengjie ~]# httpd.worker -l

 Compiled in modules:

   core.c

   worker.c        --------->你会发现他们只是MPM的类型不同。如果想要启动worker模式可以用该命令。

   http_core.c

   mod_so.c

 [root@yinzhengjie ~]#
 [root@yinzhengjie ~]# more /etc/sysconfig/httpd  | grep HTTPD=

 #HTTPD=/usr/sbin/httpd.worker   ------->服务默认是讲worker模式是关闭的。而是用的httpd

 [root@yinzhengjie ~]#

 [root@yinzhengjie ~]# ps aux | grep httpd | grep -v grep

 root         0.0  0.3    ?        Ss   :   : /usr/sbin/httpd

 apache       0.0  0.3    ?        S    :   : /usr/sbin/httpd

 apache       0.0  0.3    ?        S    :   : /usr/sbin/httpd

 apache       0.0  0.3    ?        S    :   : /usr/sbin/httpd

 apache       0.0  0.3    ?        S    :   : /usr/sbin/httpd

 apache       0.0  0.3    ?        S    :   : /usr/sbin/httpd

 apache       0.0  0.3    ?        S    :   : /usr/sbin/httpd

 apache       0.0  0.3    ?        S    :   : /usr/sbin/httpd

 apache       0.0  0.2    ?        S    :   : /usr/sbin/httpd

 [root@yinzhengjie ~]#

 [root@yinzhengjie ~]# more /etc/sysconfig/httpd  | grep HTTPD=

 HTTPD=/usr/sbin/httpd.worker              --------------->当然,我们可以手动吧worker功能给打开。

 [root@yinzhengjie ~]# service httpd restart

 Stopping httpd: [  OK  ]

 Starting httpd: httpd.worker: Could not reliably determine the server's fully qualified domain name, using 192.168.1.200 for ServerName                          ------------->这行不用管,原因是你的主机名和IP对应的不一致,该服务会自动进行反解的,只要服务可以正常启动即可。

 [  OK  ]

 [root@yinzhengjie ~]#

 [root@yinzhengjie ~]# ps aux | grep httpd | grep -v grep

 root         0.0  0.4    ?        Ss   :   : /usr/sbin/httpd.worker

 apache       0.6  0.5    ?        Sl   :   : /usr/sbin/httpd.worker

 apache       0.0  0.5    ?        Sl   :   : /usr/sbin/httpd.worker

 apache       0.4  0.5    ?        Sl   :   : /usr/sbin/httpd.worker

 [root@yinzhengjie ~]#
| Match | Allow,Deny result | Deny,Allow result |
| Match Allow only | Request allowed | Request allowed |
| Match Deny only | Request denied | Request denied |
| No match | Default to second directive: Denied | Default to second directive: Allowed |
| Match both Allow & Deny | Final match controls: Denied | Final match controls: Allowed |
 [root@yinzhengjie ~]# more /etc/httpd/conf/httpd.conf | grep -v ^# | grep -v ^$ | grep ScriptAlias

 ScriptAlias /cgi-bin/ "/var/www/cgi-bin/"

 [root@yinzhengjie ~]#

 [root@yinzhengjie ~]# more /var/www/cgi-bin/yinzhengjie

 #!/bin/bash

 #@author :yinzhengjie

 #blog:http://www.cnblogs.com/yinzhengjie

 #EMAIL:y1053419035@qq.com

 cat <<EOF

 Content-Type:text/html

 <pre>

 <h1>The hostname is `hostname`.</h1>

 The time is `date +%F`

 <h1>My name is yinzhengjie!</h1>

 </pre>

 EOF

 [root@yinzhengjie ~]#

 [root@yinzhengjie ~]# chmod +x /var/www/cgi-bin/yinzhengjie

 [root@yinzhengjie ~]#

 [root@yinzhengjie ~]# ll /var/www/cgi-bin/yinzhengjie

 -rwxr-xr-x.  root root  Oct  : /var/www/cgi-bin/yinzhengjie

 [root@yinzhengjie ~]#

 [root@yinzhengjie ~]# /etc/init.d/iptables stop

 iptables: Setting chains to policy ACCEPT: filter [  OK  ]

 iptables: Flushing firewall rules: [  OK  ]

 iptables: Unloading modules: [  OK  ]

 [root@yinzhengjie ~]#

 [root@yinzhengjie ~]# service httpd reload

 Reloading httpd:

 [root@yinzhengjie ~]#

 [root@yinzhengjie ~]# ip a | grep brd |grep inet | awk '{print $2}' | awk -F "/" '{print $1}'

 192.168.1.115

 [root@yinzhengjie ~]#

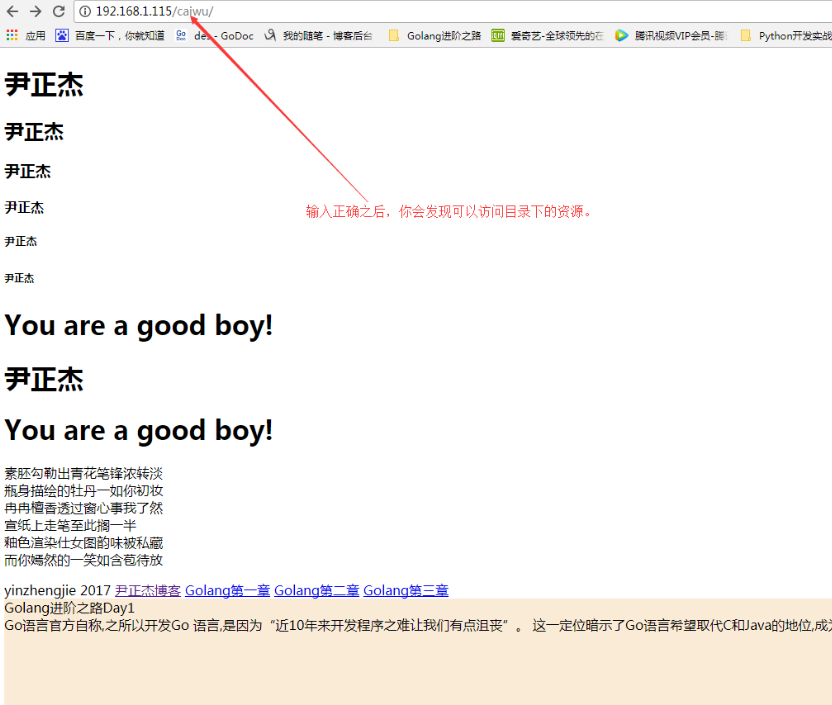
 <Directory "/yinzhengjie/www/htdocs/caiwu">

         Options None                                         ------>表示所有属性都不启用

         AllowOverride AuthConfig                             ------->表示基于用户的认证,而不再完全基于IP的认证了

         AuthType  Basic                                     ------>指定认真类型为基本认证

         AuthName "Please enter your username and password"    ------>该参数给用户一个提示的标题

         AuthBasicProvider file                                 -------->指定认真模式为基于文件的,认证方式,其实该行可以不写,默认就是基于文件认真的,而且下面一行以及充分说明认证时基于文件的

         AuthUserfile /etc/httpd/conf/.ApachePassword             -------->指定存放用户的配置文件

        #AuthGroupFile /etc/httpd/conf/.ApacheGroup                ------->指定存放组名的配置文件

  Require user yinzhengjie                                    -------->表示只允许yingzhengjie这个用户访问,如果你想要“ /etc/httpd/conf/.ApachePassword”这个配置文件的所有用户都有可以访问,就可以改成“Require valid-user”。

 #Require valid-user                                    ----------->允许用户配置文件的所有用户都可以访问

  #Require group GroupName                                ------>允许访问的组名

 </Directory>

 g>.创建用户和密码

 [root@yinzhengjie ~]# htpasswd -c -m /etc/httpd/conf/.ApachePassword  yinzhengjie     #第一次要加“-c”选项,如果第二次创建用户就不需要啦!

 New password:

 Re-type new password:

 Adding password for user yinzhengjie

 [root@yinzhengjie ~]#

 [root@yinzhengjie ~]# htpasswd  -m /etc/httpd/conf/.ApachePassword  yzj     #这是第二次创建用户,如果加“-m”参数之后,就会将之前的配置给清空掉。

 New password:

 Re-type new password:

 Adding password for user yzj

 [root@yinzhengjie ~]#

 [root@yinzhengjie ~]# more /etc/httpd/conf/.ApachePassword     #查看我们创建的用户名和密码

 yinzhengjie:$apr1$t/P8rFq4$PAbZS1icMTxnCvIG8lAS3/

 yzj:$apr1$WKxSWG2B$HuYha4pS6z7.SHyv9zNxv0

 [root@yinzhengjie ~]#

 [root@yinzhengjie ~]# ll /yinzhengjie/www/htdocs/caiwu/index.html

 -rw-r--r--.  root root  Oct  : /yinzhengjie/www/htdocs/caiwu/index.html

 [root@yinzhengjie ~]#

 htpasswd命令:(更多关于htpasswd命令的使用可以参考man帮助。)

 -c:创建文件,创建第一个用户时使用;

 -m:“密码基于MD5编码存储;

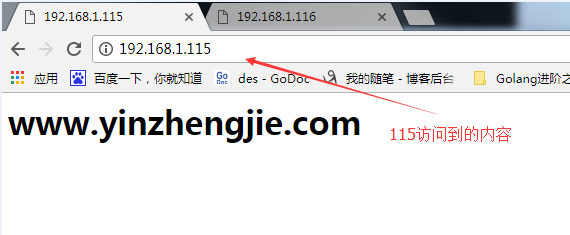
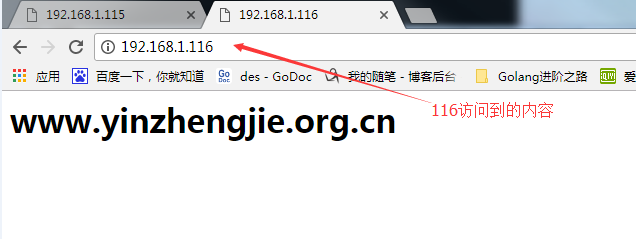
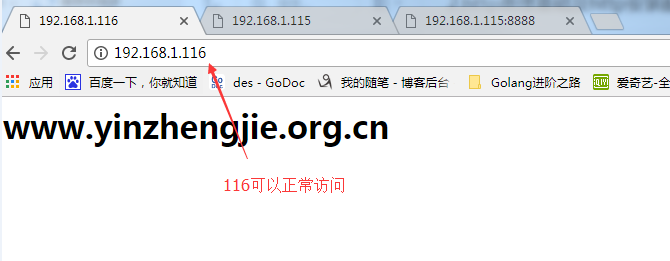
[root@yinzhengjie ~]# ifconfig eth0: 192.168.1.116/ #在web服务器中添加多个IP以便测试
[root@yinzhengjie ~]# ifconfig | grep addr|grep Bcast | awk '{print $2}'|awk -F ":" '{print $2}'
192.168.1.115
192.168.1.116
[root@yinzhengjie ~]#
[root@yinzhengjie ~]# more /etc/httpd/conf/httpd.conf | grep DocumentRoot | grep ^#DocumentRoot
#DocumentRoot "/yinzhengjie/www/htdocs/" ----->需要先关闭中心主机才能配置虚拟主机
[root@yinzhengjie ~]#
[root@yinzhengjie ~]# tail - /etc/httpd/conf/httpd.conf ------>配置虚拟主机格式如下
#ADD by yinzhengjie
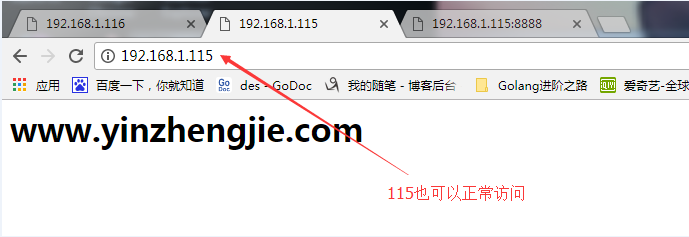
<VirtualHost 192.168.1.115:>
ServerName www.yinzhengjie.com
DocumentRoot "/yinzhengjie/www/yinzhengjie.com/htdocs"
</VirtualHost> <VirtualHost 192.168.1.116:> ------->你会发现虚拟主机的IP不一致;
ServerName yinzhengjie.org.cn
DocumentRoot "/yinzhengjie/www/yinzhengjie.org.cn/htdocs"
</VirtualHost> [root@yinzhengjie ~]#
[root@yinzhengjie ~]# mkdir -p /yinzhengjie/www/yinzhengjie.com/htdocs
[root@yinzhengjie ~]# mkdir -p /yinzhengjie/www/yinzhengjie.org.cn/htdocs
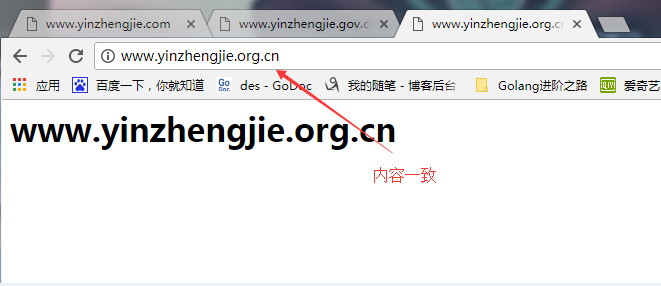
[root@yinzhengjie ~]# more /yinzhengjie/www/yinzhengjie.org.cn/htdocs/index.html ---->设置主机的IP
<h1>www.yinzhengjie.org.cn</h1>
[root@yinzhengjie ~]#
[root@yinzhengjie ~]#
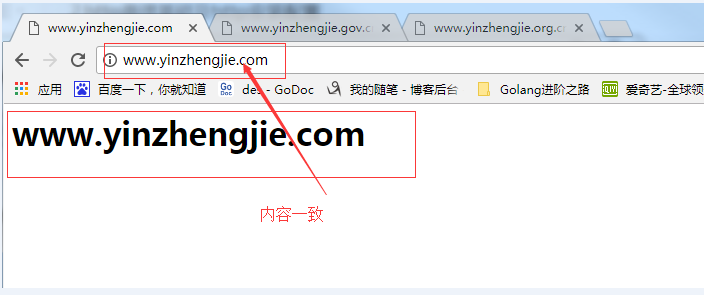
[root@yinzhengjie ~]# more /yinzhengjie/www/yinzhengjie.com/htdocs/index.html
<h1>www.yinzhengjie.com</h1>
[root@yinzhengjie ~]#
[root@yinzhengjie ~]# httpd -t ------>测试配置文件的语法格式是否正确
httpd: apr_sockaddr_info_get() failed for yinzhengjie
httpd: Could not reliably determine the server's fully qualified domain name, using 127.0.0.1 for ServerName
Syntax OK ------>诺,这是没问题的,说是语法OK。
[root@yinzhengjie ~]#
[root@yinzhengjie ~]# service httpd reload ------->重新加载服务即可。
Reloading httpd:
[root@yinzhengjie ~]#
[root@yinzhengjie ~]# tail - /etc/httpd/conf/httpd.conf
#ADD by yinzhengjie
<VirtualHost 192.168.1.115:>
ServerName www.yinzhengjie.com
DocumentRoot "/yinzhengjie/www/yinzhengjie.com/htdocs"
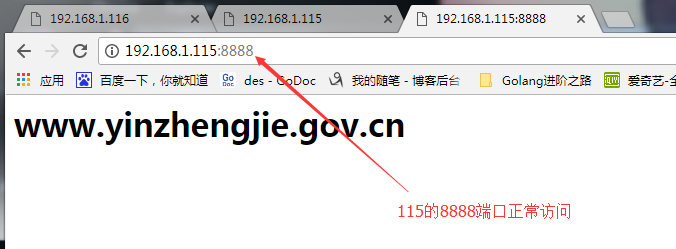
</VirtualHost> <VirtualHost 192.168.1.115:> ----->我们发现其和上面的虚拟主机不同之处在于端口,一次一定要监听8080端口哟。
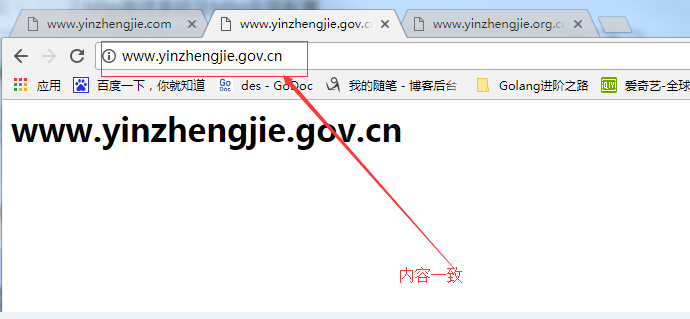
ServerName www.yinzhengjie.gov.cn
DocumentRoot "/yinzhengjie/www/yinzhengjie.gov.cn/htdocs"
</VirtualHost> <VirtualHost 192.168.1.116:>
ServerName www.yinzhengjie.org.cn
DocumentRoot "/yinzhengjie/www/yinzhengjie.org.cn/htdocs"
</VirtualHost> [root@yinzhengjie ~]#
[root@yinzhengjie ~]# more /yinzhengjie/www/yinzhengjie.gov.cn/htdocs/index.html
<h1>www.yinzhengjie.gov.cn</h1>
[root@yinzhengjie ~]#
[root@yinzhengjie ~]# grep Listen /etc/httpd/conf/httpd.conf | grep -v ^#
Listen
Listen ------>注意,一定要启用该端口,不然即使上面的虚拟主机配置正确也无法访问哟
[root@yinzhengjie ~]#
[root@yinzhengjie ~]# service httpd configtest ------->验证语法格式是否正确
httpd: apr_sockaddr_info_get() failed for yinzhengjie
httpd: Could not reliably determine the server's fully qualified domain name, using 127.0.0.1 for ServerName
Syntax OK ------->很显然,语法都是OK的。
[root@yinzhengjie ~]#
[root@yinzhengjie ~]# /etc/init.d/httpd restart ------>重启服务即可
Stopping httpd: [ OK ]
Starting httpd: [ OK ]
[root@yinzhengjie ~]#
[root@yinzhengjie ~]# grep NameVirtualHost /etc/httpd/conf/httpd.conf | grep -v ^#
NameVirtualHost *: ------>在httpd2.2版本,想要实现FQDN方法,该功能需要开启。httpd2.4则不需要开启该功能啦!
[root@yinzhengjie ~]#
[root@yinzhengjie ~]# tail - /etc/httpd/conf/httpd.conf
#ADD by yinzhengjie
<VirtualHost *:>
ServerName www.yinzhengjie.com
DocumentRoot "/yinzhengjie/www/yinzhengjie.com/htdocs"
</VirtualHost> <VirtualHost *:>
ServerName www.yinzhengjie.gov.cn
DocumentRoot "/yinzhengjie/www/yinzhengjie.gov.cn/htdocs"
</VirtualHost> <VirtualHost *:>
ServerName www.yinzhengjie.org.cn
DocumentRoot "/yinzhengjie/www/yinzhengjie.org.cn/htdocs"
</VirtualHost> [root@yinzhengjie ~]#
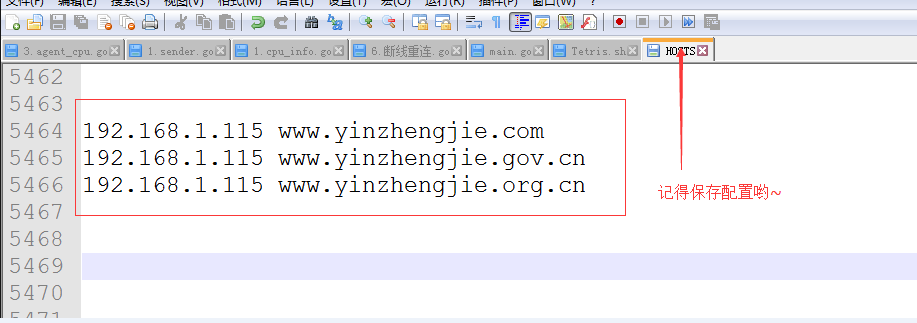
[root@yinzhengjie ~]# more /etc/hosts | grep yinzhengjie ----->我打算在本地进行测试,因此需要修改配置文件
192.168.1.105 node1.yinzhengjie.com
192.168.1.110 node2.yinzhengjie.com
192.168.1.115 node3.yinzhengjie.com
192.168.1.200 node4.yinzhengjie.com
192.168.1.115 www.yinzhengjie.com
192.168.1.115 www.yinzhengjie.gov.cn
192.168.1.115 www.yinzhengjie.org.cn
[root@yinzhengjie ~]#
[root@yinzhengjie ~]# yum -y install elinks ----->安装命令行工具
[root@yinzhengjie ~]# elinks -dump www.yinzhengjie.com -----以下是Linux测试结果
www.yinzhengjie.com
[root@yinzhengjie ~]#
[root@yinzhengjie ~]#
[root@yinzhengjie ~]# elinks -dump www.yinzhengjie.gov.cn
www.yinzhengjie.com
[root@yinzhengjie ~]#
[root@yinzhengjie ~]# elinks -dump www.yinzhengjie.org.cn
www.yinzhengjie.com
[root@yinzhengjie ~]#
 [root@yinzhengjie ~]# tail - /etc/httpd/conf/httpd.conf

 #ADD by yinzhengjie

 <VirtualHost *:>

         ServerName www.yinzhengjie.com

         DocumentRoot "/yinzhengjie/www/yinzhengjie.com/htdocs"

         CustomLog "/var/log/httpd/www.yinzhengjie.com.log" combined

 </VirtualHost>

 <VirtualHost *:>

         ServerName www.yinzhengjie.gov.cn

         DocumentRoot "/yinzhengjie/www/yinzhengjie.gov.cn/htdocs"

         CustomLog "/var/log/httpd/www.yinzhengjie.gov.cn.log" combined

 </VirtualHost>

 <VirtualHost *:>

         ServerName www.yinzhengjie.org.cn

         DocumentRoot "/yinzhengjie/www/yinzhengjie.org.cn/htdocs"

         CustomLog "/var/log/httpd/www.yinzhengjie.org.cn.log" combined

 </VirtualHost>

 [root@yinzhengjie ~]#

 [root@yinzhengjie ~]# httpd -t

 Syntax OK

 [root@yinzhengjie ~]# /etc/init.d/httpd restart

 Stopping httpd: [  OK  ]

 Starting httpd: [  OK  ]

 [root@yinzhengjie ~]#

 [root@yinzhengjie ~]# cd /var/log/httpd/        ----->客户端访问之后,再去日志目录下查看。

 [root@yinzhengjie httpd]# ll

 total

 -rw-r--r--.  root root  Oct  : access_log

 -rw-r--r--.  root root  Oct  : error_log

 -rw-r--r--.  root root    Oct  : www.yinzhengjie.com.log

 -rw-r--r--.  root root    Oct  : www.yinzhengjie.gov.cn.log

 -rw-r--r--.  root root    Oct  : www.yinzhengjie.org.cn.log

 [root@yinzhengjie httpd]#

 [root@yinzhengjie httpd]# cat www.yinzhengjie.com.log

 192.168.1.161 - - [/Oct/::: -] "GET / HTTP/1.1"  - "-" "Mozilla/5.0 (Windows NT 6.1; WOW64) AppleWebKit/537.36 (KHTML, like Gecko) Chrome/61.0.3163.100 Safari/537.36"

 [root@yinzhengjie httpd]#

 [root@yinzhengjie httpd]# cat www.yinzhengjie.gov.cn.log

 192.168.1.161 - - [/Oct/::: -] "GET / HTTP/1.1"  - "-" "Mozilla/5.0 (Windows NT 6.1; WOW64) AppleWebKit/537.36 (KHTML, like Gecko) Chrome/61.0.3163.100 Safari/537.36"

 [root@yinzhengjie httpd]#

 [root@yinzhengjie httpd]# cat www.yinzhengjie.org.cn.log

 192.168.1.161 - - [/Oct/::: -] "GET / HTTP/1.1"  - "-" "Mozilla/5.0 (Windows NT 6.1; WOW64) AppleWebKit/537.36 (KHTML, like Gecko) Chrome/61.0.3163.100 Safari/537.36"

 [root@yinzhengjie httpd]#

 [root@yinzhengjie httpd]#
httpd配置文件详解及实例的更多相关文章
- Java学习-007-Log4J 日志记录配置文件详解及实例源代码
此文主要讲述在初学 Java 时,常用的 Log4J 日志记录配置文件详解及实例源代码整理.希望能对初学 Java 编程的亲们有所帮助.若有不足之处,敬请大神指正,不胜感激!源代码测试通过日期为:20 ...
- Log4j配置文件详解及实例
1 ) . 配置根 Logger ,其语法为: log4j.rootLogger = [ level ] , appenderName, appenderName, … 其中, level 是日 ...
- Apache服务的主要目录和配置文件详解
Apache服务的主要目录和配置文件详解 2014-01-14 19:05:14 标签:httpd配置文件详解 apache配置文件 httpd配置文件 apache文件目录 原创作品,允许转载,转载 ...
- HTTPD之二————HTTPD服务详解————httpd的配置文件常见设置
HTTPD之二----HTTPD服务详解----httpd的配置文件常见设置 HTTP服务器应用 http服务器程序 httpd apache nginx lighttpd 应用程序服务器 IIS,a ...
- Rsyslog配置文件详解
Rsyslog配置文件详解https://my.oschina.net/0757/blog/198329 # Save boot messages also to boot.log 启动的相关信息lo ...
- Tomcat的配置文件详解
Tomcat的配置文件详解 作者:尹正杰 版权声明:原创作品,谢绝转载!否则将追究法律责任. 一.Tomcat的配置文件 Tomcat的配置文件默认存放在$CATALINA_HOME/conf目录中, ...
- quartz配置文件详解
quartz配置文件详解(转载) quartz学习总结: 一.关于job: 用Quartz的行话讲,作业是一个执行任务的简单Java类.任务可以是任何Java代码.只需你实现org.qu ...
- spring配置文件详解--真的蛮详细
spring配置文件详解--真的蛮详细 转自: http://book.51cto.com/art/201004/193743.htm 此处详细的为我们讲解了spring2.5的实现原理,感觉非常 ...
- (原创)LAMP搭建之二:apache配置文件详解(中英文对照版)
LAMP搭建之二:apache配置文件详解(中英文对照版) # This is the main Apache server configuration file. It contains the # ...
随机推荐
- Eclipse+tomcat+MySQL搭建JavaWeb开发环境
准备 1.安装JDK并配置环境变量 2.下载Eclipse,Tomcat,MySQL 配置eclipse 解压Eclipse,需要添加Web Tools Platform才能进行web开发 1.启动E ...
- 猜字游戏java
一.实践目的 1.掌握基本输入输出. 2.掌握方法定义与调用,理解参数传递方式. 3.掌握数组的声明.定义与初始化,数组的处理. 4.掌握数组作为方法参数和返回值. 二.实践要求 利用方法.数组.基本 ...
- github个人作业
信息学院本科生课程设计 题目 文件加密和解密 课程名称 面向对象程序设计课程设计 课程编号 X031749 所在专业 计算机科学与技术 所在班级 计科高职13-3 ...
- C学习随笔
1)要经常复习,一些基础的知识点,学过的.讲过的实例,应多看一下,学习并掌握编程的语法.思路.实验中可看出,不少同学对以前知识没有掌握,对讲过的实例没有理解2)要经常实践,纸上得来终觉浅,绝知此事要躬 ...
- 微信小程序动态数据跑马灯组件编写
开发必备:熟悉微信小程序组件开发 开发思路:如果只有一条数据,直接用css3关键帧动画:如果有多条数据,则在当前动画运动到一定时间的时候,将其数据替换掉,使之在视觉效果上有一个从下到上播放的状态.数组 ...
- 实验十一 团队作业7—团队项目设计完善&编码测试
实验十一 团队作业7—团队项目设计完善&编码测试 实验时间 2018-6-8 Deadline: 2018-6-20 10:00,以团队随笔博文提交至班级博客的时间为准. 评分标准: 按时交 ...
- PAT L2-001 紧急救援
https://pintia.cn/problem-sets/994805046380707840/problems/994805073643683840 作为一个城市的应急救援队伍的负责人,你有一张 ...
- Selenium vs TestStudio,Selenium Grid vs F2Test
Selenium vs TestStudio,不知道差异在哪里? Selenium Grid vs F2Test,后者更优. 用Selenium + FireFox做了一个单机抓图,想要扩展成集群的话 ...
- Java使用HTTPClient3.0.1开发的公众平台消息模板的推送功能
package com.company.product.manager.busniess.impl; import java.io.IOException;import java.nio.charse ...
- Git提交代码失败: empty ident name (for <>) not allowed
使用git提交代码,报错如下: 下午2:56 Commit failed with error 0 files committed, 1 file failed to commit: 升级 empty ...