iOS-绘图(Quartz2D)的简单使用(原创)
前言
附上绘图demo--https://github.com/yangfangxue/YFX_Quartz-2D
什么是Quartz2D?
Quartz 2D是一个二维图形绘制引擎,支持ios环境和Mac OS X环境。我们可以使用Quartz 2D API来实现许多功能如基本
路径的绘制、透明度、描影、绘制阴影、透明层、颜色管理、反锯齿、PDF文档生成和PDF元数据访问。在需要的时候,Quartz 2D
还可以借助图形硬件的功能。在Mac OS X中,Quartz 2D可以与其它图形图像技术混合使用,如Core Image、Core Video、
OpenGL、QuickTime。例如,通过使用 QuickTime的GraphicsImportCreateCGImage函数,可以用 Quartz从一个
QuickTime图形导入器中创建一个图像。
绘图
(1)CGContextRef 上下文--->画板
(2)画图的内容---->设置画图的内容
(3)把内容添加到上下文(画板)
(4)把内容画到画板上
基础知识
常用方法介绍
(1)CGContextRef 上下文--->画板
(2)路径
《1》UIBezierPath
《2》CGMutablePathRef 通过点绘制一个路径
《3》CGContextMoveToPoint 注意必须设置起始点
(3)画形状
《1》矩形 CGContextAddRect
《2》曲线 CGContextAddCurveToPoint
《3》圆形 CGContextAddEllipseInRect
《3.1》CGContextSetLineWidth 设置笔画宽度
《3.2》set 设置笔画的颜色
《3.3》setFill 划线区域范围的填充
《3.4》setStroke 设置笔画的颜色
《3.5》设置画笔填充样式
1.kCGPathFill 只填充
2.kCGPathStroke 画笔颜色
3.kCGPathFillStroke 既填充又有画笔颜色
(4)截图
《1》UIGraphicsBeginImageContextWithOptions 开始截图
《2》UIGraphicsGetImageFromCurrentImageContext() 获得当前图片上下文的图片--画图视图的layer上得到
《3》UIGraphicsEndImageContext 关闭图片上下文
《4》UIGraphicsBeginImageContext 开始获得图片上下文、
《5》CGContextStrokePath 把路径绘制到图片上下文
《6》直接把路径绘制到界面stroke
画线
(1)CGContextRef 上下文 ->画板
(2)路径 画图的内容
(3)CGContextAddPath把路径添加到上下文
(4)CGContextStrokePath把路径渲染到上下文
1.首先新建一个类 继承与UIView 我在这里给它命名为PaintingView
//所有画图的代码都写在drawRect里面
//1.在初始化这个类的对象的时候会调用 2.setNeedsDisplay
//以下我会写几种画直线 矩形 圆形 曲线以及画线简化 还有截屏保存到相册的方法 只需在drawRect用self调用一下即可
- (void)drawRect:(CGRect)rect {

    [super drawRect:rect];

}
画直线
//画直线
- (void)addLine{
//1.创建 画布 上下文
//获得当前上下文 当做画布
CGContextRef context =
UIGraphicsGetCurrentContext();
//2.创建画图的内容
UIBezierPath *path = [UIBezierPath bezierPath];
//point 中心点
//x 中心点x
//y 中心点y
//y不变 x从小值 - 大值 横向直线
//2.1
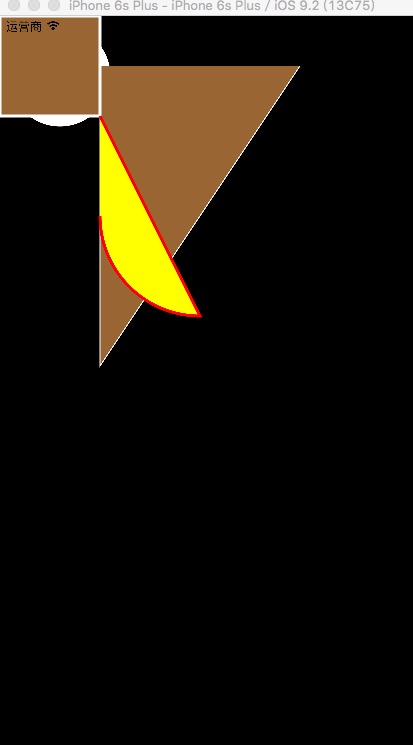
[path moveToPoint:CGPointMake(100, 50)];
//2.2添加其他点
[path addLineToPoint:CGPointMake(100, 350)];
[path addLineToPoint:CGPointMake(300, 50)];
//2.3设置画笔的宽度
path.lineWidth = 2;
//2.4设置画笔颜色
// [[UIColor whiteColor]set];
[[UIColor whiteColor]setStroke];//画笔颜色为白色
[[UIColor brownColor]setFill];//设置填充颜色
//3.把画的内容<路径>添加到上下文<画布>
CGContextAddPath(context, path.CGPath);
//4.绘制 渲染 内容到上下文《画布》
// CGContextStrokePath(context);
//设置填充的样式
CGContextDrawPath(context, kCGPathFillStroke); }
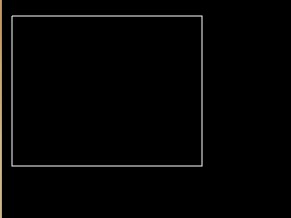
画矩形
//添加矩形

- (void)addRect{

    //1.画布

    CGContextRef context =

    UIGraphicsGetCurrentContext();

    //2.内容

    CGContextAddRect(context, CGRectMake(0, 0, 100, 100));

//    [[UIColor redColor]set];

    [[UIColor whiteColor]setStroke];

    [[UIColor brownColor]setFill];

    //设置画笔宽度

    CGContextSetLineWidth(context, 3);

    //3.渲染

    //直接渲染矩形

//    CGContextStrokeRect(context, CGRectMake(0, 0, 100, 100));

    CGContextDrawPath(context, kCGPathFillStroke);

}
画圆形
//画圆形

- (void)addRound{

    //1.画布

    contextRef =

    UIGraphicsGetCurrentContext();

    //2.内容

    CGContextAddEllipseInRect(contextRef, CGRectMake(10, 10, 100, 100));

    [[UIColor whiteColor]set];

    //3.渲染到画布

    CGContextDrawPath(contextRef, kCGPathFillStroke);

}
画曲线
//画曲线

- (void)addCurve{

    //1.画布

    CGContextRef context =

    UIGraphicsGetCurrentContext();

    //2.内容

    UIBezierPath *path = [UIBezierPath bezierPath];

    [path moveToPoint:CGPointMake(100, 100)];

//    [path addCurveToPoint:CGPointMake(200, 150) controlPoint1:CGPointMake(300, 50) controlPoint2:CGPointMake(100, 100)];

    /*

     Center:中心点

     radius:半径

     startAngle:开始的弧度

     endAngle:结束的弧度

     clockwise:是顺时针 还是逆时针

     */

    [path addArcWithCenter:CGPointMake(200, 200) radius:100 startAngle:M_PI_2 endAngle:M_PI clockwise:YES];

    [[UIColor redColor]setStroke];

    [[UIColor yellowColor]setFill];

    //3.把内容添加到画布上

    CGContextAddPath(context, path.CGPath);

    //4.渲染

    CGContextDrawPath(context, kCGPathFillStroke);

}
画线简化
//画线简化

-(void)addLine2{

    //1.路径

    //2.画出内容

    UIBezierPath *path  = [UIBezierPath bezierPath];

    [path moveToPoint:CGPointMake(200, 200)];

    [path addLineToPoint:CGPointMake(200, 500)];

    [[UIColor whiteColor]set];

    [path stroke];

}
截屏--->需要注意的一点是这个方法首先不会在这个类中被自己所调用 是先有图才能截图的 所以我们需要把这个方法放到PaintingView.h中去声明一下 然ViewController中创建PaintingView的对象 用对象去调用这个方法即可.
//截屏

- (void)cutScreen{

    //1.获得一个图片的上下文(画布)

    //2.画布的上下文

    //3.设置截图的参数

    //3.5 截图

    //4.关闭图片的上下文

    //5.保存

    UIGraphicsBeginImageContext(self.frame.size);

    [self addRound];

    [self.layer renderInContext:contextRef];

    /*

     size 图片尺寸

     opaque 透明度  YES-->不透明  NO--->透明

     scale 比例

     */

    UIGraphicsBeginImageContextWithOptions(self.frame.size, YES, 1);

    //开始截图

    UIImage *image = UIGraphicsGetImageFromCurrentImageContext();

    //关闭截图上下文

    UIGraphicsEndImageContext();

    UIImageWriteToSavedPhotosAlbum(image, self, @selector(image:didFinishSavingWithError:contextInfo:), nil);

}

- (void)image:(UIImage *)image didFinishSavingWithError:(NSError *)error contextInfo:(void *)contextInfo{

}
回到ViewController中创建Painting这个类的对象 调用截屏的方法
- (void)viewDidLoad {

    [super viewDidLoad];

    // Do any additional setup after loading the view, typically from a nib.

    PaintingView *view = [[PaintingView alloc]initWithFrame:self.view.frame];

    [self.view addSubview:view];

    [view cutScreen];

}
得到的效果图如下:

iOS-绘图(Quartz2D)的简单使用(原创)的更多相关文章
- 【iOS】Quartz2D绘图路径Path
一.绘图路径 A.简单说明 在画线的时候,方法的内部默认创建一个path.它把路径都放到了path里面去. 1.创建路径 cgmutablepathref 调用该方法相当于创建了一个路径,这个路径用 ...
- IOS 绘制圆饼图 简单实现的代码有注释
今天为大家带来IOS 绘图中圆饼的实现 .h文件 #import <UIKit/UIKit.h> @interface ZXCircle : UIView @end .m文件 #impor ...
- 论文第4章:iOS绘图平台的实现
面向移动设备的矢量绘图平台设计与实现 Design and Implementation of Mobile Device-oriented Vector Drawing Platform 引用本论文 ...
- iOS绘图教程 (转,拷贝以记录)
本文是<Programming iOS5>中Drawing一章的翻译,考虑到主题完整性,在翻译过程中我加入了一些书中没有涉及到的内容.希望本文能够对你有所帮助. 转自:http://www ...
- iOS绘图教程
本文是<Programming iOS5>中Drawing一章的翻译,考虑到主题完整性,翻译版本中加入了一些书中未涉及到的内容.希望本文能够对你有所帮助.(本文由海水的味道翻译整理,转载请 ...
- iOS绘图框架CoreGraphics分析
由于CoreGraphics框架有太多的API,对于初次接触或者对该框架不是十分了解的人,在绘图时,对API的选择会感到有些迷茫,甚至会觉得iOS的图形绘制有些繁琐.因此,本文主要介绍一下iOS的绘图 ...
- iOS学习——Quartz2D学习之UIKit绘制
iOS学习——Quartz2D学习之UIKit绘制 1.总述 在IOS中绘图技术主要包括:UIKit.Quartz 2D.Core Animation和OpenGL ES.其中Core Animati ...
- iOS CoreImage之滤镜简单使用
代码地址如下:http://www.demodashi.com/demo/11605.html 老骥伏枥,志在千里 前记 最近一直在研究图像处理方面,既上一篇iOS Quart2D绘图之UIImage ...
- iOS绘图系统UIKit与Core Graphics
概述 iOS主要的绘图系统有UIKit,Core Graphics,Core Animation,Core Image,Open GL等,本片博文主要介绍UIKit与Core Graphics的绘图系 ...
随机推荐
- [Python] Symbol Review
From:http://learnpythonthehardway.org/book/ex37.html 1. with X as Y: pass 1.1 yield 2. exec 2.1 name ...
- Linux bash - 常用操作命令
一.终端基础 本文摘录一些本人在学习Linux(CentOS 6.6) bash命令,并且会不定期保持更新. 在此先介绍一下Linux shell终端的常规命令输入格式,如下图: 上图中root是用户 ...
- Click Models for Web Search(2) - Parameter Estimation
在Click Model中进行参数预估的方法有两种:最大似然(MLE)和期望最大(EM).至于每个click model使用哪种参数预估的方法取决于此model中的随机变量的特性.如果model中的随 ...
- Web 开发人员必备的随机 JSON 数据生成工具
在 Web 开发中,经常会需要一些测试数据来测试接口或者功能时候正确.JSON Generator 就是这样一款生成随机 JSON 数据的在线工具,Web 开发人员必备,记得收藏和分享啊. 您可能感兴 ...
- SQL Server 2012:SQL Server体系结构——一个查询的生命周期(第3部分)(完结)
一个简单的更新查询 现在应该知道只读取数据的查询生命周期,下一步来认定当你需要更新数据时会发生什么.这个部分通过看一个简单的UPDATE查询,修改刚才例子里读取的数据,来回答. 庆幸的是,直到存取方法 ...
- Logger.getLogger和LogFactory.getLog的区别
Logger来自log4j自己的包.如果用Logger.getLogger,需要一个log4j的jar包,用此方式你只能依靠log4j: LogFactory来自common-logging包.如果用 ...
- C#设计模式——桥接模式(Bridge Pattern)
一.概述在软件开发中,我们有时候会遇上一个对象具有多个变化维度.比如对汽车对象来说,可能存在不同的汽车类型,如公共汽车.轿车等,也可能存在不同的发动机,如汽油发动机.柴油发动机等.对这类对象,可应用桥 ...
- jQuery实现表格拖动排序
原理就是利用mousedown.mouseover.mouseup事件实现拖动,并用Ajax实现保存结果. JS代码如下: <!--题目调序功能--> <script type=&q ...
- ref与out的区别
若要使用 ref 参数,方法定义和调用方法均必须显式使用 ref 关键字,如下面的示例所示. class RefExample { static void Method(ref int i) { // ...
- LODOP打印插件
HTML代码(请先下载对应LODOP插件安装) - 打印onclike事件CreatePrintPage()打印函数,LODOP.PREVIEW()打印预览. <div class=&q ...