npm包发布记录
下雪了,在家闲着,不如写一个npm 包发布。简单的 npm 包的发布网上有很多教程,我就不记录了。这里记录下,一个复杂的 npm 包发布,复杂指的构建环境复杂。
整个工程使用 rollup 来构建,其中会引进 babel 来转译 ES6,利用 Eslint 来规范代码的书写风格,最后代码的发布会经过 uglify 压缩。同时发布 umd、es 格式的版本以供外部调用。
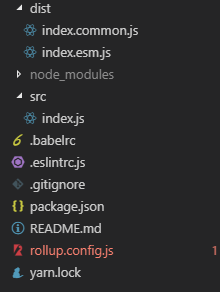
完整目录结构如下:
下面是整个过程的记录
一、初始化工程
yarn init -y
初始化后,修改 package.json 内容,如 name(项目名),description(项目描述)等信息。
二、安装 rollup
yarn add rollup@1.0. --dev
三、创建配置文件 rollup.config.js
 export default {

     input: 'src/index.js',

     output: {

         file: 'index.common.js',

         format: 'umd',

         name: 'index'

     }

 }
四、安装 babel
yarn add rollup-plugin-babel@4.2. @babel/core@7.2. @babel/preset-env@7.2. --dev
五、配置 babel
1、创建配置文件 .babelrc
 {

   "presets": [

    [

     "@babel/preset-env",

     {

      "modules": false

     }

    ]

   ]

 }
2、与 rollup 集成,在 rollup.config.js 中配置 plugins
 import babel from 'rollup-plugin-babel'

 export default {

   input: 'src/index.js',

   output: {

     file: 'index.common.js',

     format: 'umd',

     name: 'index'

   },

   plugins: [

     babel({

       exclude: 'node_modules/**',

       runtimeHelpers: true

     })

   ]

 }
六、安装 eslint
yarn add eslint@5.11.
七、配置 eslint
1、生成 eslint 配置
.\node_modules\.bin\eslint --init
2、与 rollup 集成,在 rollup.config.js 中配置 plugins
 import babel from 'rollup-plugin-babel'

 import { eslint } from 'rollup-plugin-eslint'

 export default {

   input: 'src/index.js',

   output: {

     file: 'index.common.js',

     format: 'umd',

     name: 'index'

   },

   plugins: [

     eslint({

       include: ['src/**'],

       exclude: ['node_modules/**']

     }),

     babel({

       exclude: 'node_modules/**',

       runtimeHelpers: true

     })

   ]

 }
八、commonjs 兼容
yarn add rollup-plugin-commonjs@9.2. rollup-plugin-node-resolve@4.0. --dev
九、与 rollup 集成,在 rollup.config.js 中配置 plugins
 import babel from 'rollup-plugin-babel'

 import { eslint } from 'rollup-plugin-eslint'

 import resolve from 'rollup-plugin-node-resolve'

 import commonjs from 'rollup-plugin-commonjs'

 export default {

   input: 'src/index.js',

   output: {

     file: 'index.common.js',

     format: 'umd',

     name: 'index'

   },

   plugins: [

     resolve({

       jsnext: true,

       main: true,

       browser: true

     }),

     commonjs(),

     eslint({

       include: ['src/**'],

       exclude: ['node_modules/**']

     }),

     babel({

       exclude: 'node_modules/**',

       runtimeHelpers: true

     })

   ]

 }
十、安装 UglifyJS, 用来压缩代码
yarn add rollup-plugin-uglify@6.0. rollup-plugin-uglify-es@0.0. --dev
十一、与 rollup 集成,在 rollup.config.js 中配置 plugins
 import babel from 'rollup-plugin-babel'

 import { eslint } from 'rollup-plugin-eslint'

 import resolve from 'rollup-plugin-node-resolve'

 import commonjs from 'rollup-plugin-commonjs'

 import { uglify } from 'rollup-plugin-uglify'

 export default {

   input: 'src/index.js',

   output: {

     file: 'index.common.js',

     format: 'umd',

     name: 'index'

   },

   plugins: [

     resolve({

       jsnext: true,

       main: true,

       browser: true

     }),

     commonjs(),

     eslint({

       include: ['src/**'],

       exclude: ['node_modules/**']

     }),

     babel({

       exclude: 'node_modules/**',

       runtimeHelpers: true

     }),

     uglify()

   ]

 }
十二、引入环境变量,实践差异化打包
1、安装插件
yarn add rollup-plugin-replace@2.1. --dev
2、配置 plugins
 import babel from 'rollup-plugin-babel'

 import { eslint } from 'rollup-plugin-eslint'

 import resolve from 'rollup-plugin-node-resolve'

 import commonjs from 'rollup-plugin-commonjs'

 import { uglify } from 'rollup-plugin-uglify'

 import replace from 'rollup-plugin-replace'

 export default {

   input: 'src/index.js',

   output: {

     file: 'index.common.js',

     format: 'umd',

     name: 'index'

   },

   plugins: [

     resolve({

       jsnext: true,

       main: true,

       browser: true

     }),

     commonjs(),

     eslint({

       include: ['src/**'],

       exclude: ['node_modules/**']

     }),

     babel({

       exclude: 'node_modules/**',

       runtimeHelpers: true

     }),

     replace({

       exclude: 'node_modules/**',

       ENVIRONMENT: JSON.stringify(process.env.NODE_ENV)

     }),

     uglify()

   ]

 }
十三、参数化配置,加入版权说明,最终配置如下
 import resolve from 'rollup-plugin-node-resolve'

 import commonjs from 'rollup-plugin-commonjs'

 import { eslint } from 'rollup-plugin-eslint'

 import babel from 'rollup-plugin-babel'

 import replace from 'rollup-plugin-replace'

 import { uglify } from 'rollup-plugin-uglify'

 import uglifyEs from 'rollup-plugin-uglify-es'

 const pJson = require('./package.json')

 const version = pJson.version

 const license = pJson.license

 const banner =

   '/*!\n' +

   ` * ${pJson.name} v${version}\n` +

   ` * (c) 2018-${new Date().getFullYear()}\n` +

   ` * Released under the ${license} License.\n` +

   ' */'

 const ENV = process.env.NODE_ENV.trim()

 const paths = {

   input: {

     root: 'src/index.js'

   },

   output: {

     root: 'dist/'

   }

 }

 const fileNames = {

   development: 'index.common.js',

   production: 'index.common.js',

   production6: 'index.esm.js'

 }

 const fileName = fileNames[ENV]

 export default {

   input: `${paths.input.root}`,

   output: {

     file: `${paths.output.root}${fileName}`,

     format: ENV === 'production6' ? 'es' : 'umd',

     name: 'index',

     banner

   },

   plugins: [

     resolve({

       jsnext: true,

       main: true,

       browser: true

     }),

     commonjs(),

     eslint({

       include: ['src/**'],

       exclude: ['node_modules/**']

     }),

     babel({

       exclude: 'node_modules/**',

       runtimeHelpers: true

     }),

     replace({

       exclude: 'node_modules/**',

       ENVIRONMENT: JSON.stringify(process.env.NODE_ENV)

     }),

     (ENV === 'production') && uglify({ output: { comments: /^!/ } }),

     (ENV === 'production6') && uglifyEs({ output: { comments: /^!/ } })

   ]

 }
三、业务代码编写
在 src/index.js 中编写具体业务代码
四、打包
在 package.json 中添加
 "scripts": {

     "dev": "set NODE_ENV=development && rollup -c",

     "build": "yarn run buildcjs && yarn run buildesm",

     "buildcjs": "set NODE_ENV=production && rollup -c",

     "buildesm": "set NODE_ENV=production6 && rollup -c"

 }
运行命令
yarn run build
五、发布
npm publish
发布前记得记得 注册 帐号,记得修改 package.json 中 private 字段为 false
"private": false
npm包发布记录的更多相关文章
- Vuejs 使用 lib 库模式打包 umd 解决 NPM 包发布的问题
由于升级了 v0.2 版 GearCase 使用打包工具从 parcel 更换成 vue-cli 3.x.因此打包后发布 NPM 包的方式与之前有很大的差异,这也导致了在发布完 GearCase v0 ...
- npm 包发布,自己本机发布,前端内部发布,全网发布
第一步,安装 sinopia npm install -g sinopia 开启终端一: 第二步,启动 sinopia -l 127.0.0.1:4873 开启终端二: cd 到某个指定仓库 mkdi ...
- npm包发布过程
在上一章节中,我封装了一个基于react的树状组件,后来想把它发布到npm上,下面主要介绍一下发布过程中遇到的问题: 1.去注册npm账号,注册地址(https://www.npmjs.com), 再 ...
- 如何发布一个npm包(基于vue)
前言:工作的时候总是使用别人的npm包,然而我有时心底会好奇自己如何发布一个npm包呢,什么时候自己的包能够被很多人喜欢并使用呢...今天我终于迈出了第一步. 前提:会使用 npm,有 vue 基础, ...
- 从零开始写一个npm包及上传
最近刚好自己需要写公有npm包及上传,虽然百度上资料都能找到,但是都是比较零零碎碎的,个人就来整理下,如何从零开始写一个npm包及上传. 该篇文件只记录一个大概的流程,一些细节没有记录. tips: ...
- 【转】npm publish 发布
<h3 class="catListTitle">一.npm包结构(编写)</h3> npm包实际是一个存档文件,即一个目录直接打包为.zip或tar.gz ...
- npm publish 发布
前言 我们npm publish发布的时候,一定是本地文件发布到远程仓库,并且登录到http://registry.npmjs.org(即npm adduser或npmlogin)之后,才可以进行发布 ...
- 使用cnpm搭建私有NPM仓库 发布npm包
关于如何使用cnpm搭建私有的npm仓库看这里→ http://blog.fens.me/nodejs-cnpm-npm/ 我本人还没有机会真正实践操作过,公司的npm仓库是我老大搭建的,我这里仅仅记 ...
- webpack创建library及从零开始发布一个npm包
最近公司有个需求,我们部门开发一个平台项目之后,其他兄弟部门开发出的插件我们可以拿来直接用,并且不需要我们再进行打包,只是做静态的文件引入,研究一波后发现,webpack创建library可以实现. ...
随机推荐
- 2019.01.16 bzoj3526: [Poi2014]Card(线段树)
传送门 线段树菜题. 题意:有一些卡牌,正反各有一个数,你可以任意翻转,每次操作会将两张卡牌的位置调换,你需要在每次操作后回答以现在的卡牌顺序能否通过反转形成一个单调不降的序列. 思路: 对于一个线段 ...
- 2018.11.05 NOIP模拟 相交(dfs序+bit)
传送门 又TMTMTM考原题真是服. 考虑到两条路径相交一定满足某一条的lcalcalca在另外一条路径上面. 于是分开统计有多少个lcalcalca在当前路径上面以及有多少个路径经过了当前的lcal ...
- 1-9-假期训练心得(dp+bfs)
题目一:传送门 思路:就是简单的bfs,注意仔细审题,加上对转弯次数的判断. 题目二:传送门 思路:简单dp,记录每一秒每个位置接到的大饼的数量. 状态转移方程:dp[i][j]=max(dp[i][ ...
- javaScript正则表达式的使用
今天看了一个正则的写法,回想一下,对于正则都忘记得差不多了,称这个时间整理一下,收集了一些以前的资料和查看了一些别人的资料,做一个小小的总结,方便自己以后查看,也希望能帮助到大家!! 欢迎指正,欢 ...
- Andrew机器学习第一课
批梯度下降算法: 训练样本为一个时:更新Θi 让代价函数最小,利用沿梯度下降方向函数会变得越来越小.这个函数是代价函数J关于(Θi )的.这里并没有在讨论x,y. 关于为什么式子(图是复制的 ...
- python科学计算模块NumPy
NumPy是Numerical Python的简称,是高性能科学计算和数据分析的基础包.其实NumPy 本身并并没有提供太多的高级的数据分析功能, 但是理解NumPy数组以及面向数组的计算将有利于你更 ...
- HTTP文件上传服务器-支持超大文件HTTP断点续传的实现办法
最近由于笔者所在的研发集团产品需要,需要支持高性能的大文件http上传,并且要求支持http断点续传.笔者在以前的博客如何实现支持大文件的高性能HTTP文件上传服务器已经介绍了实现大文件上传的一些基本 ...
- event based xml parser (SAX) demo
import java.io.ByteArrayInputStream; import javax.xml.parsers.SAXParser; import javax.xml.parsers.SA ...
- redis.conf之save配置项解读
配置示例: save 900 1 save 300 10 save 60 3600 配置解读: 1) “save 900 1”表示如果900秒内至少1个key发生变化(新增.修改和删除),则重写rdb ...
- 你可能不知道的Shell
Shell也叫做命令行界面,它是*nix操作系统下用户和计算机的交互界面.Shell这个词是指操作系统中提供访问内核服务的程序. 这篇文章向大家介绍Shell一些非广为人知.但却实用有趣的知识,权当品 ...