mysql8.0.17gtid方式实现主从同步
数据库的安装:
[root@node1 8.0.17]# rpm -ivh mysql-community-common-8.0.17-1.el7.x86_64.rpm
警告:mysql-community-common-8.0.17-1.el7.x86_64.rpm: 头V3 DSA/SHA1 Signature, 密钥 ID 5072e1f5: NOKEY
准备中... ################################# [100%]
正在升级/安装...
1:mysql-community-common-8.0.17-1.e################################# [100%]
[root@node1 8.0.17]# rpm -ivh mysql-community-libs-8.0.17-1.el7.x86_64.rpm
警告:mysql-community-libs-8.0.17-1.el7.x86_64.rpm: 头V3 DSA/SHA1 Signature, 密钥 ID 5072e1f5: NOKEY
准备中... ################################# [100%]
正在升级/安装...
1:mysql-community-libs-8.0.17-1.el7################################# [100%]
[root@node1 8.0.17]# rpm -ivh mysql-community-client-8.0.17-1.el7.x86_64.rpm
警告:mysql-community-client-8.0.17-1.el7.x86_64.rpm: 头V3 DSA/SHA1 Signature, 密钥 ID 5072e1f5: NOKEY
准备中... ################################# [100%]
正在升级/安装...
1:mysql-community-client-8.0.17-1.e################################# [100%]
[root@node1 8.0.17]# rpm -ivh mysql-community-server-8.0.17-1.el7.x86_64.rpm
警告:mysql-community-server-8.0.17-1.el7.x86_64.rpm: 头V3 DSA/SHA1 Signature, 密钥 ID 5072e1f5: NOKEY
准备中... ################################# [100%]
正在升级/安装...
1:mysql-community-server-8.0.17-1.e################################# [100%]
[root@node1 8.0.17]# rpm -ivh mysql-community-devel-8.0.17-1.el7.x86_64.rpm --force --nodeps
警告:mysql-community-devel-8.0.17-1.el7.x86_64.rpm: 头V3 DSA/SHA1 Signature, 密钥 ID 5072e1f5: NOKEY
准备中... ################################# [100%]
正在升级/安装...
1:mysql-community-devel-8.0.17-1.el################################# [100%]
[root@node1 8.0.17]# systemctl start mysqld
[root@node1 8.0.17]# more /var/log/mysqld.log |grep password
2019-07-28T07:48:29.031474Z 5 [Note] [MY-010454] [Server] A temporary password is generated for root@localhost: Z3(E!khsm_EE
[root@node1 8.0.17]# mysql -uroot -p
Enter password:
Welcome to the MySQL monitor. Commands end with ; or \g.
Your MySQL connection id is 8
Server version: 8.0.17
Copyright (c) 2000, 2019, Oracle and/or its affiliates. All rights reserved.
Oracle is a registered trademark of Oracle Corporation and/or its
affiliates. Other names may be trademarks of their respective
owners.
Type 'help;' or '\h' for help. Type '\c' to clear the current input statement.
mysql> alter user 'root'@'localhost' identified by 'kavl7kAkkle!'; 登录成功之后必须先修改密码,才能使用。
Query OK, 0 rows affected (0.02 sec)
mysql> show databases;
+--------------------+
| Database |
+--------------------+
| information_schema |
| mysql |
| performance_schema |
| sys |
+--------------------+
4 rows in set (0.01 sec)
环境:
master:
master配置文件:
[root@master 8.0.17]# grep -v '^#' /etc/my.cnf
[mysqld]
datadir=/var/lib/mysql
socket=/var/lib/mysql/mysql.sock
log-error=/var/log/mysqld.log
pid-file=/var/run/mysqld/mysqld.pid
server-id=1
gtid-mode=on
enforce-gtid-consistency=on
log-slave-updates=on
log_bin = binlog
[root@master 8.0.17]# systemctl restart mysql
[root@master 8.0.17]# mysql -uroot -pkavl7kAkkle!
mysql> create user 'repl'@'192.168.199.%' identified by 'kavl7kAkkle!'; 建立同步的账号
mysql>grant replication slave on *.* to 'repl'@'192.168.199.%';
mysql> flush privileges;
Query OK, 0 rows affected (0.01 sec)
测试一下建立的账号是否可以在slave上登录(可以登录)
[root@node1 8.0.17]# mysql -urepl -h 192.168.199.6 -pkavl7kAkkle!
mysql: [Warning] Using a password on the command line interface can be insecure.
Welcome to the MySQL monitor. Commands end with ; or \g.
Your MySQL connection id is 24
Server version: 8.0.17 MySQL Community Server - GPL
Copyright (c) 2000, 2019, Oracle and/or its affiliates. All rights reserved.
Oracle is a registered trademark of Oracle Corporation and/or its
affiliates. Other names may be trademarks of their respective
owners.
Type 'help;' or '\h' for help. Type '\c' to clear the current input statement.
mysql>
查看gtid是否开启:
mysql> show variables like "%gtid%";
+----------------------------------+------------------------------------------+
| Variable_name | Value |
+----------------------------------+------------------------------------------+
| binlog_gtid_simple_recovery | ON |
| enforce_gtid_consistency | ON |
| gtid_executed | c3a99d8b-b10e-11e9-9e44-000c297d60e3:1-7 |
| gtid_executed_compression_period | 1000 |
| gtid_mode | ON |
| gtid_next | AUTOMATIC |
| gtid_owned | |
| gtid_purged | |
| session_track_gtids | OFF |
+----------------------------------+------------------------------------------+
9 rows in set (0.02 sec)
查看服务器的UUID:
mysql> show global variables like '%uuid%';
+---------------+--------------------------------------+
| Variable_name | Value |
+---------------+--------------------------------------+
| server_uuid | c3a99d8b-b10e-11e9-9e44-000c297d60e3 |
+---------------+--------------------------------------+
1 row in set (0.01 sec)
查看主服务器的状态:
mysql> show master status;
+---------------+----------+--------------+------------------+------------------------------------------+
| File | Position | Binlog_Do_DB | Binlog_Ignore_DB | Executed_Gtid_Set |
+---------------+----------+--------------+------------------+------------------------------------------+
| binlog.000003 | 878 | | | c3a99d8b-b10e-11e9-9e44-000c297d60e3:1-7 |
+---------------+----------+--------------+------------------+------------------------------------------+
node1:
[root@node1 8.0.17]# grep -v '^#' /etc/my.cnf
[mysqld]
datadir=/var/lib/mysql
socket=/var/lib/mysql/mysql.sock
log-error=/var/log/mysqld.log
pid-file=/var/run/mysqld/mysqld.pid
server-id=2
gtid-mode=on
enforce-gtid-consistency=on
log-slave-updates=on
[root@node1 8.0.17]# systemctl restart mysqld
[root@node1 8.0.17]# mysql -uroot -pkavl7kAkkle!
mysql> change master to master_host='192.168.199.6',master_user='repl',master_password='kavl7kAkkle!'; 指定主库IP,使用的用户,密码
mysql> start slave;
Query OK, 0 rows affected, 1 warning (0.00 sec)
查看slave状态:
mysql> show slave status \G;
*************************** 1. row ***************************
Slave_IO_State: Waiting for master to send event
Master_Host: 192.168.199.6
Master_User: repl
Master_Port: 3306
Connect_Retry: 60
Master_Log_File: binlog.000003
Read_Master_Log_Pos: 878
Relay_Log_File: node1-relay-bin.000003
Relay_Log_Pos: 1086
Relay_Master_Log_File: binlog.000003
Slave_IO_Running: Yes
Slave_SQL_Running: Yes
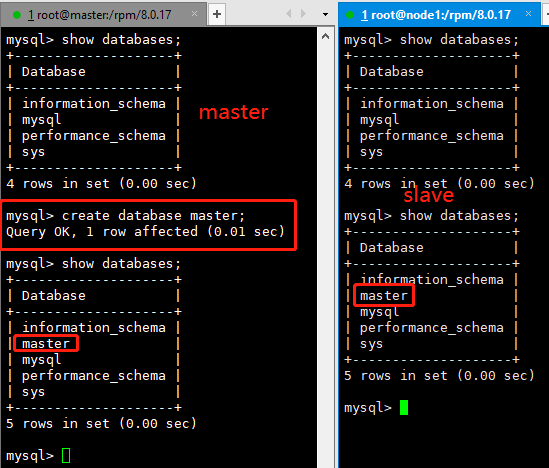
测试gtid主从复制
在master上建立数据库slave上自动创建了。
在master上查看,可以看到slave的状态(主库的sever_id、从库的server_id、slave_UUID)
mysql> show slave hosts;
+-----------+------+------+-----------+--------------------------------------+
| Server_id | Host | Port | Master_id | Slave_UUID |
+-----------+------+------+-----------+--------------------------------------+
| 2 | | 3306 | 1 | 167eed9d-b10c-11e9-af77-000c2973f66b |
+-----------+------+------+-----------+--------------------------------------+
至此gtid主从复制搭建成功!!!!有什么问题欢迎留言指教。
mysql8.0.17gtid方式实现主从同步的更多相关文章
- zabbix3.0.4监控mysql主从同步
zabbix3.0.4监控mysql主从同步 1.监控mysql主从同步原理: 执行一个命令 mysql -u zabbix -pzabbix -e 'show slave status\G' 我们在 ...
- mysql8.0.25版本设置主从数据库,并且从库只读
具体操作步骤 说明:主从数据库版本一致 1.主库创建同步使用的用户 create user 'repl'@'%' identified with 'mysql_native_password' by ...
- MySQL5.7主从同步--点位方式及GTID方式
MySQL5.6加入了GTID的新特性,其全称是Global Transaction Identifier,可简化MySQL的主从切换以及Failover.GTID用于在binlog中唯一标识一个事务 ...
- mysql-8.0 安装教程(自定义配置文件,密码方式已修改)
下载zip安装包: MySQL8.0 For Windows zip包下载地址:https://dev.mysql.com/downloads/file/?id=476233,进入页面后可以不登录.后 ...
- Mysql主从同步(1) - 概念和原理介绍 以及 主从/主主模式 部署记录
Mysql复制概念Mysql内建的复制功能是构建大型高性能应用程序的基础, 将Mysql数据分布到多个系统上,这种分布机制是通过将Mysql某一台主机数据复制到其它主机(slaves)上,并重新执行一 ...
- 高级程序员必知必会,一文详解MySQL主从同步原理,推荐收藏
1. MySQL主从同步实现方式 MySQL主从同步是基于Bin Log实现的,而Bin Log记录的是原始SQL语句. Bin Log共有三种日志格式,可以binlog_format配置参数指定. ...
- MySQL8.0安装
背景 MySQl 8.0 出来已经有段时间了,据说性能有很大提高,在网上看过很多安装教程,大同小异, 在这里亲身实战实战下MySQL8.0在Windows10系统下的安装,以下为详细的安装步骤. 1. ...
- mysql-8.0.11-winx64.zip安装教程
mysql-8.0.11-winx64.zip安装教程 下载zip安装包: MySQL8.0 For Windows zip包下载地址:https://dev.mysql.com/download ...
- 解决Navicat 无法连接mysql8.0
必须执行下面两个步骤,缺一不可. 一. mysql8.0加密方式与mysql5几加密方式不同,需要先更改加密方式. 更改加密方式 ALTERUSER 'root'@'localhost' ...
随机推荐
- (二)XML基础(2)
三.解析 服务端解析 JDK: DOM SAX JAXB java and xml Binding 开源(一般都是用开源的) ...
- C# Task.WhenAll
1.有时候我们需要同时执行一些操作,然后把这些操作的结果进行汇总,以达到用异步处理降低操作耗时的效果,此时我们会考虑使用Task,而Task.WhenAll则排上了用场. public void Is ...
- vue + element-ui 国际化实现
1. 安装组件和插件 cnpm i element-ui -S // 安装elementcnpm i vue-i18n -S //安装i18n 2.将国际化资源放在assets目录下 3.在src下新 ...
- java如何在不访问数据库就可以对list分页?
废话不多说,直接上代码 import java.util.ArrayList; import java.util.List; public class demo { public static voi ...
- 通过Nginx统计网站的PV、UV、IP
转载:通过Nginx统计网站的PV.UV.IP 概念 UV:独立访客:以cookie为依据,假设一台电脑装有3个不同的浏览器,分别打开同一个页面,将会产生3个UV.PV:访问量:页面每访问或刷新一次, ...
- jq 停止/结束多个ajax请求
页面按钮: <button id="song">abort</button> 请求: var str = {} str.xhr = $.ajax({ typ ...
- JdbcTemplate批量插入数据
运行环境:SpringBoot,注入JdbcTemplate @Autowired private JdbcTemplate jdbcTemplate; 1.单表批量插入数据 @Test public ...
- bond模式详解
目录 bond模式详解 一.什么是bond? 二.为什么使用bond? 三.bond模式配置 1.配置linux bond 2.将bond绑定到ovs上面(可选) 四.bond模式 1.模式0 2.模 ...
- keepalived+lvs+usp安装实施文档
操作系统平台:RedHat6.4 x86_64 软件:LVS+keepalived LVS+Keepalived 介绍 LVS LVS是Linux Virtual Server的简写,意即Linux ...
- sqlserver 拼接字符串分割
CREATE FUNCTION [dbo].[fnQuerySplit] ( @string VARCHAR(MAX) ,--待分割字符串 )--分割符 ) ) ) AS BEGIN DECLARE ...