创建安全的 Netty 程序
1.使用 SSL/TLS 创建安全的 Netty 程序
SSL 和 TLS 是众所周知的标准和分层的协议,它们可以确保数据时私有的
Netty提供了SSLHandler对网络数据进行加密
使用Https
public class SslChannelInitialzer extends ChannelInitializer<Channel>{

    private final SSLContext context;

    private final boolean client;

    private final boolean startTls;

    public SslChannelInitialzer(SSLContext context, boolean client, boolean startTls) {

        this.context = context;

        this.client = client;

        this.startTls = startTls;

    }

    @Override

    protected void initChannel(Channel ch) throws Exception {

        SSLEngine engine = context.createSSLEngine();

        engine.setUseClientMode(client);

        ch.pipeline().addFirst("ssl", new SslHandler(engine, startTls));

    }

}
2.使用 Netty 创建 HTTP/HTTPS 程序
public class HttpDecoderEncodeIntializer extends ChannelInitializer<Channel>{

    private final boolean client;

    public HttpDecoderEncodeIntializer(boolean client) {

        this.client = client;

    }

    @Override

    protected void initChannel(Channel ch) throws Exception {

        ChannelPipeline pipeline = ch.pipeline();

        if (client) {

            pipeline.addLast("decoder", new HttpResponseDecoder());

            pipeline.addLast("", new HttpRequestEncoder());
       pipeline.addLast("decompressor", new HttpContentDecompressor()); //添加解压缩 Handler

        } else {

            pipeline.addLast("decoder", new HttpRequestEncoder());

            pipeline.addLast("encoder", new HttpResponseDecoder());

        }

    }

}
如果你需要在 ChannelPipeline 中有一个解码器和编码器,还分别有一个在客户端和服务器简单的编解码器:HttpClientCodec 和 HttpServerCodec
pipeline.addLast("aggegator", new HttpObjectAggregator(512 * 1024)); 聚合消息
WebSocket
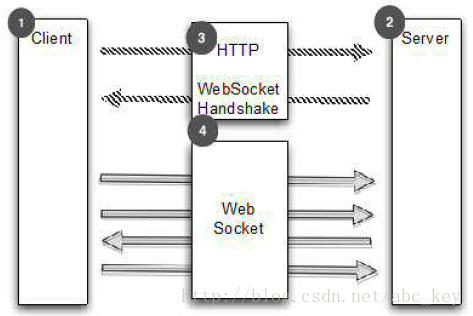
WebSocketServerProtocolHandler
处理空闲连接和超时
- IdleStateHandler,当一个通道没有进行读写或运行了一段时间后出发IdleStateEvent
- ReadTimeoutHandler,在指定时间内没有接收到任何数据将抛出ReadTimeoutException
- WriteTimeoutHandler,在指定时间内有写入数据将抛出WriteTimeoutException、
最常用的是IdleStateHandler,下面代码显示了如何使用IdleStateHandler,如果60秒内没有接收数据或发送数据,操作将失败,连接将关闭
public class IdleStateHandlerInitializer extends ChannelInitializer<Channel> {

    @Override

    protected void initChannel(Channel ch) throws Exception {

        ChannelPipeline pipeline = ch.pipeline();

        pipeline.addLast(new IdleStateHandler(0, 0, 60, TimeUnit.SECONDS));

        pipeline.addLast(new HeartbeatHandler());

    }

    public static final class HeartbeatHandler extends ChannelInboundHandlerAdapter {

        private static final ByteBuf HEARTBEAT_SEQUENCE = Unpooled.unreleasableBuffer(Unpooled.copiedBuffer(

                "HEARTBEAT", CharsetUtil.UTF_8));

        @Override

        public void userEventTriggered(ChannelHandlerContext ctx, Object evt) throws Exception {

            if (evt instanceof IdleStateEvent) {

                ctx.writeAndFlush(HEARTBEAT_SEQUENCE.duplicate()).addListener(ChannelFutureListener.CLOSE_ON_FAILURE);

            } else {

                super.userEventTriggered(ctx, evt);

            }

        }

    }

}
分隔符协议 解决粘包问题
使用LineBasedFrameDecoder提取"\r\n"分隔帧
/**

 * 处理换行分隔符消息

 *

 */

public class LineBasedHandlerInitializer extends ChannelInitializer<Channel> {

    @Override

    protected void initChannel(Channel ch) throws Exception {

        ch.pipeline().addLast(new LineBasedFrameDecoder(65 * 1204), new FrameHandler());

    }

    public static final class FrameHandler extends SimpleChannelInboundHandler<ByteBuf> {

        @Override

        protected void channelRead0(ChannelHandlerContext ctx, ByteBuf msg) throws Exception {

            // do something with the frame

        }

    }

}
如果框架的东西除了换行符还有别的分隔符,可以使用DelimiterBasedFrameDecoder,只需要将分隔符传递到构造方法中。如果想实现自己的以分隔符为基础的协议,这些解码器是有用的。
例如,现在有个协议,它只处理命令,这些命令由名称和参数形成,名称和参数由一个空格分隔
public class CmdHandlerInitializer extends ChannelInitializer<Channel> {

    @Override

    protected void initChannel(Channel ch) throws Exception {

        ch.pipeline().addLast(new CmdDecoder(65 * 1024), new CmdHandler());

    }

    public static final class Cmd {

        private final ByteBuf name;

        private final ByteBuf args;

        public Cmd(ByteBuf name, ByteBuf args) {

            this.name = name;

            this.args = args;

        }

        public ByteBuf getName() {

            return name;

        }

        public ByteBuf getArgs() {

            return args;

        }

    }

    public static final class CmdDecoder extends LineBasedFrameDecoder {

        public CmdDecoder(int maxLength) {

            super(maxLength);

        }

        @Override

        protected Object decode(ChannelHandlerContext ctx, ByteBuf buffer) throws Exception {

            ByteBuf frame = (ByteBuf) super.decode(ctx, buffer);

            if (frame == null) {

                return null;

            }

            int index = frame.indexOf(frame.readerIndex(), frame.writerIndex(), (byte) ' ');

            return new Cmd(frame.slice(frame.readerIndex(), index), frame.slice(index + 1, frame.writerIndex()));

        }

    }

    public static final class CmdHandler extends SimpleChannelInboundHandler<Cmd> {

        @Override

        protected void channelRead0(ChannelHandlerContext ctx, Cmd msg) throws Exception {

            // do something with the command

        }

    }

}
- FixedLengthFrameDecoder
- LengthFieldBasedFrameDecoder
ch.pipeline().addLast(new LengthFieldBasedFrameDecoder(65*1024, 0, 8))
读取大文件
@Override

    public void channelRead(ChannelHandlerContext ctx, Object msg) throws Exception {

        File file = new File("test.txt");

        FileInputStream fis = new FileInputStream(file);

        FileRegion region = new DefaultFileRegion(fis.getChannel(), 0, file.length());

        Channel channel = ctx.channel();

        channel.writeAndFlush(region).addListener(new ChannelFutureListener() {

            @Override

            public void operationComplete(ChannelFuture future) throws Exception {

                if(!future.isSuccess()){

                    Throwable cause = future.cause();

                    // do something

                }

            }

        });

    }
public class ChunkedWriteHandlerInitializer extends ChannelInitializer<Channel> {

    private final File file;

    public ChunkedWriteHandlerInitializer(File file) {

        this.file = file;

    }

    @Override

    protected void initChannel(Channel ch) throws Exception {

        ch.pipeline().addLast(new ChunkedWriteHandler())

            .addLast(new WriteStreamHandler());

    }

    public final class WriteStreamHandler extends ChannelInboundHandlerAdapter {

        @Override

        public void channelActive(ChannelHandlerContext ctx) throws Exception {

            super.channelActive(ctx);

            ctx.writeAndFlush(new ChunkedStream(new FileInputStream(file)));

        }

    }

}
通过JBoss编组序列化
使用ProtoBuf序列化
/**

 * 使用protobuf序列化数据,进行编码解码

 * 注意:使用protobuf需要protobuf-java-2.5.0.jar

 * @author Administrator

 *

 */

public class ProtoBufInitializer extends ChannelInitializer<Channel> {

    private final MessageLite lite;

    public ProtoBufInitializer(MessageLite lite) {

        this.lite = lite;

    }

    @Override

    protected void initChannel(Channel ch) throws Exception {

        ch.pipeline().addLast(new ProtobufVarint32FrameDecoder())

            .addLast(new ProtobufEncoder())

            .addLast(new ProtobufDecoder(lite))

            .addLast(new ObjectHandler());

    }

    public final class ObjectHandler extends SimpleChannelInboundHandler<Serializable> {

        @Override

        protected void channelRead0(ChannelHandlerContext ctx, Serializable msg) throws Exception {

            // do something

        }

    }

}
也可以自己实现,参照RPC
Bootstrap 当需要引导客户端或一些无连接协议时
- group(...),设置EventLoopGroup,EventLoopGroup用来处理所有通道的IO事件
- channel(...),设置通道类型
- channelFactory(...),使用ChannelFactory来设置通道类型
- localAddress(...),设置本地地址,也可以通过bind(...)或connect(...)
- option(ChannelOption<T>, T),设置通道选项,若使用null,则删除上一个设置的ChannelOption
- attr(AttributeKey<T>, T),设置属性到Channel,若值为null,则指定键的属性被删除
- handler(ChannelHandler),设置ChannelHandler用于处理请求事件
- clone(),深度复制Bootstrap,Bootstrap的配置相同
- remoteAddress(...),设置连接地址
- connect(...),连接远程通道
- bind(...),创建一个新的Channel并绑
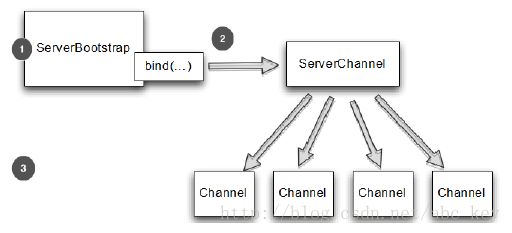
ServerBootstrap 引导服务器
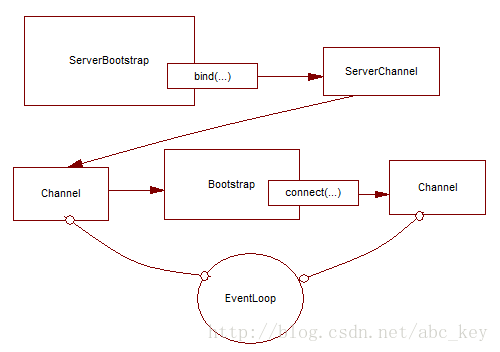
从Channel引导客户端
有时候需要从另一个Channel引导客户端,例如写一个代理或需要从其他系统检索数据。从其他系统获取数据时比较常见的,有很多Netty应用程序必须要和企业现有的系统集成,如Netty程序与内部系统进行身份验证,查询数据库等
可以不用再创建新的引导
public class BootstrapingFromChannel {

    public static void main(String[] args) throws Exception {

        EventLoopGroup bossGroup = new NioEventLoopGroup(1);

        EventLoopGroup workerGroup = new NioEventLoopGroup();

        ServerBootstrap b = new ServerBootstrap();

        b.group(bossGroup, workerGroup).channel(NioServerSocketChannel.class)

                .childHandler(new SimpleChannelInboundHandler<ByteBuf>() {

                    ChannelFuture connectFuture;

                    @Override

                    public void channelActive(ChannelHandlerContext ctx) throws Exception {

                        Bootstrap b = new Bootstrap();

                        b.channel(NioSocketChannel.class).handler(

                                new SimpleChannelInboundHandler<ByteBuf>() {

                                    @Override

                                    protected void channelRead0(ChannelHandlerContext ctx,

                                            ByteBuf msg) throws Exception {

                                        System.out.println("Received data");

                                        msg.clear();

                                    }

                                });

                        b.group(ctx.channel().eventLoop());

                        connectFuture = b.connect(new InetSocketAddress("127.0.0.1", 2048));

                    }

                    @Override

                    protected void channelRead0(ChannelHandlerContext ctx, ByteBuf msg)

                            throws Exception {

                        if (connectFuture.isDone()) {

                            // do something with the data

                        }

                    }

                });

        ChannelFuture f = b.bind(2048);

        f.addListener(new ChannelFutureListener() {

            @Override

            public void operationComplete(ChannelFuture future) throws Exception {

                if (future.isSuccess()) {

                    System.out.println("Server bound");

                } else {

                    System.err.println("bound fail");

                    future.cause().printStackTrace();

                }

            }

        });

    }

}
服务端和客户端在同一环境下
使用通道选项和属性
使用ChannelOption和属性可以让事情变得很简单,例如Netty WebSocket服务器根据用户自动路由消息,通过使用属性,应用程序能在通道存储用户ID以确定消息应该发送到哪里。应用程序可以通过使用一个通道选项进一步自动化,给定时间内没有收到消息将自动断开连接
    public static void main(String[] args) {

        //创建属性键对象

        final AttributeKey<Integer> id = AttributeKey.valueOf("ID");

        //客户端引导对象

        Bootstrap b = new Bootstrap();

        //设置EventLoop,设置通道类型

        b.group(new NioEventLoopGroup()).channel(NioSocketChannel.class)

        //设置ChannelHandler

            .handler(new SimpleChannelInboundHandler<ByteBuf>() {

                @Override

                public void channelRegistered(ChannelHandlerContext ctx) throws Exception {

                    //通道注册后执行,获取属性值

                    Integer idValue = ctx.channel().attr(id).get();

                    System.out.println(idValue);

                    //do something with the idValue

                }

                @Override

                protected void messageReceived(ChannelHandlerContext ctx, ByteBuf msg) throws Exception {

                    System.out.println("Reveived data");

                    msg.clear();

                }

            });

        //设置通道选项,在通道注册后或被创建后设置

        b.option(ChannelOption.SO_KEEPALIVE, true).option(ChannelOption.CONNECT_TIMEOUT_MILLIS, 5000);

        //设置通道属性

        b.attr(id, 123456);

        ChannelFuture f = b.connect("www.manning.com",80);

        f.syncUninterruptibly();

    }
创建安全的 Netty 程序的更多相关文章
- Netty In Action中国版 - 第二章:第一Netty程序
本章介绍 获得Netty4最新的版本号 设置执行环境,以构建和执行netty程序 创建一个基于Netty的server和client 拦截和处理异常 编制和执行Nettyserver和client 本 ...
- Netty(1):第一个netty程序
为什么选择Netty netty是业界最流行的NIO框架之一,它的健壮型,功能,性能,可定制性和可扩展性都是首屈一指的,Hadoop的RPC框架Avro就使用了netty作为底层的通信框架,此外net ...
- ASP.NET MVC 5 03 - 安装MVC5并创建第一个应用程序
不知不觉 又逢年底, 穷的钞票 所剩无几. 朋友圈里 各种装逼, 抹抹眼泪 MVC 继续走起.. 本系列纯属学习笔记,如果哪里有错误或遗漏的地方,希望大家高调指出,当然,我肯定不会低调改正的.(开个小 ...
- Visual Studio中创建混合移动应用程序解决方案Xamarin Portable Razor
在Visual Studio中创建混合移动应用程序的一个解决方案是使用Xamarin Portable Razor工具,这是ASP.NET MVC API针对移动设备的一个轻量级实现.Xamarin编 ...
- C#创建服务及使用程序自动安装服务,.NET创建一个即是可执行程序又是Windows服务的exe
不得不说,.NET中安装服务很麻烦,即要创建Service,又要创建ServiceInstall,最后还要弄一堆命令来安装和卸载. 今天给大家提供一种方式,直接使用我们的程序来安装/卸载服务,并且可以 ...
- [转]C#创建服务及使用程序自动安装服务,.NET创建一个即是可执行程序又是Windows服务的exe
写在前面 原文地址:C#创建服务及使用程序自动安装服务,.NET创建一个即是可执行程序又是Windows服务的exe 这篇文章躺在我的收藏夹中有很长一段时间了,今天闲着没事,就自己动手实践了一下.感觉 ...
- 如何创建 C# 控制台应用程序
[转] 如何:创建 C# 控制台应用程序 本主题旨在生成最简单形式的 C# 程序(控制台应用程序)熟悉 Visual Studio 2008 开发环境.由于控制台应用程序是在命令行执行其所有的输入和输 ...
- 创建C#串口通信程序详解
在.NET平台下创建C#串口通信程序,.NET 2.0提供了串口通信的功能,其命名空间是System.IO.Ports.这个新的框架不但可以访问计算机上的串口,还可以和串口设备进行通信.我们将使用标准 ...
- Windows Azure入门教学系列 (一): 创建第一个WebRole程序
原文 Windows Azure入门教学系列 (一): 创建第一个WebRole程序 在第一篇教学中,我们将学习如何在Visual Studio 2008 SP1中创建一个WebRole程序(C#语言 ...
随机推荐
- VS2010调试时,对于一些语句不能单步运行也不能对变量添加监视的问题
在以mfc建立的工程中,需要建立一个链表来保存一些数据.但是在创建结构体,以及对其赋值的过程中,发现对结构体变量不能观察,添加到监视器中的变量也出现变量名不存在的错误. 首先,在文件的开始定义一个结构 ...
- [python]字典的直接赋值、浅拷贝和深拷贝解析
1.赋值引用 b = a: a 和 b 都指向同一个对象. 2.浅拷贝 b = a.copy(): a 和 b父对象是一个独立的对象,但他们的子对象还是指向统一对象(是引用). 3.深拷贝 b = ...
- 【做题记录】AtCoder AGC做题记录
做一下AtCoder的AGC锻炼一下思维吧 目前已做题数: 75 总共题数: 239 每一场比赛后面的字母是做完的题,括号里是写完题解的题 AGC001: ABCDEF (DEF) AGC002: A ...
- JavaWeb_(Spring框架)认识Spring中的aop
1.aop思想介绍(面向切面编程):将纵向重复代码,横向抽取解决,简称:横切 2.Spring中的aop:无需我们自己写动态代理的代码,spring可以将容器中管理对象生成动态代理对象,前提是我们对他 ...
- postgresql could not connect to server
问题: postgresql部署在linux上,在自己电脑上使用pgadmin连接出现could not connect to server错误 问题分析: 出现上述原因有3种情况 1.linux上的 ...
- err="etherbase address must be explicitly specified"
如果要初始化区块链的话就用创始区块 如果通过创世区块来初始化区块链的话,首先需要一个初始化区块链的json文件,如下. { "config": { "chainId& ...
- Swift 构造过程
构造过程是为了使用某个类.结构体或枚举类型的实例而进行的准备过程.这个过程包含了为实例中的每个属性设置初始值和为其执行必要的准备和初始化任务. Swift 构造函数使用 init() 方法. 与 Ob ...
- kotlin之MutableMap委托
fun main(arg: Array<String>) { val map = mutableMapOf("name" to "tom", ) v ...
- Python3中_和__的用途和区别
访问可见性问题 对于上面的代码,有C++.Java.C#等编程经验的程序员可能会问,我们给Student对象绑定的name和age属性到底具有怎样的访问权限(也称为可见性).因为在很多面向对象编程语言 ...
- c++ 容器中元素计数
#include <iostream>#include <algorithm>#include <vector>#include <functional> ...