ActiveMQ入门系列之应用:Springboot+ActiveMQ+JavaMail实现异步邮件发送
现在邮件发送功能已经是几乎每个系统或网址必备的功能了,从用户注册的确认到找回密码再到消息提醒,这些功能普遍的会用到邮件发送功能。我们都买过火车票,买完后会有邮件提醒,有时候邮件并不是买完票立马就能收到邮件通知,这个就用到了异步邮件发送。
那怎么实现邮件的异步发送呢?
很显然,引入MQ是一个不错的选择。刚好这段时间在练习ActiveMQ,那就拿activemq来实现异步发送邮件吧。
一、springboot整合JavaMailSender
在发送异步邮件之前,先来简单介绍下邮件发送的基本内容,了解邮件是怎么发送的,然后再在此基础上添加activemq。
要发送邮件就要用到JavaMail,它是Java官方为方便Java开发人员在应用程序中实现邮件发送和接收功能而提供的一套标准开发包,它支持常见的邮件协议:SMTP/POP3/IMAP/MIME等。想要发送邮件只需要调用JavaMail的API即可。后来,Spring对于JavaMail进行了封装,然后springboot又进一步封装,现在使用起来非常方便。请看代码:
- 新建springboot工程:mail-sender
- 添加配置文件:application.properties
###mail config ###
spring.mail.host=smtp.qq.com(配置邮件发送协议)
spring.mail.username=xxxx@qq.com(发件人,具体配成你需要的邮箱)
spring.mail.password=对于qq邮箱来说,这里不是密码,而是授权码
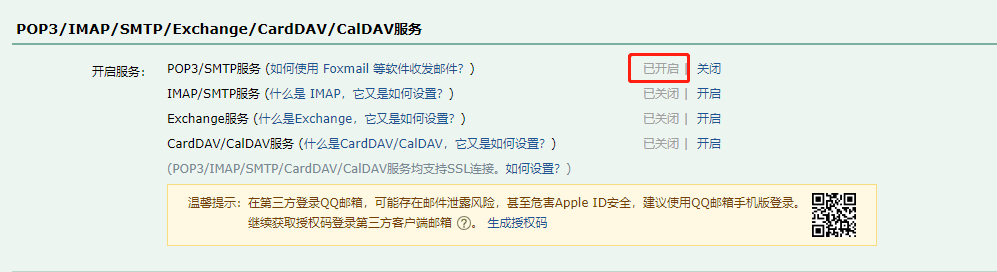
spring.mail.default-encoding=utf-8 mail.to=xxxx@qq.com (为了方便,我这里将收件人统一配置成一个,实际业务中肯定按照实际情况发送的)至于授权码的获取,需要到qq邮箱里面 设置->账户,然后到图示的地方,开启服务,然后根据提示获取授权码
- 接下来实现发送邮件的代码
package com.mail.service.impl;

import com.mail.service.MailService;

import org.slf4j.Logger;

import org.slf4j.LoggerFactory;

import org.springframework.beans.factory.annotation.Autowired;

import org.springframework.beans.factory.annotation.Value;

import org.springframework.core.io.FileSystemResource;

import org.springframework.mail.SimpleMailMessage;

import org.springframework.mail.javamail.JavaMailSender;

import org.springframework.mail.javamail.MimeMessageHelper;

import org.springframework.stereotype.Service;

import org.springframework.util.StringUtils;

import javax.mail.internet.MimeMessage;

import java.io.File;

@Service

public class MailServiceImpl implements MailService {

    private final Logger logger = LoggerFactory.getLogger(this.getClass());

    @Autowired

    private JavaMailSender mailSender;//注入JavaMailSender,具体发送工作需要它完成

    @Value("${spring.mail.username}")//从配置文件中获取发件人邮箱

    public String from;

    /**

     * 发送普通文本邮件

     */

    @Override

    public void sendSimpleMail(String to, String subject, String context){

        SimpleMailMessage mailMessage = new SimpleMailMessage();

        mailMessage.setFrom(from);//发件人

        mailMessage.setTo(to);//收件人

        mailMessage.setSubject(subject);//邮件主题

        mailMessage.setText(context);//邮件正文

        mailSender.send(mailMessage);//发送邮件

        logger.info("邮件发送成功");

    }

    /**

     * 发送HTML邮件

     */

    @Override

    public void sendMimeMail(String to, String subject, String context){

        MimeMessage mailMessage = mailSender.createMimeMessage();

        try{//发送非纯文本的邮件都需要用的helper来解析

            MimeMessageHelper helper = new MimeMessageHelper(mailMessage);

            helper.setFrom(from);

            helper.setTo(to);

//            helper.setBcc("xxxx@qq.com");//抄送人

            helper.setSubject(subject);

            helper.setText(context,true);//这里的第二个参数要为true才会解析html内容

            mailSender.send(mailMessage);

            logger.info("邮件发送成功");

        } catch(Exception ex){

            logger.error("邮件发送失败",ex);

        }

    }

    /**

     * 发送带附件的邮件

     */

    @Override

    public void sendAttachMail(String[] to, String subject, String context, String filePath) {

        MimeMessage message = mailSender.createMimeMessage();

        try{

            MimeMessageHelper helper = new MimeMessageHelper(message,true);

            helper.setFrom(from);

            helper.setTo(to);

            helper.setSubject(subject);

            helper.setText(context);

            FileSystemResource file = new FileSystemResource(new File(filePath));

            helper.addAttachment(file.getFilename(),file);//添加附件,需要用到FileStstemResource

            mailSender.send(message);

            logger.info("带邮件的附件发送成功");

        }catch(Exception ex){

            logger.error("带附件的邮件发送失败",ex);

        }

    }

    /**

     * 发送正文带图片的邮件

     */

    @Override

    public void sendInlineMail(String to, String subject, String context, String filePath, String resId) {

        MimeMessage message = mailSender.createMimeMessage();

        try{

            MimeMessageHelper helper = new MimeMessageHelper(message,true);

            helper.setFrom(from);

            helper.setTo(to);

            helper.setSubject(subject);

            helper.setText(context,true);

            FileSystemResource res = new FileSystemResource(new File(filePath));

            helper.addInline(resId, res);

            mailSender.send(message);

            logger.info("邮件发送成功");

        } catch (Exception ex){

            logger.error("邮件发送失败",ex);

        }

    }

}
代码中分别对发送普通文本邮件、HTML邮件、代码附件的邮件、带图片的邮件进行了示范
- 编写测试类
package com.mail; import com.mail.service.MailService;
import org.junit.Test;
import org.junit.runner.RunWith;
import org.springframework.beans.factory.annotation.Autowired;
import org.springframework.beans.factory.annotation.Value;
import org.springframework.boot.test.context.SpringBootTest;
import org.springframework.test.context.junit4.SpringRunner; @RunWith(SpringRunner.class)
@SpringBootTest
public class MailServiceTest {
@Autowired
MailService mailService; @Value("${mail.to}")
private String mailTo; @Test
public void testSimpleMail(){
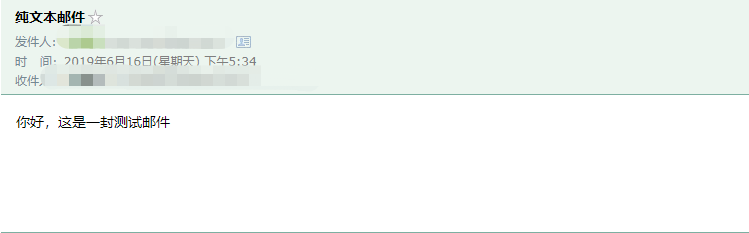
mailService.sendSimpleMail(mailTo,"纯文本邮件","你好,这是一封测试邮件");
}
@Test
public void testMimeMail(){
String context = "<html>\n" +
"<body>\n" +
"你好,<br>" +
"这是一封HTML邮件\n" +
"</body>\n" +
"</html>";
mailService.sendMimeMail(mailTo,"HTML邮件",context);
} @Test
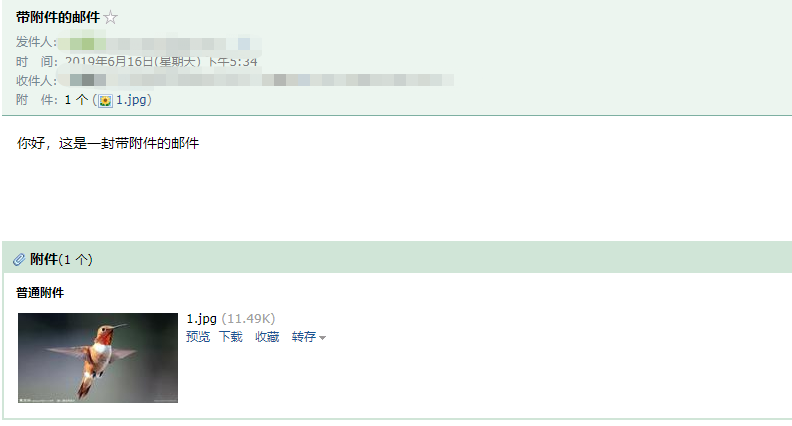
public void testSendAttachMail(){
String[] to = {mailTo,这里是收件人邮箱};
mailService.sendAttachMail(to,"带附件的邮件","你好,这是一封带附件的邮件","D:\\1.jpg");
} @Test
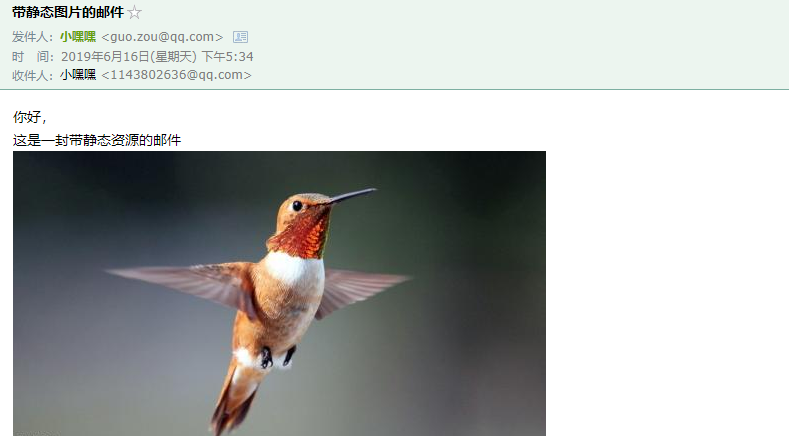
public void testSendInlineMail(){
String resId = "1";
String context = "<html><body>你好,<br>这是一封带静态资源的邮件<br><img src=\'cid:"+resId+"\'></body></html>";
mailService.sendInlineMail(mailTo,"带静态图片的邮件",context,"D:\\1.jpg",resId);
} } - 分别执行以上@Test方法


邮件发送的代码基本实现了解了,接下来引入activemq的实现。
二、springboot整合ActiveMQ实现异步邮件发送
springboot整合ActiveMQ其实也比较简单,首先配置文件中需要添加ActiveMQ的相关配置,然后生产者通过注入JmsTemplate发送消息,消费者实现监听消费。
实现功能后,最终代码结构:
controller+ActiveMQService扮演生产者角色,发送消息给消费者;
listener扮演消费者角色,接收到消息后调用MailService的接口执行邮件发送。
具体代码如下:
- 修改application.properties,添加如下内容
###queue name###

com.sam.mail.queue=com.sam.mail.queue

###activemq config###

#mq服务地址

spring.activemq.broker-url=tcp://localhost:61616

spring.activemq.pool.enabled=false

#mq用户名和密码

spring.activemq.user=admin

spring.activemq.password=admin

#处理序列化对象需要用到的配置

spring.activemq.packages.trusted=true

spring.activemq.packages.trust-all=true - 实现MQ发送的service
package com.mail.service.impl;

import com.alibaba.fastjson.JSON;

import com.mail.model.MailBean;

import com.mail.service.ActiveMQService;

import org.slf4j.Logger;

import org.slf4j.LoggerFactory;

import org.springframework.beans.factory.annotation.Autowired;

import org.springframework.beans.factory.annotation.Value;

import org.springframework.jms.core.JmsTemplate;

import org.springframework.stereotype.Service;

@Service

public class ActiveMQServiceImpl implements ActiveMQService {

    private Logger logger = LoggerFactory.getLogger(this.getClass());

    @Autowired

    JmsTemplate template;

    @Value("${com.sam.mail.queue}")

    private String queueName;

    @Override

    public void sendMQ(String[] to, String subject, String content) {

        this.sendMQ(to,subject,content,null);

    }

    @Override

    public void sendMQ(String[] to, String subject, String content, String filePath) {

        this.sendMQ(to,subject,content,filePath,null);

    }

    @Override

    public void sendMQ(String[] to, String subject, String content, String filePath, String srcId) {

        MailBean bean = new MailBean();

        bean.setTo(to);

        bean.setSubject(subject);

        bean.setContent(content);

        bean.setFilePath(filePath);

        bean.setSrcId(srcId);

        template.convertAndSend(queueName,bean);

        logger.info("邮件已经发送到MQ:"+ JSON.toJSONString(bean));

    }

} - 实现消息发送的controller
package com.mail.controller; import com.mail.service.ActiveMQService;
import org.springframework.beans.factory.annotation.Value;
import org.springframework.web.bind.annotation.RequestMapping;
import org.springframework.web.bind.annotation.RestController; import javax.annotation.Resource; /**
* @author JAVA开发老菜鸟
*/ @RestController
public class MailSenderController { @Resource
ActiveMQService activeMQService; @Value("${mail.to}")
private String mailTo; @RequestMapping("/sendSimpleMail.do")
public void sendSimpleMail(){
String[] to = {mailTo};
String subject = "普通邮件";
String context = "你好,这是一封普通邮件";
activeMQService.sendMQ(to, subject, context);
} @RequestMapping("/sendAttachMail.do")
public void sendAttachMail(){
String[] to = {mailTo};
String subject = "带附件的邮件";
String context = "<html><body>你好,<br>这是一封带附件的邮件,<br>具体请见附件</body></html>";
String filePath = "D:\\1.jpg";
activeMQService.sendMQ(to, subject, context, filePath);
} @RequestMapping("/sendMimeMail.do")
public void sendMimeMail(){
String[] to = {mailTo};
String subject = "普通邮件"; String filePath = "D:\\1.jpg";
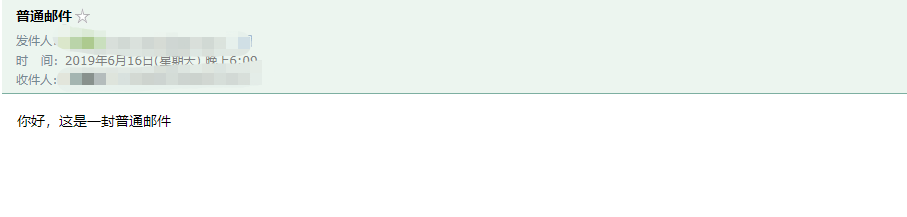
String resId = "1.jpg";
String context = "<html><body>你好,<br>这是一封带图片的邮件,<br>请见图片<br><img src=\'cid:"+resId+"\'></body></html>";
activeMQService.sendMQ(to, subject, context, filePath, resId);
} } - MailBean的具体实现
public class MailBean implements Serializable {

    private String from;//发件人

    private String[] to;//收件人列表

    private String subject;//邮件主题

    private String content;//邮件正文

    private String filePath;//文件(图片)路径

    private String srcId;//图片名

    ......

    getter/setter略

    ......

} - 消费者监听实现
package com.mail.listener;

import com.mail.model.MailBean;

import com.mail.service.MailService;

import org.slf4j.Logger;

import org.slf4j.LoggerFactory;

import org.springframework.beans.factory.annotation.Autowired;

import org.springframework.jms.annotation.JmsListener;

import org.springframework.stereotype.Service;

import javax.jms.ObjectMessage;

import java.io.Serializable;

/**

 * 监听到MQ后调用mailService执行邮件发送操作

 */

@Service

public class SendMailMQListener {

    Logger logger = LoggerFactory.getLogger(this.getClass());

    @Autowired

    MailService mailService;

    /**

     * 通过监听目标队列实现功能

     */

    @JmsListener(destination = "${com.sam.mail.queue}")

    public void dealSenderMailMQ(ObjectMessage message){

        try{

            Serializable object = message.getObject();

            MailBean bean =  (MailBean) object;

            mailService.sendMail(bean.getTo(),bean.getSubject(),bean.getContent(),bean.getFilePath(),bean.getSrcId());

            logger.error("消费者消费邮件信息成功");

        } catch (Exception ex){

            logger.error("消费者消费邮件信息失败:"+ ex);

        }

    }

} - 监听器调用的发送接口在前面没有,是新加的
@Override

    public void sendMail(String[] to, String subject, String context, String filePath, String resId ){

        MimeMessage message = mailSender.createMimeMessage();

        try{

            MimeMessageHelper helper = new MimeMessageHelper(message, true);

            helper.setFrom(from);

            helper.setTo(to);

            helper.setSubject(subject);

            helper.setText(context, true);

            if(!StringUtils.isEmpty(filePath) && !StringUtils.isEmpty(resId)){//文件路径和resId都不为空,视为静态图片

                FileSystemResource resource = new FileSystemResource(new File(filePath));

                helper.addInline(resId, resource);

            } else if(!StringUtils.isEmpty(filePath)){//只有文件路径不为空,视为附件

                FileSystemResource resource = new FileSystemResource(new File(filePath));

                helper.addAttachment(resource.getFilename(),resource);

            }

            mailSender.send(message);

            logger.info("邮件发送成功");

        } catch (Exception ex){

            logger.error("邮件发送错误:", ex);

} - 启动工程,分别调用controller中的uri,查看结果


查看下mq的页面控制台

至此,功能已经实现。
三、遇到过的问题
在实现这个demo的时候,遇到了一些问题,也把它们列出来,给别人一个参考
第一个问题:
消费者消费邮件信息失败:javax.jms.JMSException: Failed to build body from content. Serializable class not available to broker. Reason: java.lang.ClassNotFoundException: Forbidden class com.mail.model.MailBean! This class is not trusted to be serialized as ObjectMessage payload. Please take a look at http://activemq.apache.org/objectmessage.html for more information on how to configure trusted classes.
This class is not trusted to be serialized as ObjectMessage payload,是说我的MailBean对象不是可以新人的序列化对象,
原因:
传递对象消息时 ,ActiveMQ的ObjectMessage依赖于Java的序列化和反序列化,但是这个过程被认为是不安全的。具体信息查看报错后面的那个网址:
http://activemq.apache.org/objectmessage.html
解决方法:
在application.properties文件中追加下面的配置即可
spring.activemq.packages.trust-all=true
第二个问题:
***************************

APPLICATION FAILED TO START

***************************

Description:

A component required a bean of type 'com.mail.service.ActiveMQService' that could not be found.

Action:

Consider defining a bean of type 'com.mail.service.ActiveMQService' in your configuration.
原因:
ActiveMQService没有被spring扫描并初始化,然后我在代码用通过@Autowaired注解使用获取不到。 找了之后发现是我的@Service注解放到了interface上,应该放到service的impl类上。
解决方法:
将@Service注解放到impl类上
好,以上就是Springboot+ActiveMQ+JavaMail实现异步邮件发送的全部内容了,
觉得有帮助的话,记得点赞哦~~
ActiveMQ入门系列之应用:Springboot+ActiveMQ+JavaMail实现异步邮件发送的更多相关文章
- ActiveMQ入门系列三:发布/订阅模式
在上一篇<ActiveMQ入门系列二:入门代码实例(点对点模式)>中提到了ActiveMQ中的两种模式:点对点模式(PTP)和发布/订阅模式(Pub & Sub),详细介绍了点对点 ...
- ActiveMQ入门系列二:入门代码实例(点对点模式)
在上一篇<ActiveMQ入门系列一:认识并安装ActiveMQ(Windows下)>中,大致介绍了ActiveMQ和一些概念,并下载.安装.启动他,还访问了他的控制台页面. 这篇,就用代 ...
- java-基于JavaMail的Java邮件发送
1.基于JavaMail的Java邮件发送:简单邮件发送 2.基于JavaMail的Java邮件发送:复杂邮件发送
- 基于JavaMail的Java邮件发送:复杂邮件发送
参考:http://blog.csdn.net/xietansheng/article/details/51722660package com.bfd.ftp.utils;import java.ut ...
- SpringBoot系列九:SpringBoot服务整合(整合邮件服务、定时调度、Actuator监控)
声明:本文来源于MLDN培训视频的课堂笔记,写在这里只是为了方便查阅. 1.概念:SpringBoot 服务整合 2.背景 在进行项目开发的时候经常会遇见以下的几个问题:需要进行邮件发送.定时的任务调 ...
- JavaMail如何保证邮件发送成功
使用过JavaMail的api发送邮件的人可能会有这样一个疑惑:我如何知道我调用该api发送的邮件是否成功呢?一般的开放的api给我们调用都会有个返回值或者状态码,来告诉我们执行成功与否.但是Java ...
- 【转】基于JavaMail的Java邮件发送
http://blog.csdn.net/xietansheng/article/details/51673073 http://blog.csdn.net/xietansheng/article/d ...
- ActiveMQ入门系列一:认识并安装ActiveMQ(Windows下)
一.什么是ActiveMQ 度娘给出的定义: Apache ActiveMQ是Apache软件基金会所研发的开放源代码消息中间件:由于ActiveMQ是一个纯Java程序,因此只需要操作系统支持Jav ...
- JavaMail技术实现邮件发送转【】
1.导入2个jar包,mail.jar,activation.jar 2.导入的jar包与myeclipse中自带的javaee 中的javaee.jar中的javax.activation包及jav ...
随机推荐
- kotlin数据解构
fun main(arg: Array<String>) { val person = person("tom") var (name) = person//解构 pr ...
- JVM的线程
我们使用java命令来运行一个程序,那么就需要启动JVM , 而jvm的启动就相当于启动了一个进程 , 而这个进程在启动的时候会自动启动一个线程,由这个线程去调用main方法,而这个线程就是主线程 ; ...
- mongodb MongoDB C#/.NET driver version
The first column lists the driver version(s). C#/.NET Driver Version MongoDB 2.6 MongoDB 3.0 MongoDB ...
- Visual Studio Code 上java开发环境搭建
在把一些开源的SDK中java代码转成C#代码时经常需要写点java代码来实验下功能,装个Eclipse或IDEAs吧,好像也不太值当,所以用vs code搭个环境偶尔来实验下.以下: 1.下载并装好 ...
- mfc移动文件夹
SHFILEOPSTRUCT FileOp; ZeroMemory((void*)&FileOp,sizeof(SHFILEOPSTRUCT)); FileOp.fFlags = FOF_NO ...
- css简单学习属性2---背景图片
<!DOCTYPE html> <html lang="en"> <head> <meta charset="UTF-8&quo ...
- bs4笔记
1.网页输出乱码的解决办法 r= requests.get('https://www.baidu.com/') r.encoding = 'gbk2312' #有可能 gbk.utf-8 soup ...
- uni-app 保持登录状态 (Vuex)
在小程序中,保持登录状态是很常见的需求,今天就把写一写使用uni-app框架的保持登录状态功能是怎样实现的. 一.场景需求 1.场景:初始打开---登陆---关闭,再次打开---(已登录)上次关闭前的 ...
- Scrapy框架(1)
参考博客: 10.scrapy框架简介和基础应用 Scrapy框架(1)
- GRU网络
1.GRU(Gated Recurrent Unit) 为了克服RNN无法远距离依赖而提出了LSTM,而GRU是LSTM的一个变体,GRU保持LSTM效果的同时,又使结构变得简单. 2.GRU结构 G ...