Linux(16):Shell编程(3)
vim 编程环境配置:
.vimrc 文件配置如下:(.vimrc文件放到家目录下:/root ;然后退出 xshell 再登陆进来xshell)
set nocompatible

set history=100

filetype on

filetype plugin on

filetype indent on

set autoread

set mouse=c

syntax enable

set cursorline

hi cursorline guibg=#00ff00

hi CursorColumn guibg=#00ff00

set foldenable

set foldmethod=manual

set foldcolumn=0

setlocal foldlevel=3

set foldclose=all

nnoremap <space> @=((foldclosed(line('.')) < 0) ? 'zc' : 'zo')<CR>

set expandtab

set tabstop=4

set shiftwidth=4

set softtabstop=4

set smarttab

set ai

set si

set wrap

set sw=4

set wildmenu

set ruler

set cmdheight=1

set lz

set backspace=eol,start,indent

set whichwrap+=<,>,h,l

set magic

set noerrorbells

set novisualbell

set showmatch

set mat=4

set hlsearch

set ignorecase

set encoding=utf-8

set fileencodings=utf-8

set termencoding=utf-8

set smartindent

set cin

set showmatch

set guioptions-=T

set guioptions-=m

set vb t_vb=

set laststatus=4

set pastetoggle=<F9>

set background=dark

highlight Search ctermbg=black  ctermfg=white guifg=white guibg=black

autocmd BufNewFile *.py,*.cc,*.sh,*.java exec ":call SetTitle()"

func SetTitle()

    if expand("%:e") == 'sh'

        call setline(1, "#!/bin/bash")

        call setline(2, "##############################################################")

        call setline(3, "# File Name: ".expand("%"))

        call setline(4, "# Version: V1.0")

        call setline(5, "# Author: neo")                        # 作者

        call setline(6, "# Organization: anonymous")            # 公司名

        call setline(7, "# Created Time : ".strftime("%F %T"))

        call setline(8, "# Description:")

        call setline(9, "##############################################################")

    endif

endfunc
if结构条件句:
# 1、单分支if条件句语法:

if 条件表达式

then

    指令

fi

# 2、双分支if条件句语法:

if 条件表达式

then

    指令

else

    指令

fi

# 3、多分支if条件句语法:

if 条件表达式1

then

    指令1

elif 条件表达式2

  then

    指令2

else

    指令3

fi

# if条件单分支与条件测试编程对比实践:

# 例1:如果不存在 /backup 目录就创建

#!/bin/bash

path="/backup"

[ -d $path ] || mkdir /backup -p

if [ -d $path ]

then

    :        # shell 中 , : 表示什么都不做

else

    mkdir $path -p

fi

[ ! -d $path ] && mkdir $path -p

if [ ! -d $path ]

  then

    mkdir $path -p

fi

# 例2:开发shell脚本判断系统剩余内存的大小,如果低于 100MB 就提示内存不足,否则提示内存充足

# 分析: 1)提取系统内存   2) if进行判断

# 获取内存的命令: free -m

[root@m01 ~]# free -m

             total       used       free     shared    buffers     cached

Mem:           474        214        259          0         78         33

-/+ buffers/cache:        102        371

Swap:          767          0        767

[root@m01 ~]#

# linux默认把剩余的内存都当作 buffers/cache 对待,所以上面的 371 就表示剩余的内存(单位是 MB)

# 取出 剩余内存371的方法如下:

[root@m01 ~]# free -m|awk 'NR==3{print $4}'

371

[root@m01 ~]# free -m|awk 'NR==3{print $NF}'        # $NF 表示的最后一个Field(列),即输出最后一个字段的内容

371

# 例题2的示例:

[root@m01 practice]# cat get_memory_size.sh

#!/bin/bash

##############################################################

# File Name: get_memory_size.sh

# Version: V1.0

# Author: neo

# Organization: anonymous

# Created Time : 2019-06-27 23:38:55

# Description:

##############################################################

mem=`free -m|awk 'NR==3{print $NF}'`

if [ $mem -lt 100 ]

then

    echo "memory insufficient"

else

    echo "memory is sufficient"

fi

[root@m01 practice]# bash get_memory_size.sh

memory is sufficient

# 注意: read 读入没办法用 $#
函数:
函数的概念与作用:
函数的作用就是将程序里多次被调用的相同代码组合起来(函数体),并为其取个名字(即函数名),其它所有想重复调用这部分代码的地方都只

需要调用这个名字就可以了。当需要修改这部分重复代码时,也只需要改变函数体内的一部分代码即可实现所有调用的修改,也可以把函数独立写

到文件里,当需要调用函数时,再加载进来使用。

# shell函数的优势:

1. 把相同的程序段定义成函数,可以减少整个程序的代码量,提升开发效率

2. 增加程序的可读、易读性,提升管理效率

3. 可以实现程序功能模块化,使得程序具备通用性(可移植性)

# 对于shell来说,Linux系统里面的近2000个命令都可以说是shell的函数
函数的语法:
# 语法1:

function 函数名(){

    指令集

    return 返回值

}

# 语法2:

function 函数名 {        # 这种定义方式时, 函数名 和 {  之间必须要有一个空格

    指令集

    return 返回值

}

# 语法3:(推荐)

函数名(){

    指令集

    return 返回值

}
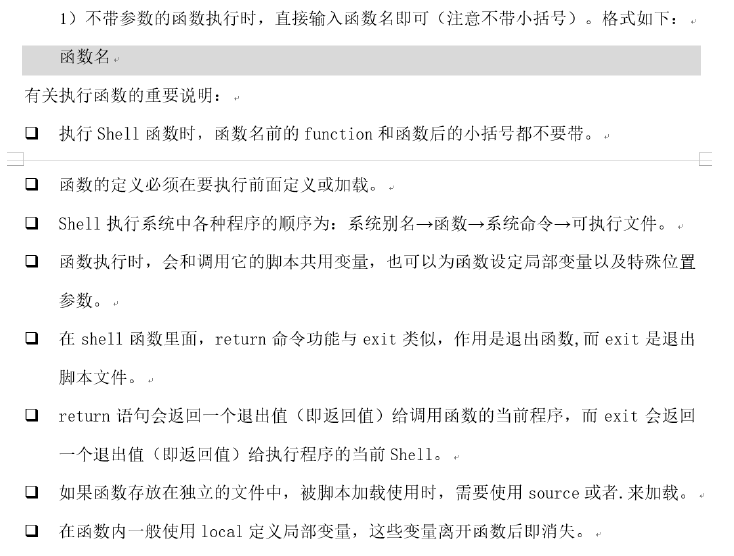
shell函数的执行:
带参数的函数的执行:
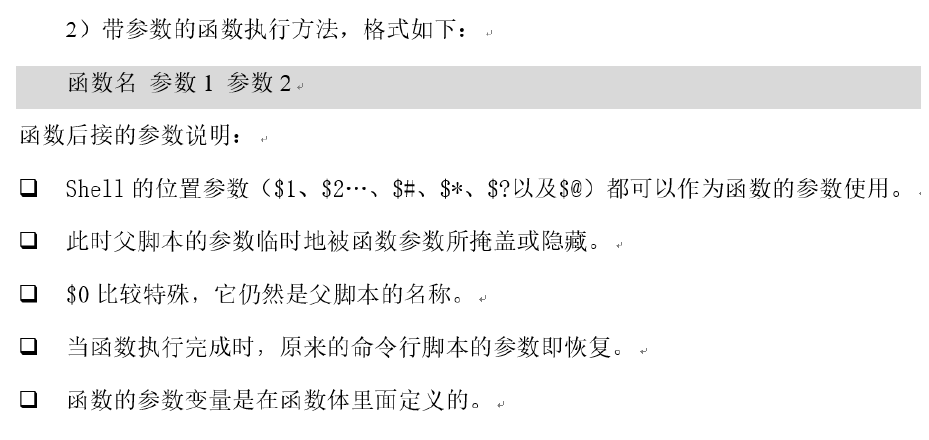
注意: 上图中的第3条表示,$0 依然是脚本的名字,而不是函数所在脚本的名字
局部变量 和 函数的返回值
[root@m01 func]# cat func_04.sh

#!/bin/bash

##############################################################

# File Name: func_04.sh

# Version: V1.0

# Author: neo

# Organization: anonymous

# Created Time : 2019-06-28 10:25:16

# Description:

##############################################################

function func01(){

    local i="local neo"    # local 变量名 ---> 定义局部变量,该变量只能在函数内部使用

    echo "I am $i"

    return 120             # 函数的返回值

}

echo "local var val:$i"    # 局部变量在函数外部不能被调用

func01

[root@m01 func]# sh func_04.sh

local var val:

I am local neo

[root@m01 func]# echo $?    # exit [<n>]    状态码n可以不指定,默认是上一条命令的退出状态码。

120

[root@m01 func]#

# 在函数内的变量最好加上 local ,即把函数内的变量定义成 局部变量,避免变量冲突
监控网站URL是否正常的常见方法
# 方法1、 wget 命令:

        --spider            # 模拟爬虫

        -q                    # 安静访问

        -o /dev/null        # 不输出

        -T                     # --timeout 超时时间

        -t                    # --tries   重试次数

[root@m01 func]# wget --spider -T 5 -q -o /dev/null -t 2 www.baidu.com

[root@m01 func]# echo $?          # 通过 echo $? 检测 wget 的URL是否正常

0

[root@m01 func]#

# 方法2、 curl 命令:

            -I                        # 看响应头

            -s                        # 安静访问

            -o /dev/null            # 不输出

            -w %{http_code}            # 返回状态码;200为正常

            -m01                    # 超时时间

[root@m01 func]# curl www.baidu.com -s &>/dev/null

[root@m01 func]# echo $?    # 也是通过查看 curl 的执行结果来判断 URL 是否正常

0

[root@m01 func]# curl -I -m 5 -s -w "%{http_code}\n" -o /dev/null www.baidu.com

200                            # 也可通过查看 状态码 查看 URL 是否正常

# 示例代码:

[root@m01 func]# cat checkurl.sh

#!/bin/bash

##############################################################

# File Name: checkurl.sh

# Version: V1.0

# Author: neo

# Organization: anonymous

# Created Time : 2019-06-29 09:19:34

# Description:

##############################################################

function usage(){           # 输入有误时的函数

    echo "Usage:$0 url"

    exit 1

}

function checkurl(){        # 检测网站是否正常的函数

    wget -q -o /dev/null -t 2 -T 5 $1

    if [ $? -eq 0 ]

    then

        echo "$1 is ok"

    else

        echo "$1 failed"

    fi

}

function main(){            # 相当于 入口函数

    if [ $# -ne 1 ]

    then

        usage               # 如果输入的参数个数不为1,则调用 usage 函数

    fi

    checkurl $1             # 调用检测url的函数

}

main $*                     # $* :把所有的参数都传给 main 函数

[root@m01 func]# sh checkurl.sh

Usage:checkurl.sh url

[root@m01 func]# sh checkurl.sh www.baidu.com 2

Usage:checkurl.sh url

[root@m01 func]# sh checkurl.sh www.baidu.com

www.baidu.com is ok
case 条件句
case结构条件句相当于多分支的 if/elif/else 条件句,但是它比这些条件句看起来更规范工整,常被用于实现系统服务启动脚本等企业应用场景中。

# case语句的语法:

case "变量" in

    值1)

        指令1...

        ;;

    值2)

        指令2...

        ;;

    值3)

        指令3...

        ;;

    *)

        指令4...

esac

# 示例代码:

[root@m01 func]# cat case01.sh

#!/bin/bash

cat <<EOF

    1. install lamp

    2. install lnmp

    3. exit

EOF

read -p "pls input an integer from above:" num

# 1. 判断是否为数字

expr 2 + $num &>/dev/null

if [ $? -ne 0 ]

then

    echo "Usage:$0 {1|2|3}"

    exit 1

fi

# 判断执行处理

case $num in

    1)

        echo "install lamp..."

        ;;

    2)

        echo "install lnmp..."

        ;;

    3)

        echo "bye"

        exit

        ;;

    *)

        echo "Uage:$0 {1|2|3}"

        exit 1

esac

[root@m01 func]# sh case01.sh

    1. install lamp

    2. install lnmp

    3. exit

pls input an integer from above:1

install lamp...

[root@m01 func]# sh case01.sh

    1. install lamp

    2. install lnmp

    3. exit

pls input an integer from above:3

bye

[root@m01 func]# sh case01.sh

    1. install lamp

    2. install lnmp

    3. exit

pls input an integer from above:6

Uage:case01.sh {1|2|3}
示例1:给不同内容加不同的颜色
[root@m01 func]# cat case02.sh

#!/bin/bash

##############################################################

# File Name: case02.sh

# Version: V1.

# Author: neo

# Organization: anonymous

# Created Time : -- ::

# Description:

##############################################################

red="\033[31m"

green="\033[32m"

yellow="\033[33m"

blue="\033[34m"

tail="\033[0m"

function color(){

case $ in

    red)

        echo -e "${red}$2${tail}"

        ;;

    green)

        echo -e "${green}$2${tail}"

        ;;

    yellow)

        echo -e "${blue}$2${tail}"

        ;;

    blue)

        echo -e "${blue}$2${tail}"

        ;;

    *)

        echo {Usage:$ colorfunction color char}

        exit

esac

}

cat <<EOF

.apple

.pear

.banana

.cherry

EOF

read -p "pls input a number:" num

case $num in

    )

        color red apple

        ;;

    )

        color green pear

        ;;

    )

        color yellow banana

        ;;

    )

        color blue cherry

        ;;

    *)

        echo "Usage:$0 {1|2|3|4}"

        exit

esac

[root@m01 func]# sh case02.sh

.apple

.pear

.banana

.cherry

pls input a number:

apple

[root@m01 func]#
示例2:开发网络服务rsync服务的启动脚本实践
利用case语句开发Rsync服务启动停止脚本,本例采用case语句以及新的思路来实现。
# 分析:

    1. 启动命令: rsync --daemon

    2. 停止进程: pkill rsync

                  killall rsync

                  kill 进程号     # 推荐这种方式

[root@m01 ~]# rsync --daemon

Failed to parse config file: /etc/rsyncd.conf        # 这台主机上没有 rsync 环境

[root@m01 ~]# touch /etc/rsyncd.conf                # 创建一个 rsyncd.conf 的空文件,就能创建一个最简单的 rsync 环境,此时 rsync 就能启动

[root@m01 ~]# rsync --daemon

[root@m01 ~]#

[root@m01 ~]# lsof -i:873

COMMAND   PID USER   FD   TYPE DEVICE SIZE/OFF NODE NAME

rsync   15961 root    4u  IPv4  89573      0t0  TCP *:rsync (LISTEN)        # rsync 已经启动

rsync   15961 root    5u  IPv6  89574      0t0  TCP *:rsync (LISTEN)

[root@m01 ~]# pkill rsync

[root@m01 ~]# lsof -i:873

[root@m01 ~]# rsync --daemon

[root@m01 ~]# killall rsync

[root@m01 ~]# lsof -i:873

[root@m01 ~]# rsync --daemon

[root@m01 ~]# lsof -i:873

COMMAND   PID USER   FD   TYPE DEVICE SIZE/OFF NODE NAME

rsync   16068 root    4u  IPv4  90215      0t0  TCP *:rsync (LISTEN)

rsync   16068 root    5u  IPv6  90216      0t0  TCP *:rsync (LISTEN)

[root@m01 ~]# kill 16068

[root@m01 ~]# lsof -i:873

[root@m01 ~]#
示例代码1:基本的 rsync 启动脚本
[root@m01 func]# cat rsyncd.sh

#!/bin/bash

##############################################################

# File Name: rsyncd.sh

# Version: V1.0

# Author: neo

# Organization: anonymous

# Created Time : 2019-07-01 23:34:57

# Description:

##############################################################

case "$1" in

    start)

        rsync --daemon

        if [ $? -eq 0 ]

        then

            echo "rsync startup ok"

        else

            echo "rsync startup failed"

        fi

        ;;

    stop)

        killall rsync

        if [ $? -eq 0 ]

        then

            echo "rsync stop ok"

        else

            echo "rsync stop failed"

        fi

        ;;

    restart)

        killall rsync && sleep 1 && rsync --daemon       # sleep 1  ---> 停止1秒 (注意:重启中间要停一下)

        if [ $? -eq 0 ]

        then

            echo "rsync restart ok"

        else

            echo "rsync restart failed"

        fi

        ;;

    *)

        echo "Usage:$0 {start|stop|restart}"

        exit 1

esac

[root@m01 func]# bash rsyncd.sh start

rsync startup ok

[root@m01 func]# lsof -i:873

COMMAND   PID USER   FD   TYPE DEVICE SIZE/OFF NODE NAME

rsync   16228 root    4u  IPv4  91096      0t0  TCP *:rsync (LISTEN)

rsync   16228 root    5u  IPv6  91097      0t0  TCP *:rsync (LISTEN)

[root@m01 func]# bash rsyncd.sh stop

rsync stop ok

[root@m01 func]# lsof -i:873

[root@m01 func]# bash rsyncd.sh start

rsync startup ok

[root@m01 func]# lsof -i:873

COMMAND   PID USER   FD   TYPE DEVICE SIZE/OFF NODE NAME

rsync   16259 root    4u  IPv4  91271      0t0  TCP *:rsync (LISTEN)

rsync   16259 root    5u  IPv6  91272      0t0  TCP *:rsync (LISTEN)

[root@m01 func]# bash rsyncd.sh restart

rsync restart ok

[root@m01 func]# lsof -i:873

COMMAND   PID USER   FD   TYPE DEVICE SIZE/OFF NODE NAME

rsync   16265 root    4u  IPv4  91312      0t0  TCP *:rsync (LISTEN)        # 重启之后 进程号发生了改变

rsync   16265 root    5u  IPv6  91313      0t0  TCP *:rsync (LISTEN)

[root@m01 func]#
示例代码2:完善实用的 rsync 启动脚本
[root@m01 func]# cp rsyncd.sh rsyncd2.sh         # 做备份

[root@m01 func]# cat rsyncd2.sh

#!/bin/bash

# chkconfig: 2345 20 80

# description: rsync start and stop script

# 上面两行的作用是让脚本开机自启动 (这两行必须写在脚本开头)

##############################################################

# File Name: rsyncd.sh

# Version: V1.0

# Author: neo

# Organization: anonymous

# Created Time : 2019-07-01 23:34:57

# Description:

##############################################################

function start(){

    rsync --daemon

    retval=$?                       # 获取上一条命令的执行结果作为返回值; 外部需要调用这个 retval ,所以定义成全局变量

    if [ $retval -eq 0 ]

    then

        echo "rsync startup ok"

        return $retval                    # 专业的脚本函数需要给 返回值

    else

        echo "rsync startup failed"

        return $retval

    fi

}

function stop(){

    killall rsync

    retval=$?

    if [ $retval -eq 0 ]

    then

        echo "rsync stop ok"

        return $retval

    else

        echo "rsync stop failed"

        return $retval

    fi

}

case "$1" in

    start)

        start

        retval=$?               # 接收 start 的执行结果并赋值给 retval 作为返回值

        ;;

    stop)

        stop

        retval=$?

        ;;

    restart)

        stop && sleep 1 && start

        retval=$?

        ;;

    *)

        echo "Usage:$0 {start|stop|restart}"

        exit 1

esac

exit $retval                    # 把上面的执行结果返回给脚本外面

[root@m01 func]# lsof -i:873

[root@m01 func]# sh rsyncd2.sh start

rsync startup ok

[root@m01 func]# lsof -i:873

COMMAND   PID USER   FD   TYPE DEVICE SIZE/OFF NODE NAME

rsync   16731 root    4u  IPv4  93672      0t0  TCP *:rsync (LISTEN)

rsync   16731 root    5u  IPv6  93673      0t0  TCP *:rsync (LISTEN)

[root@m01 func]# sh rsyncd2.sh restart

rsync stop ok

rsync startup ok

[root@m01 func]# lsof -i:873

COMMAND   PID USER   FD   TYPE DEVICE SIZE/OFF NODE NAME

rsync   16737 root    4u  IPv4  93713      0t0  TCP *:rsync (LISTEN)        # 重启之后 pid 发生了变化

rsync   16737 root    5u  IPv6  93714      0t0  TCP *:rsync (LISTEN)

[root@m01 func]# sh rsyncd2.sh stop

rsync stop ok

[root@m01 func]# sh rsyncd2.sh restart

rsync: no process killed

rsync stop failed

[root@m01 func]# echo $?

1

[root@m01 func]#

[root@m01 func]# cp rsyncd2.sh /etc/init.d/rsyncd

[root@m01 func]# chmod +x /etc/init.d/rsyncd                    # 加上执行权限

[root@m01 func]# chkconfig --list rsyncd                        # 此时 rsync服务 没在开机启动管理里面

service rsyncd supports chkconfig, but is not referenced in any runlevel (run 'chkconfig --add rsyncd')

[root@m01 func]# chkconfig --add rsyncd                            # 把 rsyncd 服务添加到开机启动管理里面

[root@m01 func]# chkconfig --list rsyncd

rsyncd             0:off    1:off    2:on    3:on    4:on    5:on    6:off        # 此时 rsyncd 在2345级别开机自启动

[root@m01 func]#

# 加载系统函数库做输出提示

[root@m01 func]# cp /etc/init.d/rsyncd{,.1}        # 做备份

[root@m01 func]# cat /etc/init.d/rsyncd

#!/bin/bash

# chkconfig: 2345 20 80

# description: rsync start and stop script

##############################################################

# File Name: rsyncd.sh

# Version: V1.0

# Author: neo

# Organization: anonymous

# Created Time : 2019-07-01 23:34:57

# Description:

##############################################################

. /etc/init.d/functions     # 调用系统函数库(用于输出提示)

function start(){

    rsync --daemon

    retval=$?                       # 获取上一条命令的执行结果作为返回值; 外部需要调用这个 retval ,所以定义成全局变量

    if [ $retval -eq 0 ]

    then

        action "rsync startup ok" /bin/true    # 用于输出提示

        return $retval                    # 专业的脚本函数需要给 返回值

    else

        action "rsync startup failed" /bin/false

        return $retval

    fi

}

function stop(){

    killall rsync &>/dev/null       # &>/dev/null   不要输出(只看返回值)

    retval=$?

    if [ $retval -eq 0 ]

    then

        action "rsync stop ok" /bin/true

        return $retval

    else

        action "rsync stop failed" /bin/false

        return $retval

    fi

}

case "$1" in

    start)

        start

        retval=$?               # 接收 start 的执行结果并赋值给 retval 作为返回值

        ;;

    stop)

        stop

        retval=$?

        ;;

    restart)

        stop && sleep 1 && start

        retval=$?

        ;;

    *)

        echo "Usage:$0 {start|stop|restart}"

        exit 1

esac

exit $retval                    # 把上面的执行结果返回给脚本外面

[root@m01 func]#

[root@m01 func]# lsof -i:873

[root@m01 func]# /etc/init.d/rsyncd start

rsync startup ok                                           [  OK  ]

[root@m01 func]# /etc/init.d/rsyncd restart

rsync stop ok                                              [  OK  ]

rsync startup ok                                           [  OK  ]

[root@m01 func]# /etc/init.d/rsyncd stop

rsync stop ok                                              [  OK  ]

[root@m01 func]# /etc/init.d/rsyncd restart

rsync stop failed                                          [FAILED]

[root@m01 func]#
示例代码3:和系统脚本类似的 rsync 启动脚本
# 分析:

    1. 系统脚本启动的时候通常会定义一个锁文件 lockfile,当系统启动时创建一个锁文件(可以通常查看有没有这个锁文件来判断服务有没有成功)

    2. 当服务停止成功时,两把锁文件删除

[root@m01 func]# cp /etc/init.d/rsyncd{,.2}        # 先备份

[root@m01 subsys]# cat /etc/rsyncd.conf            # 在 rsyncd.conf 文件中定义一个获取 rsync服务 进程号 pid 的文件

pid file = /var/run/rsyncd.pid

[root@m01 subsys]# rsync --daemon

[root@m01 subsys]# cat /var/run/rsyncd.pid        # 在 rsyncd.conf 中添加了 pid file 之后,启动  rsync 服务之后,pid file 中就会保存 rsync 服务的 pid

18082

[root@m01 func]# cat /etc/init.d/rsyncd

#!/bin/bash

# chkconfig: 2345 20 80

# description: rsync start and stop script

##############################################################

# File Name: rsyncd.sh

# Version: V1.0

# Author: neo

# Organization: anonymous

# Created Time : 2019-07-01 23:34:57

# Description:

##############################################################

lockfile=/var/lock/subsys/rsync                 # 先定义一个锁文件

rsyncd_pid_file_path="/var/run/rsyncd.pid"      # 定义 rsync 进程号的路径

. /etc/init.d/functions

function start(){

    rsync --daemon &>/dev/null

    retval=$?

    if [ $retval -eq 0 ]

    then

        action "rsync startup ok" /bin/true

        touch $lockfile                        # 启动成功后,就创建一个锁文件

        return $retval

    else

        action "rsync startup failed" /bin/false

        return $retval

    fi

}

function stop(){

    if test -s $rsyncd_pid_file_path                    # -s ---> 判断文件是否存在且不为空

    then

        rsyncd_pid=`cat $rsyncd_pid_file_path`

        if (kill -0 $rsyncd_pid &>/dev/null)      # kill -0 进程号  ---> 判断该进程号对应的服务是否存在;存在则echo $?返回0,不存在返1

        then

            kill $rsyncd_pid

            retval=$?

            if [ $retval -eq 0 ]

            then

                action "rsync stop ok" /bin/true

                \rm -f $lockfile           # 停止成功后就删除锁文件

                return $retval

            else

                action "rsync stop failed" /bin/false

                return $retval

            fi

        else        # 此种情况是:$rsyncd_pid 对应的 rsyncd 服务不存在

            action "rsyncd service is not running"

            return 2

        fi

    else    # 此种情况是: $rsyncd_pid_file_path 对应的路径不存在

        action "$rsyncd_pid_file_path not exist, or rsyncd not startup" /bin/false

        return 3

    fi

}

case "$1" in

    start)

        start

        retval=$?               # 接收 start 的执行结果并赋值给 retval 作为返回值

        ;;

    stop)

        stop

        retval=$?

        ;;

    restart)

        stop && sleep 1 && start

        retval=$?

        ;;

    *)

        echo "Usage:$0 {start|stop|restart}"

        exit 1

esac

exit $retval                    # 把上面的执行结果返回给脚本外面

[root@m01 subsys]# lsof -i:873

[root@m01 func]# /etc/init.d/rsyncd stop

/var/run/rsyncd.pid not exist, or rsyncd not startup       [FAILED]

[root@m01 func]# /etc/init.d/rsyncd restart

/var/run/rsyncd.pid not exist, or rsyncd not startup       [FAILED]

[root@m01 func]# /etc/init.d/rsyncd start

rsync startup ok                                           [  OK  ]

[root@m01 func]# lsof -i:873

COMMAND   PID USER   FD   TYPE DEVICE SIZE/OFF NODE NAME

rsync   18740 root    4u  IPv4 102100      0t0  TCP *:rsync (LISTEN)

rsync   18740 root    5u  IPv6 102101      0t0  TCP *:rsync (LISTEN)

[root@m01 func]# /etc/init.d/rsyncd restart

rsync stop ok                                              [  OK  ]

rsync startup ok                                           [  OK  ]

[root@m01 func]# lsof -i:873

COMMAND   PID USER   FD   TYPE DEVICE SIZE/OFF NODE NAME

rsync   18764 root    4u  IPv4 102183      0t0  TCP *:rsync (LISTEN)

rsync   18764 root    5u  IPv6 102184      0t0  TCP *:rsync (LISTEN)

[root@m01 func]# /etc/init.d/rsyncd stop

rsync stop ok                                              [  OK  ]

[root@m01 func]#
case条件句使用总结:

while 循环语句
# while 循环的语法:
while 条件表达式
do
指令...
done # 示例1:每隔2秒输出一次系统负载(负载是系统性能的基础重要指标)情况
[root@m01 loop]# cat loop01.sh
while true
do
uptime >>/tmp/uptime.log
sleep 2
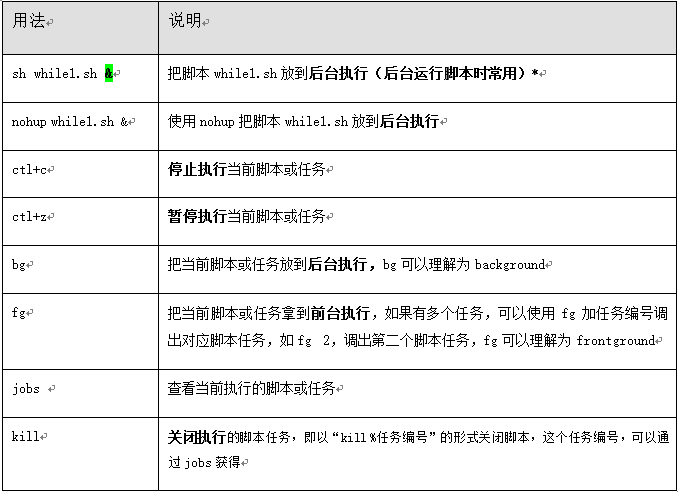
done # 后台运行的命令: & 、nohup 、screen (运维人员常用)
常见命令:
kill killall pkill ---> 杀掉进程
ps ---> 查看进程
pstree ---> 显示进程状态树
top ---> 显示进程
renice ---> 改变优先权
nohup ---> 用户退出系统之后继续工作(后台运行)
pgrep ---> 查找匹配条件的进程
strace ---> 跟踪一个进程的系统调用情况
ltrace ---> 跟踪进程调用库函数的情况
while循环可能会涉及到的一些命令:

示例2:使用while循环对下面的脚本进行修改,使得当执行脚本时,每次执行完脚本以后不退出脚本了,而是继续提示用户输入。
[root@m01 loop]# cat loop02.sh

while true

do

    read -p "pls input two numbers:" a b

    if [ -z "$b" ]

    then

        echo "pls input two numbers:"

        continue        # continue 表示结束本次循环

    fi

    expr 10 + $a + $b &>/dev/null

    if [ $? -ne 0 ]

    then

        echo "pls input two numbers:"

        continue

    fi

    echo "a-b=$(($a-$b))"

    echo "a+b=$(($a+$b))"

    echo "a*b=$(($a*$b))"

    echo "a/b=$(($a/$b))"

    echo "a**b=$(($a**$b))"

    echo "a%b=$(($a%$b))"

done

[root@m01 loop]#
示例3:猜数字游戏:首先让系统随机生成一个数字,给这个数字定一个范围(1-60),让用户输入猜的数字,对输入进行判断,如果不符合要求,就给予高或低的提示,猜对后则给出猜对用的次数,用while语句实现。
# 分析:

    1. 随机数 ---> $RANDOM    # $RANDOM 随机数的范围: 0~32767

        [root@m01 loop]# echo $RANDOM

        15258

        [root@m01 loop]# echo $(($RANDOM%60))        # 取 0~60 之间的随机数

        10

[root@m01 loop]# cat loop03.sh

#!/bin/bash

##############################################################

# File Name: loop03.sh

# Version: V1.0

# Author: neo

# Organization: anonymous

# Created Time : 2019-07-02 23:18:45

# Description:

##############################################################

val="$((RANDOM%60))"

count=0

while true

do

    read -p "pls input one number:" num

    ((count++))

    if [ -z "$num" ]

    then

        read -p "pls input one number:" num

        continue

    fi

    expr 10 + $num &>/dev/null

    if [ $? -ne 0 ]

    then

        read -p "pls input one number:" num

        continue

    fi

    if [ $val -gt $num ]

    then

        echo "try bigger"

    elif [ $val -lt $num ]

    then

        echo "try smaller"

    else

        echo "guess right"

        echo "count:$count"

        exit

    fi

done

[root@m01 loop]#
示例4: 分析Apache访问日志(access_2010-12-8.log),把日志中每行的访问字节数对应字段数字相加,计算出总的访问量。给出实现程序,用while循环实现。
# while 循环读取文件有3种方式(常用下面的前2种方式):

# 方式1:在while循环结尾done通过输入重定向指定读取的文件。

while read line        # 读取文件内容时,是从文件由上到下读取

do

    cmd        # 对 line 进行处理

done<FILE

# 方式2:使用cat读取文件内容,然后通过管道进入while循环处理。

cat FILE_PATH|while read line

do

    cmd

done

# 方式3:采用exec读取文件后,然后进入while循环处理。

exec <FILE

sum=0

while read line

do

    cmd

done

# 读取文件内容示例

[root@m01 ~]# seq 10 >neo.log

[root@m01 ~]# cat neo.log

1

2

3

4

5

6

7

8

9

10

[root@m01 loop]# vim while-read-from-file.sh

while read line

do

    echo "$line"

done</root/neo.log

[root@m01 loop]# sh while-read-from-file.sh

1

2

3

4

5

6

7

8

9

10

# 示例代码如下:

[root@m01 loop]# cat loop04.sh

#!/bin/bash

awk '{print $10}' /root/access_2010-12-8.log|grep -v -  >/tmp/count_bytes.log

num=0

while read line

do

    ((num+=line))

done</tmp/count_bytes.log

echo $num

[root@m01 loop]#
while循环涉及的一些命令:
for 循环语句
for循环语句和 while 循环语句类似,但 for 循环语句主要用于执行次数有限的循环,而不是用于守护进程以及无限循环。for 循环语句常见的语法有两种

# for循环的语法:

1)普通语法

for 变量名 in 变量取值列表

do

    指令...

done

2)C语言型for循环语法

for((exp1;exp2;exp3))

do

    指令...

done

# 示例1:通过开发脚本实现仅设置 sshd rsyslog crond network sysstat  服务开机自启动

[root@m01 loop]# cat for01.sh

#!/bin/bash

for service in `chkconfig |awk '!/crond|network|rsyslog|sshd|sysstat/{print $1}'`

do

    chkconfig $service off

done

[root@m01 loop]#

# 示例2:计算从1加到100之和

[root@m01 loop]# cat for02.sh

#!/bin/bash

for ((i=1;i<=100;i++))      # C语言型的 for 循环

do

    ((sum+=i))

done

echo $sum

echo ===================================

for n in {1..100}

do

    ((total+=n))

done

echo $total

echo ===================================

for n in `seq 100`

do

    ((amount+=n))

done

echo $amount

echo ==================================

while ((j<=100))

do

    ((vol+=j))

    ((j++))

done

echo $vol

[root@m01 loop]# echo $((100*(100+1)/2))

5050

[root@m01 loop]#

# 示例3:在Linux下批量修改文件名,将文件名中的“_finished”去掉。

# 准备测试数据:

mkdir /neo -p

cd /neo

touch stu_102999_1_finished.jpg stu_102999_2_finished.jpg stu_102999_3_finished.jpg

touch stu_102999_4_finished.jpg stu_102999_5_finished.jpg

ls -l

# 如下:

[root@m01 ~]# mkdir /neo -p

[root@m01 ~]# cd /neo

[root@m01 neo]# touch stu_102999_1_finished.jpg stu_102999_2_finished.jpg stu_102999_3_finished.jpg

[root@m01 neo]# touch stu_102999_4_finished.jpg stu_102999_5_finished.jpg

[root@m01 neo]# ls -l

total 0

-rw-r--r-- 1 root root 0 Jul  3 12:06 stu_102999_1_finished.jpg

-rw-r--r-- 1 root root 0 Jul  3 12:06 stu_102999_2_finished.jpg

-rw-r--r-- 1 root root 0 Jul  3 12:06 stu_102999_3_finished.jpg

-rw-r--r-- 1 root root 0 Jul  3 12:06 stu_102999_4_finished.jpg

-rw-r--r-- 1 root root 0 Jul  3 12:06 stu_102999_5_finished.jpg

# for循环脚本:

[root@m01 loop]# cat loop05.sh

#!/bin/bash

file_path="/neo/*.jpg"

for file in `ls $file_path`

do

    mv $file ${file/_finished/}

done

# awk 操作

[root@m01 neo]# ls *.jpg|awk -F "_finished" '{print "mv",$0,$1$2}'|sh

[root@m01 neo]# ll

total 0

-rw-r--r-- 1 root root 0 Jul  3 14:19 stu_102999_1.jpg

-rw-r--r-- 1 root root 0 Jul  3 14:19 stu_102999_2.jpg

-rw-r--r-- 1 root root 0 Jul  3 14:19 stu_102999_3.jpg

-rw-r--r-- 1 root root 0 Jul  3 14:19 stu_102999_4.jpg

-rw-r--r-- 1 root root 0 Jul  3 14:19 stu_102999_5.jpg

[root@m01 neo]#

# rename 操作

# rename语法: rename [from] [to] file

[root@m01 neo]# rename _finished "" *.jpg                # 把文件名中的 "_finished" 改为 空

[root@m01 neo]# ll

total 0

-rw-r--r-- 1 root root 0 Jul  3 14:19 stu_102999_1.jpg

-rw-r--r-- 1 root root 0 Jul  3 14:19 stu_102999_2.jpg

-rw-r--r-- 1 root root 0 Jul  3 14:19 stu_102999_3.jpg

-rw-r--r-- 1 root root 0 Jul  3 14:19 stu_102999_4.jpg

-rw-r--r-- 1 root root 0 Jul  3 14:19 stu_102999_5.jpg

[root@m01 neo]#
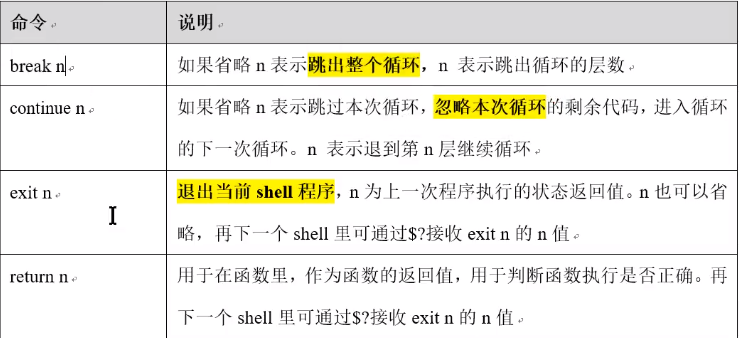
条件与循环控制及程序返回值相关知识点:
shell编程数组语法及应用实践
数组的概念:
数组也是一个变量;Shell的数组就是把有限个元素(变量或字符内容)用一个名字命名,然后用编号对它们进行区分的元素集合。

这个名字就称为数组名,用于区分不同内容的编号就称为数组下标。组成数组的各个元素(变量)称为数组的元素,有时也称为下标变量。

# 数组的本质还是变量,是特殊的变量形式,如: array=(1 2 3 4 5)
数组的定义方式:
# 方法1:推荐

array=(one two three four)

# 方法2:

array=([0]=one [1]=two [2]=three [3]=four)

# 方法3:

[root@m01 ~]# array[0]=one

[root@m01 ~]# array[1]=2

[root@m01 ~]# array[2]=3

[root@m01 ~]# echo ${array[@]}

one 2 3

[root@m01 ~]# echo ${array[*]}        # 获取所有的数组元素

one 2 3

[root@m01 ~]#

方法4:命令的结果放到数组里,推荐。

array=(`ls /server/scripts`)

# 操作数组元素

# 读取数组内容 ***

[root@m01 ~]# array=(1 2 3)

[root@m01 ~]# echo ${array[0]}

1

[root@m01 ~]# echo ${array[*]}

1 2 3

[root@m01 ~]# echo ${array[@]}

1 2 3

[root@m01 ~]# echo ${#array[@]}        # 数组的长度

3

[root@m01 ~]# echo ${array[4]}

[root@m01 ~]#

# 给数组添加内容

[root@m01 ~]# array[3]=neo

[root@m01 ~]# echo ${array[*]}

1 2 3 neo

[root@m01 ~]# array[3]=four            # 会把数组的元素覆盖

[root@m01 ~]# echo ${array[*]}

1 2 3 four                            # 会把数组的元素覆盖

[root@m01 ~]#

# 删除数组内容

[root@m01 ~]# unset array[1]        # 删除数组下标为1的数组元素

[root@m01 ~]# echo ${array[*]}

1 3 four

[root@m01 ~]# echo ${array[2]}

3

[root@m01 ~]#

# for循环数组:

[root@m01 loop]# cat array_for.sh

#!/bin/bash

array=(1 2 3 4 5)

for n in ${array[*]}

do

    echo $n

done

echo =======================

for ((i=0;i<${#array[*]};i++))     # C语言型的for 循环数组;数组的下标从0开始

do

    echo ${array[i]}               # i 是下标

done

[root@m01 loop]# sh array_for.sh

1

2

3

4

5

=======================

1

2

3

4

5

[root@m01 loop]#
Shell数组的重要命令:
# (1)定义命令

静态数组:

array=(1 2 3)

动态数组:

array=($(ls))  或  array=(`ls`)

给数组赋值:

array[3]=4

(2)打印命令

打印所有元素:

${array[@]}  或  ${array[*]}

打印数组长度:

${#array[@]}或${#array[*]}

打印单个元素:

${array[i]}                  #<==i是数组下标
企业实践:利用bash for循环打印下面这句话中字母数不大于6的单词(某企业面试真题)。
I am oldboy teacher welcome to oldboy training class
[root@m01 loop]# cat loop06.sh

#!/bin/bash

array=(I am oldboy teacher welcome to oldboy training class)

for word in ${array[*]}

do

    if [ ${#word} -le 6 ]

    then

        echo ${word}

    fi

done

echo ===================

for ((i=0;i<${#array[*]};i++))

do

    if [ ${#array[i]} -le 6 ]

    then

        echo ${array[i]}

    fi

done

[root@m01 loop]# sh loop06.sh

I

am

oldboy

to

oldboy

class

===================

I

am

oldboy

to

oldboy

class

[root@m01 loop]#
Linux(16):Shell编程(3)的更多相关文章
- Linux 下shell 编程学习脚手架
linux body { font-family: Helvetica, arial, sans-serif; font-size: 14px; line-height: 1.6; padding-t ...
- Linux下Shell编程
Linux的shell编程 1.什么是shell? 当一个用户登录Linux系统之后,系统初始化程序init就为每个用户执行一个称为shell(外壳)的程序. shell就是一个命令行解释器,它为用户 ...
- 【Hadoop离线基础总结】linux的shell编程
linux的shell编程 基本了解 概述 Shell是一个用C语言编写的程序,通过shell用户可以访问操作系统内核服务,它类似于DOS下的command和后来的cmd.exe.Shell既是一种命 ...
- linux中shell编程
shell编程 1 echo -e 识别\转义符 \a \b \t \n \x十六进制 \0八进制 等等 #!/bin/bash echo -e "hello world" 执行脚 ...
- linux下shell编程示例-获取进程id
今天初步学习了一下linux下的shell编程,简单记录一下测试用例 1.编辑shell脚本文件如下: #!/bin/bashecho "hello bash linux"echo ...
- linux之shell编程基本语法
Shell是用户与内核进行交互操作的一种接口,目前最流行的Shell称为bash Shell.Shell也是一门编程语言<解释型的编程语言>,即shell脚本<就是在用linux的s ...
- Linux学习——shell编程之变量
shell编程之变量:Linux shell编程基础中的变量. 包括Bash变量的分类和各变量的详细使用,如:用户自定义变量.环境变量.语系变量.位置参数变量和预定义变量. 1:什么是Bash变量? ...
- 3. Linux的shell编程
Shell 是一个用 C 语言编写的程序, 通过 Shell 用户可以访问操作系统内核服务.它类似于 DOS 下的 command 和后来的 cmd.exe.Shell 既是一种命令语言,又是一种程序 ...
- Linux之shell编程的基本使用
1.Shell shell是一个命令行解释器,它为用户提供了一个向 Linux 内核发送请求以便运行程序的系统级程序 2.shell编程打印hello world 2.1 代码部分 #!/bin/ba ...
- Linux学习——shell编程之正则表达式和字符处理命令
shell编程之正则表达式 一 正则表达式 1 什么是正则表达式 正则表达式用于描述字符排列和匹配模式的一种语法规则.它主要用于字符串的模式分隔.匹配.查找及替换操作. 2 shell编程之正则表达式 ...
随机推荐
- 03.从尾到头打印链表 (Java)
题目描述 输入一个链表,按链表值从尾到头的顺序返回一个ArrayList. 思路 采用递归: 若当前节点不为空,则递归其后继节点,并将当前节点加入list中. 采用数据结构栈实现: 利用栈“后进先出” ...
- (十一)C语言之选择结构
- TCP层shutdown系统调用的实现分析
概述 shutdown系统调用在tcp层会调用两个函数,对于ESTABLISHED状态需要调用tcp_shutdown关闭连接,对于LISTEN和SYN_SENT状态则需要以非阻塞模式调用tcp_di ...
- 2018-2019-2 20165215《网络对抗技术》Exp9 :Web安全基础
目录 实验目的及内容 实验过程记录 一.Webgoat安装 二. 注入缺陷(Injection Flaws) (一)命令注入(Command Injection) (二)数字型注入(Numeric S ...
- JS基础_原型对象
原型prototype 我们创建的每一个函数,解析器都会向函数中添加一个属性prototype 这个属性,对应着一个对象,这个对象就是我们所谓的原型对象 1.如果函数作为普通函数调用prototype ...
- VLC-Qt 入门指南
关于 VLC-Qt VLC-Qt:一个结合了 Qt 应用程序和 libVLC 的免费开源库.它包含了用于媒体播放的核心类,以及用于更快速地进行媒体播放器开发的一些 GUI 类. 官网地址:http ...
- HearthstoneBot
https://github.com/ChuckFork/HearthstoneBot Sigmund Card game automation framework Hooks game and lo ...
- invalid new-expression of abstract class type 'CurveFittingEdge'
目录 一 报错原因 注:原创不易,转载请务必注明原作者和出处,感谢支持! 一 报错原因 今天遇到了一个之前从未遇到的报错: error: invalid new-expression of abstr ...
- mysql之备份与恢复
数据备份全备 备份命令 :mysqldump把数据库的数据以sql语句导出属于逻辑备份 格式 : mysqldump -uroot -p123456 -S 多实例的mysql.sock 数据库名 &g ...
- LC 526. Beautiful Arrangement
uppose you have N integers from 1 to N. We define a beautiful arrangement as an array that is constr ...