Linux驱动 | 从0写一个设备树节点实例
一、前言
设备树是每一个Linux驱动工程师都必须掌握的一个知识点,有很多之前做单片机的朋友刚接触Linux驱动时,会一脸懵!
其实设备树的使用并没有大家想像的那么复杂,对于大部分工程师来说,只要会修改即可。
很多粉丝留言说,希望彭老师提供一个设备树到驱动解析的实例。
必须安排!
在学习设备树之前,大家一定要搞清楚什么是platform总线,请详细学习下面这篇文章:
关于设备树理论部分内容请学习下面这篇文章:
关于驱动基础文章,可以去B站学习一口君的入门视频:
https://www.bilibili.com/video/BV1d5411A7VJ?spm_id_from=333.999.0.0
有了这些基础知识后,我们就可以来编写一个设备树的实例,
下面彭老师就给大家讲解如何自己添加一个设备树节点,并如何在驱动中提取出设备树的信息。
老规矩,代码从0开始编写,并且全部验证通过,并分享给大家。
二、测试平台
本次测试在开发板上操作,操作环境如下:
1. 编译环境
ubuntu 16.04
2. 交叉编译工具
root@ubuntu:/home/peng/linux-3.14# arm-none-linux-gnueabi-gcc -v

Using built-in specs.

COLLECT_GCC=arm-none-linux-gnueabi-gcc

COLLECT_LTO_WRAPPER=/home/peng/toolchain/gcc-4.6.4/bin/../libexec/gcc/arm-arm1176jzfssf-linux-gnueabi/4.6.4/lto-wrapper

Target: arm-arm1176jzfssf-linux-gnueabi

………………

gcc version 4.6.4 (crosstool-NG hg+default-2685dfa9de14 - tc0002)
3. 开发板
开发板:fs4412

soc:exynos4412
4. 内核版本
Linux kernel 3.14.0
三、内核解析设备树一般过程
系统启动后,uboot会从网络或者flash、sd卡中读取设备树文件(具体由uboot命令给出),
引导linux内核启动后,会把设备树镜像保存到的内存地址传递给Linux内核,Linux内核会解析设备树镜像,从设备树中提取硬件信息并逐一初始化。
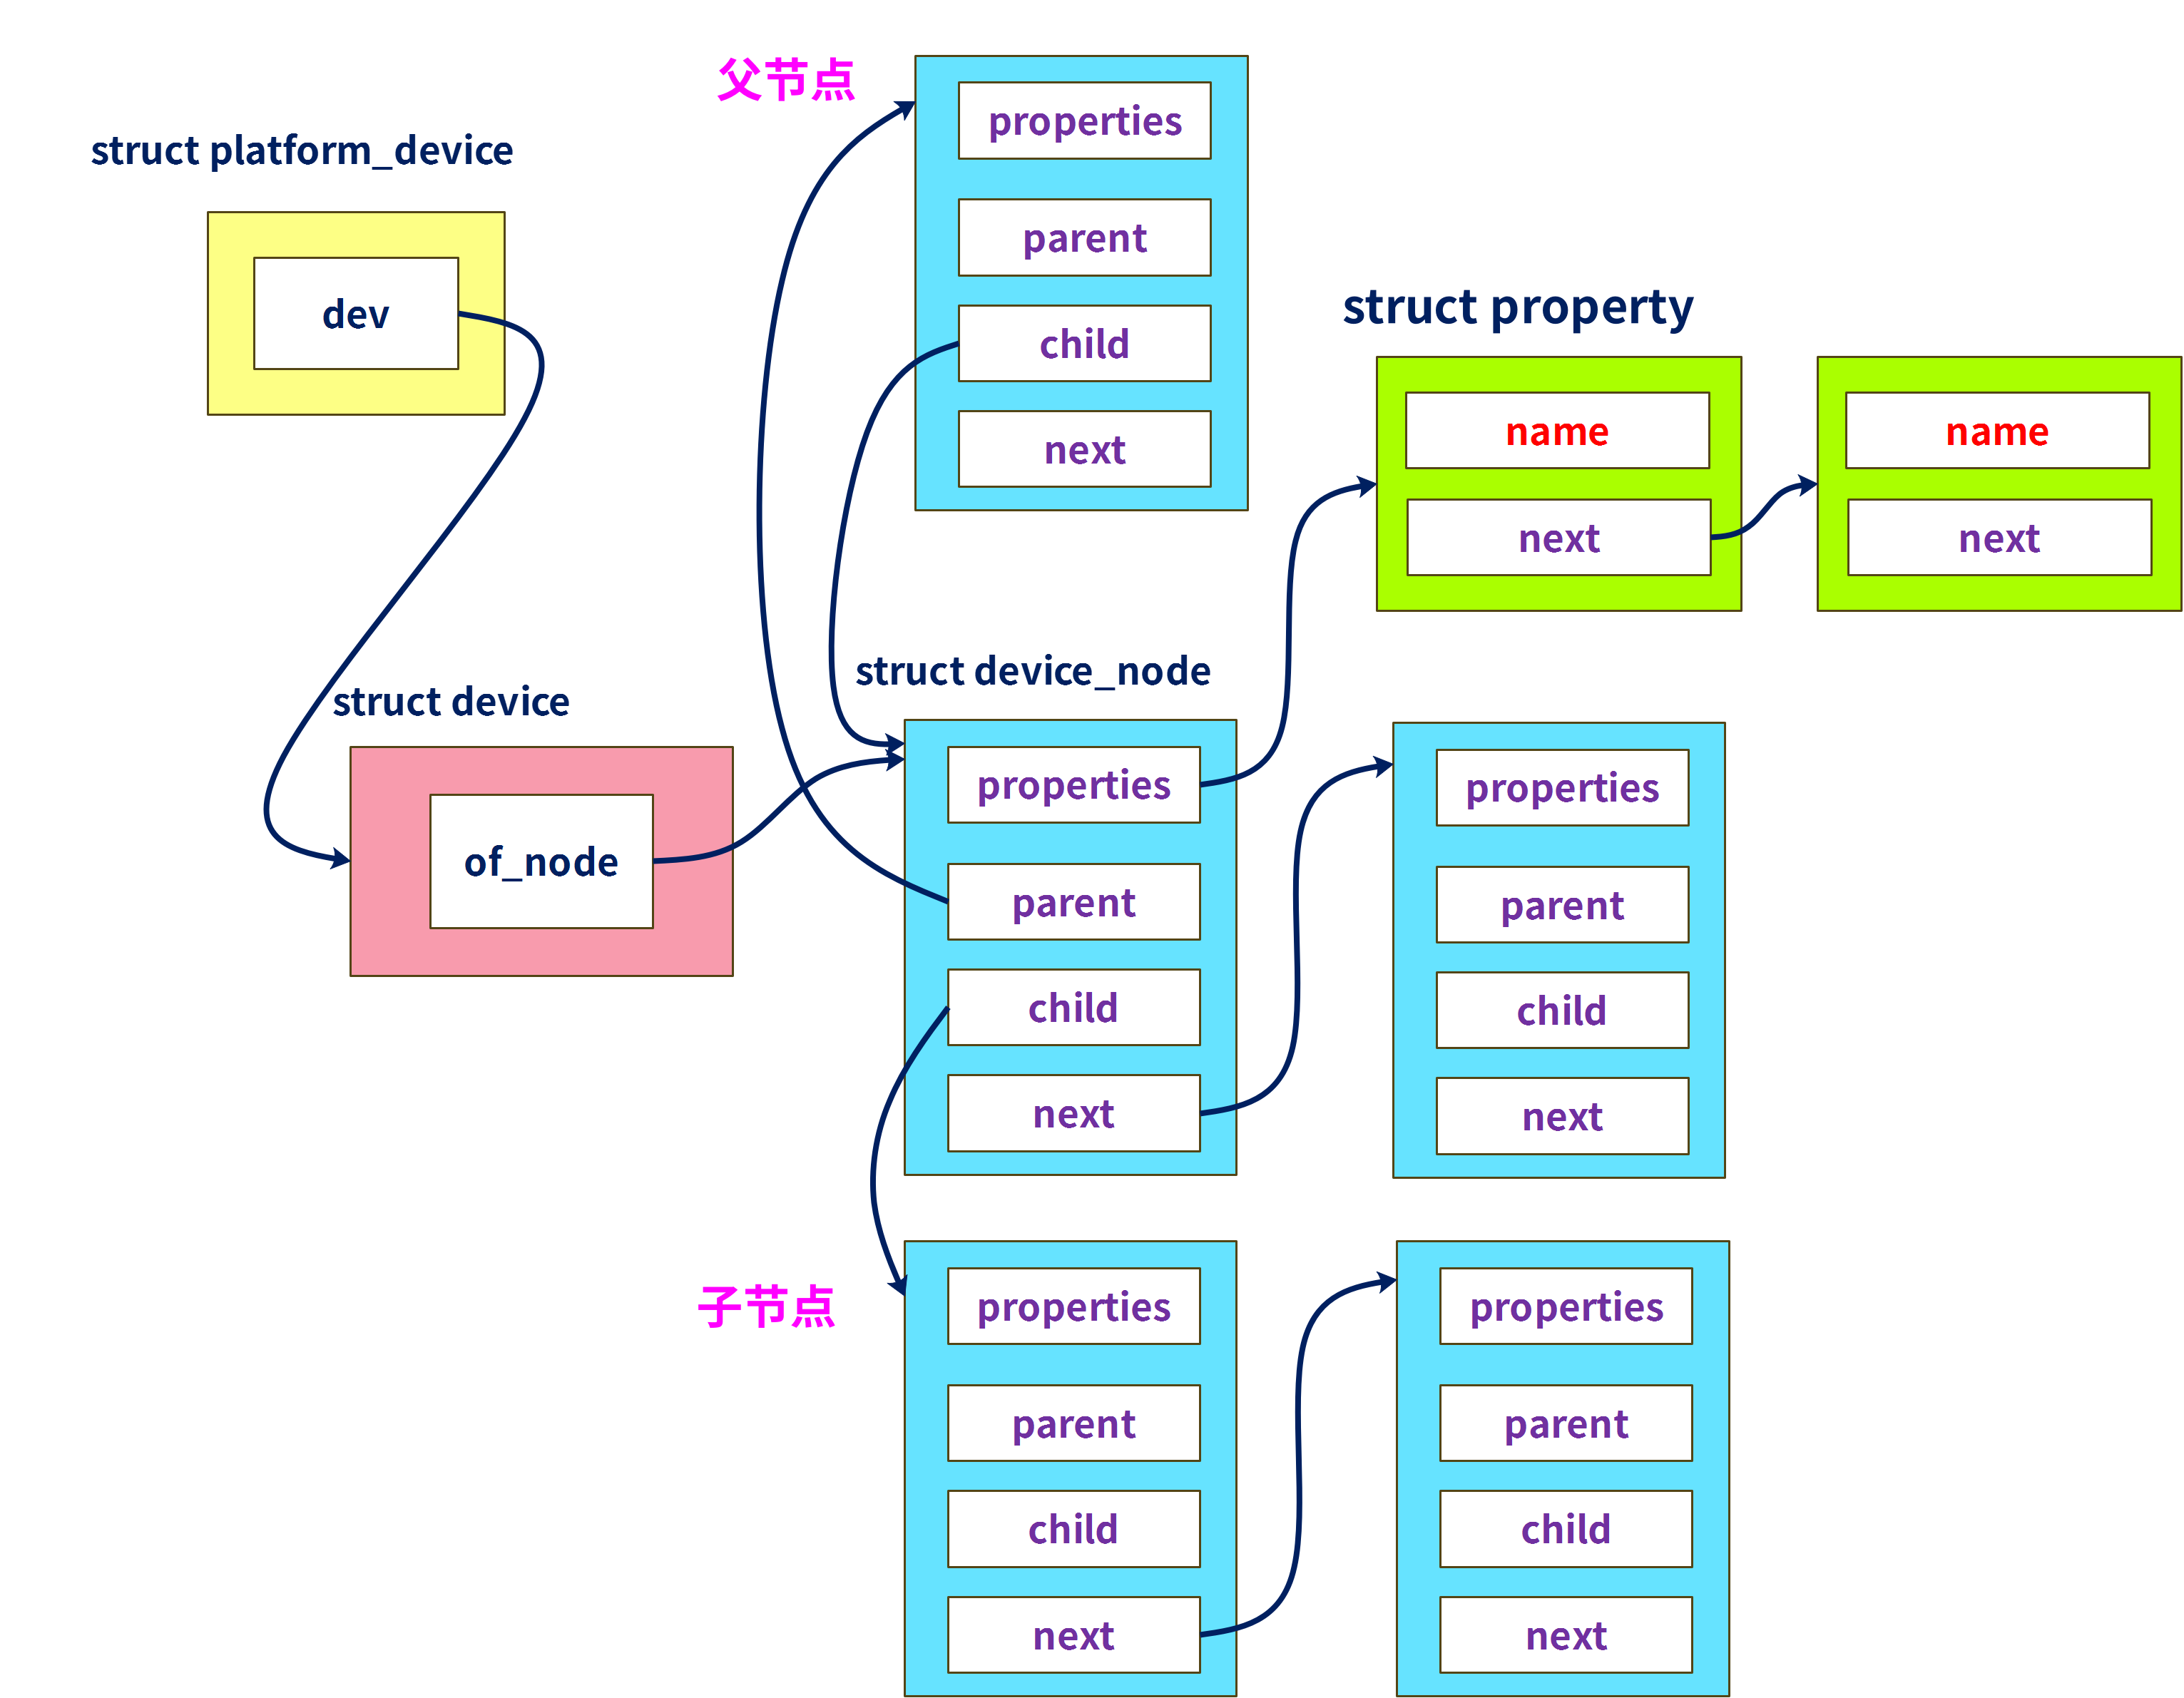
其中设备树信息会被转换成
struct platform_device类型变量。而驱动要解析设备树,必须定义
struct platform_driver类型结构体变量,并通过函数platform_driver_register()注册。这两者都会注册到platform总线,当驱动和设备树节点匹配成功后,就调用
struct platform_driver中.probe方法。
其中设备树节点会封装在struct device_node 结构体变量中
各个属性信息会封装在 struct property结构体变量中,
他们与struct platform_device结构体之间关系如下:
四、驱动架构
以下是一口君编写的驱动架构,
我们只需要将测试代码填充到hello_probe()中即可:
static int hello_probe(struct platform_device *pdev)

{

	printk("match ok \n");

//解析代码编写

	return 0;

}

static 	int hello_remove(struct platform_device *pdev)

{

	printk("hello_remove \n");

	return 0;

}

static struct of_device_id beep_table[] = {

		{.compatible = "yikoulinux"},

};

static struct platform_driver hello_driver =

{

	.probe = hello_probe,

	.driver.name = "duang",

	.remove = hello_remove,

	.driver = {

		.name = "yikoupeng",

		.of_match_table = beep_table,

	},

};

static int hello_init(void)

{

	printk("hello_init \n");

	return platform_driver_register(&hello_driver);

}

static void hello_exit(void)

{

	printk("hello_exit \n");

	platform_driver_unregister(&hello_driver);

	return;

}

MODULE_LICENSE("GPL");

module_init(hello_init);

module_exit(hello_exit);
五、设备树节点
下面是给出的设备树信息:
	yikou_node{

        compatible = "yikoulinux";

        reg = <0x114000a0 0x4 0x139D0000 0x20>;

        reg-names = "peng";

        interrupt-parent=<&gpx1>;

        interrupts =<1 2>,<2  2>;

        csm_gpios=<&gpx2 3 0 &gpx2 4 0 &gpx2 5 0 &gpx2 6 0>;

        crl0_gpio=<&gpx0 5 0>;

        crl1_gpio=<&gpx0 6 0>;

        rst_gpio=<&gpx0 7 0>;

        cfg_gpio=<&gpx0 4 0>;

		phy_ref_freq = <26000>;  /* kHz */

		suspend_poweroff;

		clock-names = "xusbxti",

			"otg";

		yikou_node {

			compatible = "leadcore,dsi-panel";

			panel_name = "lcd_rd_rm67295";

			refresh_en = <1>;

			bits-per-pixel = <32>;

		};

    };
其中包括常见reg、中断、整型值、bool值、字符串、子节点、时钟等属性。
一定要注意,很多属性的给出会因为使用的SOC平台的不同有所差异,
下面介绍下GPIO和中断编写原理:
1. GPIO
gpio信息的给出有以下两种方法:
csm_gpios=<&gpx2 3 0 &gpx2 4 0 &gpx2 5 0 &gpx2 6 0>;
	crl0_gpio=<&gpx0 5 0>;

	crl1_gpio=<&gpx0 6 0>;

	rst_gpio=<&gpx0 7 0>;

	cfg_gpio=<&gpx0 4 0>;
第1种是公用同一个名字,第2种是每一个gpio单独使用1个名字。
gpio需要指明父节点,关于gpio父节点的说明下说明文档(通常linux-3.14\Documentation下有关于该内核版本的一些模块说明,很重要):
linux-3.14\Documentation\devicetree\bindings\gpio.txt
For example, the following could be used to describe gpios pins to use

as chip select lines; with chip selects 0, 1 and 3 populated, and chip

select 2 left empty:

	gpio1: gpio1 {

		gpio-controller

		 #gpio-cells = <2>;

	};

	gpio2: gpio2 {

		gpio-controller

		 #gpio-cells = <1>;

	};

	[...]

	 chipsel-gpios = <&gpio1 12 0>,

			 <&gpio1 13 0>,

			 <0>, /* holes are permitted, means no GPIO 2 */

			 <&gpio2 2>;

Note that gpio-specifier length is controller dependent.  In the

above example, &gpio1 uses 2 cells to specify a gpio, while &gpio2

only uses one.

gpio-specifier may encode: bank, pin position inside the bank,

whether pin is open-drain and whether pin is logically inverted.

Exact meaning of each specifier cell is controller specific, and must

be documented in the device tree binding for the device.

Example of the node using GPIOs:

	node {

		gpios = <&qe_pio_e 18 0>;

	};

In this example gpio-specifier is "18 0" and encodes GPIO pin number,

and empty GPIO flags as accepted by the "qe_pio_e" gpio-controller.
翻译总结成如下几点:
- gpio父节点需要包含属性
	gpio-controller、    表示是gpi控制器

	#gpio-cells = <2>;    表示子节点包括2个属性
- 对于子节点是2个属性的函数
比如:
gpios = <&qe_pio_e 18 0>;
父节点是qe_pio_e
其中18表示GPIO pin值,就是gpio下面管理的pin脚序号,该pin值一般就需要查询用户手册&电路图。
2. 中断
中断属性节点如下:
        interrupt-parent=<&gpx1>;

        interrupts =<1 2>,<2  2>;
其中
interrupt-parent=<&gpx1>;: 该中断信号所述的中断控制器

interrupts =<1 2>,<2  2>;  :描述中断属性,其中<>中第一个值表示该中断所述中断控制器index,第二个值表示中断触发方式
中断子节点格式如下:
linux-3.14\Documentation\devicetree\bindings\gpio.txt
Example of a peripheral using the GPIO module as an IRQ controller:

	funkyfpga@0 {

		compatible = "funky-fpga";

		...

		interrupt-parent = <&gpio1>;   #父节点

		interrupts = <4 3>;     #节点属性

	};
中断子节点说明文档如下:
linux-3.14\Documentation\devicetree\bindings\interrupt-controller\interrupts.txt
  b) two cells

  ------------

  The #interrupt-cells property is set to 2 and the first cell defines the

  index of the interrupt within the controller, while the second cell is used

  to specify any of the following flags:

    - bits[3:0] trigger type and level flags

        1 = low-to-high edge triggered          上升沿

        2 = high-to-low edge triggered				下降沿

        4 = active high level-sensitive			   高电平有效

        8 = active low level-sensitive          低电平有效
我们所填写的中断父节点gpx1定义如下(该文件由三星厂家出厂定制好):
linux-3.14\arch\arm\boot\dts\exynos4x12-pinctrl.dtsi
		gpx1: gpx1 {

			gpio-controller;        #gpio控制器

			#gpio-cells = <2>;      #子节点有2个属性

			interrupt-controller;  #中断控制器

			interrupt-parent = <&gic>;    #父节点gic

			interrupts = <0 24 0>, <0 25 0>, <0 26 0>, <0 27 0>,   #子节点属性约束

				     <0 28 0>, <0 29 0>, <0 30 0>, <0 31 0>;

			#interrupt-cells = <2>;

		};
可见三星的exynos4412平台中gpx1,既可以做gpio控制器又可以做中断控制器,而gpx1作为中断控制器则路由到gic上。
其中interrupts 属性说明如下:
linux-3.14\Documentation\devicetree\bindings\arm\gic.txt
Main node required properties:

- compatible : should be one of:

	"arm,gic-400"

	"arm,cortex-a15-gic"

	"arm,cortex-a9-gic"

	"arm,cortex-a7-gic"

	"arm,arm11mp-gic"

- interrupt-controller : Identifies the node as an interrupt controller

- #interrupt-cells : Specifies the number of cells needed to encode an

  interrupt source.  The type shall be a <u32> and the value shall be 3.

  The 1st cell is the interrupt type; 0 for SPI interrupts, 1 for PPI

  interrupts.

  The 2nd cell contains the interrupt number for the interrupt type.

  SPI interrupts are in the range [0-987].  PPI interrupts are in the

  range [0-15].

  The 3rd cell is the flags, encoded as follows:

	bits[3:0] trigger type and level flags.

		1 = low-to-high edge triggered

		2 = high-to-low edge triggered

		4 = active high level-sensitive

		8 = active low level-sensitive

	bits[15:8] PPI interrupt cpu mask.  Each bit corresponds to each of

	the 8 possible cpus attached to the GIC.  A bit set to '1' indicated

	the interrupt is wired to that CPU.  Only valid for PPI interrupts.
翻译总结:
interrupts = <0 24 0>
- 第1个0 表示该中断是SPI类型中断,如果是1表示PPI类型中断
- 24表示中断号(通过查询电路图和datasheet获得)
- 第三个0表示中断触发方式
再强调一遍
不同的平台gpio、中断控制器管理可能不一样,所以填写方法可能会有差异,不可教条
六、驱动提取设备树信息方法
驱动解析代码与设备树节点之间关系如下,代码与属性用相同颜色框出:
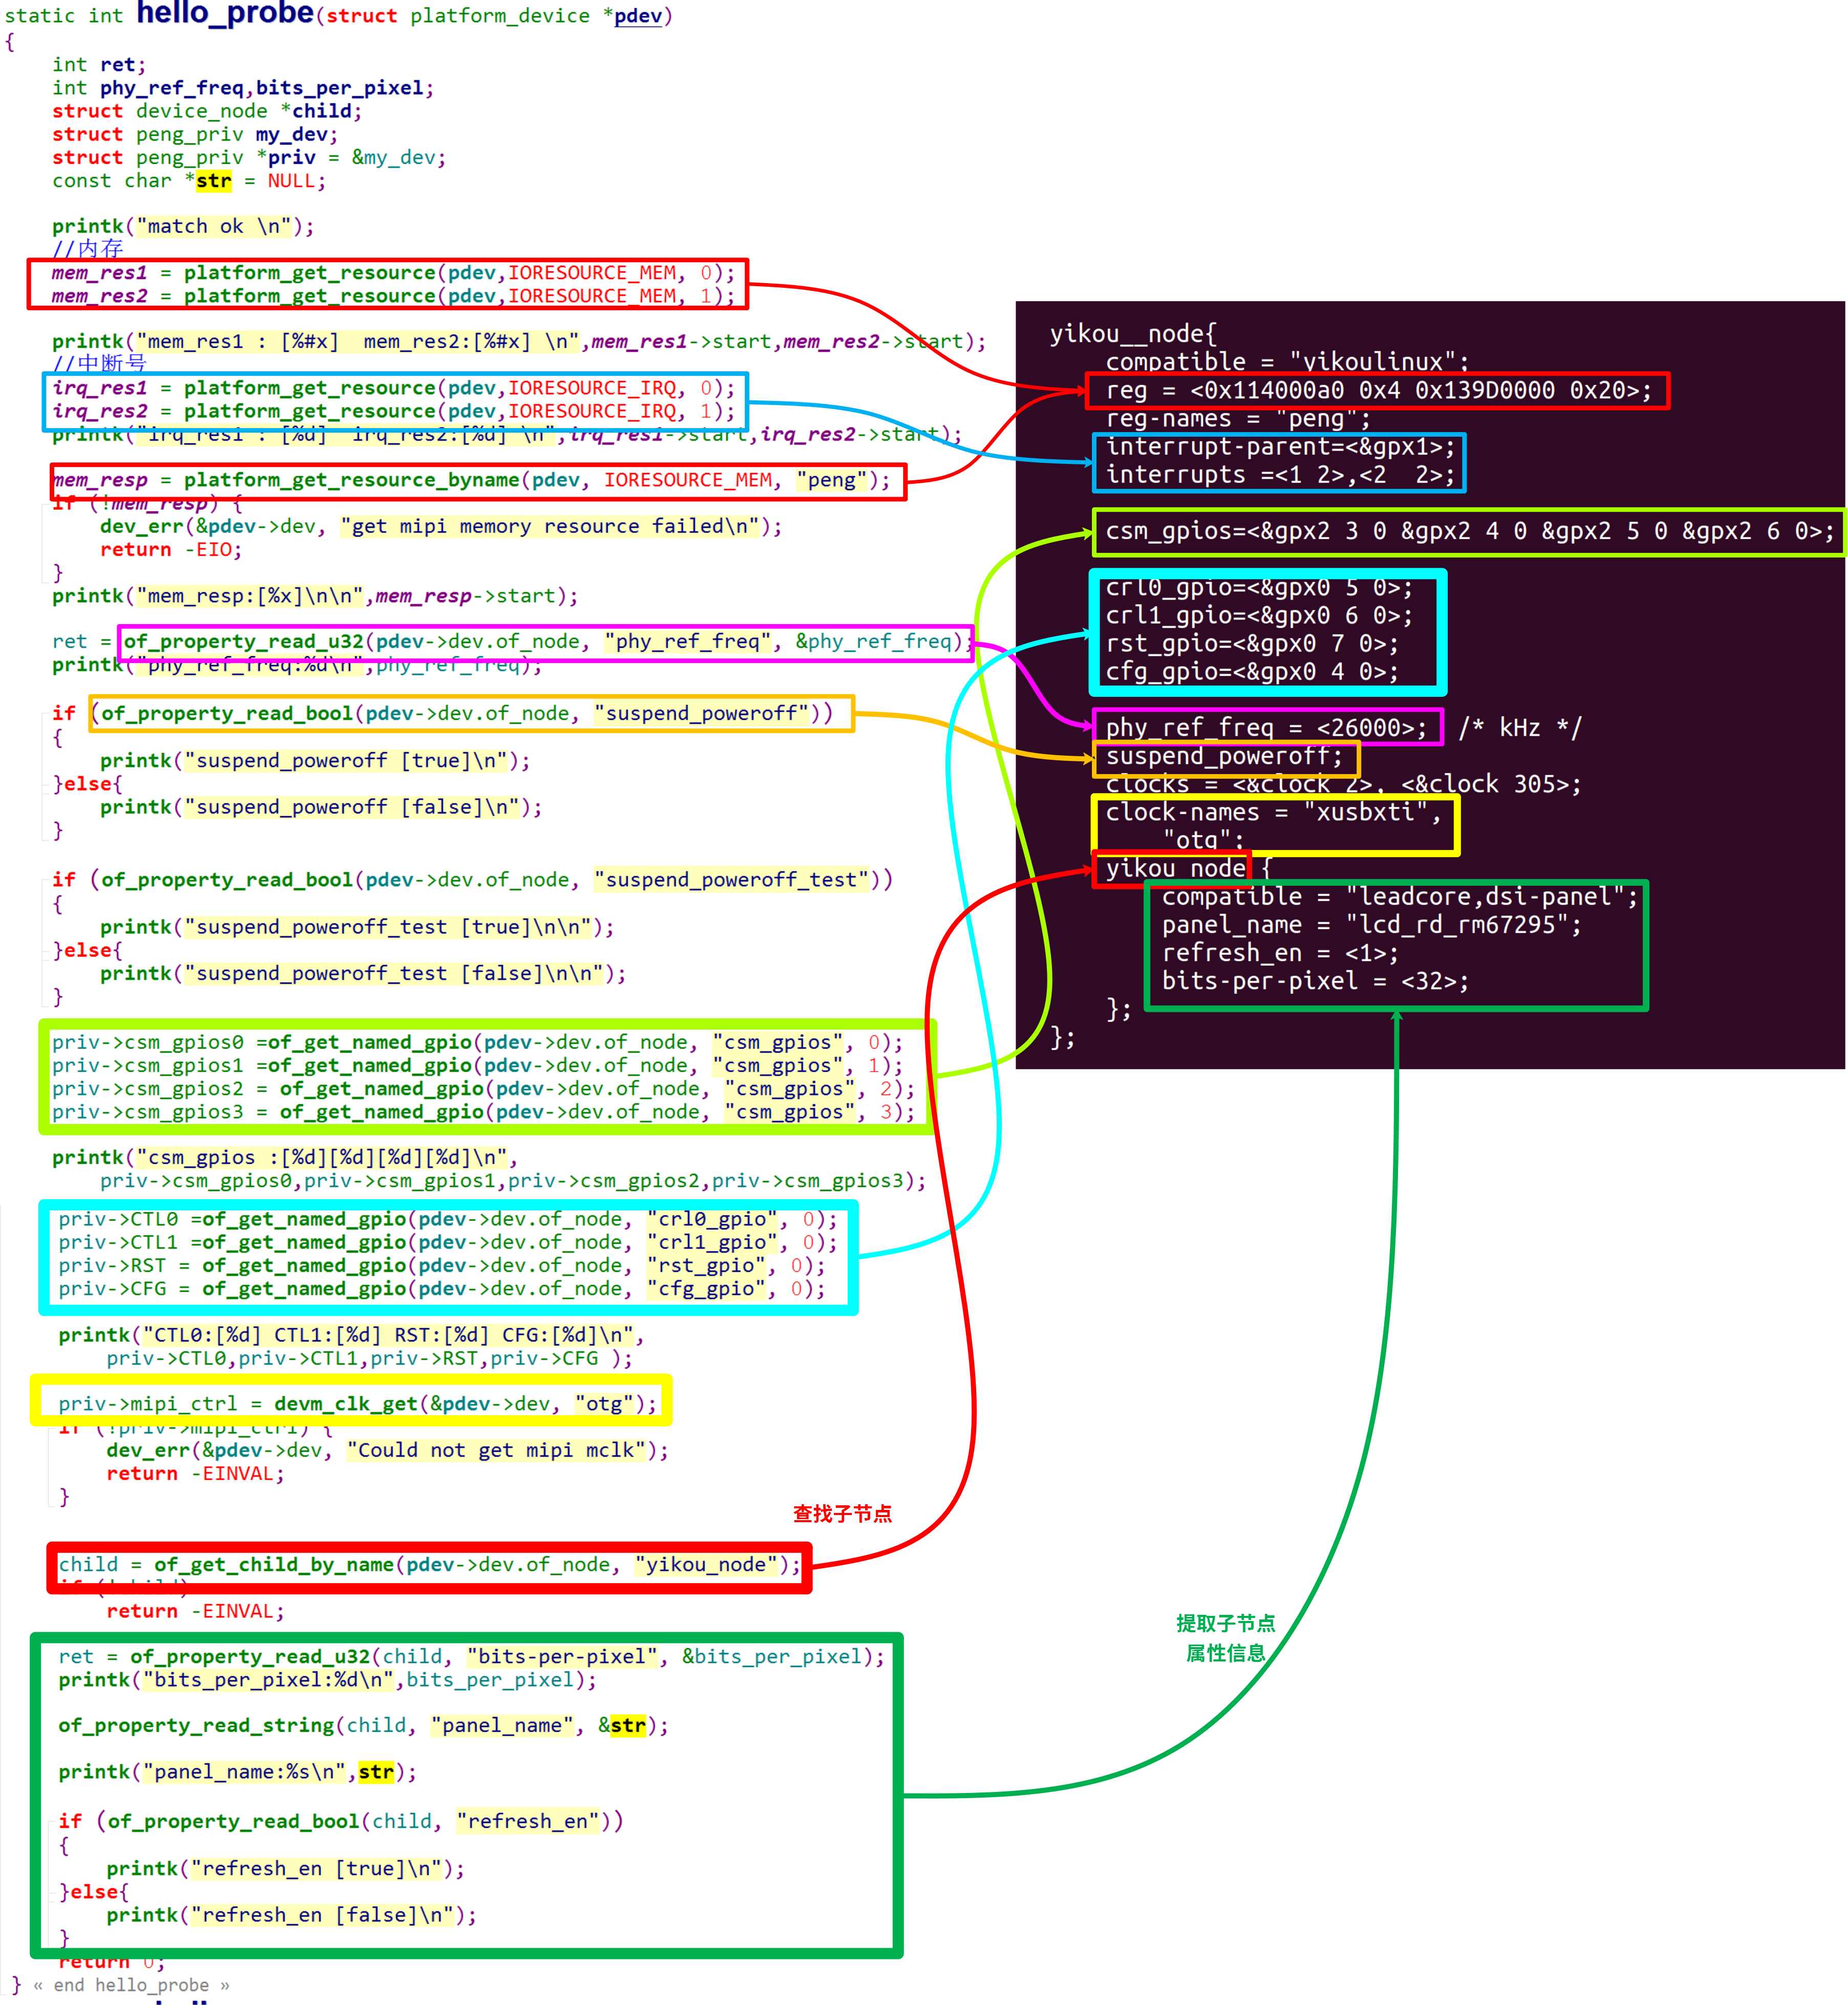
of开头的函数请参考《手把手教linux驱动11-linux设备驱动统一模型》
七、编译(ubuntu中操作)
驱动编译:
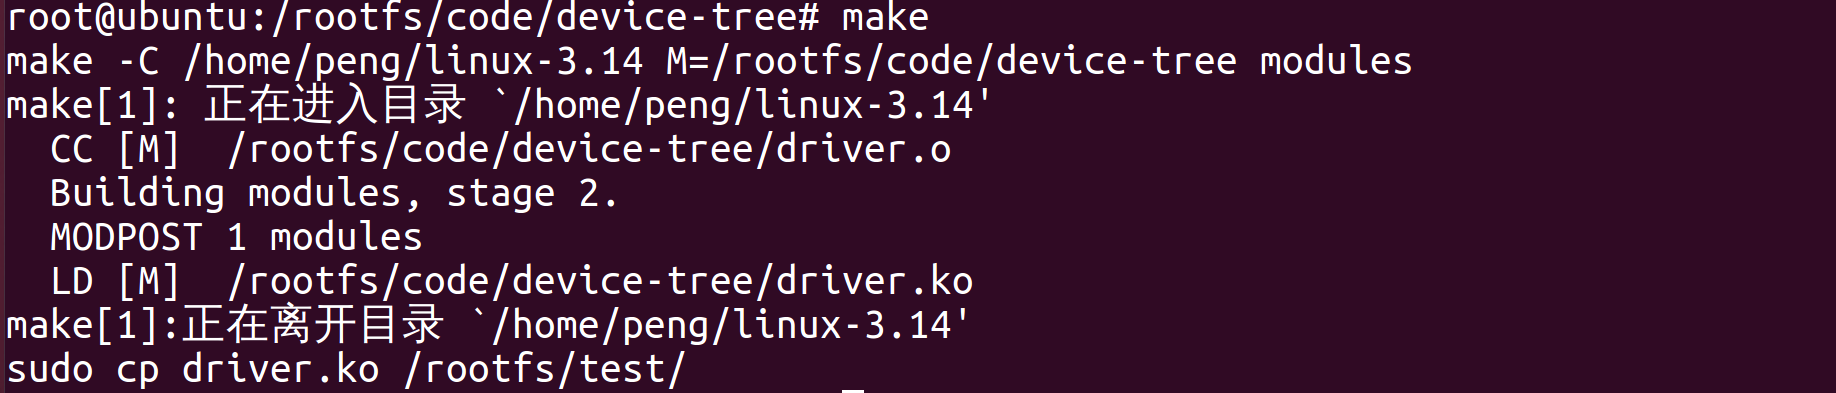 注意,内核必须提前编译好
设备树编译:

编译设备树命令,各个厂家的SDK都不尽相同,本例制作参考。
除此之外驱动模块文件、设备树文件如何导入给开发板,差别也比较大,本文不再给出步骤。
八、加载模块(开发板上操作)
加载模块后执行结果如下:
[root@peng test]# insmod driver.ko

[   26.880000] hello_init

[   26.880000] match ok

[   26.880000] mem_res1 : [0x114000a0]  mem_res2:[0x139d0000]

[   26.885000] irq_res1 : [168]  irq_res2:[169]

[   26.890000] mem_resp:[114000a0]

[   26.890000]

[   26.895000] phy_ref_freq:26000

[   26.900000] suspend_poweroff [true]

[   26.900000] suspend_poweroff_test [false]

[   26.900000]

[   26.905000] csm_gpios :[231][232][233][234]

[   26.910000] CTL0:[217] CTL1:[218] RST:[219] CFG:[216]

[   26.915000] bits_per_pixel:32

[   26.920000] panel_name:lcd_rd_rm67295

[   26.925000] refresh_en [true]
其中打印的信息就是最终我们解析出的设备树里的硬件信息,
我们就可以根据这些信息进行相关资源申请、初始化。
同时设备树中的信息,会以文件节点形式创建在一下目录中:

完整代码请关注公众号:一口Linux,后台回复设备树dt
Linux驱动 | 从0写一个设备树节点实例的更多相关文章
- 从0写一个Golang日志处理包
WHY 日志概述 日志几乎是每个实际的软件项目从开发到最后实际运行过程中都必不可少的东西.它对于查看代码运行流程,记录发生的事情等方面都是很重要的. 一个好的日志系统应当能准确地记录需要记录的信息,同 ...
- linux驱动由浅入深系列:高通sensor架构实例分析之二(驱动代码结构)【转】
本文转载自:https://blog.csdn.net/radianceblau/article/details/73498303 本系列导航: linux驱动由浅入深系列:高通sensor架构实例分 ...
- linux驱动由浅入深系列:高通sensor架构实例分析之三(adsp上报数据详解、校准流程详解)【转】
本文转载自:https://blog.csdn.net/radianceblau/article/details/76180915 本系列导航: linux驱动由浅入深系列:高通sensor架构实例分 ...
- 如何编写一个简单的Linux驱动(二)——完善设备驱动
前期知识 1.如何编写一个简单的Linux驱动(一)——驱动的基本框架 2.如何编写一个简单的Linux驱动(二)——设备操作集file_operations 前言 在上一篇文章中,我们编写设备驱动遇 ...
- 利用 Linux tap/tun 虚拟设备写一个 ICMP echo 程序
本文首发于我的公众号 Linux云计算网络(id: cloud_dev),专注于干货分享,号内有 10T 书籍和视频资源,后台回复「1024」即可领取,欢迎大家关注,二维码文末可以扫. 前面两篇文章已 ...
- Linux驱动框架之misc类设备驱动框架
1.何为misc设备 (1)misc中文名就是杂项设备\杂散设备,因为现在的硬件设备多种多样,有好些设备不好对他们进行一个单独的分类,所以就将这些设备全部归属于 杂散设备,也就是misc设备,例如像a ...
- 嵌入式Linux驱动案例之中的一个
前几天解决一个嵌入式Linux驱动问题,做为一个案例进行记录. 本案例是一个CPU通过LocalBus总线訪问外围一个设备,详细设备是一个DSP器件.在实际应用中,性能要求非常高,对数据訪问速度提出比 ...
- 用extjs6.0写一个点击新建窗口的功能
一.写一个按钮 注意id { id: 'ListEdit', text:'编辑', iconCls:'x-fa fa-edit' } 二.写新建的页面 下面我新建的是表单,有几点需要注意的: ① 因为 ...
- Extjs6(二)——用extjs6.0写一个系统登录及注销
本文基于ext-6.0.0 一.写login页 1.在view文件夹中创建login文件夹,在login中创建文件login.js和loginController.js(login.js放在class ...
- 004_linux驱动之_class_create创建一个设备类
(一)解析:class_create函数和class_destroy函数 创建一个类 和 删除一个类. (二)class_create函数原型 struc ...
随机推荐
- 原生js实现下拉框可输入
js实现下拉框可输入 前言 众所周知,html默认的下拉框是无法输入值的,然后最新的办法是用datalist和输入框绑定,但是很多浏览器不支持.然后还有很多框架提供的下拉框都是可输入的.但是公司的项目 ...
- 记录.Net部署Docker-v指令使用
记录Docker的-v指令使用 前言 之前我浅学了一下docker,方便部署.net项目(部署的是打包之后的项目) dockerfile文件如下: FROM mcr.microsoft.com/dot ...
- n阶前缀和 の 拆解
二阶 \[\sum_{i=l}^{r} \sum^{i}_{j=1} a_j \] \[=\sum_{i=l}^{r} (r-i+1) a_i \] \[=(r+1)\sum_{i=l}^{r} a_ ...
- 历代iPhone及Android手机的屏幕参数对比
手机逻辑分辨率Point,也就是CSS像素,是进行网页适配的关键,以下是平时整理的一些备忘录数据,可以收藏. 屏幕清晰度分类 SD标清 HD高清(2倍屏) FHD全高清(3倍屏) QHD倍高清(4倍屏 ...
- Grafana Loki查询加速:如何在不添加资源的前提下提升查询速度
Grafana Loki查询加速:如何在不添加资源的前提下提升查询速度 来自Grafana Loki query acceleration: How we sped up queries withou ...
- 人类高质量 Java 学习路线【一条龙版】
Java 学习路线一条龙版 by 鱼皮. 原创不易,请勿抄袭,违者必究! 大家好,我是鱼皮.现在网上的编程资料实在太多了,而且人人肯定都说自己的最好,那就导致大家又不知道怎么选了.大部分的博主推荐资源 ...
- webpack4.15.1 学习笔记(四) — Tree shaking
目录 Tree shaking 原理 标记效果 副作用代码不可被删除 如何实现 Tree shaking 的几种方法 总结 Tree shaking 本质上为了消除无用的js代码,减少加载文件体积的方 ...
- AT_agc017_b 题解
洛谷链接&Atcoder 链接 本篇题解为此题较简单做法,请放心阅读. 题目简述 一共有 \(n\) 个格子,给定两个整数 \(A,B\) 分别位于第 \(1\) 和第 \(n\) 格,中间有 ...
- RSA加解密,Java和C#互通
一.使用场景 Java作为服务端生成一对公私钥,C#作为客户端拥有公钥. RSA算法这里就不多做介绍了,可参考RSA算法介绍 二.规范 公私钥的形式都是base64字符串 通过公私钥加密后的字符串也是 ...
- C# 泛型单例工厂
核心代码,线程安全 class SingletonFactory<T> where T : new() { private static T uniqueInstance; private ...