
junit使用stub进行单元测试
stub是代码的一部分,我们要对某一方法做单元测试时,可能涉及到调用第三方web服务。假如当前该服务不存在或不可用咋办?好办,写一段stub代码替代它。
stub 技术就是把某一部分代码与环境隔离起来(比如,通过替换 Web服务器、文件系统、数据库等手段)从而进行单元测试的。
下面演示一个例子,利用jetty编写相关的stub充当web服务器,返回适当内容。
环境: idea + spring boot + jetty
关于jetty服务器,对比tomcat更轻量级,可轻松嵌入java代码启动它。
如何在项目中启动一个jetty服务器?
package com.lhy.junitkaifa.stubs;

import org.eclipse.jetty.server.Server;

import org.eclipse.jetty.server.handler.ContextHandler;

import org.eclipse.jetty.server.handler.ResourceHandler;

/**

 * @author xusucheng

 * @create 2018-12-20

 **/

public class JettySample {

    public static void main(String[] args) throws Exception {

        Server server = new Server( 8081 );

        ContextHandler context = new ContextHandler(server,"/");

        //默认为项目根目录

        context.setResourceBase(".");

        context.setHandler(new ResourceHandler());

        server.setStopAtShutdown( true );

        server.start();

    }

}
请求:http://localhost:8081
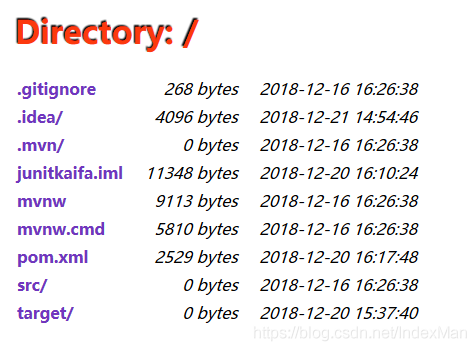
编写一个获取url内容的工具方法叫WebClient
package com.lhy.junitkaifa.stubs;

import java.io.IOException;

import java.io.InputStream;

import java.net.HttpURLConnection;

import java.net.URL;

/**

 * 读取指定URL内容

 * @author xusucheng

 * @create 2018-12-20

 **/

public class WebClient {

    public String getContent( URL url )

    {

        StringBuffer content = new StringBuffer();

        try

        {

            HttpURLConnection connection = (HttpURLConnection) url.openConnection();

            connection.setDoInput( true );

            InputStream is = connection.getInputStream();

            byte[] buffer = new byte[2048];

            int count;

            while ( -1 != ( count = is.read( buffer ) ) )

            {

                content.append( new String( buffer, 0, count ) );

            }

        }

        catch ( IOException e )

        {

            return null;

        }

        return content.toString();

    }

    public static void main(String[] args) throws Exception{

        WebClient wc = new WebClient();

        String content = wc.getContent(new URL("http://www.baidu.com/"));

        System.out.println(content);

    }

}
编写测试类TestWebClient
package com.lhy.junitkaifa.stubs;

import org.eclipse.jetty.server.Handler;

import org.eclipse.jetty.server.Request;

import org.eclipse.jetty.server.Server;

import org.eclipse.jetty.server.handler.AbstractHandler;

import org.eclipse.jetty.server.handler.ContextHandler;

import org.eclipse.jetty.server.handler.HandlerList;

import org.eclipse.jetty.servlet.ServletContextHandler;

import org.eclipse.jetty.util.ByteArrayISO8859Writer;

import org.junit.AfterClass;

import org.junit.BeforeClass;

import org.junit.Test;

import org.springframework.http.HttpHeaders;

import javax.servlet.ServletException;

import javax.servlet.http.HttpServletRequest;

import javax.servlet.http.HttpServletResponse;

import java.io.IOException;

import java.io.OutputStream;

import java.net.URL;

import static org.junit.Assert.assertEquals;

import static org.junit.Assert.assertNull;

/**

 * @author xusucheng

 * @create 2018-12-20

 **/

public class TestWebClient {

    private WebClient client = new WebClient();

    private static final int PORT=8081;

    @BeforeClass

    public static void setUp() throws Exception{

        System.out.println("====================Befor Class=====================");

        Server server = new Server(PORT);

        TestWebClient t = new TestWebClient();

        ContextHandler contentOkContext = new ContextHandler(server,"/testGetContentOk");

        contentOkContext.setHandler(t.new TestGetContentOkHandler());

        ContextHandler contentErrorContext = new ContextHandler(server,"/testGetContentError");

        contentErrorContext.setHandler(t.new TestGetContentServerErrorHandler());

        ContextHandler contentNotFoundContext = new ContextHandler(server,"/testGetContentNotFound");

        contentNotFoundContext.setHandler(t.new TestGetContentNotFoundHandler());

        HandlerList handlers = new HandlerList();

        handlers.setHandlers(new Handler[] { contentOkContext, contentErrorContext, contentNotFoundContext});

        server.setHandler(handlers);

        server.setStopAtShutdown( true );

        server.start();

    }

    @Test

    public void testGetContentOk()

            throws Exception

    {

        String result = client.getContent( new URL( "http://localhost:"+PORT+"/testGetContentOk" ) );

        assertEquals( "It works", result );

    }

    @Test

    public void testGetContentError()

            throws Exception

    {

        String result = client.getContent( new URL( "http://localhost:"+PORT+"/testGetContentError/" ) );

        assertNull( result );

    }

    @Test

    public void testGetContentNotFound()

            throws Exception

    {

        String result = client.getContent( new URL( "http://localhost:"+PORT+"/testGetContentNotFound" ) );

        assertNull( result );

    }

    @AfterClass

    public static void tearDown()

    {

        // Do nothing becuase the Jetty server is configured

        // to stop at shutdown.

        System.out.println("====================After Class=====================");

    }

    /**

     * 正常请求处理器

     */

    private class TestGetContentOkHandler

            extends AbstractHandler

    {

        @Override

        protected void doStart() throws Exception {

            super.doStart();

        }

        @Override

        public void setServer(Server server) {

            super.setServer(server);

        }

        @Override

        public void handle(String s, Request request, HttpServletRequest httpServletRequest, HttpServletResponse response) throws IOException, ServletException {

            System.out.println("======================TestGetContentOkHandler=======================");

            OutputStream out = response.getOutputStream();

            ByteArrayISO8859Writer writer = new ByteArrayISO8859Writer();

            writer.write( "It works" );

            writer.flush();

            response.setIntHeader( HttpHeaders.CONTENT_LENGTH, writer.size() );

            writer.writeTo( out );

            out.flush();

            request.setHandled(true);

        }

    }

    /**

     * 异常请求处理器

     */

    private class TestGetContentServerErrorHandler

            extends AbstractHandler

    {

        @Override

        public void handle(String s, Request request, HttpServletRequest httpServletRequest, HttpServletResponse response) throws IOException, ServletException {

            response.sendError( HttpServletResponse.SC_SERVICE_UNAVAILABLE );

        }

    }

    /**

     * 404处理器

     */

    private class TestGetContentNotFoundHandler

            extends AbstractHandler

    {

        @Override

        public void handle(String s, Request request, HttpServletRequest httpServletRequest, HttpServletResponse response) throws IOException, ServletException {

            response.sendError( HttpServletResponse.SC_NOT_FOUND );

        }

    }

}
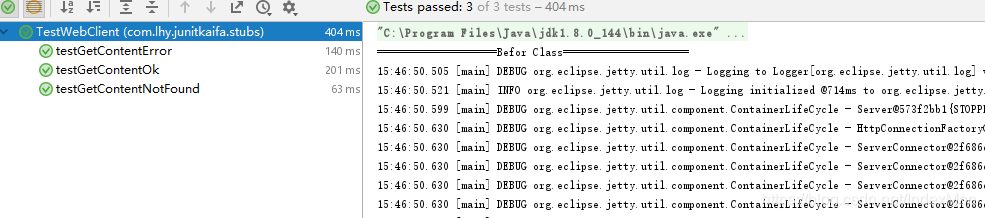
直接运行该类,结果为:
junit使用stub进行单元测试的更多相关文章
- [Java SE/Junit] 基于Java的单元测试框架Mockito
Mockito 是一个模拟测试框架,主要功能是在单元测试中模拟类/对象的行为. 1 为什么要使用Mockito? Mock可以理解为创建一个虚假的对象,或者说模拟出一个对象.在测试环境中用来替换掉真实 ...
- 使用Junit等工具进行单元测试
一.类的定义: 类是同一事物的总称,类是封装对象的属性和行为的载体,反过来说具有相同属性和行为的一类实体被称为类. 二.Junit工具的使用: 1.首先新建一个项目叫JUnit_Test,我们编写一个 ...
- (转)Eclipse中junit框架的使用——单元测试
[转]junit浅学笔记一 JUnit是一个回归测试框架(regression testing framework).Junit测试是程序员测试,即所谓白盒测试,因为程序员知道被测试的软件如何(How ...
- JUnit基础及第一个单元测试实例(JUnit3.8)
单元测试 单元测试(unit testing) ,是指对软件中的最小可测试单元进行检查和验证. 单元测试不是为了证明您是对的,而是为了证明您没有错误. 单元测试主要是用来判断程序的执行结果与自己期望的 ...
- 单元测试系列:如何使用JUnit+JaCoCo+EclEmma完成单元测试
更多原创测试技术文章同步更新到微信公众号 :三国测,敬请扫码关注个人的微信号,感谢! 原文链接:http://www.cnblogs.com/zishi/p/6726664.html -----如 ...
- Maven下使用Junit对Spring进行单元测试
主要步骤 1. 在工程的pom文件中增加spring-test的依赖: <dependency> <groupId>org.springframework</groupI ...
- 阿里知识储备之二——junit学习以及android单元测试
一,junit框架 http://blog.csdn.net/afeilxc/article/details/6218908 详细见这篇博客 juit目前已经可以和maven项目进行集成和测试,而且貌 ...
- junit配合catubuter统计单元测试的代码覆盖率
1.视频参考孔浩老师ant视频笔记 对应的build-junit.xml脚步如下所示: <?xml version="1.0" encoding="UTF-8&qu ...
- 使用Junit对Spring进行单元测试实战小结
Demo代码: @RunWith(SpringJUnit4ClassRunner.class) @ContextConfiguration(locations = "classpath*:/ ...
- 使用JUnit 和Jacoco进行单元测试
Jacoco配置 <dependency> <groupId>org.jacoco</groupId> <artifactId>jacoco-maven ...
随机推荐
- 百度网盘(百度云)SVIP超级会员共享账号每日更新(2023.12.21)
一.百度网盘SVIP超级会员共享账号 可能很多人不懂这个共享账号是什么意思,小编在这里给大家做一下解答. 我们多知道百度网盘很大的用处就是类似U盘,不同的人把文件上传到百度网盘,别人可以直接下载,避免 ...
- Redis异常问题分析黄金一分钟
Redis异常问题分析黄金一分钟 背景 同事发现一个环境redis比较卡顿,导致业务比较难以开展. 问题是下午出现的. 六点左右找到我这边. 想着帮忙看看, 问题其实没有定位完全, 仅是发现了一个可能 ...
- [转帖]第24/24周 数据库维护(Database Maintenance)
https://www.cnblogs.com/woodytu/p/4795542.html 哇哦,光阴似箭!欢迎回到性能调优培训的最后一期.今天我会详细讲下SQL Server里的数据库维护,尤其是 ...
- linux机制
cpu Cache 工作原理:文中对Cache的一致性提出了两种策略:基于监听的和基于目录的.前者是所有Cache均监听各个Cache的写操作,当一个Cache中的数据被写了,其处理方式有:写更新协议 ...
- 结论&定理大全
定理 1:包含 \(0\) 与 \(2^k-1\) 的按位与或空间和 \(k\) 个点的有传递性的有向图形成双射 证明: 空间->传递闭包:对于任意两个位 \(i,j\),若某个数包含 \(i\ ...
- 【JS 逆向百例】某易支付密码 MD5+AES 加密分析
关注微信公众号:K哥爬虫,持续分享爬虫进阶.JS/安卓逆向等技术干货! 声明 本文章中所有内容仅供学习交流,抓包内容.敏感网址.数据接口均已做脱敏处理,严禁用于商业用途和非法用途,否则由此产生的一切后 ...
- 利用pearcmd.php本地文件包含(LFI)
本文主要是为了学习如何用pearcmd进行本地文件包含 0x00 环境准备 首先先在docker中安装一个php环境. docker exec -it [container id] /bin/bas ...
- 小白学k8s(1)二进制部署k8s
二进制部署k8s 前言 准备工作 关闭防火墙 关闭 swap 分区 关闭 SELinux 更新系统时间 秘钥免密码 设置主机名称 服务器角色 安装etcd 创建证书 生成证书 部署Etcd 在Node ...
- MySQL8.0配置my.cnf
环境 centos7.9 mysql Ver 8.0.32 因为是源码安装的MySQL8.0.32,查了一下MySQL 8.0之后源码中不包含my.cnf文件和my-default.cnf文件了. ...
- 5个前端开源项目带你在Web上体验Windows
本文来分享五个 yyds 的开源项目,这些项目把 Windows 带到了 Web 平台上.让我们一起感受这些项目带来的回忆和创新,重温 Windows 93.98.XP 和 7 的经典界面,甚至探索现 ...