在eclipse里配置Android ndk环境 适用于windows mac 和linux(转)
由于做Android在底层有库的时候需要交叉编译环境,c代码需要用ndk-build来进行编译,而java代码则需要用Android sdk编译。之前由于对eclipse ide不太熟悉,所以往往编译的时候都是在记事本里写好c代码,然后用cygwin搭建ndk-build环境,用ndk-build来编译出相关的so 之后再用eclipse里去编译java程序,从而使用该so。
其实并不用这么复杂,利用eclipse完全可以达到编译so的目的
点击project->builders->new->Program
然后选择Location
在windows下为
D:\Android\ndk\ndk\ndk-r7-windows\ndk-build.cmd
在linux和mac下为可执行的ndk-build路径
然后选择
Working Directory
D:\Android\ndk\ndk\android-ndk-r6b\samples\<your jni project name>
选择到您对应的jni路径,然后在我们编译运行的时候,这个builder就会自动地去编译so库,而sdk会去编译java代码,实现利用eclipse实现交叉编译
如果还有疑问,可以看这篇文章
http://mobilepearls.com/labs/ndk-builder-in-eclipse/
Setting up Automatic NDK Builds in Eclipse
When editing native JNI code in an Android project using the Android NDK you may configure Eclipse to automatically rebuild your project when editing native code, just
as it does for java. The below steps shows how to perform the necessary configuration (note that this requires revision 4 or later of the NDK – previous revisions does not contain the necessary ndk-build binary):
Start by right clicking on your android project (named hello-neon in the below screenshots) with JNI resources, and select Properties. In the resulting dialog, choose the Builders entry in the list to the left and press the New... button:

A new dialog will open presenting a list of builder types. Select the Program type and press the OK button:

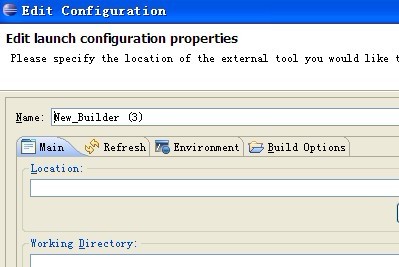
In the Main tab, fill in the following:
- Name:
- NDK Builder
- Location:
- /opt/android-ndk/ndk-build (or wherever your ndk-build binary is). You may use a variable as in ${system_property:user.home}/lib/android-ndk/ndk-build
- Working Directory:
- ${workspace_loc:/hello-neon} (replace hello-neon with your project name. Press the
Browse Workspace...button to select it graphically)
The result should look something like the below:

Now continue with the refresh tab. Make sure the two checkboxes Refresh resources upon completion. and Recursively include sub-foldersare checked. Choose the Specific resources radio button and press the Specify button:
Resources...

Since the ndk-build process will generate files in the lib folder, we want Eclipse to discover changes made there without having to refresh manually. So select the lib folder in the project (create one if necessary) and press the Finish button:

Now skip the Environment tab and go to the final Build Options tab. Make sure the Run the builder: During auto builds checkbox is checked.

Since the NDK build only needs to happen when editing files in the jni folder, check that folder and press the Finish button.

Now finally press OK in the builder configuration dialog – the new NDK builder should now be up and running. Try editing any file in the jni folder and check that the Console view produces output from the build process:

Contact support@mobilepearls.com for feedback
在eclipse里配置Android ndk环境 适用于windows mac 和linux(转)的更多相关文章
- eclipse里配置Android ndk环境,用eclipse编译.so文件
做Android NDK开发时,c代码需要用ndk-build来进行编译,而java代码则需要用Android sdk编译. 编译c代码有两种方法: 一.写好c代码后,然后用cygwin搭建ndk-b ...
- 在eclipse中配置android ndk的自动编译环境builders
无论linux还是mac在jni目录中直接运行 ndk-build 就可以生成 lib目录及所需要的 so文件: windows 装上lnx模拟器也是一样: 每次修改完 c++代码, 都要运行一下 ...
- 在Eclipse下搭建Android开发环境教程
我们昨天向各位介绍了<在NetBeans上搭建Android SDK环境>,前不久也介绍过<在MyEclipse 8.6上搭建Android开发环境>, 都受到了读者的欢迎.但 ...
- Ubuntu配置Android编译环境
1.Ubuntu安装 VMware安装ubuntu之后,安装Vmware tools: 1.安装完ubuntu后,VMware Workstation菜单:虚拟机-->安装 Vmware Too ...
- Windows XP环境下 搭建Android NDK环境
搭建Android NDK环境 Windows XP环境下 1 一些下载 ① NDK r7:http://developer.android.com/sdk/ndk/index.html ② cygw ...
- 【转】在Eclipse下搭建Android开发环境教程
本文将全程演示Android开发环境的搭建过程,无需配置环境变量.所有软件都是写该文章时最新版本,希望大家喜欢. 一 相关下载 三 Eclipse配置 (1)Java JDK下载 1 安装andr ...
- ubuntu配置android开发环境和编译源码遇到的一些问题
---------------------------------------------环境变量设置--------------------------------------------- 1.设 ...
- Android开发:修改eclipse里的Android虚拟机路径
一.发现问题: 今天打开电脑发现C盘缩了不少,这才意识到:eclipse里配置的安卓虚拟机默认放在了C盘里. 当然,在不同的电脑上可能路径有所不同,我的默认路径是:C:\Users\lenovo\.a ...
- Ubuntu Linux下如何配置Android开发环境
下载和安装Win7系统Android开发环境中讲了怎样在Win7系统中安装Android开发环境,那么怎样在Linux系统中配置Android开发环境呢?本篇文章就将演示如何使用Eclipse.And ...
随机推荐
- 【转】工作中使用Trepn Power Profiler的应用总结
Trepn™ Profiler 工具的概述 Trepn™工具是高通开发的运行在使用高通骁龙芯片或者硬件开发设备等移动设备上 分析功耗和性能的一个应用. ## 特点 ## 1 2 3 Six fast- ...
- Linux进程间通信之管道(pipe)、命名管道(FIFO)与信号(Signal)
整理自网络 Unix IPC包括:管道(pipe).命名管道(FIFO)与信号(Signal) 管道(pipe) 管道可用于具有亲缘关系进程间的通信,有名管道克服了管道没有名字的限制,因此,除具有管道 ...
- TI webench 一款不错的软件
之前在一些电子论坛的网站看到过关于TI webench的介绍,今天适用了一下,确实功能很强大,设计内容可以输入你所要设计的内容,包括下面内容: 下图是笔者设计的一个FPGA供电系统,采用5V输入, ...
- WDCP面板V3新版本安装与体验记录
WDCP面板V3版本看介绍变动还是比较大的,比如从底层重新架构,以及我们需要的PHP.MYSQL.NGINX等版本都是使用较新稳定版本,支持CENTOS5-7发行版本环境,至于后台界面的友好度有点扁平 ...
- [转]Idea2016 使用Maven配置简单Web项目(受益比较多的一篇)
最近被同事一直吵着用Idea写Java,于是偷偷的去试用了一下Idea.确实不错,无论界面还是智能提醒都是蛮符合我的使用习惯,但是刚从Eclipse出来,使用Idea还是不太习惯的.所以这里写出来,供 ...
- JDBC异常
异常处理允许我们以受控的方式处理异常情况,而不是直接退出程序,例如程序定义的错误. 发生异常时可以抛出异常.术语“异常”表示当前的程序执行停止,并且被重定向到最近的适用的catch子句.如果没有适用的 ...
- (转)Ubuntu12.04上NFS Server安装使用过程
原文链接:Ubuntu12.04上NFS Server安装使用过程 实现步骤: 1.服务器端:sudo apt-get install portmap2.服务器端:sudo apt-get insta ...
- Redis与Memcached的实现对比
原文链接:http://www.tuicool.com/articles/qUBNZva Memcached 与 Redis ,作为近些年最常用的缓存服务器,相信大家对它们再熟悉不过了.前两年还在学校 ...
- Linux 查看操作系统版本
在下载软件的时候,需要知道操作系统对应的版本,通过 cat /etc/issue 可以查看对应信息 运行的结果如下: CentOS release 6.7 (Final) Kernel \r on a ...
- C# ToString()格式设置大全
C 货币 2.5.ToString("C") ¥2.50 D 十进制数 25.ToString("D5") 00025 E 科学型 25000.ToString ...