关于Spring的配置文件的注解使用
从Spring3.0,@Configuration用于定义配置类,可替换xml配置文件,被注解的类内部包含有一个或多个被@Bean注解的方法,
这些方法将会AnnotationConfigApplicationContext类进行扫描,并用于构建bean定义,
初始化Spring容器。@Configuration标注在类上,相当于把该类作为spring的xml配置文件中的<beans>,作用为:配置spring容器(应用上下文)
当然也可为了便于分类配置多个类配置文件。
注意:@Configuration注解的配置类有如下要求:
- @Configuration不可以是final类型;
- @Configuration不可以是匿名类;
- 嵌套的configuration必须是静态类。
一、@Configuration配置spring并启动spring容器
@Configuration

public class TestConfiguration {

    public TestConfiguration(){

        System.out.println("spring容器启动初始化。。。");

    }

}
相当于:
<?xml version="1.0" encoding="UTF-8"?>

<beans xmlns="http://www.springframework.org/schema/beans" xmlns:xsi="http://www.w3.org/2001/XMLSchema-instance"

    xmlns:context="http://www.springframework.org/schema/context" xmlns:jdbc="http://www.springframework.org/schema/jdbc"

    xmlns:jee="http://www.springframework.org/schema/jee" xmlns:tx="http://www.springframework.org/schema/tx"

    xmlns:util="http://www.springframework.org/schema/util" xmlns:task="http://www.springframework.org/schema/task" xsi:schemaLocation="

        http://www.springframework.org/schema/beans http://www.springframework.org/schema/beans/spring-beans-4.0.xsd

        http://www.springframework.org/schema/context http://www.springframework.org/schema/context/spring-context-4.0.xsd

        http://www.springframework.org/schema/jdbc http://www.springframework.org/schema/jdbc/spring-jdbc-4.0.xsd

        http://www.springframework.org/schema/jee http://www.springframework.org/schema/jee/spring-jee-4.0.xsd

        http://www.springframework.org/schema/tx http://www.springframework.org/schema/tx/spring-tx-4.0.xsd

        http://www.springframework.org/schema/util http://www.springframework.org/schema/util/spring-util-4.0.xsd

        http://www.springframework.org/schema/task http://www.springframework.org/schema/task/spring-task-4.0.xsd" default-lazy-init="false">

</beans>
主方法进行测试:
public class TestMain {

    public static void main(String[] args) {

        //@Configuration注解的spring容器加载方式,用AnnotationConfigApplicationContext替换ClassPathXmlApplicationContext

        ApplicationContext context = new AnnotationConfigApplicationContext(TestConfiguration.class);

        //如果加载spring-context.xml文件:

        //ApplicationContext context = new ClassPathXmlApplicationContext("spring-context.xml");

    }

}
运行结果:

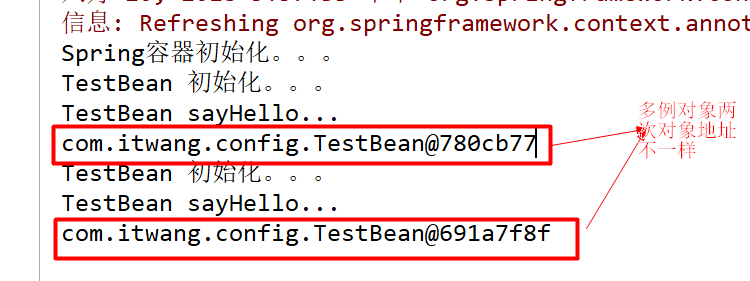
二、@Configuration启动容器+@Bean注册Bean,@Bean标注在方法上(返回某个实例的方法),等价于spring的xml配置文件中的<bean>,作用为:注册bean对象
bean类:
public class TestBean {
    private String username;
    private String url;
    private String password;
    public void sayHello(){
        System.out.println("TestBean sayHello...");
    }

    public String toString(){
        return "username:"+this.username+",url:"+this.url+",password:"+this.password;
    }

    public void start(){
        System.out.println("TestBean 初始化。。。");
    }

    public void cleanUp(){
        System.out.println("TestBean 销毁。。。");
    }
}
配置类:
@Configuration

public class TestConfiguration {

        public TestConfiguration(){

            System.out.println("spring容器启动初始化。。。");

        }

    //@Bean注解注册bean,同时可以指定初始化和销毁方法

    //@Bean(name="testBean",initMethod="start",destroyMethod="cleanUp")

    @Bean

    @Scope("prototype")

    public TestBean testBean() {

        return new TestBean();

    }

}
主方法测试类:
package com.dxz.demo.configuration;

import org.springframework.context.ApplicationContext;

import org.springframework.context.annotation.AnnotationConfigApplicationContext;

public class TestMain {

    public static void main(String[] args) {

        // @Configuration注解的spring容器加载方式,用AnnotationConfigApplicationContext替换ClassPathXmlApplicationContext

        ApplicationContext context = new AnnotationConfigApplicationContext(TestConfiguration.class);

        // 如果加载spring-context.xml文件:

        // ApplicationContext context = new

        // ClassPathXmlApplicationContext("spring-context.xml");

         //获取bean

        TestBean tb = (TestBean) context.getBean("testBean");

        tb.sayHello();

    }

}
@Bean下管理bean的生命周期
可以使用基于 Java 的配置来管理 bean 的生命周期。@Bean 支持两种属性,即 initMethod 和destroyMethod,这些属性可用于定义生命周期方法。在实例化 bean 或即将销毁它时,容器便可调用生命周期方法。生命周期方法也称为回调方法,因为它将由容器调用。使用 @Bean 注释注册的 bean 也支持 JSR-250 规定的标准 @PostConstruct 和 @PreDestroy 注释。如果您正在使用 XML 方法来定义 bean,那么就应该使用 bean 元素来定义生命周期回调方法。以下代码显示了在 XML 配置中通常使用 bean 元素定义回调的方法。
@Configuration

@ComponentScan(basePackages = "com.dxz.demo.configuration")

public class TestConfiguration {

    public TestConfiguration() {

        System.out.println("TestConfiguration容器启动初始化。。。");

    }

    //@Bean注解注册bean,同时可以指定初始化和销毁方法

    @Bean(name="testBean",initMethod="start",destroyMethod="cleanUp")

    @Scope("prototype")

    public TestBean testBean() {

        return new TestBean();

    }

}
启动类:
public class TestMain {

    public static void main(String[] args) {

        ApplicationContext context = new AnnotationConfigApplicationContext(TestConfiguration.class);

        TestBean tb = (TestBean) context.getBean("testBean");

        tb.sayHello();

        System.out.println(tb);

        TestBean tb2 = (TestBean) context.getBean("testBean");

        tb2.sayHello();

        System.out.println(tb2);

    }

}
分析:
结果中的1:表明initMethod生效
结果中的2:表明@Scope("prototype")生效
注:
(1)、@Bean注解在返回实例的方法上,如果未通过@Bean指定bean的名称,则默认与标注的方法名相同;
(2)、@Bean注解默认作用域为单例singleton作用域,可通过@Scope(“prototype”)设置为原型作用域;
(3)、既然@Bean的作用是注册bean对象,那么完全可以使用@Component、@Controller、@Service、@Ripository等注解注册bean,
当然需要配置@ComponentScan注解进行自动扫描。
三、@Configuration启动容器+@Component注册Bean
bean类:
package com.test.spring.configuration;

//添加注册bean的注解

@Component

public class TestBean {

    public void sayHello(){

        System.out.println("TestBean sayHello...");

    }

    public String toString(){

        return "username:"+this.username+",url:"+this.url+",password:"+this.password;

    }

}
配置类:
@Configuration

//添加自动扫描注解,basePackages为TestBean包路径

@ComponentScan(basePackages = "com.test.spring.configuration")

public class TestConfiguration {

    public TestConfiguration(){

        System.out.println("spring容器启动初始化。。。");

    }

    //取消@Bean注解注册bean的方式

    //@Bean

    //@Scope("prototype")

    //public TestBean testBean() {

    //  return new TestBean();

    //}

}
主方法测试获取bean对象:
public class TestMain {

    public static void main(String[] args) {

        ApplicationContext context = new AnnotationConfigApplicationContext(TestConfiguration.class);

        //获取bean

        TestBean tb = context.getBean("testBean");

        tb.sayHello();

    }

}
sayHello()方法都被正常调用。
四、使用 AnnotationConfigApplicationContext 注册 AppContext 类的两种方法
1. 配置类的注册方式是将其传递给 AnnotationConfigApplicationContext 构造函数
public static void main(String[] args) {

        // @Configuration注解的spring容器加载方式,用AnnotationConfigApplicationContext替换ClassPathXmlApplicationContext

        ApplicationContext context = new AnnotationConfigApplicationContext(TestConfiguration.class);

        //获取bean

        TestBean tb = (TestBean) context.getBean("testBean");

        tb.sayHello();

    }
2.AnnotationConfigApplicationContext 的register 方法传入配置类来注册配置类
@Test
public void startSpringContext() {
    AnnotationConfigRegistry ctx = new AnnotationConfigApplicationContext();
    ctx.register(TestConfiguration.class);
}
3. 配置Web应用程序(web.xml中配置AnnotationConfigApplicationContext)
过去,您通常要利用 XmlWebApplicationContext 上下文来配置 Spring Web 应用程序,即在 Web 部署描述符文件 web.xml 中指定外部 XML 上下文文件的路径。XMLWebApplicationContext 是 Web 应用程序使用的默认上下文类。以下代码描述了 web.xml 中指向将由 ContextLoaderListener 监听器类载入的外部 XML 上下文文件的元素。
<!-- 加载spring容器 -->

    <context-param>

        <param-name>contextConfigLocation</param-name>

        <param-value>classpath:applicationContext-*.xml</param-value>

    </context-param>

    <listener>

        <listener-class>org.springframework.web.context.ContextLoaderListener</listener-class>

    </listener>
现在,您要将 web.xml 中的上述代码更改为使用 AnnotationConfigApplicationContext 类。切记,XmlWebApplicationContext 是 Spring 为 Web 应用程序使用的默认上下文实现,因此您永远不必在您的web.xml 文件中显式指定这个上下文类。现在,您将使用基于 Java 的配置,因此在配置 Web 应用程序时,需要在web.xml 文件中指定 AnnotationConfigApplicationContext 类。上述代码将修改如下:
<context-param>

        <param-name>contextClass</param-name>

        <param-value>    org.springframework.web.context.support.AnnotationConfigWebApplicationContext

        </param-value>

    </context-param>

    <context-param>

        <param-name>contextConfigLocation</param-name>

        <param-value>

            com.itwang.config.TestConfiguration  //这里需要些你的配置类所在位置

        </param-value>

    </context-param>

    <listener>

        <listener-class>

            org.springframework.web.context.ContextLoaderListener

        </listener-class>

    </listener>
五、组合多个配置类
1. 在@configuration中引入spring的xml配置文件
@Configuration

@ImportResource("spring.xml")

public class WebConfig {

}
新建一个spring.xml配置文件
<?xml version="1.0" encoding="UTF-8"?>

<beans xmlns="http://www.springframework.org/schema/beans"

    xmlns:context="http://www.springframework.org/schema/context"

    xmlns:p="http://www.springframework.org/schema/p"

    xmlns:aop="http://www.springframework.org/schema/aop"

    xmlns:tx="http://www.springframework.org/schema/tx"

    xmlns:xsi="http://www.w3.org/2001/XMLSchema-instance"

    xsi:schemaLocation="http://www.springframework.org/schema/beans

    http://www.springframework.org/schema/beans/spring-beans-4.0.xsd

    http://www.springframework.org/schema/context

    http://www.springframework.org/schema/context/spring-context-4.0.xsd

    http://www.springframework.org/schema/aop

    http://www.springframework.org/schema/aop/spring-aop-4.0.xsd

    http://www.springframework.org/schema/tx

    http://www.springframework.org/schema/tx/spring-tx-4.0.xsd

    http://www.springframework.org/schema/util

    http://www.springframework.org/schema/util/spring-util-4.0.xsd">

    <bean id="testBean2" class="com.itwang.config.TestBean2"></bean>

</beans>
测试
    @Test

    public void testSpring() {

        ApplicationContext applicationContext =

                new AnnotationConfigApplicationContext(WebConfig.class);

        TestBean2 testBean2 = (TestBean2) applicationContext.getBean("testBean2");

        testBean2.sayHello();

    }
结果:

2. 在@configuration中引入其它注解配置
@Configuration

@ImportResource("classpath:spring.xml")

@Import(TestConfiguration.class)

public class WebConfig {

}
测试:
public class TestMain2 {

    public static void main(String[] args) {

        // @Configuration注解的spring容器加载方式,用AnnotationConfigApplicationContext替换ClassPathXmlApplicationContext

        ApplicationContext context = new AnnotationConfigApplicationContext(WebConfig.class);

        // 如果加载spring-context.xml文件:

        // ApplicationContext context = new

        // ClassPathXmlApplicationContext("spring-context.xml");

        // 获取bean

        TestBean2 tb2 = (TestBean2) context.getBean("testBean2");

        tb2.sayHello();

        TestBean tb = (TestBean) context.getBean("testBean");

        tb.sayHello();

    }

}

3. @configuration嵌套(嵌套的Configuration必须是静态类)
通过配置类嵌套的配置类,达到组合多个配置类的目的。但注意内部类必须是静态类。
上代码:
@Component

public class TestBean {

    private String username;

    private String url;

    private String password;

    public void sayHello() {

        System.out.println("TestBean sayHello...");

    }

    public String toString() {

        return "username:" + this.username + ",url:" + this.url + ",password:" + this.password;

    }

    public void start() {

        System.out.println("TestBean start");

    }

    public void cleanUp() {

        System.out.println("TestBean destory");

    }

}
public class DataSource {

    private String dbUser;

    private String dbPass;

    public String getDbUser() {

        return dbUser;

    }

    public void setDbUser(String dbUser) {

        this.dbUser = dbUser;

    }

    public String getDbPass() {

        return dbPass;

    }

    public void setDbPass(String dbPass) {

        this.dbPass = dbPass;

    }

    @Override

    public String toString() {

        return "DataSource [dbUser=" + dbUser + ", dbPass=" + dbPass + "]";

    }

}
//配置类
@Configuration

@ComponentScan(basePackages = "com.dxz.demo.configuration3")

public class TestConfiguration {

    public TestConfiguration() {

        System.out.println("TestConfiguration容器启动初始化。。。");

    }

    @Configuration

    static class DatabaseConfig {

        @Bean

        DataSource dataSource() {

            return new DataSource();

        }

    }

}
启动类:
public class TestMain {

    public static void main(String[] args) {

        // @Configuration注解的spring容器加载方式,用AnnotationConfigApplicationContext替换ClassPathXmlApplicationContexts

        ApplicationContext context = new AnnotationConfigApplicationContext(TestConfiguration.class);

         //bean

        TestBean tb = (TestBean) context.getBean("testBean");

        tb.sayHello();

        DataSource ds = (DataSource) context.getBean("dataSource");

        System.out.println(ds);

    }

}
结果:
TestConfiguration容器启动初始化。。。

TestBean sayHello...

DataSource [dbUser=null, dbPass=null]
六、@EnableXXX注解
配合@Configuration使用,包括 @EnableAsync, @EnableScheduling, @EnableTransactionManagement, @EnableAspectJAutoProxy, @EnableWebMvc。
@EnableAspectJAutoProxy---《spring AOP 之:@Aspect注解》
@EnableScheduling--《Spring 3.1新特性之二:@Enable*注解的源码,spring源码分析之定时任务Scheduled注解》
关于Spring的配置文件的注解使用的更多相关文章
- Spring的AOP配置文件和注解实例解析
1.1 Spring的AOP配置文件和注解实例解析 AOP它利用一种称为"横切"的技术,将那些与核心业务无关,却为业务模块所共同调用的逻辑或责任封装起来,便于减 ...
- spring 学习(二):spring bean 管理--配置文件和注解混合使用
spring 学习(二)spring bean 管理--配置文件和注解混合使用 相似的,创建 maven 工程,配置pom.xml 文件,具体可以参考上一篇博文: sprint 学习(一) 然后我们在 ...
- Struts2 整合Spring(Maven,注解版)
这两天正在试验Struts2与Spring框架的整合,和他们各自的“注解”.今天就总结一下这两个框架怎么用注解进行整合. 一,加入两者的依赖包,除了两者的必要依赖外,还需要导入struts2-spri ...
- Spring Shedule Task之注解实现 (两次启动Schedule Task 的解决方案)
在spring 中的新引入的task 命名空间.可以部分取代 quartz 功能,配置和API更加简单,并且支持注解方式. 第一步: 在Spring的相关配置文件中(applicationContex ...
- [Spring框架]Spring开发实例: XML+注解.
前言: 本文为自己学习Spring记录所用, 文章内容包括Spring的概述已经简单开发, 主要涉及IOC相关知识, 希望能够对新入门Spring的同学有帮助, 也希望大家一起讨论相关的知识. 一. ...
- Spring的配置文件
Web.xml将会配置Spring的配置文件位置: <servlet> <servlet-name>x</servlet-name> & ...
- 使用 Spring 2.5 基于注解驱动的 Spring MVC
http://www.ibm.com/developerworks/cn/java/j-lo-spring25-mvc/ 概述 继 Spring 2.0 对 Spring MVC 进行重大升级后,Sp ...
- Spring+AOP+Log4j 用注解的方式记录指定某个方法的日志
一.spring aop execution表达式说明 在使用spring框架配置AOP的时候,不管是通过XML配置文件还是注解的方式都需要定义pointcut"切入点" 例如定义 ...
- 使用 Spring 2.5 基于注解驱动的 Spring MVC--转
概述 继 Spring 2.0 对 Spring MVC 进行重大升级后,Spring 2.5 又为 Spring MVC 引入了注解驱动功能.现在你无须让 Controller 继承任何接口,无需在 ...
随机推荐
- Silver Cow Party---poj3268(最短路,迪杰斯特拉)
Silver Cow Party Time Limit:2000MS Memory Limit:65536KB 64bit IO Format:%I64d & %I64u De ...
- oracle(五)tkprof 使用 transient kernal profile 侧面 轮廓
1.show parameter sql_trace value是false表示系统当前不会产生trace文件 2.使产生trace文件 alter session set sql_trace = t ...
- javaScript高级教程(四) 复制对象
//返回新对象,双方互不影响 function clone(obj){ //alert('clone'); if(typeof(obj) != 'object') return obj; if(obj ...
- Mirror--如何在主库上增加文件
由于各种原因,如磁盘不空不足,需要对主库增加数据库文件到其他磁盘上,而镜像服务器上没有对应盘符,很多人会选择删除镜像,重新完备还原来搭建镜像,这种方式耗时耗力. 在做此类操作时,需要对主服务器和镜像服 ...
- linux下的字符界面和图形界面转换
linux下的字符界面和图形界面转换 linux下有六个虚拟终端按键ctrl+alt+F1-F6可以进入相应的虚拟终端永久的话修改/etc/inittab将id:5:initdefault:中的5改成 ...
- [py]约瑟夫问题-循环队列
约瑟夫问题(历史战争问题) 直观理解 老外视频讲解 模拟器演示 约瑟夫问题 数学姥公众号 讲的最清楚 背景及,推倒过程讲解得很清晰,旨在提高人们对数据的兴趣 简单说下: 几个人围成一圈(循环队列), ...
- CloudFlare防护下的破绽:寻找真实IP的几条途径
本文仅代表作者独立观点,本文提及的技术仅供安全研究和渗透测试用途 看Twitter发现CloudFlare总裁什么的最近很高调,北京.香港的跑着参加会议.发表演说什么的,CloudFlare似乎也没那 ...
- 【Win7 x64】+【annaconda3】+ 【python3.5.2】+【tensorflow-gpu】 [最终配置 gtx 940mx + Cuda8.0+cudnn v5.1 + tensorflow-gpu1.0.0 ]
1.安装cuda Toolkit 和cudnn (百度云可下载,版本需要对应) 2.配置环境变量: 3.安装cudnn(需要拷贝一些dll和lib来进行配置) 4.进入cmd,找到anaconda3的 ...
- 软件包管理:rpm命令管理-包命名与依赖性
rpm包的管理主要有两种方法:一种是rpm命令管理另一种是yum在线管理 注意软件包没有扩展名,写上只是为了好看,便于识别而已. 注意区别包名,包全名.之所以要区分,就是因为有些命令十分挑剔,需要跟正 ...
- Object之总结(一)
一.Object类中一共有12个方法.一个私有方法,两个保护方法,9个公共方法.另外还有一个静态代码块. 1.registerNatives方法.私有静态本地无参数无返回值. 2.finalize方法 ...