python webdriver api-读取、设置配置文件
文件结构:
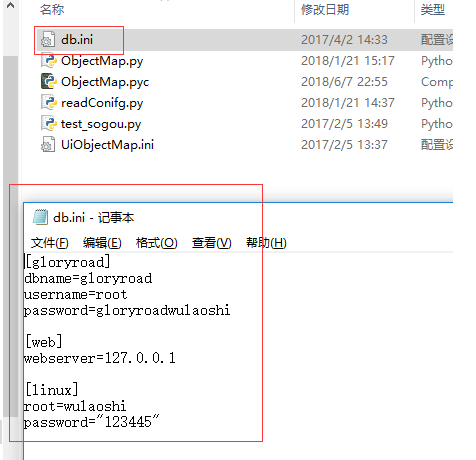
db.ini放置db信息的配置文件
文件中[gloryroad]是section信息
下边的dbname等是option信息
UiObjectMap.ini放置访问web的配置信息
配置用到的xpath元素信息-做到数据和程序的分离
第一步读取配置文件
把配置文件放到当前脚本所在目录下
#encoding=utf-8
import ConfigParser
import os
import platform
if platform.system() == "Windows":
configFilePath = os.path.dirname(os.path.abspath(__file__)) + "\db.ini"
else:
configFilePath = os.path.dirname(os.path.abspath(__file__)) + "/db.ini"
print "path:",configFilePath
cf = ConfigParser.ConfigParser()#专门解析ini文件的,python的类
cf.read(configFilePath)#实例化后,进行读取,拼成完全路径
print cf.sections()#section就是方括号的内容
print cf.options("gloryroad")#获取gloryroad的section下边的所有的配置选项
dbname = cf.get("gloryroad","dbname")#获取gloryroad下边dbname的值
username = cf.get("gloryroad","username")
password = cf.get("gloryroad","password")
webserver= cf.get("web","webserver")
print dbname
print username
print password
print webserver
D:\test>python test.py
path: D:\test\db.ini
['gloryroad', 'web', 'linux']
['dbname', 'username', 'password']
gloryroad
root
gloryroadwulaoshi
127.0.0.1
加了打印__file__,os.path.abspath(__file__)
#encoding=utf-8
import ConfigParser
import os
import platform
print __file__
print os.path.abspath(__file__)
if platform.system()=='Windows':
configFilePath=os.path.dirname(os.path.abspath(__file__))+'\db.ini'
else:
configFilePath=os.path.dirname(os.path.abspath(__file__))+'/db.ini'
print "path:",configFilePath
cf=ConfigParser.ConfigParser()
cf.read(configFilePath)
print cf.sections()
print cf.options("gloryroad")
dbname=cf.get("gloryroad","dbname")
username=cf.get("gloryroad",'username')
password=cf.get("gloryroad","password")
webserver=cf.get("web","webserver")
print dbname
print username
print password
print webserver
D:\test>python test.py
test.py
D:\test\test.py
path: D:\test\db.ini
['gloryroad', 'web', 'linux']
['dbname', 'username', 'password']
gloryroad
root
gloryroadwulaoshi
127.0.0.1
自己调试:
#encoding=utf-8
import ConfigParser
import os
import platform
if platform.system() == "Windows":
configFilePath = os.path.dirname(os.path.abspath(__file__)) + "\gloryxia.ini"
else:
configFilePath = os.path.dirname(os.path.abspath(__file__)) + "/gloryxia.ini"
print "path:",configFilePath
cf = ConfigParser.ConfigParser()#专门解析ini文件的,python的类
cf.read(configFilePath)#实例化后,进行读取,拼成完全路径
print cf.sections()#section就是方括号的内容
print cf.options("xiaxiaoxu")#获取gloryroad的section下边的所有的配置选项
gender = cf.get("xiaxiaoxu","gender")#获取gloryroad下边dbname的值
age = cf.get("xiaxiaoxu","age")
carrer = cf.get("xiaxiaoxu","carrer")
print gender
print age
print carrer
D:\test>python test.py
path: D:\test\gloryxia.ini
['xiaxiaoxu']
['gender', 'age', 'carrer']
male
32
tester
封装成函数
#encoding=utf-8
import ConfigParser
import os
import platform
def read_ini_file(ini_file_path,section_name,option_name):
cf = ConfigParser.ConfigParser()
cf.read(ini_file_path)
try:
value = cf.get(section_name,option_name)
except:
print "the specific seciton or the specific option doesn't exit!"
return None
else:
return value
print read_ini_file(os.path.dirname(os.path.abspath(__file__)) + "\gloryxia.ini","xiaxiaoxu","carrer")
D:\test>python test.py
tester
修改:
#encoding=utf-8
import ConfigParser
import os
import platform
def read_ini_file(ini_path,section_name,option):
cf=ConfigParser.ConfigParser()
cf.read(ini_path)
try:
value=cf.get(section_name,option)
except:
print "option of '%s' is not existed!"%section_name
return None
else:
return "option '%s' of section '%s' is '%s'"%(option,section_name,value)
print read_ini_file('d:\\test\\db.ini','gloryroad','dbname')
print read_ini_file('d:\\test\\db.ini','gloryroad','username')
print read_ini_file('d:\\test\\db.ini','gloryroad','password')
print read_ini_file('d:\\test\\db.ini','web','webserver')
D:\test>python test.py
option 'dbname' of section 'gloryroad' is 'gloryroad'
option 'username' of section 'gloryroad' is 'root'
option 'password' of section 'gloryroad' is 'gloryroadwulaoshi'
option 'webserver' of section 'web' is '127.0.0.1'
第二步怎么分割配置文件
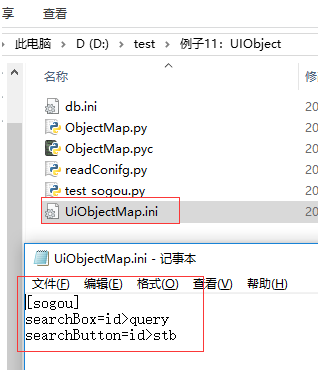
指定浏览器,section(网站名),和元素名(element_name)
UiObjectMap.ini:
[sogou]
searchBox=id>query
searchButton=id>stb
脚本:
#encoding=utf-8
from selenium.webdriver.support.ui import WebDriverWait
import ConfigParser
import os
from selenium import webdriver
class ObjectMap(object):
def __init__(self):#这里把文件路径写死了,可以在封装时把路径作为参数传进去
# 获取存放页面元素定位表达方式及定位表达式的配置文件所在绝对路径
# os.path.abspath(__file__)表示获取当前文件所在路径目录
self.uiObjMapPath = os.path.dirname(os.path.abspath(__file__))\
+ "\\UiObjectMap.ini"
print self.uiObjMapPath
def getElementObject(self, driver, webSiteName, elementName):
try:
# 创建一个读取配置文件的实例
cf = ConfigParser.ConfigParser()
# 将配置文件内容加载到内存
cf.read(self.uiObjMapPath)
# 根据section和option获取配置文件中页面元素的定位方式及
# 定位表达式组成的字符串,并使用“>”分割
locators = cf.get(webSiteName, elementName).split(">")
# 得到定位方式
locatorMethod = locators[0]
# 得到定位表达式
locatorExpression = locators[1]
print locatorMethod, locatorExpression
# 通过显示等待方式获取页面元素
element = WebDriverWait(driver, 10).until(lambda x: \
x.find_element(locatorMethod, locatorExpression))
except Exception, e:
raise e
else:
# 当页面元素被找到后,将该页面元素对象返回给调用者
return element
if __name__ == '__main__':
driver = webdriver.Firefox(executable_path = "d:\\geckodriver")
url = "http://www.sogou.com"
driver.get(url)
print driver.find_element("id","stb")
objmap =ObjectMap()
print objmap.getElementObject(driver,"sogou","searchBox")
print objmap.getElementObject(driver,"sogou","searchButton")
D:\test>python test.py
<selenium.webdriver.firefox.webelement.FirefoxWebElement (session="34bb42dc-7a7c-4bfe-9e6c-dcafdcdc99f1", element="a238abd6-a1dc-48eb-ab7a-e18dbdc1e4ca")>
D:\test\UiObjectMap.ini
id query
<selenium.webdriver.firefox.webelement.FirefoxWebElement (session="34bb42dc-7a7c-4bfe-9e6c-dcafdcdc99f1", element="060bb8c0-c4b4-49d1-845b-0c57e921d216")>
id stb
<selenium.webdriver.firefox.webelement.FirefoxWebElement (session="34bb42dc-7a7c-4bfe-9e6c-dcafdcdc99f1", element="a238abd6-a1dc-48eb-ab7a-e18dbdc1e4ca")>
第三步结合搜狗的使用进行点击
ObjectMap.py:
#encoding=utf-8
from selenium.webdriver.support.ui import WebDriverWait
import ConfigParser
import os
from selenium import webdriver
class ObjectMap(object):
def __init__(self):
# 获取存放页面元素定位表达方式及定位表达式的配置文件所在绝对路径
# os.path.abspath(__file__)表示获取当前文件所在路径目录
self.uiObjMapPath = os.path.dirname(os.path.abspath(__file__))\
+ "\\UiObjectMap.ini"
print self.uiObjMapPath
def getElementObject(self, driver, webSiteName, elementName):
try:
# 创建一个读取配置文件的实例
cf = ConfigParser.ConfigParser()
# 将配置文件内容加载到内存
cf.read(self.uiObjMapPath)
# 根据section和option获取配置文件中页面元素的定位方式及
# 定位表达式组成的字符串,并使用“>”分割
locators = cf.get(webSiteName, elementName).split(">")
# 得到定位方式
locatorMethod = locators[0]
# 得到定位表达式
locatorExpression = locators[1]
print locatorMethod, locatorExpression
# 通过显示等待方式获取页面元素
element = WebDriverWait(driver, 10).until(lambda x: \
x.find_element(locatorMethod, locatorExpression))
except Exception, e:
raise e
else:
# 当页面元素被找到后,将该页面元素对象返回给调用者
return element
if __name__ == '__main__':
driver = webdriver.Ie(executable_path = "e:\\IEDriverServer")
url = "http://www.sogou.com"
driver.get(url)
print driver.find_element("id","stb")
objmap =ObjectMap()
print objmap.getElementObject(driver,"sogou","searchBox")
print objmap.getElementObject(driver,"sogou","searchButton")
UiObjectMap.ini:
[sogou]
searchBox=id>query
searchButton=id>stb
脚本:
#encoding=utf-8
from selenium import webdriver
import unittest
import time, traceback
from ObjectMap import ObjectMap
class TestSoGouByObjectMap(unittest.TestCase):
def setUp(self):
self.obj = ObjectMap()
# 启动Firefox浏览器
self.driver = webdriver.Firefox(executable_path = "c:\\geckodriver")
def testSoGouSearch(self):
url = "http://www.sogou.com"
# 访问搜狗首页
self.driver.get(url)
try:
# 查找页面搜索输入框
searchBox = self.obj.getElementObject\
(self.driver, "sogou", "searchBox")
# 在找到的搜索输入框中输入“WebDriver实战宝典”
searchBox.send_keys(u"WebDriver实战宝典")
# 查找搜索按钮
searchButton = self.obj.getElementObject\
(self.driver, "sogou", "searchButton")
# 点击找到的搜索按钮
searchButton.click()
# 等待2秒,以便页面加载完成
time.sleep(2)
# 断言关键字“吴晓华”是否按预期出现在页面源代码中
self.assertTrue(u"吴晓华" in self.driver.page_source, "assert error!")
except Exception, e:
# 打印异常堆栈信息
print traceback.print_exc()
def tearDown(self):
# 退出IE浏览器
self.driver.quit()
if __name__ == '__main__':
unittest.main()
D:\test>python test.py
D:\test\UiObjectMap.ini
id query
id stb
.
----------------------------------------------------------------------
Ran 1 test in 56.168s
OK
python webdriver api-读取、设置配置文件的更多相关文章
- python的ConfigParser读取设置配置文件
python 读写配置文件在实际应用中具有十分强大的功能,在实际的操作中也有相当简捷的操作方案,以下的文章就是对python 读写配置文件的具体方案的介绍,望你浏览完下面的文章会有所收获. pytho ...
- 转:python webdriver API 之设置等待时间
有时候为了保证脚本运行的稳定性,需要脚本中添加等待时间.sleep(): 设置固定休眠时间. python 的 time 包提供了休眠方法 sleep() , 导入 time 包后就可以使用 slee ...
- 转:python webdriver API 之下载文件
webdriver 允许我们设置默认的文件下载路径.也就是说文件会自动下载并且存在设置的那个目录中.要想下载文件,首选要先确定你所要下载的文件的类型.要识别自动文件的下载类型可以使用 curl ,如图 ...
- 转:python webdriver API 之操作测试对象
一般来说,所有有趣的操作与页面交互都将通过 WebElement 接口,包括上一节中介绍的对象定位,以及本节中需要介绍的常对象操作.webdriver 中比较常用的操作元素的方法有下面几个: cle ...
- 转:python webdriver API 之cookie 处理
有时候我们需要验证浏览器中是否存在某个 cookie,因为基于真实的 cookie 的测试是无法通过白盒和集成测试完成的.webdriver 可以读取.添加和删除 cookie 信息.webdrive ...
- 转:python webdriver API 之简单对象的定位
对象(元素)的定位和操作是自动化测试的核心部分,其中操作又是建立在定位的基础上的,因此元素定位就显得非常重要. (本书中用到的对象与元素同为一个事物)一个对象就像是一个人,他会有各种的特征(属性) , ...
- 转:python webdriver API 之 验证码问题
对于 web 应用来说,大部分的系统在用户登录时都要求用户输入验证码,验证码的类型的很多,有字母数字的,有汉字的,甚至还要用户输入一条算术题的答案的,对于系统来说使用验证码可以有效果的防止采用机器猜测 ...
- 转:python webdriver API 之浏览器的操作
1.1.浏览器最大化在统一的浏览器大小下运行用例,可以比较容易的跟一些基于图像比对的工具进行结合,提升测试的灵活性及普遍适用性.比如可以跟 sikuli 结合,使用 sikuli 操作 flash.# ...
- 转:python webdriver API 之调用 JavaScript
当 webdriver 遇到没法完成的操作时,笔者可以考虑借用 JavaScript 来完成,比下下面的例子,通过 JavaScript 来隐藏页面上的元素.除了完成 webdriver 无法完成的操 ...
- 转:python webdriver API 之alert/confirm/prompt 处理
webdriver 中处理 JavaScript 所生成的 alert.confirm 以及 prompt 是很简单的.具体思路是使用switch_to.alert()方法定位到 alert/conf ...
随机推荐
- SDK Location not found Android Studio + Gradle
extends: http://stackoverflow.com/questions/19272127/sdk-location-not-found-android-studio-gradle I ...
- openstack 部署(Q版)-----环境准备篇
一.环境准备 系统:centos7 cinder01 内网:192.168.10.51 外网:172.16.1.51 compute01 内网:192.168.10.52 外网:172.16.1. ...
- python中的字符串切片
python中的字符串切片,似乎有点乱,例如: >>>pystr='Python' >>>pystr[2:5] 就会输出 'tho' 这该怎样理解呢?中括号[2:5 ...
- CCCC L2-005. 集合相似度
https://www.patest.cn/contests/gplt/L2-005 题解:直接set的count函数 坑 :要用容斥原理算两个集合的并,否则超时.(我还以为要打表呢) #includ ...
- ResourceManager High Availability
Introduction This guide provides an overview of High Availability of YARN’s ResourceManager, and det ...
- javascript 字符串去空格
1.正则去空格 a.去掉字符串中所有空格 " hello world ".replace(/\s+/g,"");//helloworld b.去掉字符串左边空格 ...
- js之操作cookie
js通过document.cookie获取所有的cookie信息, cookie在存储的格式是键值对,key=value每个键值对之间用; (分号和空格隔开). 添加cookie和修改cookie的值 ...
- Bitfinex API
本文介绍Bitfinex APi Platform Status Get the current status of the platform. Maintenance periods last fo ...
- PULL解析学习
学习过程 安卓中有三种对XML解析的方式,这个众所周知,DOM,SAX,PULL 其中被推荐的方法是PULL,说是非常简单,但从一开始接触就觉得比较迷惑,总是云里雾里的感觉,甚至在自己写出了一个能 ...
- qt——常用的布局方法
布局相关对象及简介 窗体上的所有的控件必须有一个合适的尺寸和位置.Qt提供了一些类负责排列窗体上的控件,主要有:QHBoxLayout,QVBoxLayout,QGridLayout,QStackLa ...