Django(投票程序)
Django是一个web框架,python编写的。
MTV模式
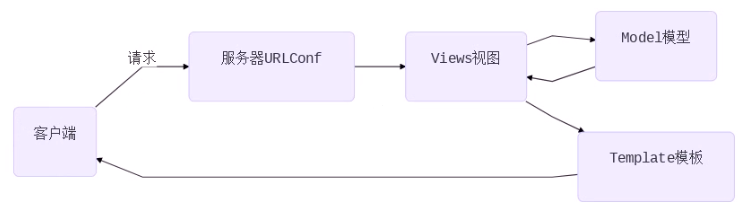
Django的MTV模式本质上和MVC是一样的,也是为了各组件间保持松耦合关系,只是定义上有些许不同

-M代表模型(Model ):负责业务对象和数据库的关系映射(ORM)

-T代表模板(Template):负责如何把页面展示给用户(html)

-V代表视图(View ) :负责业务逻辑,并在适当时候调用Model和Template
client(客户端)-->请求(url)--> server(服务器的urlconf)-->views(视图,相当于函数,客户机访问url,每次的访问都有相应的函数对应)-->model(数据库,增删改查)-->views(修改数据库后再返回信息给视图,数据交互)-->Template(web页面)-->client
一、创建python的虚拟环境
(一)配置pip文件
(django_env) [root@django ~]# cat .pip/pip.conf

[global]

index-url = http://pypi.douban.com/simple

[install]

trusted-host=pypi.douban.com
(二)虚拟环境安装
mkdir pyproject

cd pyproject/

python3 -m venv django_env        #在当前目录创建虚拟环境(Django_env 名字可以变)

source django_env/bin/activate    #激活虚拟环境

pip install django==1.11.6        #在虚拟环境中安装Django==1.11.6

    (django_env) [root@localhost pyproject]# python  #验证

    Python 3.6.4 (default, Apr 27 2018, 08:26:23)

    [GCC 4.8.5 20150623 (Red Hat 4.8.5-16)] on linux

    Type "help", "copyright", "credits" or "license" for more information.

    >>> import django

    >>> django.__version__

    '1.11.6'
二 、Django项目创建
django-admin startproject mysite   #创建项目

    (django_env) [root@localhost pyproject]# cd mysite     #Django的目录结构

    (django_env) [root@localhost mysite]# tree

    .

    ├── manage.py

    └── mysite

        ├── __init__.py

        ├── settings.py

        ├── urls.py

        └── wsgi.py
mysite:项目的容器。
manage.py:一个使用的命令行工具,可让你以各种方式与该django项目进行交互(项目的管理目录)
mysite/__init__.py:一个空文件,告诉python该目录是一个python包。(项目的初始化文件)
mysite/settings.py:该django项目的设置/配置。(项目的配置文件)
mysite/urls.py:该django项目的URL声明;一份由django驱动的网站“目录”。(项目的路由文件)
mysite/wsgi.py:一个WSGI兼容的Web服务器的入口,以便运行你的项目。(将网站部署到web服务器时使用的文件)
python manage.py runserver 0.0.0.0:8000 #运行项目
127.0.0.1:8000 #查看项目
三、Django配置
(一)创建数据库
CREATE DATABASE django DEFAULT CHARSET 'UTF8';
(二)配置 setting.py(配置完成后页面变成中文)
ALLOWED_HOSTS = ['*']   # 允许所有的客户端访问

DATABASES = {

    'default': {'ENGINE': 'django.db.backends.mysql',

    'NAME': 'django',

    'USER': 'root',

    'PASSWORD': '数据库root密码',

    'HOST': '127.0.0.1',

    'PORT': '3306',    }

}

LANGUAGE_CODE ='zh-hans'   #中文

TIME_ZONE ='Asia/Shanghai'

USE_TZ = False
(三)配置__init__.py(要先安装pymysql模块)
import pymysql

pymysql.install_as_MySQLdb()
运行查看
# 重新运行测试服务器,监听在0.0.0.0的80端口。注意:如果不是root,不能监听1024以下端口

[root@room8pc16 mysite]# python manage.py runserver 0:80
(四)生成数据
 [root@room8pc16 mysite]#python manage.py makemigrations  #会生成一些相应的sql语句

 [root@room8pc16 mysite]# python manage.py migrate        #生成表
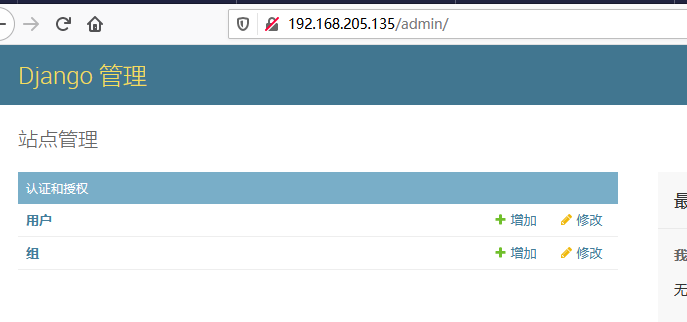
(五)创建管理员
[root@room8pc16 mysite]# python manage.py createsuperuser #密码要求复杂度和长度
查看页面
四、使用Django创建应用
(一)创建应用(对应的一个个的功能模块,使用一个投票为例子)
[root@room8pc16 mysite]# python manage.py startapp polls #创建应用(可以集成到任何的一个项目中)
(二)在settings配置文件中声明应用(把应用集成在项目中)
INSTALLED_APPS = [

    'django.contrib.admin',

    'django.contrib.auth',

    'django.contrib.contenttypes',

    'django.contrib.sessions',

    'django.contrib.messages',

    'django.contrib.staticfiles',

    'polls'           #添加的应用

]
(三)授权,把应用的url交给投票应用处理,都在项目下的urls.py的这个文件就会特别大
polls/urls.py

from django.conf.urls import url, include

from django.contrib import adminurlpatterns = [

# 正则匹配时,从http://x.x.x.x/后面开始算起

# 正则匹配时,从http://x.x.x.x/polls

url(r'^admin/', admin.site.urls),

url(r'^polls/', include('polls.urls')), #其中r意思真实字符串相当于shell中的单引号

]
在polls目录下没有urls.py文件就创建一个
[root@django polls]# touch  urls.py

vim polls/urls.py
from django.conf.urls import url
urlpatterns = [
]
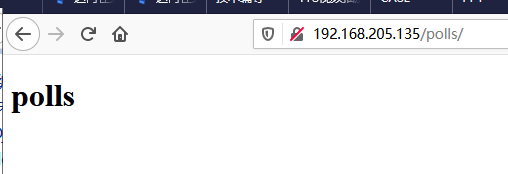
五、创建投票首页
(一)编写url
from django.conf.urls import url,include

from django.contrib import admin
from . import views   #.是当前目录的意思(和urls.py同级,也可以from polls import views)

urlpatterns = [

        url(r'^$', views.index,name='index'),    #匹配到空白,都用views.index函数进行响应,那么为函数名字

]
(二)编写views视图函数
def index(request):

# 用户发起的请求将会作为第一个参数传给函数 (客户端发起请求时可能是 get,put,post,携带的参数或者数据等等 都会作为第一个参数 传给request)

# 所以函数至少要定义一个参数来接收用户的请求

# render负责找寻模板文件发送给用户

return render(request, 'index.html')
(三)编写页面(确定templates模板的位置)
TEMPLATES = [

    {

        'BACKEND': 'django.template.backends.django.DjangoTemplates',

        'DIRS': [os.path.join(BASE_DIR, 'templates')],    #templates模板的位置,项目目录同级

        'APP_DIRS': True,

        'OPTIONS': {

            'context_processors': [

                'django.template.context_processors.debug',

                'django.template.context_processors.request',

                'django.contrib.auth.context_processors.auth',

                'django.contrib.messages.context_processors.messages',

            ],
index.html
<html lang="en">

<head>

    <meta charset="UTF-8">

    <title>polls</title>

</head>

<body>

<div class="container">

    <h1>polls</h1>

</div>

</body>

</html>
六、编写问题页面
(一)编写urls.py
urlpatterns = [

    url(r'^$', views.index,name='index'),

    url(r'(\d+)/$', views.a,name='a'),

    #\d+为匹配数字(+为至少匹配到一个数字)

    # ()为传参(把匹配到的数字作为视图函数a的参数 )

]
(二)编写views.py
from django.shortcuts import render

def index(request):

    return render(request,'index.html')

def a(request,id):  #在urls.py中匹配到的参数的值用变量id接受

    return  render(request,'a.html',{'id':id})

  # 字典的内容将会成为模板文件的变量,字典的key是变量名,value是变量值(字典的值成为html的参数)
(三)编写a.html
<!DOCTYPE html>

<html lang="en">

<head>

    <meta charset="UTF-8">

    <title>Title</title>

</head>

<body>

<div class="container">

   <h1>{{id}}question</h1>   #在views.py文件中接受的参数,用{{}}表示

</div>

</body>

</html>

七、编写结果页面
(一)编写urls.py
urlpatterns = [

    url(r'^$', views.index,name='index'),    #r‘’单引号里面什么也不填写那么就是匹配空串(在任何字符之间都有空串),不管在ip/polls/后面填写什么都将匹配首页

    url(r'(\d+)/$', views.a,name='a'),

    url(r'(\d+)/result/$', views.result,name='result')

]
(二)编写views.py
from django.shortcuts import render

# Create your views here.

def index(request):

    return render(request,'index.html')

def a(request,id):

    return  render(request,'a.html',{'id':id})

def result(request,id):

    return  render(request,'result.html',{'id':id})
(三)编写result.html
    <meta charset="UTF-8">

    <title>Title</title>

</head>

<body>

<div>

    <h1>{{id}}result</h1>

</div>

</body>

</html>
八、model模型
ORM

object :对象﹐对应django模型中的class

Relationship:关系﹐对应关系型数据库

Mapping:映射

一个class对应数据库中的一张表

表中的字段与class中的类变量对应

数据库中的数据类型也与django模型中的类映射

表中的每个记录都与class的实例对应
(一)编写models.py
from django.db import models

# Create your models here.

class Question(models.Model):

    question_text = models.CharField(max_length=200, unique=True)

    pub_date = models.DateTimeField()  #不加Field,没有时分秒

class Chioce(models.Model):

    chioce_text = models.CharField(max_length=200, unique=True)

    votes = models.IntegerField(default=0)

    question = models.ForeignKey(Question)    #如果想要修改字段名,在配置文件中修改之后,重新生成表
(二)生成表
python manage.py makemigrations

python manage.py migrate
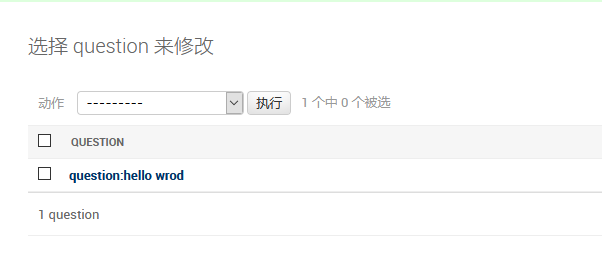
(三)将模型加入到后台页面
# polls/admin.py

from  django.contrib  import  admin# 在当前目录下的models模块中导入模型

from .models   import   Question, Choice

# Register your models here.

admin.site.register(Question)

admin.site.register(Choice)

解决办法
class Question(models.Model):

    question_text = models.CharField(max_length=200, unique=True)

    pub_date = models.DateTimeField()

    def __str__(self):

        return 'question:%s' % self.question_text

class Chioce(models.Model):

    chioce_text = models.CharField(max_length=200, unique=True)

    votes = models.IntegerField(default=0)

    question = models.ForeignKey(Question)

    def __str__(self):

        return '%s:%s' % return '%s:%s' % (self.question,self.chioce_text)
九、Django API(首页)
(一)在views文件中把问题取出来传给html
# polls/views.py

from django.shortcuts import render

from .models import Question

def index(request):

  questions = Question.objects.order_by('-pub_date')

  returnrender(request, 'index.html', {'questions': questions})
(二)编辑index.html
<!DOCTYPEhtml>

<htmllang="en">

<head>

<metacharset="UTF-8">

<title>投票首页</title>

</head>

<body>

<div class="container">

    <div class="content">

        <h1>投票首页</h1>

        <ol>

            {% for question in questions %}

            <li>

                <a href="{% url 'a' question.id %}" target="_blank">
#question_id是views.py中的\d+这个参数,数据库中没有指定主键时Django会自动创建主键,question_id就是问题的id号

                       {{ question.question_text }}</a>

                    {{ question.pub_date }}

            </li>

         {%endfor%}

        </ol>

    </div>

</div>

</body>

</html>
(三)可以添加轮播图
<div class="container">

     <div id="linux-carousel" class="carousel slide">

        <ol class="carousel-indicators">

            <li class="active" data-target="#linux-carousel" data-slide-to="0"></li>  #轮播图下面的小圆点

            <li data-target="#linux-carousel" data-slide-to="1"></li>

            <li data-target="#linux-carousel" data-slide-to="2"></li>

        </ol>

         <div class="carousel-inner">

            <div class="item active">

                <a href="http://www.sogou.com" target="_blank">

                    <img src="{% static 'imgs/first.jpg' %}">

                </a>

            </div>

            <div class="item">

                 <img src="{% static 'imgs/second.jpg' %}">

            </div>

             <div class="item">

                <img src="{% static 'imgs/third.jpg' %}">

            </div>

        </div>

        <a href="#linux-carousel" data-slide="prev" class="carousel-control left"> <span class="glyphicon glyphicon-chevron-left"></span>    #向左翻

制作投票详情页

         </a>

        <a href="#linux-carousel" data-slide="next" class="carousel-control right"> <span class="glyphicon glyphicon-chevron-right"></span>   #向右翻

        </a>

     </div>

<script src="{% static 'js/jquery.min.js' %}"></script>    #要有JS代码才能实现轮播图

<script src="{% static 'js/bootstrap.min.js' %}"></script>

<script type="text/javascript">
(四)模板继承(为了避免一些网页的重复代码)
1.复制index.html一本命令为bak.html
# 在basic.html中,将个性(不相同)内容用block替代

{% load static %}

<!DOCTYPE html>

<html lang="en">

<head><meta charset="UTF-8">

 <title>{% block title %}{% endblock %}</title>

<meta name="viewport" content="width=device-width, initial-scale=1">

<link rel="stylesheet" href="{% static 'css/bootstrap.min.css' %}">

</head>

 <body>

<div class="container">

    <div id="linux-carousel" class="carousel slide">

         <ol class="carousel-indicators">

             <li class="active" data-target="#linux-carousel" data-slide-to="0"></li>

             <li data-target="#linux-carousel" data-slide-to="1"></li>

             <li data-target="#linux-carousel" data-slide-to="2"></li>

        </ol>

        <div class="carousel-inner">

            <div class="item active">

            <a href="http://www.sogou.com" target="_blank">

                <img src="{% static 'imgs/first.jpg' %}">   #图片放在polls下static目录的imgs目录中

            </a>

        </div>

        <div class="item">

            <img src="{% static 'imgs/second.jpg' %}">

        </div>

        <div class="item">

            <img src="{% static 'imgs/third.jpg' %}">

        </div>

    </div>

    <a href="#linux-carousel" data-slide="prev" class="carousel-control left"> <span class="glyphicon glyphicon-chevron-left"></span>

制作投票详情页 </a>

    <a href="#linux-carousel" data-slide="next" class="carousel-control right"> <span class="glyphicon glyphicon-chevron-right"></span>

    </a>

</div>

    {% block content %}{% endblock %}

<script src="{% static 'js/jquery.min.js' %}"></script>

<script src="{% static 'js/bootstrap.min.js' %}"></script>

<script type="text/javascript"></script>

</body>

</html>
2.index.html
# 修改index.html,把共性内容删除,个性内容写到对应的block中

{% extends 'bak.html' %}  #继承

{% load static %}

{% block title %}投票首页{% endblock %}

{% block content %}

<div class="content h4">

    <h1 class="text-center text-warning">投票首页</h1>

    <ol style="margin: 20px 0">

        {% for question in questions %}

        <li><a href="{% url 'detail' question.id %}" target="_blank">

        {{ question.question_text }} </a> {{ question.pub_date }}

        </li> {% endfor %}

    </ol>

</div>

{% endblock %}
十、制作a.html(第二个页面)
(一)编辑views.py
from django.shortcuts import render

from .models import Question, Chioce

# Create your views here.

def index(request):

    d = Question.objects.order_by('-pub_date')

    return render(request,'index.html',{'d':d})

def a(request,question_id):

    c = Question.objects.get(id=question_id)

    return  render(request,'a.html',{'id':c})

def result(request,id):

    return  render(request,'result.html',{'id':id})
(二)编辑a.html(取出选项)
{% extends 'bak.html'%}

{% load static %}

{% block title%}polls{%endblock%}

{% block content%}

<div class="container">

   <h1>{{ id.id }}</h1>

</div>

<div class="content h4 text-warning"  >

    <h1 class="text-center">chioce</h1>

    <h2>{{ id }}</h2>

    <form action="">
      {% csrf_token %}    #安全选项

        {% for i in id.chioce_set.all %}

            <div class="radio">

                <label >

                    <input type="radio" name="chioce_id" value="{{ chioce_id }}">

                    {{ i.chioce_text }}

                </label>

            </div>

        {% endfor %}

    </form>

</div>

<div class="group">

            <input  class="btn btn-primary" tpye="submit" value="submit">

 </div>

{%endblock%}
十一、实现投票功能(数据库添加删除)
实现数据库的增删改查。执行函数对model模型的操作(url-->views-->model)
(一)配置urls.py
from django.conf.urls import url,include

from django.contrib import admin

from . import  views

urlpatterns = [

    url(r'^$', views.index,name='index'),

    url(r'(\d+)/$', views.a,name='a'),

    url(r'(\d+)/result/$', views.result,name='result'),

    url(r'(\d+)/vote/$', views.vote,name='vote'),

]
(二)配置views.py
from django.shortcuts import  render, redirect

from .models import Question, Chioce

# Create your views here.

def index(request):

    d = Question.objects.order_by('-pub_date')

    return render(request,'index.html',{'d':d})

def a(request,question_id):

    c = Question.objects.get(id=question_id)

    return  render(request,'a.html',{'id':c})

def result(request,id):

    return  render(request,'result.html',{'id':id})

def vote(request,id):

    d = Question.objects.get(id=id)    #取出问题

# 当用户提交表单时,request.POST是一个字典,里面记录了与POST相关的数据

# choice_id是detail.html页面中单选按钮的name,值是选项的id(value的值)

    chioce_id = request.POST.get('chioce_id')   #取出name的值

    chioce  = d.chioce_set.get(id=chioce_id)   #取出对用id的项

    chioce.votes += 1

    chioce.save()

# 这里返回使用的不是render,因为render直接返回页面,URL不变,也就是http://x.x.x.x/polls/2/vote显示的是2号问题的投票结果,这是不合理的应该由http://x.x.x.x/polls/2/result/显示投票结果。所以使用redirect

    return redirect('result',id)
(三)配置a.html
{% extends 'bak.html'%}

{% load static %}

{% block title%}polls{%endblock%}

{% block content%}

<div class="container">

   <h1>{{ id.id }}</h1>

</div>

<div class="content h4 text-warning"  >

    <h1 class="text-center">chioce</h1>

    <h2>{{ id }}</h2>

    <form action="{% url 'vote' id.id %}" method="post">

        {% csrf_token %}

        {% for i in id.chioce_set.all %}

            <div class="radio">

                <label >

                    <input type="radio" name="chioce_id" value="{{ i.id }}">

                    {{ i.chioce_text }}

                </label>

            </div>

        {% endfor %}

        <div class="form-group">

            <input  class="btn btn-primary" type="submit" value="submit">

        </div>

    </form>

</div>

{%endblock%}
十二、配置result.html
(一)views.py
from django.shortcuts import  render, redirect

from .models import Question, Chioce

# Create your views here.

def index(request):

    d = Question.objects.order_by('-pub_date')

    return render(request,'index.html',{'d':d})

def a(request,question_id):

    c = Question.objects.get(id=question_id)

    return  render(request,'a.html',{'id':c})

def result(request,id):

    d = Question.objects.get(id=id)

    return  render(request,'result.html',{'id':d})

def vote(request,id):

    d = Question.objects.get(id=id)

    chioce_id = request.POST.get('chioce_id')

    chioce  = d.chioce_set.get(id=chioce_id)

    chioce.votes += 1

    chioce.save()

    return redirect('result',id)
(二)配置resul.html
{% extends 'bak.html'%}

{% load static %}

{% block title%}投票结果{%endblock%}

{% block content%}

<div>

    <h1 class="text-center">{{ id.id }}投票结果</h1>

    <table class="table table-striped table-hover">

        <thead class="bg-primary">

            <tr>

                <td colspan="2">{{ id.question_text }}</td>

            </tr>

        </thead>

        {% for i in id.chioce_set.all %}

        <tr>

            <td>{{ i.chioce_text }}</td>

            <td >{{ i.votes }}</td>

        </tr>

        {%endfor%}

    </table>

</div>

{%endblock%}
Django(投票程序)的更多相关文章
- Django教程:第一个Django应用程序(4)
Django教程:第一个Django应用程序(4) 2013-10-09 磁针石 #承接软件自动化实施与培训等gtalk:ouyangchongwu#gmail.comqq 37391319 #博客: ...
- Django教程:第一个Django应用程序(3)
Django教程:第一个Django应用程序(3) 2013-10-08 磁针石 #承接软件自动化实施与培训等gtalk:ouyangchongwu#gmail.comqq 37391319 #博客: ...
- 第一个Django应用程序_part3
一.概述 此文延续第一个Django应用程序part2. 官方文档:https://docs.djangoproject.com/en/1.11/intro/tutorial03/ view是Djan ...
- 编写你的第一个django应用程序2
从1停止的地方开始,我们将设置数据库,创建您的第一个模型,并快速介绍django自动生成的管理站点 数据库设置 现在,打开mysite/settings.py.这是一个普通的python模块,其中模块 ...
- 伪造http的ip地址,突破ip限制的投票程序
某WEB投票程序, 使用 ip 限制和cookie限制技术,来限制每个ip每天只能投一次票,使用的是php开发,获取访问者的 ip 使用了搜狐的接口: http://txt.go.sohu.com/i ...
- 搭建你的第一个Django应用程序
首先你要确保你机器上面安装了python:Python开发_python的安装 python的相关学习资料:http://www.cnblogs.com/hongten/tag/python/ 其次, ...
- 使用Seam Framework + JBoss 5.0 开发第一个Web应用 - 简单投票程序
Seam这个单词的本意是缝合.连接,因而,Seam的作用即是把Java EE 规范里的JSF 和 EJB技术完美融合在一起,免去了很多胶合代码,并增强了JSF 和 EJB的很多功能.Seam的设计目标 ...
- 第一个Django应用程序_part2
一.数据库配置 此文延续第一个Django应用程序_part1. 打开mystic/settings.py.这是一个普通的Python模块,其模块变量表示Django配置 默认情况下,配置使用SQLi ...
- Django+小程序技术打造微信小程序助手 ✌✌
Django+小程序技术打造微信小程序助手 (一个人学习或许会很枯燥,但是寻找更多志同道合的朋友一起,学习将会变得更加有意义✌✌) 从零到一的完整项目开发实战过程,项目开发聚焦重要知识点,先原理后实战 ...
- 将 Django 应用程序部署到生产服务器
原文出自: http://www.ibm.com/developerworks/cn/opensource/os-django/ 比较有启发性质的一篇文章,会避免很多弯路 Django 是一个基于 P ...
随机推荐
- SQL Server常用函数及命令
1.字符串函数 --ascii函数,返回字符串最左侧字符的ascii码值 SELECT ASCII('a') AS asciistr --ascii代码转换函数,返回指定ascii值对应的字符 SEL ...
- Scrum 冲刺 第六篇
Scrum 冲刺 第六篇 每日会议照片 昨天已完成工作 队员 昨日完成任务 黄梓浩 完成app项目架构搭建 黄清山 完成部分个人界面模块数据库的接口 邓富荣 完成登录注册接口 钟俊豪 完成部分博客圈模 ...
- STL—— 容器(vector)的数据插入之 insert()
vector 容器可以使用 vectorName.insert() 方法插入元素,vectorName.insert() 函数一共有4种重载方法: 第一种 insert() 用法:在指定地址插入单个元 ...
- 零基础学习python 你该怎么做
本人文科生,回顾自己近 2 年的Python 自学经历,有一些学习心得和避坑经验分享给大家,让大家在学习 Python 的过程中少走一些弯路!减少遇到不必要的学习困难! 首先,最开始最大的困难应该就是 ...
- Vagrant批量安装CentOS7
环境准备 下载virtualbox https://download.virtualbox.org/virtualbox/6.1.10/VirtualBox-6.1.10-138449-Win.exe ...
- 系统类 System类
System类代表系统,系统级的很多属性和控制方法都放置在该类的内部.该类位于java.lang包. 由于该类的构造方法是private的,所以无法创建该类的对象,也就是无法实例化该类.其内部的成员变 ...
- Redis安装教程及安装报错解决方案(大佬勿喷)
安装环境:CentOS7 Redis版本:redis-6.0.9.tar.gz 依次按照以下顺序执行: 1. [root@localhost ~]# wget https://download.red ...
- css 17-CSS3的常见边框汇总
17-CSS3的常见边框汇总 #CSS3 常见边框汇总 <!DOCTYPE html> <html lang="en"> <head> < ...
- Vue3 使用 svg-sprite-loader 实现 svg 图标按需加载
前面文章有讲到 svg 图标按需加载的优势以及 Vue 如何使用 vue-svg-icon 实现 svg 图标按需载入: https://www.cnblogs.com/Leophen/p/13201 ...
- 【JAVA并发第二篇】Java线程的创建与运行,线程状态与常用方法
1.线程的创建与运行 (1).继承或直接使用Thread类 继承Thread类创建线程: /** * 主类 */ public class ThreadTest { public static voi ...