EXT4.2--Ext Designer 使用
前言:
“画EXT”是一个美好的想法,如果有一款可视化工具能够只需进行拖拽而设计EXT,生成代码--那真是一件美丽的事。然而现实是,即使是为Eclipse装上EXT插件,用上idea,手写代码的提示也只是聊以安慰而已。Ext Designer是官方出的一款可视化设计EXT的工具,用来通过鼠标拖拽设计EXT,虽然设计滞后明显,但闲时倒腾几番对于EXT的理解和学习也是有帮助的。
下面笔者将演示2个示例来说明该工具的基本用法。
其中涉及到重要点包括:运用Ext Designer 创建项目,导出js源码,设计中重要步骤。最后以idea工具在项目中显示。
示例一:

Ext Designer 设计图
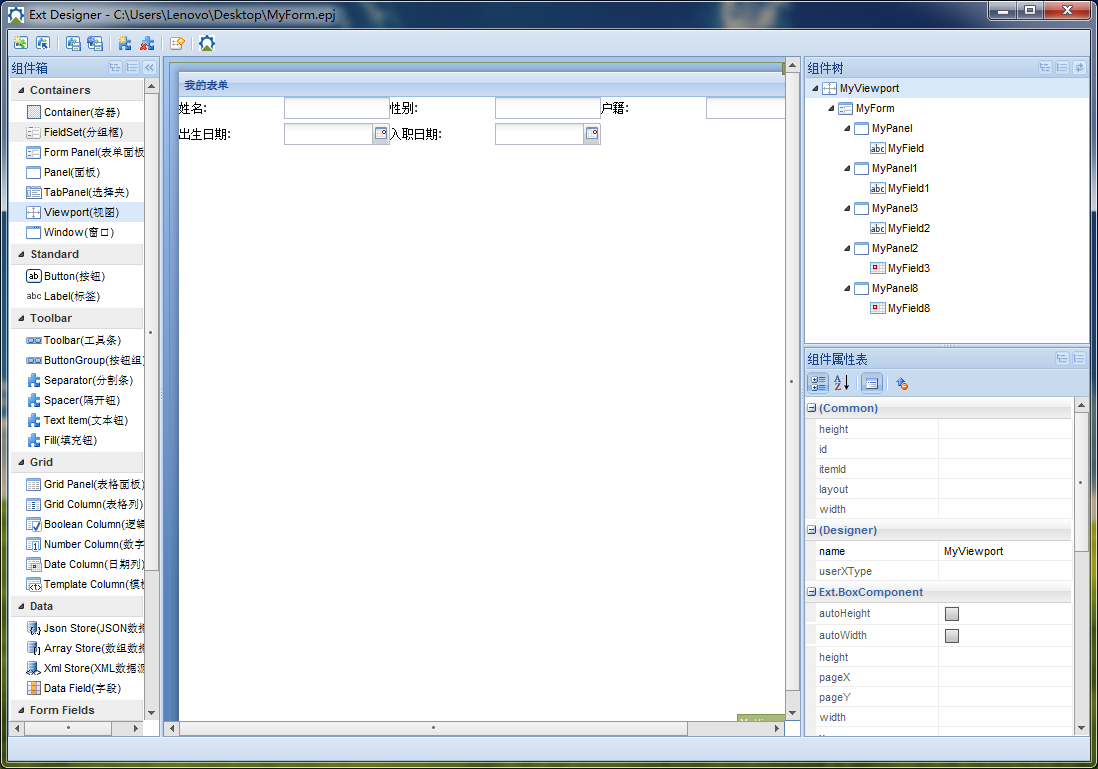
设计中重要点:
布局:Form Panel 的布局为column (MyForm);Panel的布局为form(MyPanel). 布局决定了组件如何显示,因此十分重要。
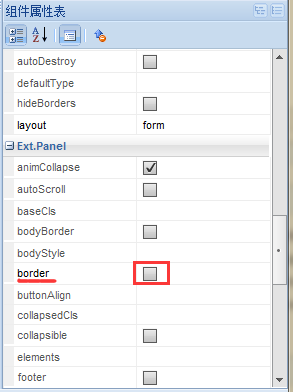
border:MyForm下面的第一级子组件为Panel,它的默认border是显示的--虽然你第一次看到下面的border属性会疑惑我没有勾选怎么还有显示?--没关系,你再点一次就发现没有了。
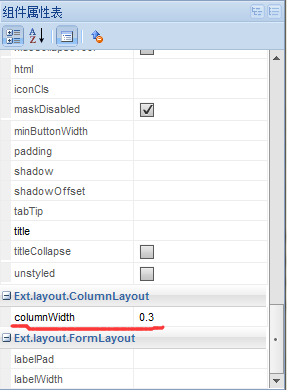
columnWidth:既然布局为column,那么子组件有一个属性--columnWidth是必备配置项,如下:
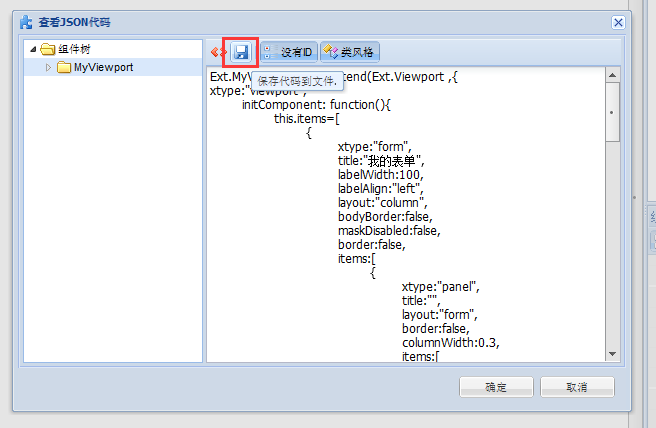
生成/导出代码:
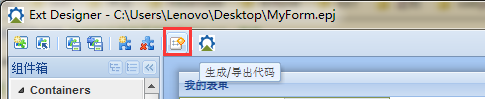
保存到指定目录,便导出了js代码
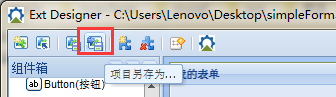
保存项目:
设计完成,如下所示保存项目到指定目录下次可直接打开。
这里是原始代码:
Ext.MyViewport=Ext.extend(Ext.Viewport ,{

xtype:"viewport",

    initComponent: function(){

        this.items=[

            {

                xtype:"form",

                title:"我的表单",

                labelWidth:100,

                labelAlign:"left",

                layout:"column",

                bodyBorder:false,

                maskDisabled:false,

                border:false,

                items:[

                    {

                        xtype:"panel",

                        title:"",

                        layout:"form",

                        border:false,

                        columnWidth:0.3,

                        items:[

                            {

                                xtype:"textfield",

                                fieldLabel:"姓名",

                                anchor:"100%"

                            }

                        ]

                    },

                    {

                        xtype:"panel",

                        title:"",

                        layout:"form",

                        bodyBorder:false,

                        animCollapse:false,

                        border:false,

                        columnWidth:0.3,

                        items:[

                            {

                                xtype:"textfield",

                                fieldLabel:"性别",

                                anchor:"100%"

                            }

                        ]

                    },

                    {

                        xtype:"panel",

                        title:"",

                        layout:"form",

                        border:false,

                        columnWidth:0.3,

                        items:[

                            {

                                xtype:"textfield",

                                fieldLabel:"户籍",

                                anchor:"100%"

                            }

                        ]

                    },

                    {

                        xtype:"panel",

                        title:"",

                        layout:"form",

                        border:false,

                        columnWidth:0.3,

                        items:[

                            {

                                xtype:"datefield",

                                fieldLabel:"出生日期",

                                anchor:"100%"

                            }

                        ]

                    },

                    {

                        xtype:"panel",

                        title:"",

                        layout:"form",

                        border:false,

                        columnWidth:0.3,

                        items:[

                            {

                                xtype:"datefield",

                                fieldLabel:"入职日期",

                                anchor:"100%"

                            }

                        ]

                    }

                ]

            }

        ]

        Ext.MyViewport.superclass.initComponent.call(this);

    }

})
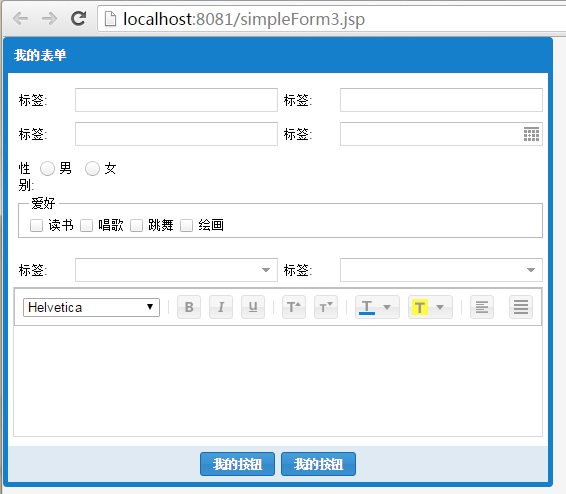
现在用idea来显示吧
如下所示:(注:因为是Viewport,所以无需以renderTo配置项渲染页面指定的dom,只需var port = new Ext.MyViewport(); 即可显示。)
<%--

  Created by IntelliJ IDEA.

  User: Lenovo

  Date: 2016/2/21

  Time: 4:32

  To change this template use File | Settings | File Templates.

--%>

<%@ page contentType="text/html;charset=UTF-8" language="java" %>

<html>

<head>

    <title></title>

  <link rel="stylesheet" type="text/css" href="Extjs4.2/resources/css/ext-all-neptune-rtl.css">

  <script type="text/javascript" src="Extjs4.2/ext-all.js"></script>

  <script type="text/javascript" src="Extjs4.2/locale/ext-lang-zh_CN.js"></script>

  <script type="text/javascript">

      Ext.onReady(function(){

          Ext.MyViewport=Ext.extend(Ext.Viewport ,{

              xtype:"viewport",

              initComponent: function(){

                  this.items=[

                      {

                          xtype:"form",

                          title:"我的表单",

                          labelWidth:100,

                          labelAlign:"left",

                          layout:"column",

                          bodyBorder:false,

                          maskDisabled:false,

                          border:false,

                          items:[

                              {

                                  xtype:"panel",

                                  title:"",

                                  layout:"form",

                                  border:false,

                                  columnWidth:0.3,

                                  items:[

                                      {

                                          xtype:"textfield",

                                          fieldLabel:"姓名",

                                          anchor:"100%"

                                      }

                                  ]

                              },

                              {

                                  xtype:"panel",

                                  title:"",

                                  layout:"form",

                                  bodyBorder:false,

                                  animCollapse:false,

                                  border:false,

                                  columnWidth:0.3,

                                  items:[

                                      {

                                          xtype:"textfield",

                                          fieldLabel:"性别",

                                          anchor:"100%"

                                      }

                                  ]

                              },

                              {

                                  xtype:"panel",

                                  title:"",

                                  layout:"form",

                                  border:false,

                                  columnWidth:0.3,

                                  items:[

                                      {

                                          xtype:"textfield",

                                          fieldLabel:"户籍",

                                          anchor:"100%"

                                      }

                                  ]

                              },

                              {

                                  xtype:"panel",

                                  title:"",

                                  layout:"form",

                                  border:false,

                                  columnWidth:0.3,

                                  items:[

                                      {

                                          xtype:"datefield",

                                          fieldLabel:"出生日期",

                                          anchor:"100%"

                                      }

                                  ]

                              },

                              {

                                  xtype:"panel",

                                  title:"",

                                  layout:"form",

                                  border:false,

                                  columnWidth:0.3,

                                  items:[

                                      {

                                          xtype:"datefield",

                                          fieldLabel:"入职日期",

                                          anchor:"100%"

                                      }

                                  ]

                              }

                          ]

                      }

                  ]

                  Ext.MyViewport.superclass.initComponent.call(this);

              }

          })

          var port = new Ext.MyViewport();

     })

  </script>

</head>

<body>

<div id="mydiv"></div>

</body>

</html>
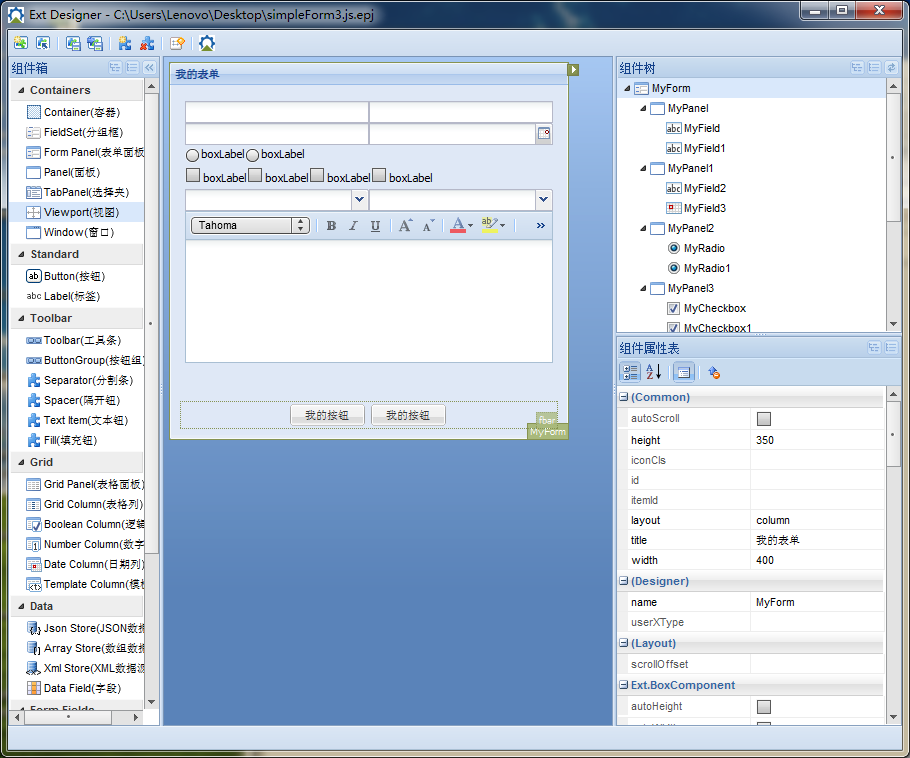
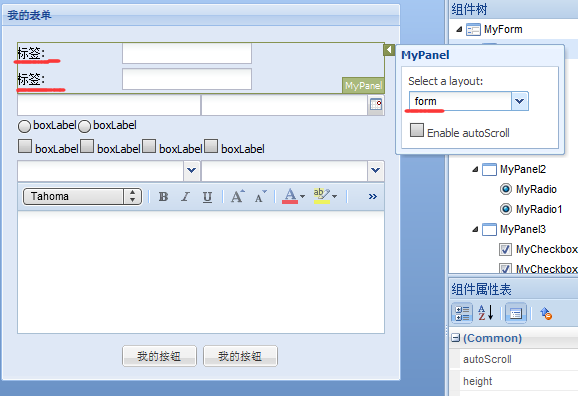
示例二:
Ext Designer 设计图
说明:
1.隐藏的fieldLabel
在“我的表单”中的textfield、radio、checkbox、combobox其实都有fieldLabel这个配置项,默认为:标签: ,但很奇怪上面的视图却没有任何文字--这便是笔者发现Ext Designer的第一个bug。
看到这里,亲爱的朋友你可能会问--示例1也是这样吗?答:不是。因为经笔者测试发现,如果将父组件的布局设定为form布局即会显示fieldLabel,如下:
2.buttonAlign:经笔者测试formPanel的此配置项在设计视图中如果设定为right无法看到正确显示(在项目中正常显示),left、center显示正常。如下:
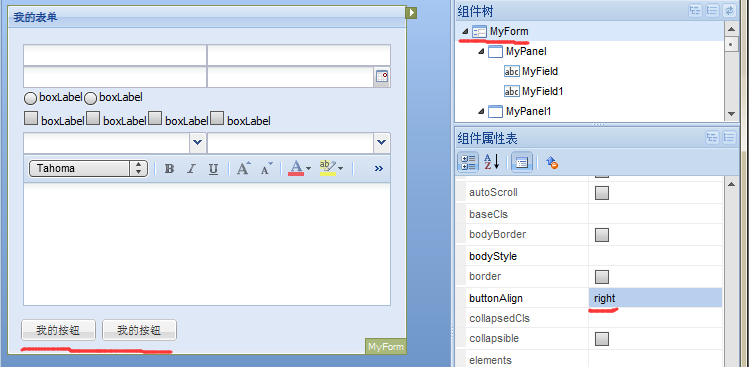
重要点:
frame:formPanel的这个配置项决定了它的button是否在框架视图内显示。记得勾选此项,否则上图中的2个“我的按钮”将不在formPanel中显示。
原始代码:
Ext.MyForm=Ext.extend(Ext.form.FormPanel ,{

    xtype:"form",

    title:"我的表单",

    labelWidth:100,

    labelAlign:"left",

    layout:"column",

    width:400,

    height:350,

    padding:"10px",

    frame:true,

    style:";bodyPadding:10px;",

    bodyStyle:"",

    buttonAlign:"right",

    initComponent: function(){

        this.fbar=[

            {

                text:"我的按钮"

            },

            {

                text:"我的按钮"

            }

        ]

        this.items=[

            {

                xtype:"panel",

                title:"",

                border:false,

                columnWidth:1,

                layout:"column",

                items:[

                    {

                        xtype:"textfield",

                        fieldLabel:"标签",

                        columnWidth:0.5

                    },

                    {

                        xtype:"textfield",

                        fieldLabel:"标签",

                        columnWidth:0.5

                    }

                ]

            },

            {

                xtype:"panel",

                title:"",

                columnWidth:1,

                border:false,

                layout:"column",

                items:[

                    {

                        xtype:"textfield",

                        fieldLabel:"标签",

                        columnWidth:0.5

                    },

                    {

                        xtype:"datefield",

                        fieldLabel:"标签",

                        columnWidth:0.5

                    }

                ]

            },

            {

                xtype:"panel",

                title:"",

                border:false,

                layout:"column",

                columnWidth:1,

                items:[

                    {

                        xtype:"radio",

                        fieldLabel:"标签",

                        boxLabel:"boxLabel",

                        validationEvent:"0.5",

                        columnWidth:""

                    },

                    {

                        xtype:"radio",

                        fieldLabel:"标签",

                        boxLabel:"boxLabel"

                    }

                ]

            },

            {

                xtype:"panel",

                title:"",

                layout:"column",

                border:false,

                columnWidth:1,

                items:[

                    {

                        xtype:"checkbox",

                        fieldLabel:"标签",

                        boxLabel:"boxLabel"

                    },

                    {

                        xtype:"checkbox",

                        fieldLabel:"标签",

                        boxLabel:"boxLabel"

                    },

                    {

                        xtype:"checkbox",

                        fieldLabel:"标签",

                        boxLabel:"boxLabel"

                    },

                    {

                        xtype:"checkbox",

                        fieldLabel:"标签",

                        boxLabel:"boxLabel"

                    }

                ]

            },

            {

                xtype:"panel",

                title:"",

                layout:"column",

                columnWidth:1,

                items:[

                    {

                        xtype:"combo",

                        triggerAction:"all",

                        fieldLabel:"标签",

                        columnWidth:0.5

                    },

                    {

                        xtype:"combo",

                        triggerAction:"all",

                        fieldLabel:"标签",

                        columnWidth:0.5

                    }

                ]

            },

            {

                xtype:"htmleditor",

                anchor:"100%",

                fieldLabel:"标签",

                height:150,

                width:300,

                columnWidth:1

            }

        ]

        Ext.MyForm.superclass.initComponent.call(this);

    }

})
现在用idea来显示吧
如下所示:
<%--

  Created by IntelliJ IDEA.

  User: Lenovo

  Date: 2016/2/21

  Time: 6:23

  To change this template use File | Settings | File Templates.

--%>

<%@ page contentType="text/html;charset=UTF-8" language="java" %>

<html>

<head>

    <title></title>

  <link rel="stylesheet" type="text/css" href="Extjs4.2/resources/css/ext-all-neptune-rtl.css">

  <script type="text/javascript" src="Extjs4.2/ext-all.js"></script>

  <script type="text/javascript" src="Extjs4.2/locale/ext-lang-zh_CN.js"></script>

  <script type="text/javascript">

    Ext.onReady(function(){

      var states = Ext.create('Ext.data.Store', {

        fields: ['abbr', 'name'],

        data : [

          {"abbr":"AL", "name":"Alabama"},

          {"abbr":"AK", "name":"Alaska"},

          {"abbr":"AZ", "name":"Arizona"}

        ]

      });

      Ext.MyForm=Ext.extend(Ext.form.FormPanel ,{

        xtype:"form",

        title:"我的表单",

        labelWidth:100,

        labelAlign:"left",

        layout:"column",

        width:550,

        height:450,

//        padding:"10px",

        bodyPadding :'5px',

        frame:true,

        buttonAlign:'center',

        defaults:{

          style:'margin-top:10px;',//子组件距离顶部间距

        },

        fieldDefaults:{

          labelAlign:'left',

          labelStyle:'margin-left:5px',//label距离左边间距

          labelWidth:'30%'//注意:此选项设定后radio布局混乱--暂不知道radio应该怎样布局

        },

        renderTo:'mydiv',

        initComponent: function(){

          this.fbar=[

            {

              text:"我的按钮"

            },

            {

              text:"我的按钮"

            }

          ]

          this.items=[

            {

              xtype:"panel",

              title:"",

              border:false,

              columnWidth:1,

              layout:"column",

              items:[

                {

                  xtype:"textfield",

                  fieldLabel:"标签",

                  columnWidth:0.5

                },

                {

                  xtype:"textfield",

                  fieldLabel:"标签",

                  columnWidth:0.5

                }

              ]

            },

            {

              xtype:"panel",

              title:"",

              columnWidth:1,

              border:false,

              layout:"column",

              items:[

                {

                  xtype:"textfield",

                  fieldLabel:"标签",

                  columnWidth:0.5

                },

                {

                  xtype:"datefield",

                  fieldLabel:"标签",

                  columnWidth:0.5

                }

              ]

            },

            {

              xtype:"panel",//暂不知如何正常布局(像上面的textfield那样)

              title:"",

              border:false,

              layout:"column",

              columnWidth:1,

              items:[

                {

                  xtype:"radio",

                  fieldLabel:"性别",

                  boxLabel:"男",

                  validationEvent:"0.5",

                  columnWidth:""

                },

                {

                  xtype:"radio",

//                  fieldLabel:"",

                  boxLabel:"女"

                }

              ]

            },

            /*{//若将下面的fieldset组件放在这里的items中则fledlset右边框看不到了。原因暂时未知。

              xtype:"container",//panel

              title:"",

              layout:"form",//column

              border:false,

              columnWidth:1,

              items:[

              ]

            },*/

            {

              xtype:'fieldset',//暂不知如何正常布局,故采用fieldset

                  columnWidth:1,

              layout:'column',

              chechboxToggle:true,

              title:'爱好',

              defaultType:'checkbox',

              style:'margin-left:5px;margin-left:5px;',

              items:[

                {

                  xtype:"checkbox",

//                  fieldLabel:"爱好:",

                  boxLabel:"读书",

                  columnWidth:0.1

                },

                {

                  xtype:"checkbox",

//                  fieldLabel:"",

                  boxLabel:"唱歌",

                  columnWidth:0.1

                },

                {

                  xtype:"checkbox",

//                  fieldLabel:"",

                  boxLabel:"跳舞",

                  columnWidth:0.1

                },

                {

                  xtype:"checkbox",

                  fieldLabel:"",

                  boxLabel:"绘画",

                  columnWidth:0.1

                }

              ]

            },

            {

              xtype:"panel",

              title:"",

              layout:"column",

              columnWidth:1,

              border:false,

              items:[

                {

                  xtype:"combobox",

                  triggerAction:"all",

                  fieldLabel:"标签",

                  columnWidth:0.5,

                  store: states,

                  displayField: 'name',

                  valueField: 'abbr'

                },

                {

                  xtype:"combobox",

                  triggerAction:"all",

                  fieldLabel:"标签",

                  columnWidth:0.5,

                  store: states,

                  displayField: 'name',

                  valueField: 'abbr'

                }

              ]

            },

            {

              xtype:"htmleditor",

              anchor:"100%",

//              fieldLabel:"标签",

              height:150,

              width:300,

              style:'margin-top:5px',

              columnWidth:1

            }

          ]

          Ext.MyForm.superclass.initComponent.call(this);

        }

      })

      var form = new Ext.MyForm();

    })

  </script>

</head>

<body>

<div id="mydiv"></div>

</body>

</html>
后记:Ext Designer 其他更多功能待续。。如果你看到这里,也对EXT感兴趣就联系我吧以前探讨吧(qq: 472543236)
EXT4.2--Ext Designer 使用的更多相关文章
- Ext Designer生成表格
1.生成表格代码 Ext.MyPanel=Ext.extend(Ext.Panel ,{ xtype:"panel", title:"我的面板", width: ...
- 【转载】《Ext JS 4 First Look》翻译之一:新特性
免责声明: 本文转自网络文章,转载此文章仅为个人收藏,分享知识,如有侵权,请联系博主进行删除. 原文作者:^_^肥仔John 原文地址:http://www.cnblogs. ...
- Ext JS学习第九天 Ext基础之 扩展原生的javascript对象
此文来记录学习笔记: •Ext对于原生的javascript对象进行了一系列的扩展,我们把他们掌握好,更能深刻的体会Ext的架构,从而对我们的web开发更好的服务, 源码位置,我们可以从开发包的这个位 ...
- ExtJS学习-----------Ext.Object,ExtJS对javascript中的Object的扩展
关于ExtJS对javascript中的Object的扩展.能够參考其帮助文档,文档下载地址:http://download.csdn.net/detail/z1137730824/7748893 以 ...
- Android开发工具类
7种无须编程的DIY开发工具 你知道几个? 现如今,各种DIY开发工具不断的出现,使得企业和个人在短短几分钟内就能完成应用的创建和发布,大大节省了在时间和资金上的投入.此外,DIY工 具的出现,也帮助 ...
- Linux LVM硬盘管理之二:创建逻辑卷步骤
创建逻辑卷(LV)的顺序:Linux分区---物理卷(PV)---卷组(VG)---逻辑卷(LV)---挂载到文件系统 删除逻辑卷(LV)的顺序:卸载文件系统----逻辑卷(LV)---卷组(VG)- ...
- SenchaTouch介绍和Sencha Architect介绍以及安装
一.SenchaTouch介绍 Sencha Touch框架是世界上第一个基于HTML 5的Mobile App框架. 在Sencha Touch这个名词中,包括了两个组成部分,其中Sencha的前身 ...
- .Net 学习
.Net 的微型Web框架Nancy ORM工具 Simple Data Ojbective-C 与 swift Xamarin for VisualStudio jQuery 1. 绝对的万金油,核 ...
- Web开发必备资源汇总[转]
导读:原文来自< Best “must know” open sources to build the new Web>,译文由酷壳网陈皓整理编译< 开源中最好的Web开发的资源 & ...
随机推荐
- 使用SSIS创建同步数据库数据任务
国外相关的文章:http://blog.dxuf.com/sql-tutorial/use-ssis-to-create-the-synchronization-database-data-task. ...
- JQuery 动态添加onclick事件
$('#div_id').click(function(){ show(1,2,this); });
- C# JSON 序列化和反序列化——JavaScriptSerializer实现
一. JavaScriptSerializer 类由异步通信层内部使用,用于序列化和反序列化在浏览器和 Web 服务器之间传递的数据.您无法访问序列化程序的此实例.但是,此类公开了公共 API.因此, ...
- jquery动态移除/增加onclick属性详解
本文章给大家介绍利用jquery的removeAttr与attr事件来给a标签增加与删除onclick事件的具体操作方法,有需要了解的朋友可参考. 要实现效果:点击链接先去掉onclick属性,3秒 ...
- C# 关于委托和事件的妙文
C# 关于委托和事件的妙文: 通过一个例子详细介绍委托和事件的作用:Observer模式简介 转自:http://blog.csdn.net/susan19890313/article/details ...
- zedboard U盘挂载+交叉编译helloworld
交叉编译环境见http://blog.csdn.net/xiabodan/article/details/22717175 1:编写hello.c文件 #include<stdio.h> ...
- sql简易的MRP资源分析
写了个简易的MRP根据传进来的数据,进行上下级的判断,父表,子表 构思: 3张变量表,第一张用来存传进来的成品,这边对表做了循环就是成品是一样一样进去的,取成品表的第一行,将数据做父表和子表关联,取出 ...
- iOS人机界面指南(翻译)
本文源自于苹果开发者网站的文章iOS Human Interface Guidelines,内容比较多,此处仅仅是部分笔记.
- Java HttpURLConnection 抓取网页内容 解析gzip格式输入流数据并转换为String格式字符串
最近GFW为了刷存在感,搞得大家是头晕眼花,修改hosts 几乎成了每日必备工作. 索性写了一个小程序,给办公室的同事们分享,其中有个内容 就是抓取网络上的hosts,废了一些周折. 我是在一个博客上 ...
- uniform 中checkbox通过jquery 选中
你是否曾经为不能修改多选框.单选框.文件选择框的样式而郁闷呢,是否想过控制它们的样式且兼容所有浏览器呢?我现在给你推荐的这个jQuery表单美化插件Uniform就可以解决这些问题. Uniform可 ...