Gitlab_ansible_jenkins三剑客①搭建gitlab的详细步骤
环境准备
1.关闭selinux和防火墙
[root@node1 lesson2]# vim /etc/sysconfig/selinux
SELINUX=disabled
# systemctl stop firewalld
# systemctl disable firewalld
# 安装依赖包
yum -y install curl policycoreutils openssh-server openssh-clients postfix
# 获取gitlab的yum源安装脚本并执行
curl -sS https://packages.gitlab.com/install/repositories/gitlab/gitlab-ce/script.rpm.sh | sudo bash
# 因为有代理,需要设置
export http_proxy=http://10.11.0.148:808
export https_proxy=http://10.11.0.148:808
export ftp_proxy=http://10.11.0.148:808
# 启动邮件服务
systemctl enable postfix && systemctl start postfix
# 安装gitlab-ce 版
yum install gitlab-ce -y
Is this ok [y/N]: y
Running transaction check
Running transaction test
Transaction test succeeded
Running transaction
Updating : audit-libs-2.8.4-4.el7.x86_64 1/12
Installing : audit-libs-python-2.8.4-4.el7.x86_64 2/12
Installing : setools-libs-3.3.8-4.el7.x86_64 3/12
Installing : python-IPy-0.75-6.el7.noarch 4/12
Installing : libsemanage-python-2.5-14.el7.x86_64 5/12
Installing : checkpolicy-2.5-8.el7.x86_64 6/12
Installing : libcgroup-0.41-20.el7.x86_64 7/12
Installing : policycoreutils-python-2.5-29.el7_6.1.x86_64 8/12
Installing : gitlab-ce-11.8.1-ce.0.el7.x86_64 9/12
Updating : audit-2.8.4-4.el7.x86_64 10/12
Cleanup : audit-2.8.1-3.el7.x86_64 11/12
Cleanup : audit-libs-2.8.1-3.el7.x86_64 12/12
It looks like GitLab has not been configured yet; skipping the upgrade script.
*. *.
*** ***
***** *****
.****** *******
******** ********
,,,,,,,,,***********,,,,,,,,,
,,,,,,,,,,,*********,,,,,,,,,,,
.,,,,,,,,,,,*******,,,,,,,,,,,,
,,,,,,,,,*****,,,,,,,,,.
,,,,,,,****,,,,,,
.,,,***,,,,
,*,.
_______ __ __ __
/ ____(_) /_/ / ____ _/ /_
/ / __/ / __/ / / __ `/ __ \
/ /_/ / / /_/ /___/ /_/ / /_/ /
\____/_/\__/_____/\__,_/_.___/
Thank you for installing GitLab!
GitLab was unable to detect a valid hostname for your instance.
Please configure a URL for your GitLab instance by setting `external_url`
configuration in /etc/gitlab/gitlab.rb file.
Then, you can start your GitLab instance by running the following command:
sudo gitlab-ctl reconfigure
For a comprehensive list of configuration options please see the Omnibus GitLab readme
https://gitlab.com/gitlab-org/omnibus-gitlab/blob/master/README.md
Verifying : libcgroup-0.41-20.el7.x86_64 1/12
Verifying : checkpolicy-2.5-8.el7.x86_64 2/12
Verifying : policycoreutils-python-2.5-29.el7_6.1.x86_64 3/12
Verifying : audit-libs-2.8.4-4.el7.x86_64 4/12
Verifying : libsemanage-python-2.5-14.el7.x86_64 5/12
Verifying : gitlab-ce-11.8.1-ce.0.el7.x86_64 6/12
Verifying : python-IPy-0.75-6.el7.noarch 7/12
Verifying : setools-libs-3.3.8-4.el7.x86_64 8/12
Verifying : audit-2.8.4-4.el7.x86_64 9/12
Verifying : audit-libs-python-2.8.4-4.el7.x86_64 10/12
Verifying : audit-2.8.1-3.el7.x86_64 11/12
Verifying : audit-libs-2.8.1-3.el7.x86_64 12/12
Installed:
gitlab-ce.x86_64 0:11.8.1-ce.0.el7
Dependency Installed:
audit-libs-python.x86_64 0:2.8.4-4.el7 checkpolicy.x86_64 0:2.5-8.el7 libcgroup.x86_64 0:0.41-20.el7 libsemanage-python.x86_64 0:2.5-14.el7 policycoreutils-python.x86_64 0:2.5-29.el7_6.1 python-IPy.noarch 0:0.75-6.el7 setools-libs.x86_64 0:3.3.8-4.el7
Dependency Updated:
audit.x86_64 0:2.8.4-4.el7 audit-libs.x86_64 0:2.8.4-4.el7
Complete!
# 配置gitlab本地证书,并加载证书
a. 创建私钥
[root@node1 ~]# mkdir -p /etc/gitlab/ssl
[root@node1 ~]# openssl genrsa -out "/etc/gitlab/ssl/gitlab.example.com.key" 2048
Generating RSA private key, 2048 bit long modulus
.......................................................................................................................+++
......................................................+++
e is 65537 (0x10001)
b. 使用私钥创建 csr 证书
[root@node1 ~]# openssl req -new -key "/etc/gitlab/ssl/gitlab.example.com.key" -out "/etc/gitlab/ssl/gitlab.example.com.csr"
You are about to be asked to enter information that will be incorporated
into your certificate request.
What you are about to enter is what is called a Distinguished Name or a DN.
There are quite a few fields but you can leave some blank
For some fields there will be a default value,
If you enter '.', the field will be left blank.
-----
Country Name (2 letter code) [XX]:cn
State or Province Name (full name) []:sz
Locality Name (eg, city) [Default City]:sz
Organization Name (eg, company) [Default Company Ltd]:
Organizational Unit Name (eg, section) []:
Common Name (eg, your name or your server's hostname) []:gitlab.example.com
Email Address []:admin@example.gitlab.com
Please enter the following 'extra' attributes
to be sent with your certificate request
A challenge password []:123456
An optional company name []:
[root@node1 ~]# cd /etc/gitlab/ssl/
[root@node1 ssl]# ll
total 8
-rw-r--r-- 1 root root 1086 Mar 11 20:46 gitlab.example.com.csr
-rw-r--r-- 1 root root 1679 Mar 11 20:45 gitlab.example.com.key
c.签署crt证书
[root@node1 ssl]# openssl x509 -req -days 365 -in "/etc/gitlab/ssl/gitlab.example.com.csr" -signkey "/etc/gitlab/ssl/gitlab.example.com.key" -out "/etc/gitlab/ssl/gitlab.example.com.crt"
Signature ok
subject=/C=cn/ST=sz/L=sz/O=Default Company Ltd/CN=gitlab.example.com/emailAddress=admin@example.gitlab.com
Getting Private key
# 创建pem证书
# openssl dhparam -out /etc/gitlab/ssl/dhparams.pem 2048
# 修改权限
[root@node1 ssl]# ll
total 16
-rw-r--r-- 1 root root 424 Mar 11 20:53 dhparams.pem
-rw-r--r-- 1 root root 1302 Mar 11 20:50 gitlab.example.com.crt
-rw-r--r-- 1 root root 1086 Mar 11 20:46 gitlab.example.com.csr
-rw-r--r-- 1 root root 1679 Mar 11 20:45 gitlab.example.com.key
[root@node1 ssl]# chmod 600 *
[root@node1 ssl]# ll
total 16
-rw------- 1 root root 424 Mar 11 20:53 dhparams.pem
-rw------- 1 root root 1302 Mar 11 20:50 gitlab.example.com.crt
-rw------- 1 root root 1086 Mar 11 20:46 gitlab.example.com.csr
-rw------- 1 root root 1679 Mar 11 20:45 gitlab.example.com.key
修改配置 vim /etc/gitlab/gitlab.rb
external_url 'http://gitlab.example.com'
改成
external_url 'https://gitlab.example.com'
nginx['redirect_http_to_https'] = false 改为 nginx['redirect_http_to_https'] = true
nginx['ssl_certificate'] = "/etc/gitlab/ssl/#{node['fqdn']}.crt" 改为 nginx['ssl_certificate'] = "/etc/gitlab/ssl/gitlab.example.com.crt"
nginx['ssl_certificate_key'] = "/etc/gitlab/ssl/#{node['fqdn']}.key" 改为 nginx['ssl_certificate_key'] = "/etc/gitlab/ssl/gitlab.example.com.key"
# nginx['ssl_dhparam'] = nil 改为 # nginx['ssl_dhparam'] = /etc/gitlab/ssl/dhparams.pem
#####初始化 gitlab 配置
gitlab-ctl reconfigure
# nginx配置
# vim /var/opt/gitlab/nginx/conf/gitlab-http.conf
server {
listen *:80;
server_name gitlab.example.com;
// 新增该行配置
rewrite ^(.*)$ https://$host$1 permanent;
server_tokens off; ## Don't show the nginx version number, a security best practice
location / {
return 301 https://gitlab.example.com:443$request_uri;
}
access_log /var/log/gitlab/nginx/gitlab_access.log gitlab_access;
error_log /var/log/gitlab/nginx/gitlab_error.log;
}
# 重新启动,加载nginx 配置
[root@node1 lesson2]# gitlab-ctl restart
本地电脑新增hosts记录,用于访问我们自己搭建的gitlab服务
10.11.0.210 gitlab.example.com
访问浏览器:gitlab.example.com
root 修改密码为 admin888
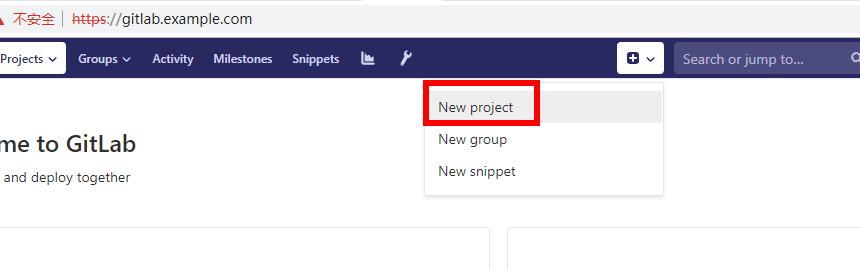
简单使用gitlab
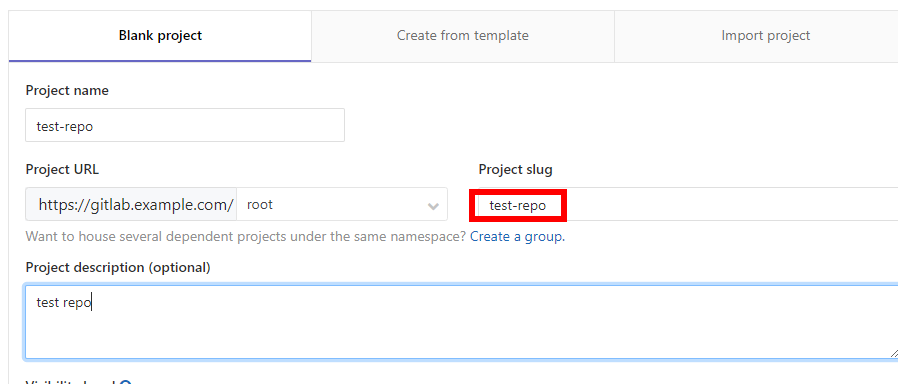
创建一个test-repo仓库
拷贝仓库地址

简单验证git仓库能否正常工作
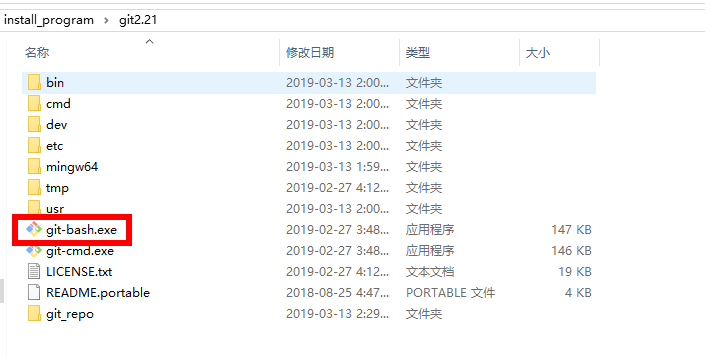
下载安装git windows客户端
下载地址:https://git-scm.com/download/win
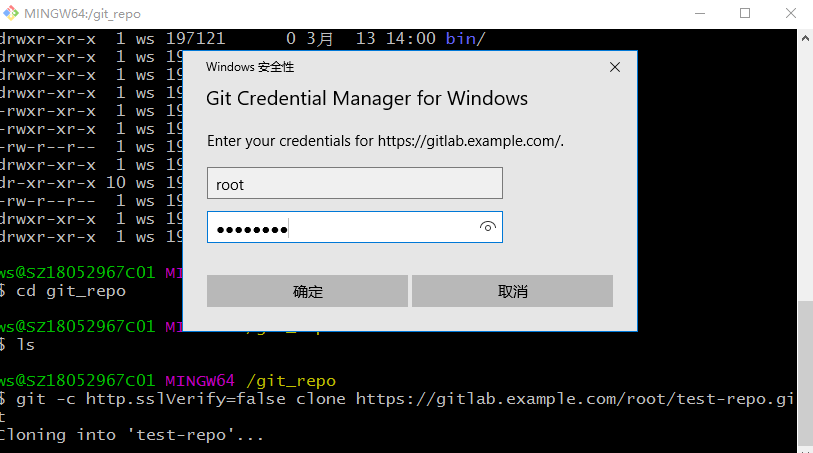
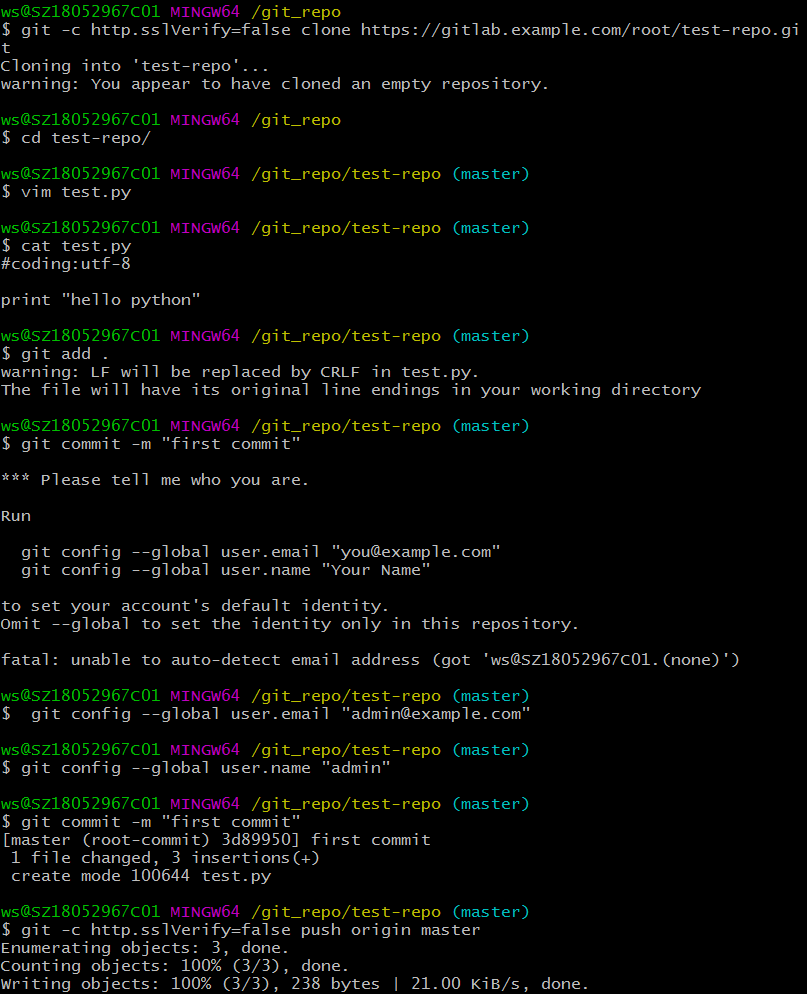
# 克隆 test_repo 仓库
ws@SZ18052967C01 MINGW64 /git_repo
$ git -c http.sslVerify=false clone https://gitlab.example.com/root/test-repo.git
ws@SZ18052967C01 MINGW64 /git_repo
$ git -c http.sslVerify=false clone https://gitlab.example.com/root/test-repo.git
Cloning into 'test-repo'...
warning: You appear to have cloned an empty repository.
ws@SZ18052967C01 MINGW64 /git_repo
$ cd test-repo/
ws@SZ18052967C01 MINGW64 /git_repo/test-repo (master)
$ vim test.py
ws@SZ18052967C01 MINGW64 /git_repo/test-repo (master)
$ cat test.py
#coding:utf-8
print "hello python"
ws@SZ18052967C01 MINGW64 /git_repo/test-repo (master)
$ git add .
warning: LF will be replaced by CRLF in test.py.
The file will have its original line endings in your working directory
ws@SZ18052967C01 MINGW64 /git_repo/test-repo (master)
$ git commit -m "first commit"
*** Please tell me who you are.
Run
git config --global user.email "you@example.com"
git config --global user.name "Your Name"
to set your account's default identity.
Omit --global to set the identity only in this repository.
fatal: unable to auto-detect email address (got 'ws@SZ18052967C01.(none)')
# 初始化windows本地的git配置
ws@SZ18052967C01 MINGW64 /git_repo/test-repo (master)
$ git config --global user.email "admin@example.com"
ws@SZ18052967C01 MINGW64 /git_repo/test-repo (master)
$ git config --global user.name "admin"
ws@SZ18052967C01 MINGW64 /git_repo/test-repo (master)
$ git commit -m "first commit"
[master (root-commit) 3d89950] first commit
1 file changed, 3 insertions(+)
create mode 100644 test.py
#把我们刚才的test.py代码推送到gitlab服务器
ws@SZ18052967C01 MINGW64 /git_repo/test-repo (master)
$ git -c http.sslVerify=false push origin master
Enumerating objects: 3, done.
Counting objects: 100% (3/3), done.
Writing objects: 100% (3/3), 238 bytes | 21.00 KiB/s, done.
Total 3 (delta 0), reused 0 (delta 0)
To https://gitlab.example.com/root/test-repo.git
* [new branch] master -> master
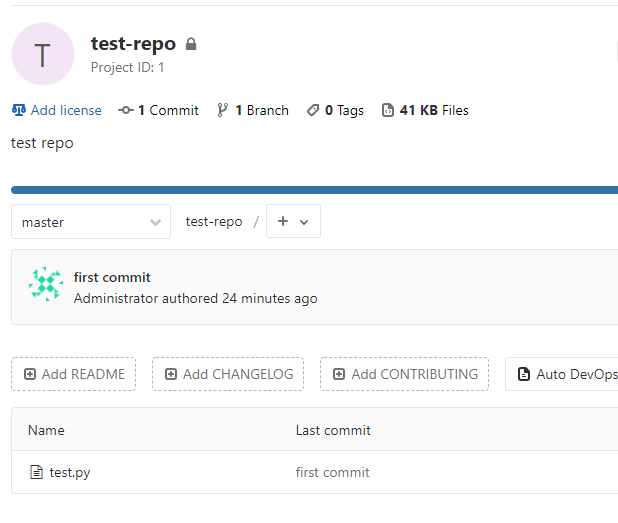
查看git仓库,可以看到代码成功推送
Gitlab_ansible_jenkins三剑客①搭建gitlab的详细步骤的更多相关文章
- 一、linux搭建jenkins+github详细步骤
事情缘由: 现在在做的主要工作是通过jenkins+postman实现api的自动化测试,想要达到的效果是,api自动化测试定时跑脚本的同时,github有新的代码提交,jenkins会自动检测部署新 ...
- linux搭建jenkins+github详细步骤
事情缘由: 现在在做的主要工作是通过jenkins+postman实现api的自动化测试,想要达到的效果是,api自动化测试定时跑脚本的同时,github有新的代码提交,jenkins会自动检测部署新 ...
- CentOS 6.5下搭建LAMP环境详细步骤
1.确认搭建LAMP所需的环境是否已经安装: [root@localhost ~]#rpm -q make gcc gcc-c++ zlib-devel libtool libtool-ltdl li ...
- Linux 下搭建Git 服务器详细步骤
参考: https://www.cnblogs.com/dee0912/p/5815267.html#_label0 https://blog.csdn.net/carfge/article/deta ...
- vue-cli安装以及搭建vue项目详细步骤
vue init webpack projectname(projectname是你项目的名称) 创建项目卡住不动解决方案: https://cli.vuejs.org/zh/guide/instal ...
- yum 搭建lnmp环境详细步骤
1.关闭防火墙[root@CentOS ~]# chkconfig iptables off 2.关闭selinuxvi /etc/sysconfig/selinux//将SELINUX=enforc ...
- 转载 IDEA搭建maven项目详细步骤(解决没有src及其下面的文件)
转载自
- CentOS服务器上搭建Gitlab安装步骤、中文汉化详细步骤、日常管理以及异常故障排查
一, 服务器快速搭建gitlab方法 可以参考gitlab中文社区 的教程centos7安装gitlab:https://www.gitlab.cc/downloads/#centos7centos6 ...
- 用grunt搭建自动化的web前端开发环境实战教程(详细步骤)
用grunt搭建自动化的web前端开发环境实战教程(详细步骤) jQuery在使用grunt,bootstrap在使用grunt,百度UEditor在使用grunt,你没有理由不学.不用!前端自动化, ...
随机推荐
- ios之库Protobuf的使用
https://blog.csdn.net/dangbai01_/article/details/81099001 (1)Protobuf是什么? Protobuf 即 google protocol ...
- MySQL之执行流程
最近开始在学习mysql相关知识,自己根据学到的知识点,根据自己的理解整理分享出来,本篇文章会分析下一个sql语句在mysql中的执行流程,包括sql的查询在mysql内部会怎么流转,sql语句的更新 ...
- git 拉取远程分支到本地
步骤: 1.新建一个空文件,文件名为hhhh 2.初始化 git init 3.自己要与origin master建立连接(下划线为远程仓库链接) git remote add origin git@ ...
- 迁移git
转自:https://www.darrenfang.com/2016/03/transferring-a-repository/ 因为更换服务器,需要将原来的 git 项目迁移到新的服务器上,需要保留 ...
- WebSocket介绍,与Socket的区别
WebSocket介绍与原理 WebSocket protocol 是HTML5一种新的协议.它实现了浏览器与服务器全双工通信(full-duplex).一开始的握手需要借助HTTP请求完成. ——百 ...
- bugku web web3
flag就在这里快来找找吧http://123.206.87.240:8002/web3/ 点进去这个页面可以看到不断地有提示 flag就在这里 来找找吧 那就找一找哇 在source中可以找到一行注 ...
- B-Tree和B+Tree的区别
B+树索引是B+树在数据库中的一种实现,是最常见也是数据库中使用最为频繁的一种索引.B+树中的B代表平衡(balance),而不是二叉(binary),因为B+树是从最早的平衡二叉树演化而来的.在讲B ...
- bzoj 5301: [Cqoi2018]异或序列 (莫队算法)
链接:https://www.lydsy.com/JudgeOnline/problem.php?id=5301 题面; 5301: [Cqoi2018]异或序列 Time Limit: 10 Sec ...
- 转载:原来JavaScript的闭包是这么回事!
相关阅读:https://www.itcodemonkey.com/article/8565.html
- 【dp】摘花生
[题目描述] Hello Kitty想摘点花生送给她喜欢的米老鼠.她来到一片有网格状道路的矩形花生地(如下图),从西北角进去,东南角出来.地里每个道路的交叉点上都有种着一株花生苗,上面有若干颗花生,经 ...