Shiro安全框架的说明及配置入门
Shiro是什么?
Shiro是一个非常强大的,易于使用的,开源的,权限框架。它包括了权限校验,权限授予,会话管理,安全加密等组件
什么时候使用它呢?
如果你是设计RBAC基础系统,需要编写大量用于权限控制的代码时,使用Shiro开源大大减少工作量。
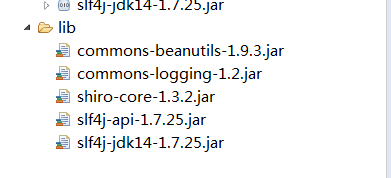
使用到的包:
下载路径:
http://shiro.apache.org/download.html
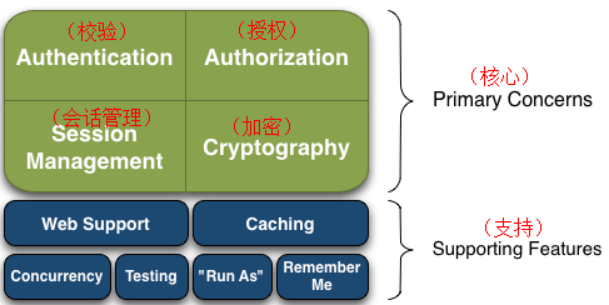
Shiro结构图:
入门配置:
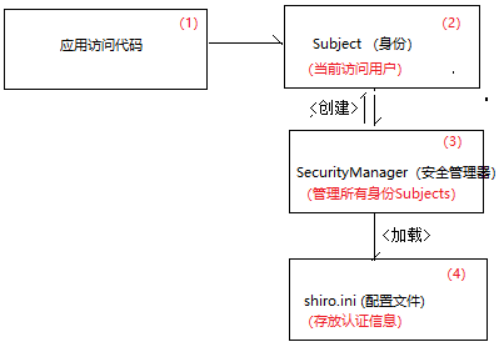
1.配置流程图
配置文件代码:
注意:配置文件的后缀一定要是 .ini
##[users]   #用于配置用户名信息

##   用户名= 密码, 角色1, 角色2, …, 角色N

##[roles]   #用于配置角色信息

##   角色名= 权限1, 权限2, …, 权限N   #全部权限使用 * (星号)

[users]

  admin=123456,role_admin,role_edu

[roles]

  role_admin = user:list,user:create,user:edit,user:delete

  role_edu = edu:list,edu:create
测试代码:
package cn.gzsxt.shiro;

import org.apache.shiro.SecurityUtils;

import org.apache.shiro.authc.AuthenticationException;

import org.apache.shiro.authc.UsernamePasswordToken;

import org.apache.shiro.config.IniSecurityManagerFactory;

import org.apache.shiro.mgt.SecurityManager;

import org.apache.shiro.subject.Subject;

public class ShiroTest {

    public static void main(String[] args) {

        //第一步:创建SecurityManager

        //shiro框架读取配置文件,如果在源码夹下,需要在前缀加上classpath

        IniSecurityManagerFactory imf=new IniSecurityManagerFactory("classpath:shiro.ini");

        SecurityManager securityManager = imf.createInstance();

        //第二步:创建一个身份对象Subject

        SecurityUtils.setSecurityManager(securityManager);

        Subject subject = SecurityUtils.getSubject();

        UsernamePasswordToken token =new UsernamePasswordToken("admin1","123456");

        //第三步:校验参数

        try {

            Subject resultSubject = securityManager.login(subject,token );

//            System.out.println(resultSubject.getPrincipal());

//            boolean hasRole = resultSubject.hasRole("role_admin");

//            System.out.println(hasRole);

            boolean authenticated = resultSubject.isAuthenticated();

            System.out.println(authenticated);

        } catch (AuthenticationException e) {

            // TODO Auto-generated catch block

            e.printStackTrace();

        }

    }

}
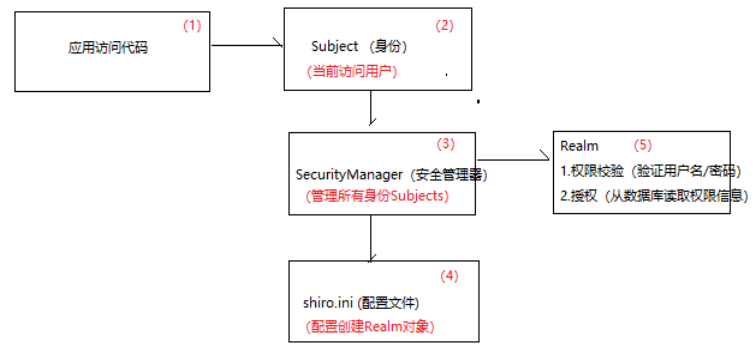
Realm机制的必要性:
Shiro是通过Realm机制,实现将配置用户信息存放在数据库等储存系统中
通过Realm可以从数据库里面获得用户的验证信息
配置文件代码:
[main]

#声明realm对象

myRealm=cn.gzsxt.realm.MyRealm

#指定securityManager的realm对象

securityManager.realms=$myRealm
编写Realm
package cn.gzsxt.realm;

import org.apache.shiro.authc.AuthenticationException;

import org.apache.shiro.authc.AuthenticationInfo;

import org.apache.shiro.authc.AuthenticationToken;

import org.apache.shiro.authc.SimpleAuthenticationInfo;

import org.apache.shiro.authz.AuthorizationInfo;

import org.apache.shiro.realm.AuthorizingRealm;

import org.apache.shiro.subject.PrincipalCollection;

public class MyRealm extends AuthorizingRealm{

    /**

     * 权限校验

     */

    @Override

    protected AuthenticationInfo doGetAuthenticationInfo(AuthenticationToken token) throws AuthenticationException {

        // TODO Auto-generated method stub

        System.out.println("账号名:"+token.getPrincipal());

        if ("admin".equals(token.getPrincipal())) {

            SimpleAuthenticationInfo info = new SimpleAuthenticationInfo(token.getPrincipal(),"123",this.getName());

            return info;

        }

        return null;

    }

    /**

     * 权限授权

     */

    @Override

    protected AuthorizationInfo doGetAuthorizationInfo(PrincipalCollection token) {

        // TODO Auto-generated method stub

        return null;

    }

}
测试代码:
package cn.gzsxt.shiro;

import org.apache.shiro.SecurityUtils;

import org.apache.shiro.authc.AuthenticationToken;

import org.apache.shiro.authc.UsernamePasswordToken;

import org.apache.shiro.config.IniSecurityManagerFactory;

import org.apache.shiro.mgt.SecurityManager;

import org.apache.shiro.subject.Subject;

public class ShiroTest {

    public static void main(String[] args) {

        IniSecurityManagerFactory factory = new IniSecurityManagerFactory("classpath:Shiro.ini");

        SecurityManager securityManager = factory.createInstance();

        SecurityUtils.setSecurityManager(securityManager);

        Subject subject = SecurityUtils.getSubject();

        AuthenticationToken token = new UsernamePasswordToken("admin","123");

        Subject resultSubject = securityManager.login(subject, token );

        boolean authenticated = resultSubject.isAuthenticated();

        System.out.println(authenticated);

    }

}
附:加密
先创建一个Md5帮助类,得到加密后的密码,便于测试
md5帮助类代码:
package cn.gzsxt.utils;

import org.apache.shiro.crypto.hash.SimpleHash;

import org.apache.shiro.util.ByteSource;

public class Md5Util {

    public static void main(String[] args) {

        ByteSource salt = ByteSource.Util.bytes("123");

        SimpleHash sh = new SimpleHash("md5", "123", salt,1);

        String target = sh.toString();

        System.out.println(target);

    }

}
Realm处代码

Shiro安全框架的说明及配置入门的更多相关文章
- Shiro安全框架【快速入门】就这一篇!
Shiro 简介 照例又去官网扒了扒介绍: Apache Shiro™ is a powerful and easy-to-use Java security framework that perfo ...
- Shiro安全框架入门使用方法
详见:https://blog.csdn.net/qq_32651225/article/details/77199464 框架介绍Apache Shiro是一个强大且易用的Java安全框架,执行身份 ...
- shiro安全框架
原文:http://blog.csdn.net/boonya/article/details/8233303 可能大家早先会见过 J-security,这个是 Shiro 的前身.在 2009 年 3 ...
- Shiro 安全框架详解二(概念+权限案例实现)
Shiro 安全框架详解二 总结内容 一.登录认证 二.Shiro 授权 1. 概念 2. 授权流程图 三.基于 ini 的授权认证案例实现 1. 实现原理图 2. 实现代码 2.1 添加 maven ...
- Shiro 安全框架详解一(概念+登录案例实现)
shiro 安全框架详细教程 总结内容 一.RBAC 的概念 二.两种常用的权限管理框架 1. Apache Shiro 2. Spring Security 3. Shiro 和 Spring Se ...
- Shiro 权限框架使用总结
我们首先了解下什么是shiro ,Shiro 是 JAVA 世界中新近出现的权限框架,较之 JAAS 和 Spring Security,Shiro 在保持强大功能的同时,还在简单性和灵活性方面拥有巨 ...
- thymeleaf模板引擎shiro集成框架
shiro权限框架.前端验证jsp设计.间tag它只能用于jsp系列模板引擎. 使用最近项目thymeleaf作为前端模板引擎,采用HTML档,未出台shiro的tag lib,假设你想利用这段时间s ...
- SpringMVC整合Shiro权限框架
尊重原创:http://blog.csdn.net/donggua3694857/article/details/52157313 最近在学习Shiro,首先非常感谢开涛大神的<跟我学Shiro ...
- SpringBoot集成Shiro安全框架
跟着我的步骤:先运行起来再说 Spring集成Shiro的GitHub:https://github.com/yueshutong/shiro-imooc 一:导包 <!-- Shiro安全框架 ...
随机推荐
- python读写excle
我们可以通过python的一些模块进行excle中用例的读取,或者导出数据到excle 目录 1.安装模块 2.读excle 3.写excle 1.安装模块 python中有第三方模块可以进行excl ...
- Redis 基础及各数据类型对应的命令
Redis 命令文档 基本概念 安装及使用 可以在官网下载源码编译安装.对于 CentOS,还可以通过 yum install redis 安装. Redis 安装完成后,通过 redis-serve ...
- canvas绘制加载特效
css样式: body{ text-align: center; } canvas{ background: #ddd; } canvas标签: <canvas id="canvas& ...
- apt-get updete以及apt-get upgrade的区别
You should first run update, then upgrade. Neither of them automatically runs the other. apt-get upd ...
- iframe父页面和子页面高度自适应
父页HTML: <iframe id="mainframe" name="mainframe" style="width:100%;&quo ...
- 微信小程序这一块(中)
1.if语句跟for循环的使用 <block wx:if="{{n==1}}"> <view>1917</view> </block> ...
- OSPF协议——原理及实验
首先命令部分: ospf 1 进入ospf协议 area 0 划定自治区域 因为实验只用了1个区域所以参数就为0 也就是骨干区域 network +网段+反写掩码(0.0.0.255)指定运行OSPF ...
- 爬虫(十一)—— 请求库(三)pypeteer请求库
曾经使用模拟浏览器操作(selenium + webdriver)来写爬虫,但是稍微有点反爬的网站都会对selenium和webdriver进行识别,网站只需要在前端js添加一下判断脚本,很容易就可以 ...
- 转 python 字符串前加r
在打开文件的时候open(r'c:\....') 加r和不加''r是有区别的 'r'是防止字符转义的 如果路径中出现'\t'的话 不加r的话\t就会被转义 而加了'r'之后'\t'就能保留原有的样子 ...
- Codeforces 1148C(思维)
题面 给出一个长度为n的排列a,每次可以交换序列的第i个和第j个元素,当且仅当\(2 \times |i-j| \geq n\),求一种交换方案,让序列从小到大排好序 分析 重点是考虑我们怎么把第x个 ...