戏说 .NET GDI+系列学习教程(二、Graphics类的方法)
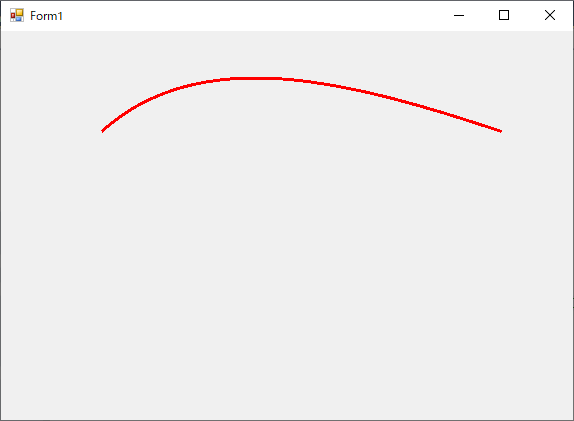
一、DrawBezier 画立体的贝尔塞曲线
        private void frmGraphics_Paint(object sender, PaintEventArgs e)

        {

            Graphics g = this.CreateGraphics();// e.Graphics;

            Pen blackPen = new Pen(Color.Red, );

            //从第一个点到第四个点绘制贝塞尔曲线。 第二个和第三个点是确定曲线的形状的控制点。

            Point start = new Point(, );

            Point control1 = new Point(, );

            Point control2 = new Point(, );

            Point end = new Point(, );

            //画立体的贝尔塞曲线.

            //DrawBezier有多种重载这里就不一一说明了

            g.DrawBezier(blackPen, start, control1, control2, end);

        }
效果图:
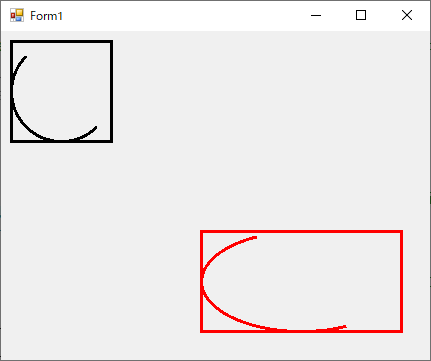
二、DrawArc 画弧
        private void frmGraphics_Paint(object sender, PaintEventArgs e)

        {

            Graphics g = this.CreateGraphics();// e.Graphics;

            Pen p = new Pen(Color.Black, );

            // 定义矩形,用于确定弧线的边界,顾名思义就是在一个定义好的矩形中画画线

            // 现在创建的是一个正方形(正方形画圆,长方形画椭圆)

            Rectangle rect = new Rectangle(, , , );

            // 从 x 轴到弧线的起始点沿顺时针方向度量的角(以度为单位)

            float startAngle = 45.0F;

            // 从 startAngle 参数到弧线的结束点沿顺时针方向度量的角(以度为单位)

            float sweepAngle = 180.0F;

            // 画矩形

            g.DrawRectangle(p, rect);

            // 画弧.

            g.DrawArc(p, rect, startAngle, sweepAngle);

            p = new Pen(Color.Red, );

            // 定义矩形,用于确定弧线的边界,顾名思义就是在一个定义好的矩形中画画线

            // 现在创建的是一个长方形(正方形画圆,长方形画椭圆)

            rect = new Rectangle(, , , );

            // 从 x 轴到弧线的起始点沿顺时针方向度量的角(以度为单位)

            startAngle = 45.0F;

            // 从 startAngle 参数到弧线的结束点沿顺时针方向度量的角(以度为单位)

            sweepAngle = 180.0F;

            // 画矩形

            g.DrawRectangle(p, rect);

            // 画弧.

            g.DrawArc(p, rect, startAngle, sweepAngle);

        }
效果图:
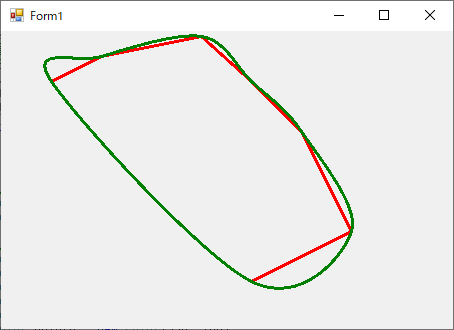
三、DrawClosedCurve 画闭合曲线
         private void frmGraphics_Paint(object sender, PaintEventArgs e)

         {

             Graphics g = this.CreateGraphics();// e.Graphics;

             //DrawClosedCurve 画闭合曲线

             Pen redPen = new Pen(Color.Red, );

             Pen greenPen = new Pen(Color.Green, );

             // 创建七个点来定义一条曲线.

             Point point1 = new Point(, );

             Point point2 = new Point(, );

             Point point3 = new Point(, );

             Point point4 = new Point(, );

             Point point5 = new Point(, );

             Point point6 = new Point(, );

             Point point7 = new Point(, );

             Point[] curvePoints =

                      {

                  point1,

                  point2,

                  point3,

                  point4,

                  point5,

                  point6,

                  point7

              };

             // 画线.

             e.Graphics.DrawLines(redPen, curvePoints);

             // 画闭合曲线

             e.Graphics.DrawClosedCurve(greenPen, curvePoints);

         }
效果图:
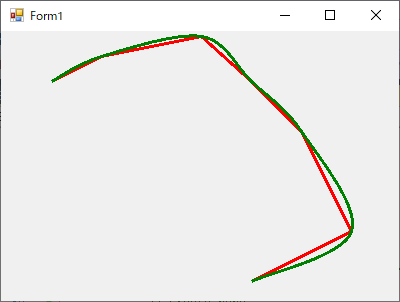
四、DrawCurve 画曲线
         private void frmGraphics_Paint(object sender, PaintEventArgs e)

         {

             Graphics g = this.CreateGraphics();// e.Graphics;

             // Create pens.

             Pen redPen = new Pen(Color.Red, );

             Pen greenPen = new Pen(Color.Green, );

             // Create points that define curve.

             Point point1 = new Point(, );

             Point point2 = new Point(, );

             Point point3 = new Point(, );

             Point point4 = new Point(, );

             Point point5 = new Point(, );

             Point point6 = new Point(, );

             Point point7 = new Point(, );

             Point[] curvePoints = { point1, point2, point3, point4, point5, point6, point7 };

             // Draw lines between original points to screen.

             e.Graphics.DrawLines(redPen, curvePoints);

             // Draw curve to screen.

             e.Graphics.DrawCurve(greenPen, curvePoints);

         }
效果图:
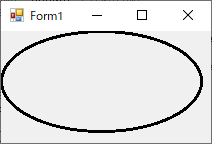
五、DrawEllipse 画椭圆
         private void frmGraphics_Paint(object sender, PaintEventArgs e)

         {

             Graphics g = this.CreateGraphics();// e.Graphics;

             // Create pen.

             Pen blackPen = new Pen(Color.Black, );

             // 创建矩形,定义椭圆边界值

             Rectangle rect = new Rectangle(, , , );

             // 绘制椭圆

             e.Graphics.DrawEllipse(blackPen, rect);

         }
效果图:
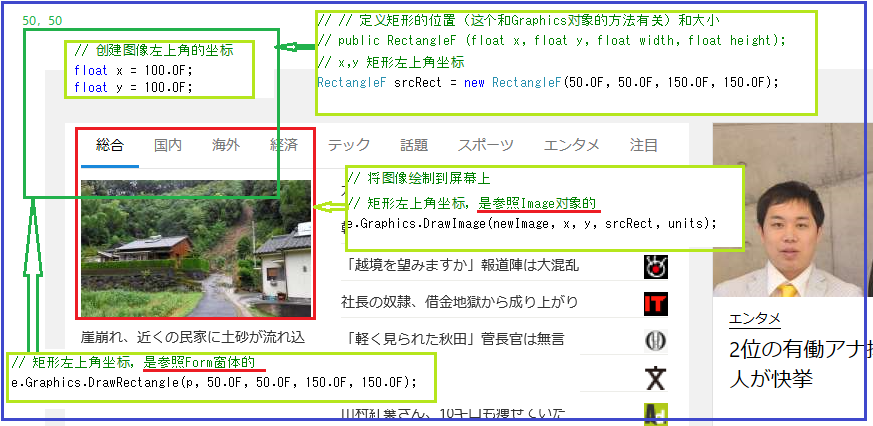
六、DrawImage 画图像
         private void frmGraphics_Paint(object sender, PaintEventArgs e)

         {

             Pen p = new Pen(Color.Red);

             // 创建Image对象

             Image newImage = Image.FromFile(@"E:\Test\Test\GDI_Demo\images\DrawBackgroundImage.png");

             // 创建图像左上角的坐标

             float x = 100.0F;

             float y = 100.0F;

             // 定义矩形的位置(这个和Graphics对象的方法有关)和大小

             // public RectangleF (float x, float y, float width, float height);

             // x,y 矩形左上角坐标

             RectangleF srcRect = new RectangleF(50.0F, 50.0F, 150.0F, 150.0F);

             // 单位:像素

             GraphicsUnit units = GraphicsUnit.Pixel;

             // 矩形左上角坐标,是参照Form窗体的

             e.Graphics.DrawRectangle(p, 50.0F, 50.0F, 150.0F, 150.0F);

             // 将图像绘制到屏幕上

             // 矩形左上角坐标,是参照Image对象的

             e.Graphics.DrawImage(newImage, x, y, srcRect, units);

         }
效果图:
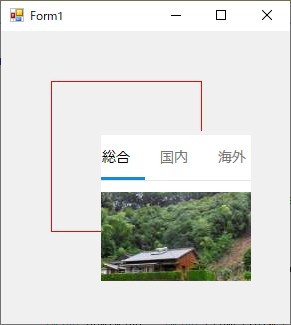
说明:
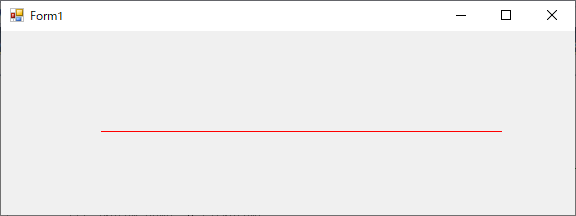
七、DrawLine 画线
         private void frmGraphics_Paint(object sender, PaintEventArgs e)

         {

             Pen p = new Pen(Color.Red);

             //起点坐标

             Point point1 = new Point(, );

             //终点坐标

             Point point2 = new Point(, );

             // 绘制直线

             e.Graphics.DrawLine(p, point1, point2);

         }
效果图:
         private void frmGraphics_Paint(object sender, PaintEventArgs e)

         {

             Pen p = new Pen(Color.Red);

             Point[] points =

              {

                  new Point(,  ),

                  new Point(, ),

                  new Point(,  ),

                  new Point(, )

              };

             //Draw lines to screen.

             e.Graphics.DrawLines(p, points);

         }
效果图:

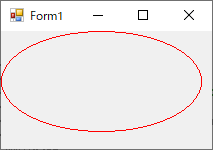
八、DrawPath 通过路径画线和曲线
         private void frmGraphics_Paint(object sender, PaintEventArgs e)

         {

             Pen p = new Pen(Color.Red);

             // 创建图形路径对象,并向它添加一个椭圆

             GraphicsPath graphPath = new GraphicsPath();

             graphPath.AddEllipse(, , , );

             // 绘制图形路径

             e.Graphics.DrawPath(p, graphPath);

         }
效果图:
九、DrawPie 画饼形
         private void frmGraphics_Paint(object sender, PaintEventArgs e)

         {

             Pen p = new Pen(Color.Red);

             // 绘制一个扇形,该形状由一个坐标对、宽度、高度以及两条射线所指定的椭圆定义

             float x = 0.0F;

             float y = 0.0F;

             float width = 200.0F;

             float height = 100.0F;

             // Create start and sweep angles.

             float startAngle = 0.0F;

             float sweepAngle = 90.0F;

             // Draw pie to screen.

             e.Graphics.DrawPie(p, x, y, width, height, startAngle, sweepAngle);

         }
效果图 |
说明图 |
|
|
|

十、DrawPolygon 画多边形
         private void frmGraphics_Paint(object sender, PaintEventArgs e)

         {

             Pen p = new Pen(Color.Red,);

             // Create points that define polygon.

             PointF point1 = new PointF(50.0F, 50.0F);

             PointF point2 = new PointF(100.0F, 25.0F);

             PointF point3 = new PointF(200.0F, 5.0F);

             PointF point4 = new PointF(250.0F, 50.0F);

             PointF point5 = new PointF(300.0F, 100.0F);

             PointF point6 = new PointF(350.0F, 200.0F);

             PointF point7 = new PointF(250.0F, 250.0F);

             PointF[] curvePoints =

                      {

                  point1,

                  point2,

                  point3,

                  point4,

                  point5,

                  point6,

                  point7

              };

             // Draw polygon curve to screen.

             e.Graphics.DrawPolygon(p, curvePoints);

         }
效果图:

十一、DrawRectangle 画矩形
         private void frmGraphics_Paint(object sender, PaintEventArgs e)

         {

             Pen p = new Pen(Color.Red,);

             // Create rectangle.

             Rectangle rect = new Rectangle(, , , );

             // Draw rectangle to screen.

             e.Graphics.DrawRectangle(p, rect);

         }
效果图:

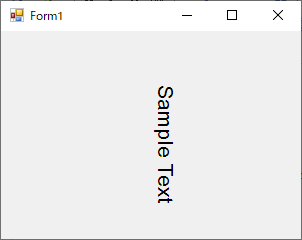
十二、DrawString 绘制文字
         private void frmGraphics_Paint(object sender, PaintEventArgs e)

         {

             // 定义绘制文字

             String drawString = "Sample Text";

             // 定义字体

             Font drawFont = new Font("Arial", );

             // 定义单色画笔,墨要使用刷子(可以理解为毛笔)才能作画

             // 所以刷子就有以下几种

             // SolidBrush               : 单色画笔

             // TextureBrush             : 纹理画笔(使用图像来填充形状的内部)

             // HatchBrush               : 用阴影样式、前景色和背景色定义矩形画笔

             // LinearGradientBrush      : 线性渐变

             // PathGradientBrush        : 通过渐变填充 GraphicsPath 对象

             SolidBrush drawBrush = new SolidBrush(Color.Black);

             // Create point for upper-left corner of drawing.

             float x = 150.0F;

             float y = 50.0F;

             // 绘制文本的格式化特性(如行距和对齐方式)

             StringFormat drawFormat = new StringFormat();

             drawFormat.FormatFlags = StringFormatFlags.DirectionVertical;

             // Draw string to screen.

             e.Graphics.DrawString(drawString, drawFont, drawBrush, x, y, drawFormat);

         }
效果图:
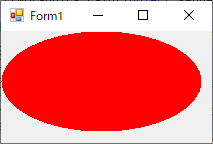
十三、FillEllipse 填充椭圆
         private void frmGraphics_Paint(object sender, PaintEventArgs e)

         {

             // 定义单色画笔,墨要使用刷子(可以理解为毛笔)才能作画

             // 所以刷子就有以下几种

             // SolidBrush               : 单色画笔

             // TextureBrush             : 纹理画笔(使用图像来填充形状的内部)

             // HatchBrush               : 用阴影样式、前景色和背景色定义矩形画笔

             // LinearGradientBrush      : 线性渐变

             // PathGradientBrush        : 通过渐变填充 GraphicsPath 对象

             SolidBrush redBrush = new SolidBrush(Color.Red);

             // Create location and size of ellipse.

             int x = ;

             int y = ;

             int width = ;

             int height = ;

             // 填充边框所定义的椭圆的内部

             e.Graphics.FillEllipse(redBrush, x, y, width, height);

         }
效果图:
十四、FillPath 填充路径
         private void frmGraphics_Paint(object sender, PaintEventArgs e)

         {

             // 定义单色画笔,墨要使用刷子(可以理解为毛笔)才能作画

             // 所以刷子就有以下几种

             // SolidBrush               : 单色画笔

             // TextureBrush             : 纹理画笔(使用图像来填充形状的内部)

             // HatchBrush               : 用阴影样式、前景色和背景色定义矩形画笔

             // LinearGradientBrush      : 线性渐变

             // PathGradientBrush        : 通过渐变填充 GraphicsPath 对象

             //SolidBrush redBrush = new SolidBrush(Color.Red);

             Bitmap image1 = (Bitmap)Image.FromFile(@"E:\Test\Test\GDI_Demo\images\TextureImage.png", true);

             TextureBrush texture = new TextureBrush(image1);

             texture.WrapMode = System.Drawing.Drawing2D.WrapMode.Tile;

             // 创建图形路径对象

             GraphicsPath graphPath = new GraphicsPath();

             //向图形路径添加一个椭圆。

             graphPath.AddEllipse(, , , );

             // 填充 GraphicsPath

             e.Graphics.FillPath(texture, graphPath);

         }
效果图:
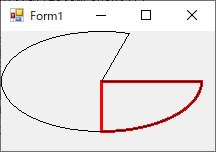
十五、FillPie 填充饼图
         private void frmGraphics_Paint(object sender, PaintEventArgs e)

         {

             // 定义单色画笔,墨要使用刷子(可以理解为毛笔)才能作画

             // 所以刷子就有以下几种

             // SolidBrush               : 单色画笔

             // TextureBrush             : 纹理画笔(使用图像来填充形状的内部)

             // HatchBrush               : 用阴影样式、前景色和背景色定义矩形画笔

             // LinearGradientBrush      : 线性渐变

             // PathGradientBrush        : 通过渐变填充 GraphicsPath 对象

             //SolidBrush redBrush = new SolidBrush(Color.Red);

             // HatchStyle.Horizontal => 水平线, Color.Red => 红色水平线,背景色:Color.FromArgb(255, 128, 255, 255)

             HatchBrush hBrush = new HatchBrush(HatchStyle.Horizontal, Color.Red, Color.FromArgb(, , , ));

             Rectangle rect = new Rectangle(, , , );

             // Create start and sweep angles.

             float startAngle = 0.0F;

             float sweepAngle = 45.0F;

             // Fill pie to screen.

             e.Graphics.FillPie(hBrush, rect, startAngle, sweepAngle);

         }
效果图:

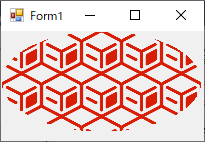
十六、FillPolygon 填充多边形
         private void frmGraphics_Paint(object sender, PaintEventArgs e)

         {

             // 定义单色画笔,墨要使用刷子(可以理解为毛笔)才能作画

             // 所以刷子就有以下几种

             // SolidBrush               : 单色画笔

             // TextureBrush             : 纹理画笔(使用图像来填充形状的内部)

             // HatchBrush               : 用阴影样式、前景色和背景色定义矩形画笔

             // LinearGradientBrush      : 线性渐变

             // PathGradientBrush        : 通过渐变填充 GraphicsPath 对象

             //SolidBrush redBrush = new SolidBrush(Color.Red);

             //坐标相对填充对象

             LinearGradientBrush linGrBrush = new LinearGradientBrush(new Point(, ), new Point(, ),

                                                                        Color.FromArgb(, , , ),   // Opaque red

                                                                        Color.FromArgb(, , , ));  // Opaque blue

             Pen pen = new Pen(linGrBrush,);

             e.Graphics.DrawLine(pen, , , , );

             // Create points that define polygon.

             Point point1 = new Point(, );

             Point point2 = new Point(, );

             Point point3 = new Point(, );

             Point point4 = new Point(, );

             Point point5 = new Point(, );

             Point point6 = new Point(, );

             Point point7 = new Point(, );

             Point[] curvePoints = { point1, point2, point3, point4, point5, point6, point7 };

             // Draw polygon to screen.

             e.Graphics.FillPolygon(linGrBrush, curvePoints);

         }
效果图:

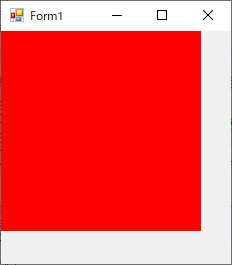
十七、FillRectangle 填充矩形
         private void frmGraphics_Paint(object sender, PaintEventArgs e)

         {

             // 定义单色画笔,墨要使用刷子(可以理解为毛笔)才能作画

             // 所以刷子就有以下几种

             // SolidBrush               : 单色画笔

             // TextureBrush             : 纹理画笔(使用图像来填充形状的内部)

             // HatchBrush               : 用阴影样式、前景色和背景色定义矩形画笔

             // LinearGradientBrush      : 线性渐变

             // PathGradientBrush        : 通过渐变填充 GraphicsPath 对象

             SolidBrush redBrush = new SolidBrush(Color.Red);

             Rectangle rect = new Rectangle(, , , );

             e.Graphics.FillRectangle(redBrush, rect);

         }
效果图:
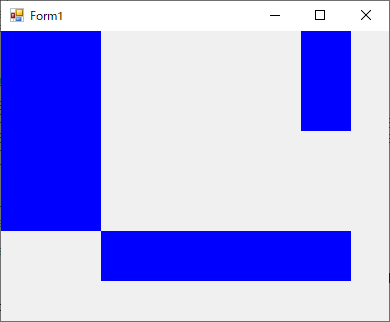
十八、FillRectangles 填充矩形组
         private void frmGraphics_Paint(object sender, PaintEventArgs e)

         {

             // 定义单色画笔,墨要使用刷子(可以理解为毛笔)才能作画

             // 所以刷子就有以下几种

             // SolidBrush               : 单色画笔

             // TextureBrush             : 纹理画笔(使用图像来填充形状的内部)

             // HatchBrush               : 用阴影样式、前景色和背景色定义矩形画笔

             // LinearGradientBrush      : 线性渐变

             // PathGradientBrush        : 通过渐变填充 GraphicsPath 对象

             //SolidBrush redBrush = new SolidBrush(Color.Red);

             SolidBrush blueBrush = new SolidBrush(Color.Blue);

             RectangleF[] rects = { new RectangleF(0.0F, 0.0F, 100.0F, 200.0F),

                                    new RectangleF(100.0F, 200.0F, 250.0F, 50.0F),

                                    new RectangleF(300.0F, 0.0F, 50.0F, 100.0F) };

             e.Graphics.FillRectangles(blueBrush, rects);

         }
效果图:
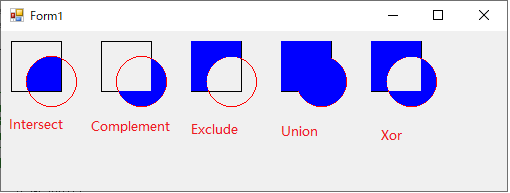
十九、FillRegion 填充区域
         private void frmGraphics_Paint(object sender, PaintEventArgs e)

         {

             // 定义单色画笔,墨要使用刷子(可以理解为毛笔)才能作画

             // 所以刷子就有以下几种

             // SolidBrush               : 单色画笔

             // TextureBrush             : 纹理画笔(使用图像来填充形状的内部)

             // HatchBrush               : 用阴影样式、前景色和背景色定义矩形画笔

             // LinearGradientBrush      : 线性渐变

             // PathGradientBrush        : 通过渐变填充 GraphicsPath 对象

             Graphics g = e.Graphics;

             // 创建矩形,为定义Region对象的填充区域

             Rectangle regionRect = new Rectangle(, , , );

             Pen pen1 = new Pen(Color.Black);

             //为看出效果

             g.DrawRectangle(pen1, regionRect);

             // 创建第二个矩形,主要用于区域交集填充

             RectangleF unionRect = new RectangleF(, , , );//第2个矩形

             pen1.Color = Color.Red;

             //为看出效果

             g.DrawEllipse(pen1, unionRect);//画椭圆

             GraphicsPath myPath = new GraphicsPath();

             myPath.AddEllipse(unionRect);

             // 创建Region对象的填充区域

             Region myRegion = new Region(regionRect);

             //两个区域的交集被填充

             myRegion.Intersect(myPath);

             SolidBrush blueBrush = new SolidBrush(Color.Blue);

             // 填充

             e.Graphics.FillRegion(blueBrush, myRegion);

             //=================Complement==================

             regionRect = new Rectangle(, , , );

             pen1 = new Pen(Color.Black);

             //为看出效果

             g.DrawRectangle(pen1, regionRect);

             // 创建第二个矩形

             unionRect = new RectangleF(, , , );

             pen1.Color = Color.Red;

             g.DrawEllipse(pen1, unionRect);//画椭圆

             myPath = new GraphicsPath();

             myPath.AddEllipse(unionRect);

             myRegion = new Region(regionRect);

             // myPath 无交集的区域被填充

             myRegion.Complement(myPath);

             // 填充

             e.Graphics.FillRegion(blueBrush, myRegion);

             //=================Exclude==================

             regionRect = new Rectangle(, , , );

             pen1 = new Pen(Color.Black);

             //为看出效果

             g.DrawRectangle(pen1, regionRect);

             // 创建第二个矩形

             unionRect = new RectangleF(, , , );

             pen1.Color = Color.Red;

             g.DrawEllipse(pen1, unionRect);//画椭圆

             myPath = new GraphicsPath();

             myPath.AddEllipse(unionRect);

             myRegion = new Region(regionRect);

             // myRegion 无交集的区域被填充

             myRegion.Exclude(myPath);

             // 填充

             e.Graphics.FillRegion(blueBrush, myRegion);

             //=================Union==================

             regionRect = new Rectangle(, , , );

             pen1 = new Pen(Color.Black);

             //为看出效果

             g.DrawRectangle(pen1, regionRect);

             // 创建第二个矩形

             unionRect = new RectangleF(, , , );

             pen1.Color = Color.Red;

             g.DrawEllipse(pen1, unionRect);//画椭圆

             myPath = new GraphicsPath();

             myPath.AddEllipse(unionRect);

             myRegion = new Region(regionRect);

             // 两个区域被填充

             myRegion.Union(myPath);

             // 填充

             e.Graphics.FillRegion(blueBrush, myRegion);

             //=================Xor==================

             regionRect = new Rectangle(, , , );

             pen1 = new Pen(Color.Black);

             //为看出效果

             g.DrawRectangle(pen1, regionRect);

             // 创建第二个矩形

             unionRect = new RectangleF(, , , );

             pen1.Color = Color.Red;

             g.DrawEllipse(pen1, unionRect);//画椭圆

             myPath = new GraphicsPath();

             myPath.AddEllipse(unionRect);

             myRegion = new Region(regionRect);

             // 交集以外区域被填充

             myRegion.Xor(myPath);

             // 填充

             e.Graphics.FillRegion(blueBrush, myRegion);

         }
效果图:
戏说 .NET GDI+系列学习教程(二、Graphics类的方法)的更多相关文章
- 戏说 .NET GDI+系列学习教程(一、Graphics类--纸)
Graphics类(纸) Graphics类封装一个GDI+绘图图面,提供将对象绘制到显示设备的方法,Graphics与特定的设备上下文关联. 画图方法都被包括在Graphics类中,在画任何对象时, ...
- 戏说 .NET GDI+系列学习教程(三、Graphics类的应用_验证码扩展)
从别人那拷贝的 #region 定义和初始化配置字段 //用户存取验证码字符串 public string validationCode = String.Empty; //生成的验证码字符串 pub ...
- 戏说 .NET GDI+系列学习教程(三、Graphics类的应用_验证码)
关于Graphics也有了基本了解下面想说的的是学这个东东干什么呢,到底如何应用目前常见应用1.验证码(参照网上的)2.打印排版(会提到关于条形码大小设置)3.自定义控件 一.验证码 class Va ...
- 戏说 .NET GDI+系列学习教程(三、Graphics类的应用_自定义控件--主要用于画面拖拽效果)
如题,需求:在某个图片上用户可以手动指定位置. 如下: 中心思想:仿照Visual Studio工具中的控件的做法 如何仿照呢? 1.自定义的控件类继承System.Windows.Forms.Con ...
- 戏说 .NET GDI+系列学习教程(三、Graphics类的应用_打印收银小票)
#region 打印 /// <summary> /// 打印字符串内容 /// </summary> /// <returns></returns> ...
- 戏说 .NET GDI+系列学习教程(三、Graphics类的方法的总结)
- VB6 GDI+ 入门教程[7] Graphics 其他内容
http://vistaswx.com/blog/article/category/tutorial/page/2 VB6 GDI+ 入门教程[7] Graphics 其他内容 2009 年 9 月 ...
- java 基础二 Graphics类
一.处理图形 1.画直线 void drawLine (int startx , int starty , int endx , int endy) 参数列表:直线开始的横坐标.纵坐标,直线结束的横坐 ...
- Java多线程系列二——Thread类的方法
Thread实现Runnable接口并实现了大量实用的方法 public static native void yield(); 此方法释放CPU,但并不释放已获得的锁,其它就绪的线程将可能得到执行机 ...
随机推荐
- python数据结构:进制转化探索
*********************************第一部分*************************************************************** ...
- JS轻松实现单击文本框弹出选择日期
我的开发工具是vs2005,你们可选择自己合适的开发工具 首先创建个文本框<input id="txFDate" name="txFDate" type= ...
- Safari的CSS HACK方法
以前的文章里提到过IE6/IE7/IE8/IE9/.Firefox的CSS HACK方法,那么Safari的CSS HACK是什么呢? 请看以下CSS代码: .box { color: black ...
- 301重定向将不带www的域名跳转到www的域名,403 Forbidden You don’t have permission to access the URL on this server
博客搬迁,给你带来的不便,敬请谅解! http://www.suanliutudousi.com/2017/11/14/301%e9%87%8d%e5%ae%9a%e5%90%91%e5%b0%86% ...
- 17-vim-查找字符或单词-02-查找并替换
在vi中查找和替换命令需要在末行模式下执行. 命令 功能 :%s///g 末行模式下,查找并替换字符.例:%s /hello/world/g 1.全局替换 一次性替换文件中的所有文件的旧文本. 命令格 ...
- arcpy-字段唯一值、重复值、最值、平均值、方差、标准差、中数、众数
插个广告,制作ArcGIS的Tool工具学习下面的教程就对了: 零基础学习Python制作ArcGIS自定义工具观看链接 <零基础学习Python制作ArcGIS自定义工具>课程简介 im ...
- tomcat+nginx 单机部署多应用LINUX
1.首先虚拟机上安装nginx 和tomcat,这里安装就不赘述了. nginx安装可以参考https://www.linuxidc.com/Linux/2016-09/134907.htm,相关配置 ...
- hbuilder模拟器端口
模拟器 | 端口 夜神安卓模拟器夜神安卓模拟器 62001 逍遥安卓模拟器逍遥安卓模拟器 21503 BlueStacks(蓝叠安卓模拟器)BlueStacks(蓝叠安卓模拟器) ...
- 【记录】利用Jquery 在 textarea 内实现文字动态换行
背景: 最近在做前端时候遇到一种情况,需要用js动态输入内容到textarea, 比如实时聊天功能,用户A每次发送信息都需要另起一行. 问题: 根据以往经验,以为用$('#textArea').htm ...
- RK3288编译 Android 5.1 固件
1 准备工作 编译 Android 对机器的配置要求较高: 64 位 CPU 16GB 物理内存+交换内存 30GB 空闲的磁盘空间用于构建,源码树另外占用大约 25GB Ubuntu 14.04 操 ...