Mongo--04 Mongo分片集群
一、分片的概念
1.有了副本集,为什么还需要分片?
副本集资源利用率不高
分片可以提高资源利用率
2.分片的缺点
理想情况下需要机器比较多
配置和运维变得复杂且困难
提前规划好特别重要,一旦建立后在想改变架构变得很困难
二、 分片工作原理
**1.路由服务mongos **
路由服务,提供代理,替用户去向后请求shard分片的数据
2.数据节点shard
负责处理数据的节点,每个shard都是分片集群的一部分
**3.分片配置信息服务器config **
保存数据分配在哪个shard上
保存所有shard的配置信
提供给mongos查询服务
4.片键
数据存放到哪个shard的区分规则
片键就是索引
选择片键的依据:
能够被经常访问到的字段
索引字段基数够大
分类:

区间片键

id  name   host  sex

1	zhang  SH	 boy

2   ya     BJ    boy

3   yaya   SZ    girl

如果以id作为片键:

索引:id

1-100   shard1

100-200 shard2

200-300 shard3

300-+无穷 shard4

如果以host作为片键:

SH  shard1

BJ  shard2

SZ  shard3

hash片键:

足够平均,足够随机

id  name   host  sex

1	zhang  SH	 boy

2   ya     BJ    boy

3   yaya   SZ    girl

如果以id作为片键:

索引:id

1	hash 之后 shard2

2   hash 之后 shard3

3   hash 之后 shard1
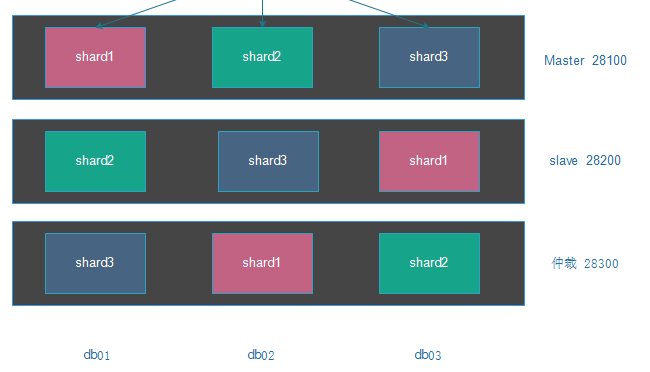
三、IP端口目录规划
1.IP端口规划
1.IP端口规划

db01	10.0.0.51

		Shard1_Master	28100

		Shard2_Slave	28200

		Shard3_Arbiter	28300

		Config Server	40000

		mongos Server	60000

db02	10.0.0.52

		Shard2_Master	28100

		Shard3_Slave	28200

		Shard1_Arbiter	28300

		Config Server	40000

		mongos Server	60000

db03	10.0.0.53

		Shard3_Master	28100

		Shard1_Slave	28200

		Shard2_Arbiter	28300

		Config Server	40000

		mongos Server	60000
2.目录规划
服务目录:

/opt/master/{conf,log,pid}

/opt/slave//{conf,log,pid}

/opt/arbiter/{conf,log,pid}

/data/config/{conf,log,pid}

/data/mongos/{conf,log,pid}

数据目录:

/data/master/

/data/slave/

/data/arbiter/

/data/config/s
四、分片集群搭建副本集步骤
1.安装软件
注意:三台服务器都操作!!!

tar xf mongodb-linux-x86_64-3.6.13.tgz -C /opt/

ln -s /opt/mongodb-linux-x86_64-3.6.13 /opt/mongodb

echo 'export PATH=$PATH:/opt/mongodb/bin' >> /etc/profile

source /etc/profile
2.创建目录
注意:三台服务器都操作!!!

mkdir -p /opt/master/{conf,log,pid}

mkdir -p /opt/slave/{conf,log,pid}

mkdir -p /opt/arbiter/{conf,log,pid}

mkdir -p /data/master/

mkdir -p /data/slave/

mkdir -p /data/arbiter/
3.创建配置文件
db01创建配置文件
#master节点配置文件

cat >/opt/master/conf/mongod.conf  <<EOF

systemLog:

  destination: file

  logAppend: true

  path: /opt/master/log/mongodb.log

storage:

  journal:

    enabled: true

  dbPath: /data/master/

  directoryPerDB: true

  wiredTiger:

    engineConfig:

      cacheSizeGB: 1

      directoryForIndexes: true

    collectionConfig:

      blockCompressor: zlib

    indexConfig:

      prefixCompression: true

processManagement:

  fork: true

  pidFilePath: /opt/master/pid/mongodb.pid

  timeZoneInfo: /usr/share/zoneinfo

net:

  port: 28100

  bindIp: 127.0.0.1,$(ifconfig eth0|awk 'NR==2{print $2}')

replication:

  oplogSizeMB: 1024

  replSetName: shard1

sharding:

  clusterRole: shardsvr

EOF

#slave节点配置文件

cat >/opt/slave/conf/mongod.conf  <<EOF

systemLog:

  destination: file

  logAppend: true

  path: /opt/slave/log/mongodb.log

storage:

  journal:

    enabled: true

  dbPath: /data/slave/

  directoryPerDB: true

  wiredTiger:

    engineConfig:

      cacheSizeGB: 1

      directoryForIndexes: true

    collectionConfig:

      blockCompressor: zlib

    indexConfig:

      prefixCompression: true

processManagement:

  fork: true

  pidFilePath: /opt/slave/pid/mongodb.pid

  timeZoneInfo: /usr/share/zoneinfo

net:

  port: 28200

  bindIp: 127.0.0.1,$(ifconfig eth0|awk 'NR==2{print $2}')

replication:

  oplogSizeMB: 1024

  replSetName: shard2

sharding:

  clusterRole: shardsvr

EOF

#aribiter节点配置文件

cat >/opt/arbiter/conf/mongod.conf<<EOF

systemLog:

  destination: file

  logAppend: true

  path: /opt/arbiter/log/mongodb.log

storage:

  journal:

    enabled: true

  dbPath: /data/arbiter/

  directoryPerDB: true

  wiredTiger:

    engineConfig:

      cacheSizeGB: 1

      directoryForIndexes: true

    collectionConfig:

      blockCompressor: zlib

    indexConfig:

      prefixCompression: true

processManagement:

  fork: true

  pidFilePath: /opt/arbiter/pid/mongodb.pid

  timeZoneInfo: /usr/share/zoneinfo

net:

  port: 28300

  bindIp: 127.0.0.1,$(ifconfig eth0|awk 'NR==2{print $2}')

replication:

  oplogSizeMB: 1024

  replSetName: shard3

sharding:

  clusterRole: shardsvr

EOF

##############################################################################
db02创建配置文件
#master节点配置文件

cat >/opt/master/conf/mongod.conf  <<EOF

systemLog:

  destination: file

  logAppend: true

  path: /opt/master/log/mongodb.log

storage:

  journal:

    enabled: true

  dbPath: /data/master/

  directoryPerDB: true

  wiredTiger:

    engineConfig:

      cacheSizeGB: 1

      directoryForIndexes: true

    collectionConfig:

      blockCompressor: zlib

    indexConfig:

      prefixCompression: true

processManagement:

  fork: true

  pidFilePath: /opt/master/pid/mongodb.pid

  timeZoneInfo: /usr/share/zoneinfo

net:

  port: 28100

  bindIp: 127.0.0.1,$(ifconfig eth0|awk 'NR==2{print $2}')

replication:

  oplogSizeMB: 1024

  replSetName: shard2

sharding:

  clusterRole: shardsvr

EOF

#slave节点配置文件

cat >/opt/slave/conf/mongod.conf  <<EOF

systemLog:

  destination: file

  logAppend: true

  path: /opt/slave/log/mongodb.log

storage:

  journal:

    enabled: true

  dbPath: /data/slave/

  directoryPerDB: true

  wiredTiger:

    engineConfig:

      cacheSizeGB: 1

      directoryForIndexes: true

    collectionConfig:

      blockCompressor: zlib

    indexConfig:

      prefixCompression: true

processManagement:

  fork: true

  pidFilePath: /opt/slave/pid/mongodb.pid

  timeZoneInfo: /usr/share/zoneinfo

net:

  port: 28200

  bindIp: 127.0.0.1,$(ifconfig eth0|awk 'NR==2{print $2}')

replication:

  oplogSizeMB: 1024

  replSetName: shard3

sharding:

  clusterRole: shardsvr

EOF

#aribiter节点配置文件

cat >/opt/arbiter/conf/mongod.conf  <<EOF

systemLog:

  destination: file

  logAppend: true

  path: /opt/arbiter/log/mongodb.log

storage:

  journal:

    enabled: true

  dbPath: /data/arbiter/

  directoryPerDB: true

  wiredTiger:

    engineConfig:

      cacheSizeGB: 1

      directoryForIndexes: true

    collectionConfig:

      blockCompressor: zlib

    indexConfig:

      prefixCompression: true

processManagement:

  fork: true

  pidFilePath: /opt/arbiter/pid/mongodb.pid

  timeZoneInfo: /usr/share/zoneinfo

net:

  port: 28300

  bindIp: 127.0.0.1,$(ifconfig eth0|awk 'NR==2{print $2}')

replication:

  oplogSizeMB: 1024

  replSetName: shard1

sharding:

  clusterRole: shardsvr

EOF
db03创建配置文件
#master节点配置文件

cat >/opt/master/conf/mongod.conf  <<EOF

systemLog:

  destination: file

  logAppend: true

  path: /opt/master/log/mongod.log

storage:

  journal:

    enabled: true

  dbPath: /data/master/

  directoryPerDB: true

  wiredTiger:

    engineConfig:

      cacheSizeGB: 1

      directoryForIndexes: true

    collectionConfig:

      blockCompressor: zlib

    indexConfig:

      prefixCompression: true

processManagement:

  fork: true

  pidFilePath: /opt/master/pid/mongodb.pid

  timeZoneInfo: /usr/share/zoneinfo

net:

  port: 28100

  bindIp: 127.0.0.1,$(ifconfig eth0|awk 'NR==2{print $2}')

replication:

  oplogSizeMB: 1024

  replSetName: shard3

sharding:

  clusterRole: shardsvr

EOF

#slave节点配置文件

cat >/opt/slave/conf/mongod.conf  <<EOF

systemLog:

  destination: file

  logAppend: true

  path: /opt/slave/log/mongodb.log

storage:

  journal:

    enabled: true

  dbPath: /data/slave/

  directoryPerDB: true

  wiredTiger:

    engineConfig:

      cacheSizeGB: 1

      directoryForIndexes: true

    collectionConfig:

      blockCompressor: zlib

    indexConfig:

      prefixCompression: true

processManagement:

  fork: true

  pidFilePath: /opt/slave/pid/mongod.pid

  timeZoneInfo: /usr/share/zoneinfo

net:

  port: 28200

  bindIp: 127.0.0.1,$(ifconfig eth0|awk 'NR==2{print $2}')

replication:

  oplogSizeMB: 1024

  replSetName: shard1

sharding:

  clusterRole: shardsvr

EOF

#aribiter节点配置文件

cat >/opt/arbiter/conf/mongod.conf  <<EOF

systemLog:

  destination: file

  logAppend: true

  path: /opt/arbiter/log/mongodb.log

storage:

  journal:

    enabled: true

  dbPath: /data/arbiter/

  directoryPerDB: true

  wiredTiger:

    engineConfig:

      cacheSizeGB: 1

      directoryForIndexes: true

    collectionConfig:

      blockCompressor: zlib

    indexConfig:

      prefixCompression: true

processManagement:

  fork: true

  pidFilePath: /opt/arbiter/pid/mongod.pid

  timeZoneInfo: /usr/share/zoneinfo

net:

  port: 28300

  bindIp: 127.0.0.1,$(ifconfig eth0|awk 'NR==2{print $2}')

replication:

  oplogSizeMB: 1024

  replSetName: shard2

sharding:

  clusterRole: shardsvr

EOF
4.优化警告
注意!三台服务器都操作!!!

useradd mongod -s /sbin/nologin -M

echo "never"  > /sys/kernel/mm/transparent_hugepage/enabled

echo "never"  > /sys/kernel/mm/transparent_hugepage/defrag
5.启动服务
mongod -f /opt/master/conf/mongod.conf

mongod -f /opt/slave/conf/mongod.conf

mongod -f /opt/arbiter/conf/mongod.conf

netstat -lntup|grep mongod
6.初始化副本集
#db01 master节点初始化shard1的副本

mongo --port 28100

rs.initiate()

rs.add("10.0.0.53:28200")

rs.addArb("10.0.0.52:28300")

#db02 master节点初始化shard2的副本

mongo --port 28100

config = {

	_id:"shard2",

	members:[

		{_id:0,host:"10.0.0.52:28100"},

		{_id:1,host:"10.0.0.51:28200"},

		{_id:2,host:"10.0.0.53:28300",arbiterOnly:true},

	]

}

rs.initiate(config)

#db03 master节点初始化shard3的副本

mongo --port 28100

config = {

	_id:"shard3",

	members:[

		{_id:0,host:"10.0.0.53:28100"},

		{_id:1,host:"10.0.0.52:28200"},

		{_id:2,host:"10.0.0.51:28300",arbiterOnly:true},

	]

}

rs.initiate(config)
7.检查命令
mongo --port 28100

rs.status()
五、分片集群搭建config步骤
1.创建目录
mkdir -p /opt/config/{conf,log,pid}

mkdir -p /data/config/
2.创建配置文件
cat >/opt/config/conf/mongod.conf  <<EOF

systemLog:

  destination: file

  logAppend: true

  path: /opt/config/log/mongodb.log

storage:

  journal:

    enabled: true

  dbPath: /data/config/

  directoryPerDB: true

  wiredTiger:

    engineConfig:

      cacheSizeGB: 1

      directoryForIndexes: true

    collectionConfig:

      blockCompressor: zlib

    indexConfig:

      prefixCompression: true

processManagement:

  fork: true

  pidFilePath: /opt/config/pid/mongod.pid

  timeZoneInfo: /usr/share/zoneinfo

net:

  port: 40000

  bindIp: 127.0.0.1,$(ifconfig eth0|awk 'NR==2{print $2}')

replication:

  replSetName: configset

sharding:

  clusterRole: configsvr

EOF
3.启动
mongod -f /opt/config/conf/mongod.conf
4.初始化副本集
mongo localhost:40000

rs.initiate({

	_id:"configset",

    configsvr: true,

	members:[

		{_id:0,host:"10.0.0.51:40000"},

		{_id:1,host:"10.0.0.52:40000"},

		{_id:2,host:"10.0.0.53:40000"},

	] })
5.检查
rs.status()
六、mongos配置
1.创建目录

mkdir -p /opt/mongos/{conf,log,pid}

2.创建配置文件

cat >/opt/mongos/conf/mongos.conf  <<EOF

systemLog:

  destination: file

  logAppend: true

  path: /opt/mongos/log/mongos.log

processManagement:

  fork: true

  pidFilePath: /opt/mongos/pid/mongos.pid

  timeZoneInfo: /usr/share/zoneinfo

net:

  port: 60000

  bindIp: 127.0.0.1,$(ifconfig eth0|awk 'NR==2{print $2}')

sharding:

  configDB:

    configset/10.0.0.51:40000,10.0.0.52:40000,10.0.0.53:40000

EOF

3.启动

mongos -f /opt/mongos/conf/mongos.conf

4.登录

mongo --port 60000
七、分片配置
#1.区间分片:

数据库开启分片

mongo localhost:60000 .

#先切换到admin库下

use admin

db.runCommand( { enablesharding : "test" } )

#创建索引

mongo localhost:60000

#进到test库

mongos> use test

switched to db test

db.range.ensureIndex( { id: 1 } )

#对集合开启分片,片键是id

use admin

db.runCommand( { shardcollection : "test.range",key : {id: 1} } )

#插入测试数据

use test

for(i=1;i<10000;i++){ db.range.insert({"id":i,"name":"shanghai","age":28,"date":new Date()}); }

db.range.stats()

db.range.count()

#hash分片:

数据库开启分片

mongo --port 60000

use admin

db.runCommand( { enablesharding : "oldboy" } )

#创建索引

use oldboy

db.hash.ensureIndex( { id: "hashed" } )

#集合开启哈希分片

use admin

sh.shardCollection( "oldboy.hash", { id: "hashed" } )

#生成测试数据

use oldboy

for(i=1;i<10000;i++){ db.hash.insert({"id":i,"name":"shenzheng","age":70,"date":new Date()}); }

#分片验证

shard1

mongo db01:28100

use oldboy

db.hash.count()

33755

shard2

mongo db02:28100

use oldboy

db.hash.count()

33142

shard3

mongo db03:28100

use oldboy

db.hash.count()

33102
八、分片集群常用管理命令
1列出分片所有详细信息

db.printShardingStatus()

sh.status()

2列出所有分片成员信息

use admin

db.runCommand({ listshards : 1})

3列出开启分片的数据库

use config

db.databases.find({"partitioned": true })

4查看分片的片键

use config

db.collections.find().pretty()

5查看集合的分片信息

use test

db.getCollection('range').getShardDistribution()

db.getCollection('hash').getShardDistribution()
Mongo--04 Mongo分片集群的更多相关文章
- mongo 3.4分片集群系列之八:分片管理
这个系列大致想跟大家分享以下篇章: 1.mongo 3.4分片集群系列之一:浅谈分片集群 2.mongo 3.4分片集群系列之二:搭建分片集群--哈希分片 3.mongo 3.4分片集群系列之三:搭建 ...
- mongo 3.4分片集群系列之七:配置数据库管理
这个系列大致想跟大家分享以下篇章: 1.mongo 3.4分片集群系列之一:浅谈分片集群 2.mongo 3.4分片集群系列之二:搭建分片集群--哈希分片 3.mongo 3.4分片集群系列之三:搭建 ...
- mongo 3.4分片集群系列之六:详解配置数据库
这个系列大致想跟大家分享以下篇章: 1.mongo 3.4分片集群系列之一:浅谈分片集群 2.mongo 3.4分片集群系列之二:搭建分片集群--哈希分片 3.mongo 3.4分片集群系列之三:搭建 ...
- mongo 3.4分片集群系列之五:详解平衡器
这个系列大致想跟大家分享以下篇章: 1.mongo 3.4分片集群系列之一:浅谈分片集群 2.mongo 3.4分片集群系列之二:搭建分片集群--哈希分片 3.mongo 3.4分片集群系列之三:搭建 ...
- mongo 3.4分片集群系列之四:搭建分片集群--哈希分片 + 安全 + 区域
这个系列大致想跟大家分享以下篇章: 1.mongo 3.4分片集群系列之一:浅谈分片集群 2.mongo 3.4分片集群系列之二:搭建分片集群--哈希分片 3.mongo 3.4分片集群系列之三:搭建 ...
- mongo 3.4分片集群系列之三:搭建分片集群--哈希分片 + 安全
这个系列大致想跟大家分享以下篇章: 1.mongo 3.4分片集群系列之一:浅谈分片集群 2.mongo 3.4分片集群系列之二:搭建分片集群--哈希分片 3.mongo 3.4分片集群系列之三:搭建 ...
- mongo 3.4分片集群系列之二:搭建分片集群--哈希分片
这个系列大致想跟大家分享以下篇章: 1.mongo 3.4分片集群系列之一:浅谈分片集群 2.mongo 3.4分片集群系列之二:搭建分片集群--哈希分片 3.mongo 3.4分片集群系列之三:搭建 ...
- mongo 3.4分片集群系列之一:浅谈分片集群
这篇为理论篇,稍后会有实践篇. 这个系列大致想跟大家分享以下篇章: 1.mongo 3.4分片集群系列之一:浅谈分片集群 2.mongo 3.4分片集群系列之二:搭建分片集群--哈希分片 3.mong ...
- Mongo 整体架构介绍(1)-------分片集群
摘要 在mongo初识文中介绍了mongo与cassandra的主要区别,以及mongo物理部署架构图.本文接着上一篇的mongo 架构图,来继续讲分片集群. 分片介绍 shard key mongo ...
随机推荐
- nginx下的负载均衡
负载均衡应用场景: 普通web应用部署到多台应用服务器上,客户端通过访问应用服务器发送请求,最简单的就是n对1模式,n个客户端访问同一个应用服务器,这种情况当并发量大了,就无法应对,而且,如果只有一台 ...
- 不知道Java类文件结构的同学,看这篇文章就够了
一.前言 代码编译的结果从本地机器码转变为字节码,是存储格式发展的一小步,却是编程语言发展的一大步.经过多年的发展,目前的计算机仍然只能识别0和1,但是由于近10年内虚拟机以及大量建立在虚拟机之上的程 ...
- oracle 11g安装教程终结版
1.解压文件 2.双击 “setup.exe” 3.高级安装.下一步 4.企业版 下一步 5.下一步 6.只要不报错,警告没事.(路径如果报错的话,没事,直接继续) 注意:如果有需要6.2版本的错误 ...
- leetcode-mid-dynamic programming-55. Jump Game
mycode 71.47% 思路: 既然要到达终点,那么俺就可以倒推,要想到达n,可以有以下情况 1)到达n-1,然后该位置最少可以走一步 2)到达n-2,然后该位置最少可以走两步 3)到达n-3, ...
- leetcode 287寻找重复数
这道题用STL容器就很好写了,可以用set也可以用map, 用unordered_map的C++代码如下: class Solution { public: int findDuplicate(vec ...
- vivo 部分链表反转
方法一:使用栈交换需要反转的数字 #include <iostream> #include <stack> #include "list.h" using ...
- C# 打印倒三角
void test6(int num) { try { #region 方法1 int maxstar = (num - 1) * 2 + 1; string line = ""; ...
- aiXcoder安装&使用
1.官网下载 https://www.aixcoder.com/#/setting 1.1介绍 1.2选择对应的下载版本 1.3安装&注册(需关闭IDEA) 安装完进行手机/邮箱注册,下载对应 ...
- idea中怎么去查看maven项目的依赖包是否有冲突
1:快捷键:
- Snow的追寻--线段树维护树的直径
Snow终于得知母亲是谁,他现在要出发寻找母亲.王国中的路由于某种特殊原因,成为了一棵有n个节点的根节点为1的树,但由于"Birds are everywhere.",他得到了种种 ...