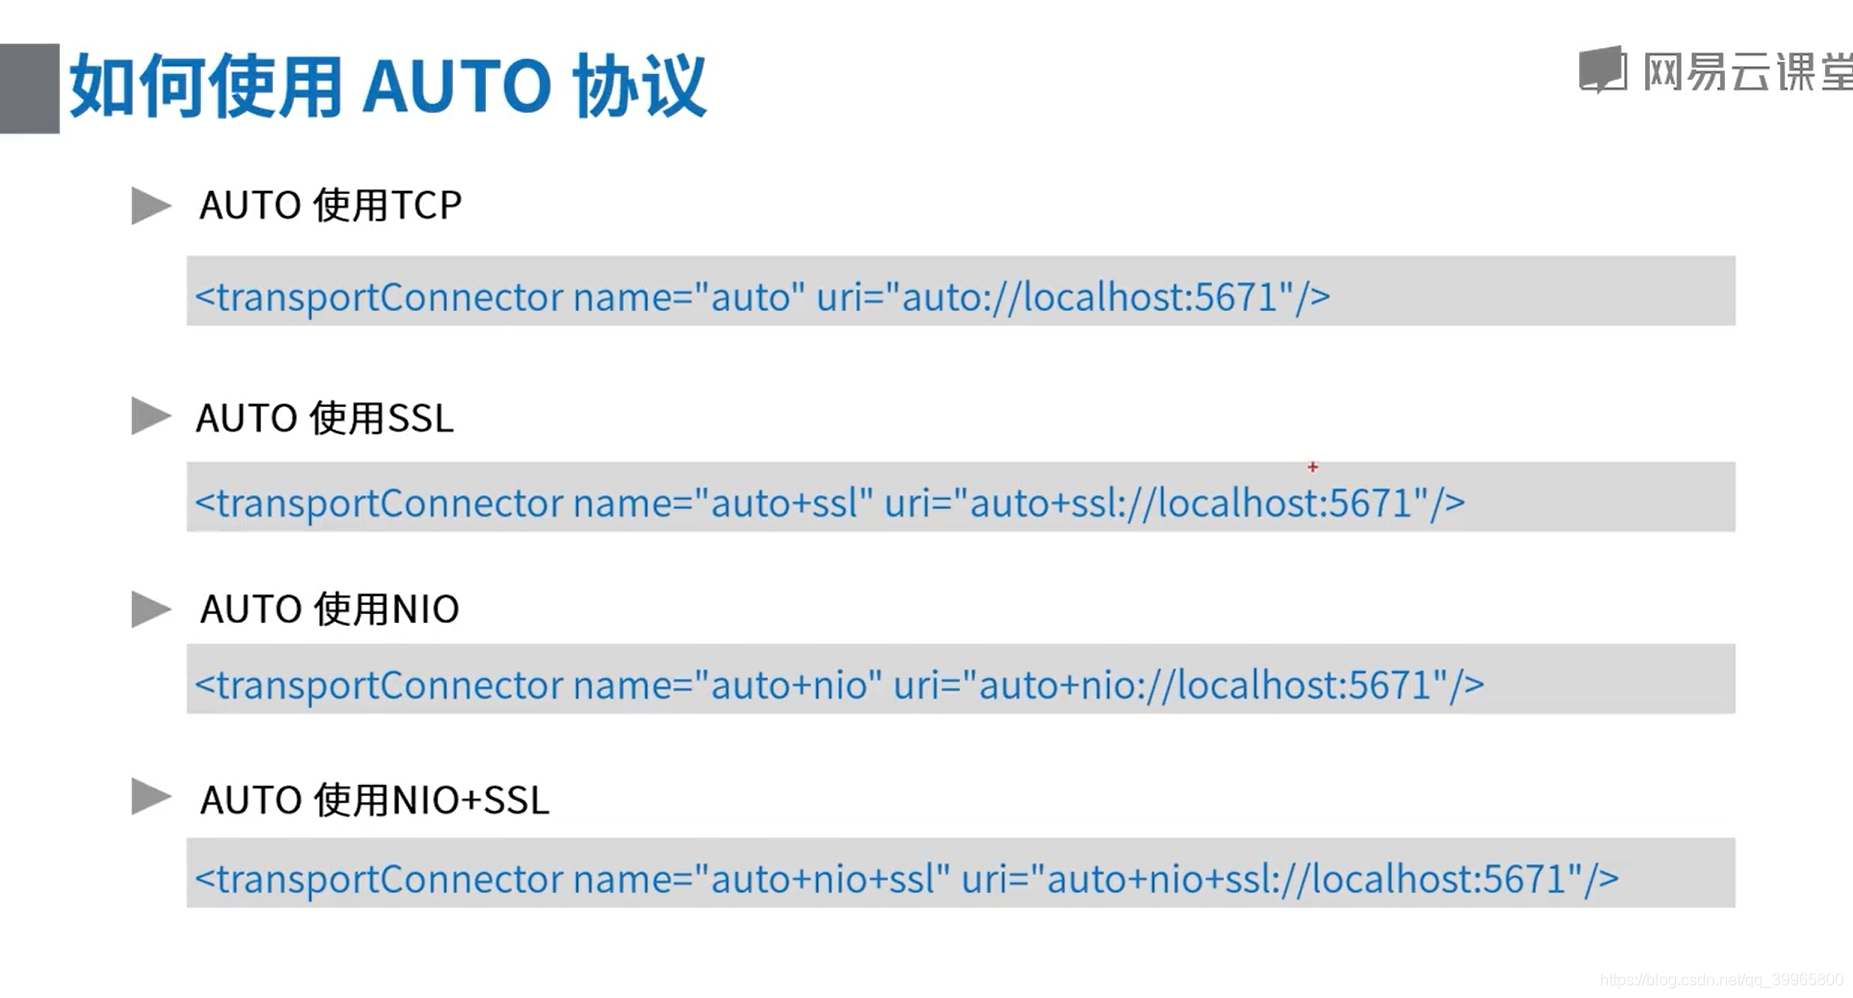
消息中间件-ActiveMQ支持的消息协议


package com.study.mq.a1_example.helloworld.queue;

import org.apache.activemq.ActiveMQConnectionFactory;

import javax.jms.*;

/**
简单生产者
*/
public class Producer {
public static void main(String[] args) {
new ProducerThread("tcp://10.201.157.250:61616", "queue1").start();
} static class ProducerThread extends Thread {
String brokerUrl;
String destinationUrl;public ProducerThread(String brokerUrl, String destinationUrl) {
this.brokerUrl = brokerUrl;
this.destinationUrl = destinationUrl;
} @Override
public void run() {
ActiveMQConnectionFactory connectionFactory;
Connection conn;
Session session; try {
// 1、创建连接工厂
connectionFactory = new ActiveMQConnectionFactory(brokerUrl);
// 2、创建连接对象md
conn = connectionFactory.createConnection();
conn.start();
// 3、创建会话,表示是否支持事务
session = conn.createSession(false, Session.AUTO_ACKNOWLEDGE);
// 4、创建点对点发送的目标
Destination destination = session.createQueue(destinationUrl);
// 5、创建生产者消息
MessageProducer producer = session.createProducer(destination);
// 设置生产者的模式,有两种可选 持久化 / 不持久化
producer.setDeliveryMode(DeliveryMode.PERSISTENT);
// 6、创建一条文本消息
String text = "Hello world!";
TextMessage message = session.createTextMessage(text);
for (int i = 0; i < 1; i++) {
// 7、发送消息
producer.send(message);
}
// 8、 关闭连接
session.close();
conn.close();
} catch (JMSException e) {
e.printStackTrace();
}


}
}
}
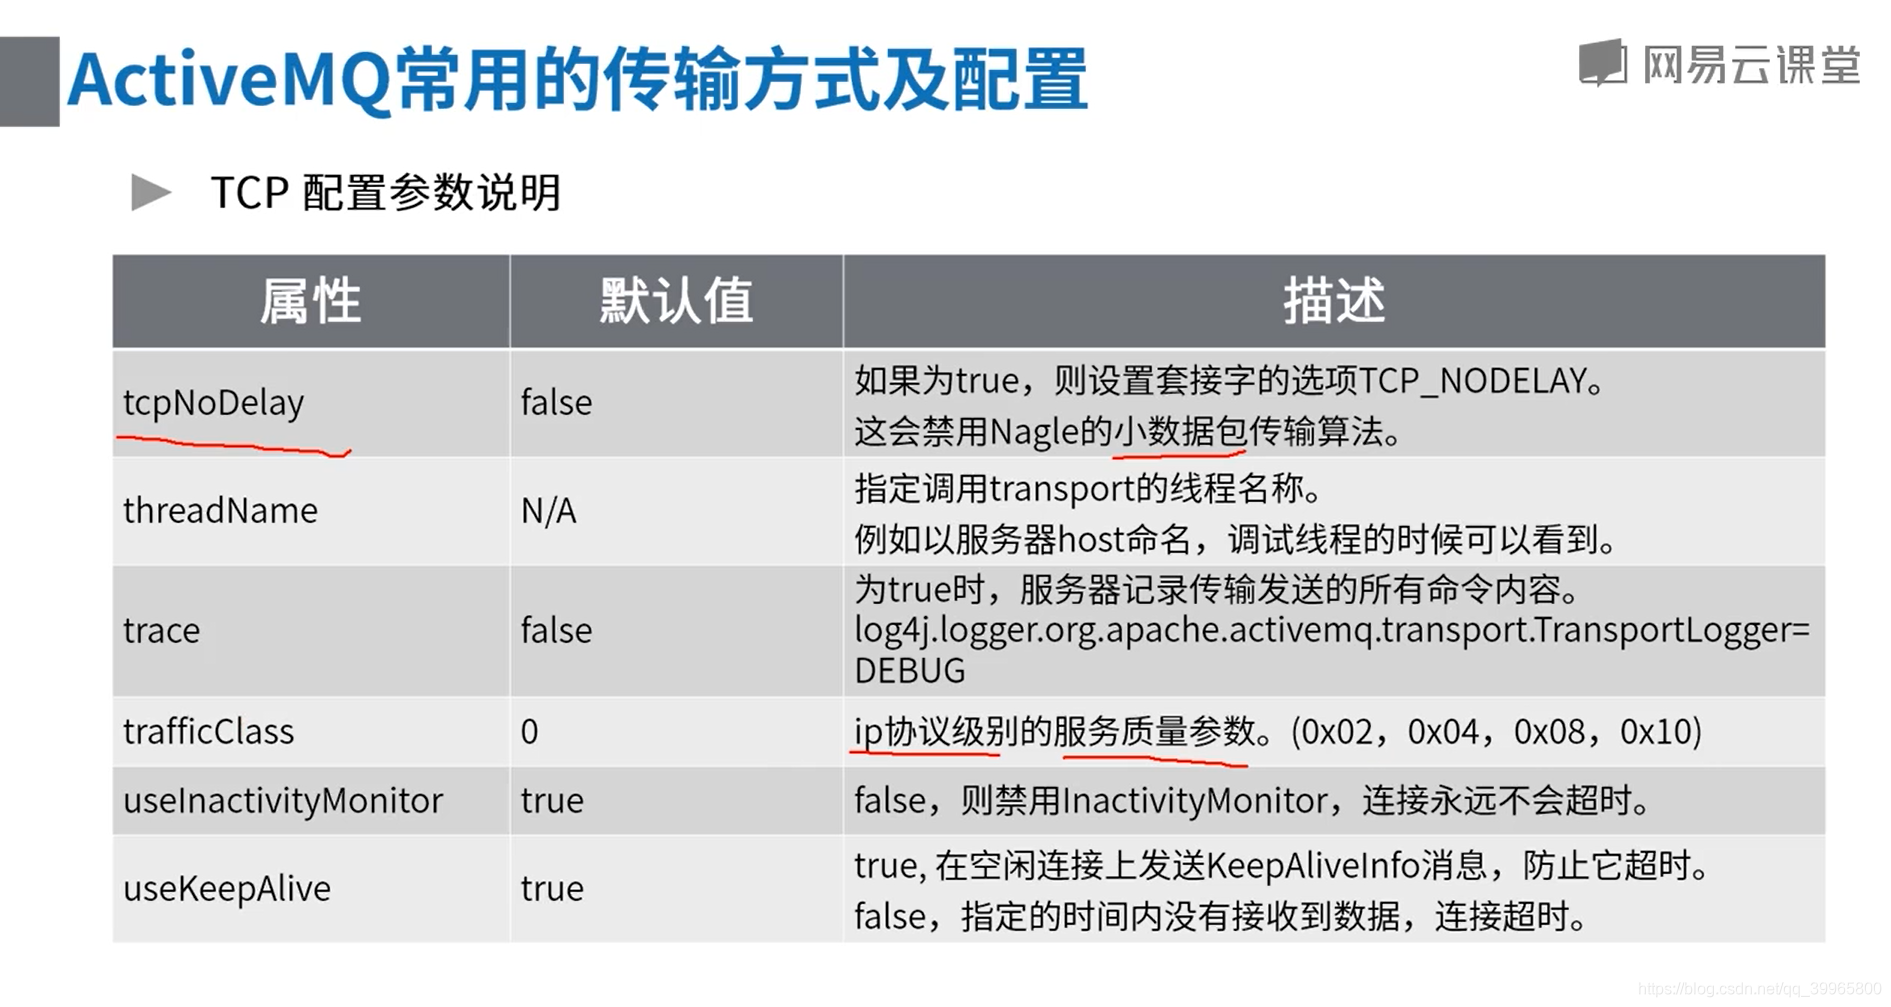
1、可以通过log4j.properties可以记录log信息
阅读下面的文档就可以添加修改相应的参数
http://activemq.apache.org/tcp-transport-reference
vi activemq.xml


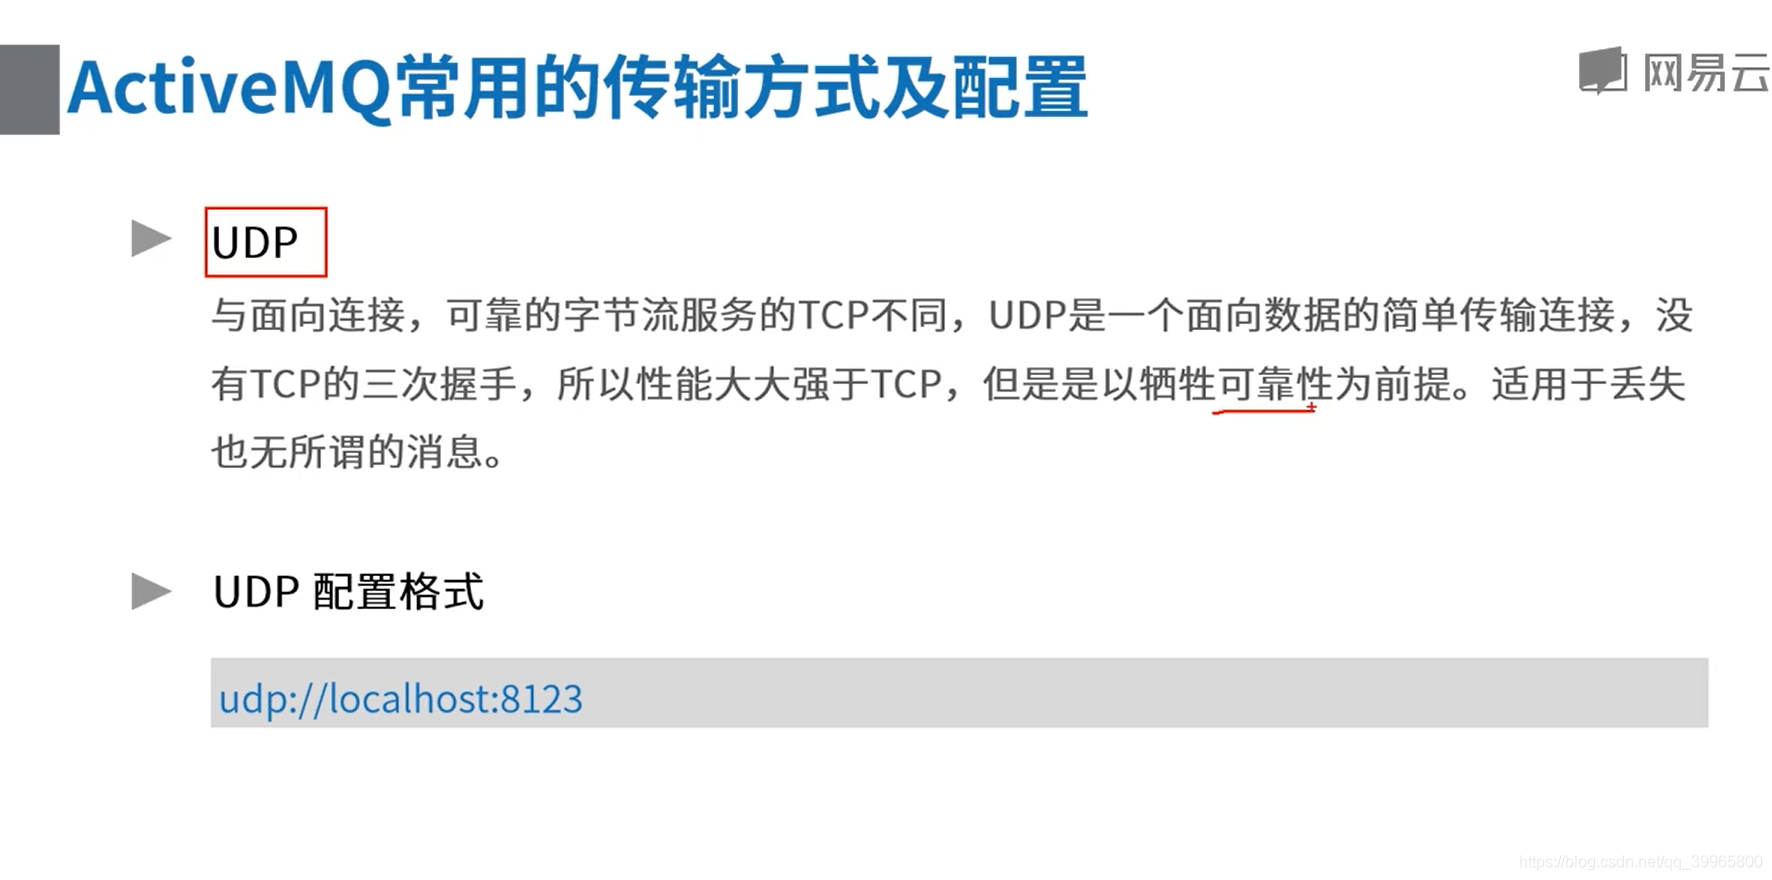
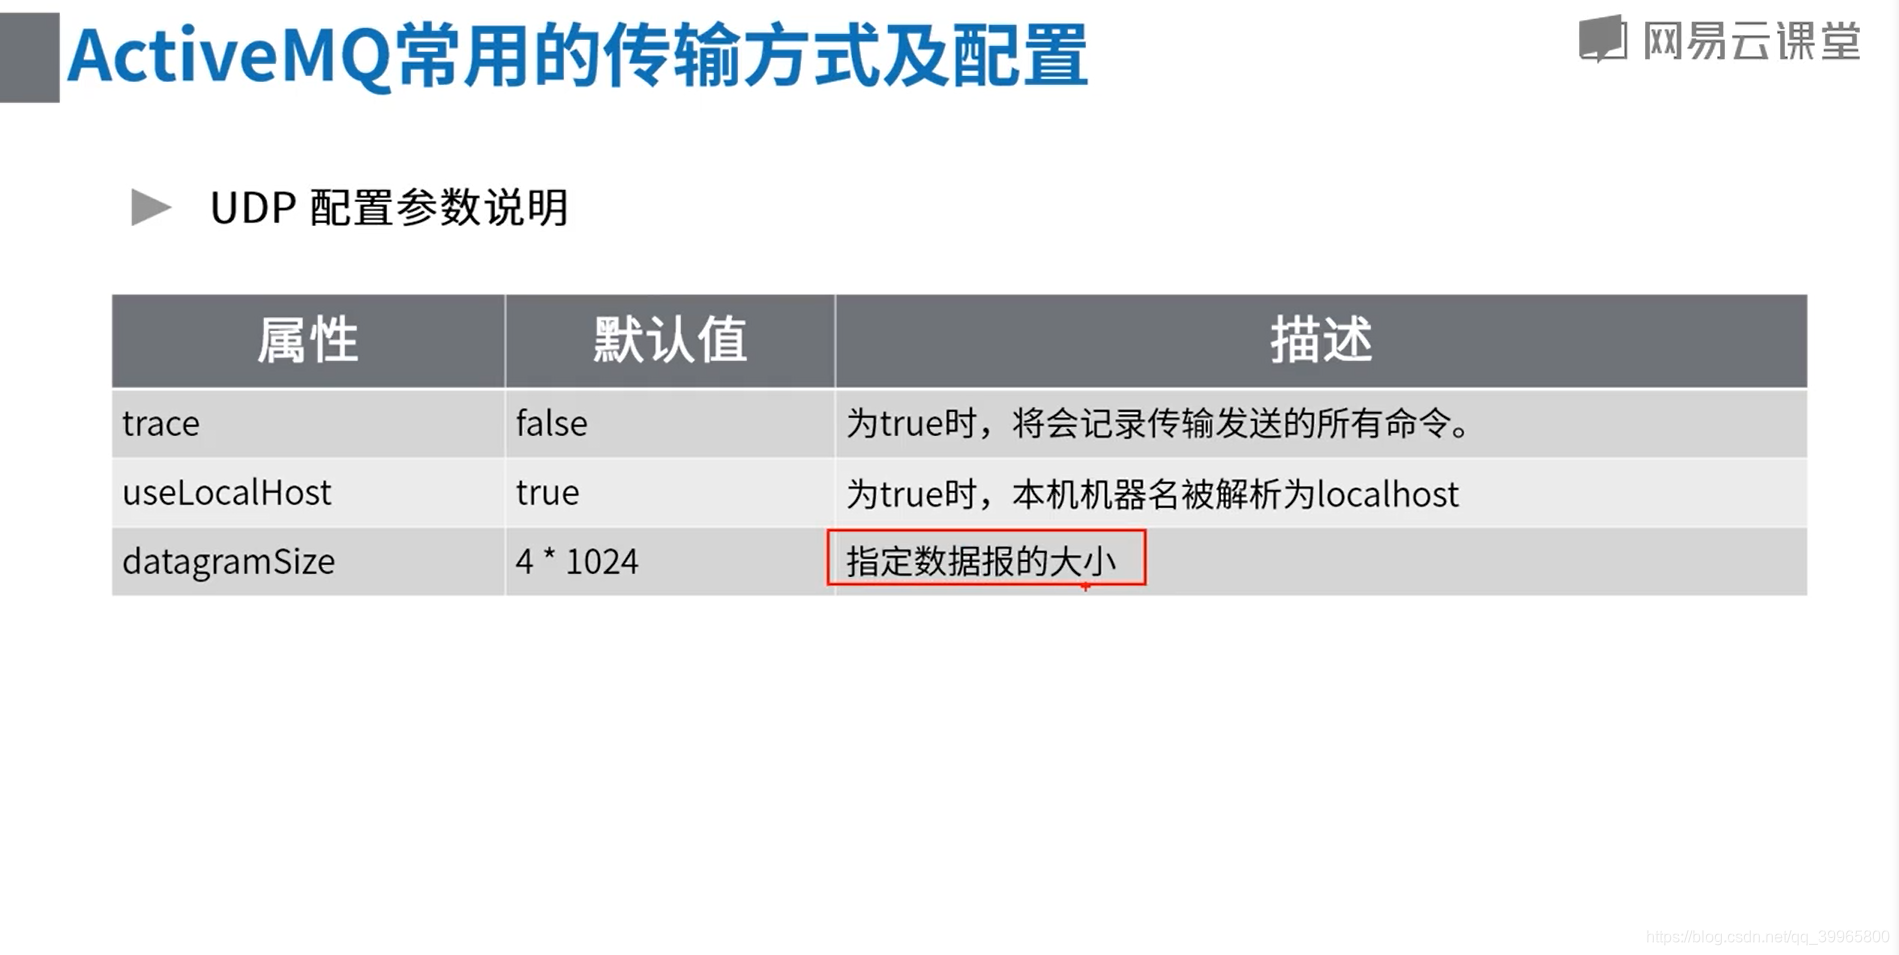
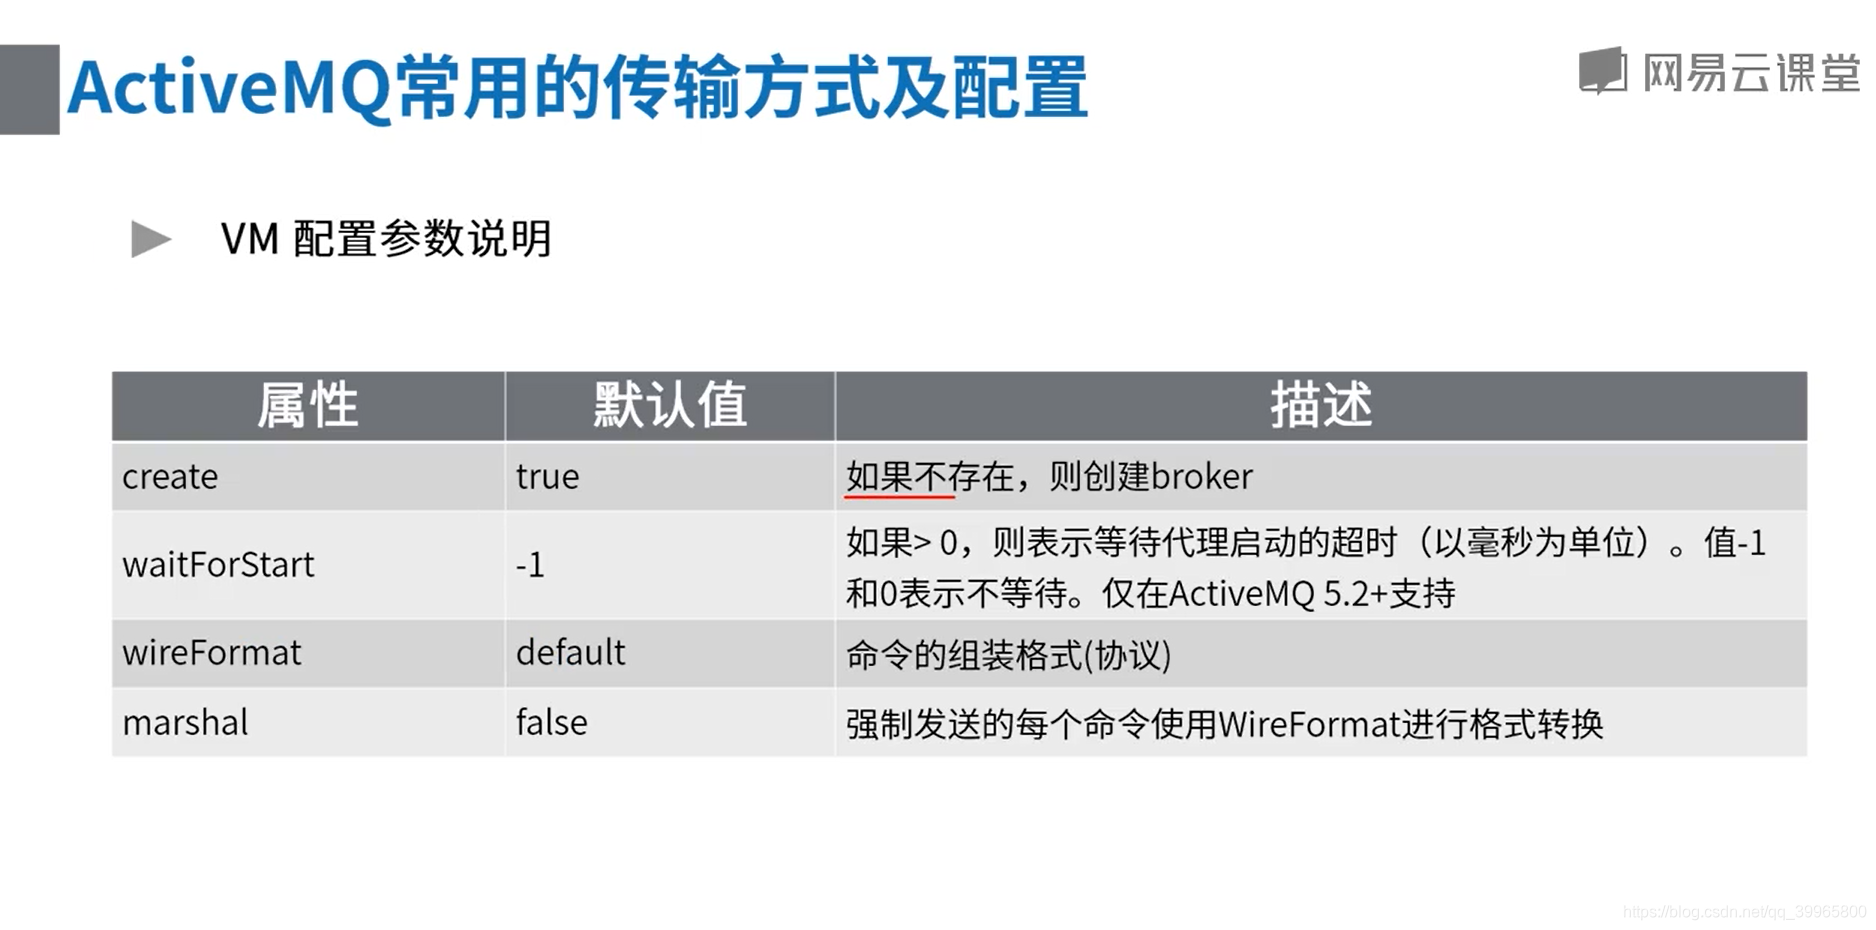
2、传输协议改成UDP

package com.study.mq.a1_example.transport; import org.apache.activemq.ActiveMQConnectionFactory; import javax.jms.*; // UDP示例 http://activemq.apache.org/udp-transport-reference.html
public class ConsumerAndProducerUDP {
public static void main(String[] args) {
ActiveMQConnectionFactory connectionFactory = null;
Connection conn = null;
Session session = null;
MessageConsumer consumer = null;try {
// 1、创建连接工厂
connectionFactory = new ActiveMQConnectionFactory("udp://activemq.tony.com:61616");
// 2、创建连接对象
conn = connectionFactory.createConnection("admin", "admin");
conn.start(); session = conn.createSession(false, Session.AUTO_ACKNOWLEDGE); // 4、创建点对点接收的目标
Destination destination = session.createQueue("queue1"); // 5、创建生产者消息
MessageProducer producer = session.createProducer(destination);
// 设置生产者的模式,有两种可选
// DeliveryMode.PERSISTENT 当activemq关闭的时候,队列数据将会被保存
// DeliveryMode.NON_PERSISTENT 当activemq关闭的时候,队列里面的数据将会被清空
producer.setDeliveryMode(DeliveryMode.NON_PERSISTENT); // 6、创建一条消息
String text = "Hello world!";
TextMessage message = session.createTextMessage(text);
// 7、发送消息
producer.send(message); // 8、创建消费者消息
consumer = session.createConsumer(destination); // 9、接收消息
Message consumerMessage = consumer.receive();
if (consumerMessage instanceof TextMessage) {
System.out.println("收到文本消息:" + ((TextMessage) consumerMessage).getText());
} else {
System.out.println(consumerMessage);
}
} catch (JMSException e) {
e.printStackTrace();
} finally {
if (consumer != null) {
try {
consumer.close();
} catch (JMSException e) {
e.printStackTrace();
}
} if (session != null) {
try {
session.close();
} catch (JMSException e1) {
e1.printStackTrace();
}
} if (conn != null) {
try {
conn.close();
} catch (JMSException e1) {
e1.printStackTrace();
}
}
}
}
}
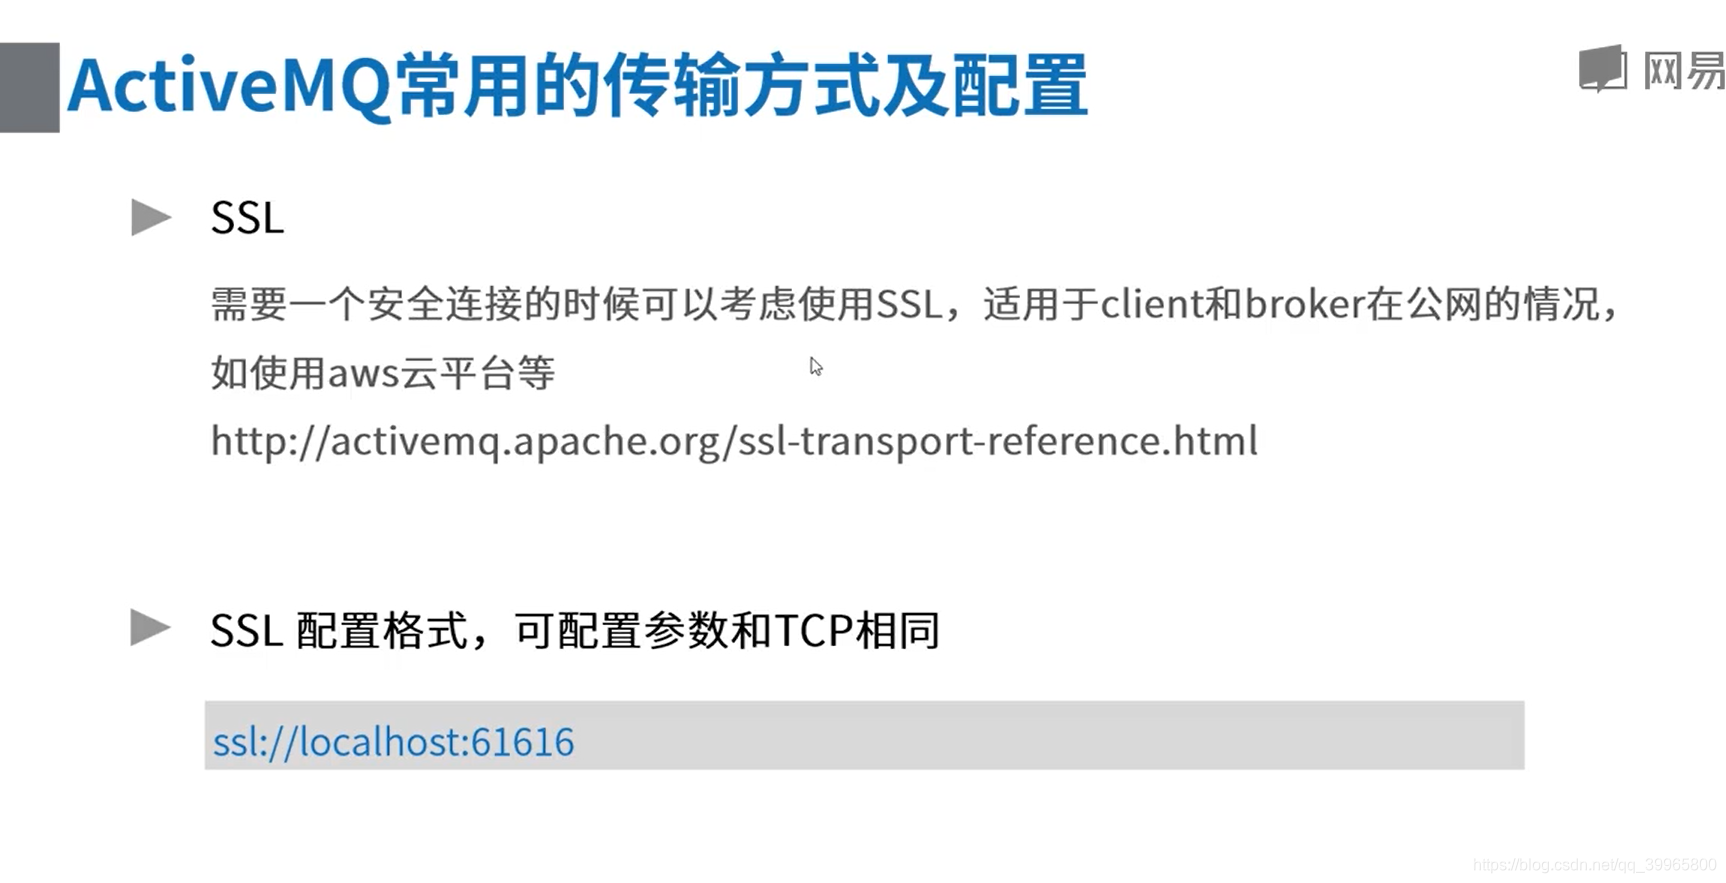
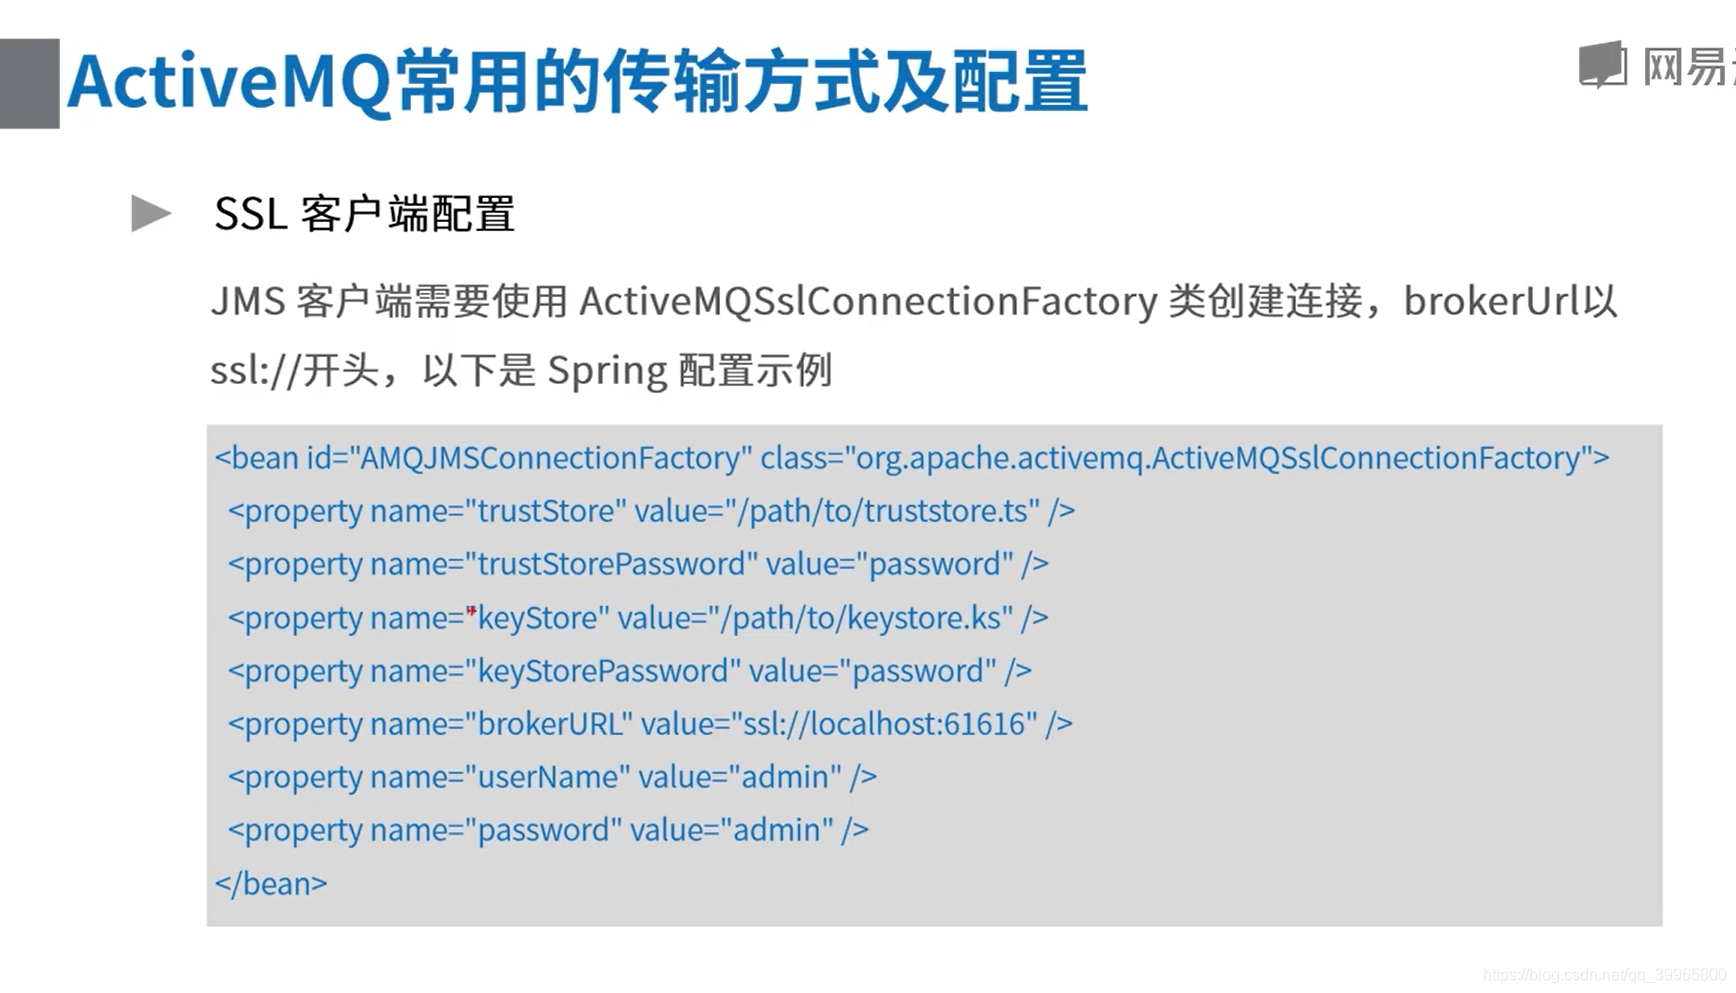
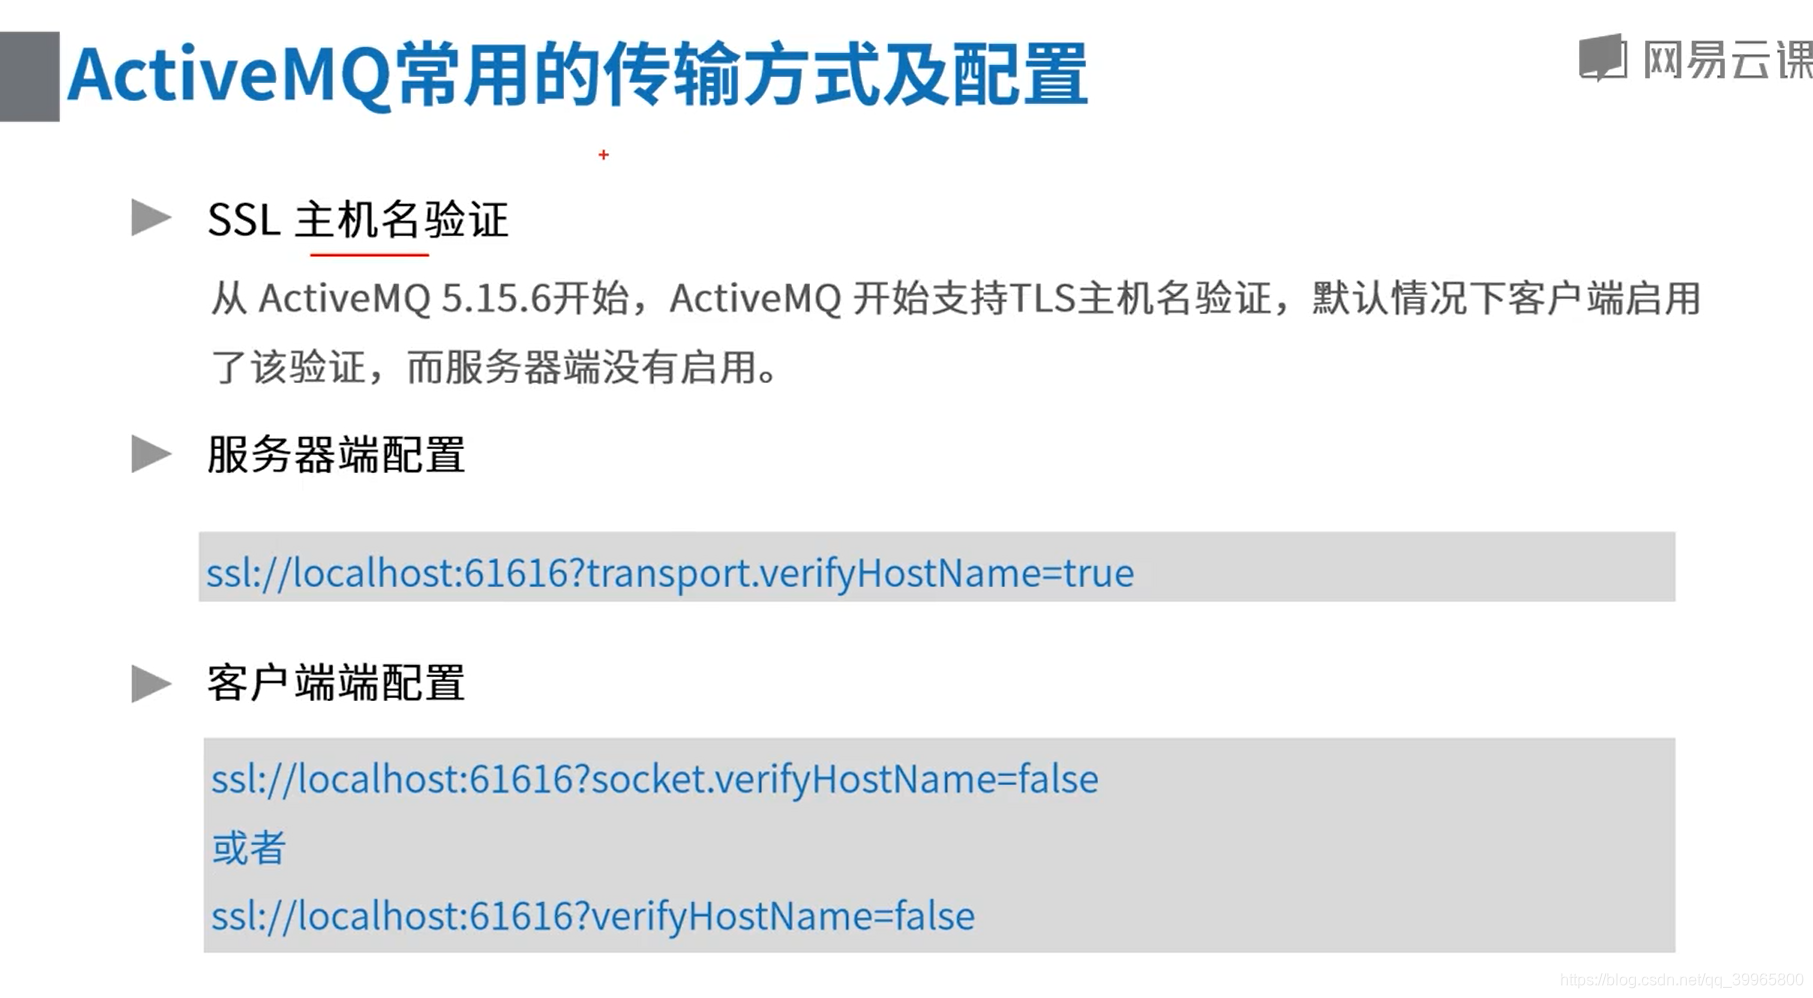
3、SSL修改
 ssl客户端: http://activemq.apache.org/ssl-transport-reference.html

 http://activemq.apache.org/how-do-i-use-ssl.html
package com.study.mq.a1_example.transport; import org.apache.activemq.ActiveMQConnectionFactory;
import org.apache.activemq.ActiveMQSslConnectionFactory; import javax.jms.*; // ssl客户端: http://activemq.apache.org/ssl-transport-reference.html
// http://activemq.apache.org/how-do-i-use-ssl.html
public class ConsumerAndProducerSSL {
public static void main(String[] args) {
// ssl
ActiveMQSslConnectionFactory connectionFactory = null;
Connection conn = null;
Session session = null;
MessageConsumer consumer = null;try {
// 1、创建连接工厂
connectionFactory = new ActiveMQSslConnectionFactory("ssl://activemq.tony.com:61617?socket.verifyHostName=false");
connectionFactory.setTrustStore("activemq-client.ts");
connectionFactory.setTrustStorePassword("netease");
// 2、创建连接对象
conn = connectionFactory.createConnection();
conn.start();
// 3、 创建session
session = conn.createSession(false, Session.AUTO_ACKNOWLEDGE);
// 4、创建点对点接收的目标
Destination destination = session.createQueue("queue1");
// 5、创建生产者消息
MessageProducer producer = session.createProducer(destination);
// 设置生产者的模式,有两种可选
producer.setDeliveryMode(DeliveryMode.NON_PERSISTENT);
// 6、创建一条消息
String text = "Hello world!";
TextMessage message = session.createTextMessage(text);
// 7、发送消息
producer.send(message);
// 8、创建消费者消息
consumer = session.createConsumer(destination);
// 9、接收消息
Message consumerMessage = consumer.receive();
if (consumerMessage instanceof TextMessage) {
System.out.println("收到文本消息:" + ((TextMessage) consumerMessage).getText());
} else {
System.out.println(consumerMessage);
} consumer.close();
session.close();
conn.close();
} catch (Exception e) {
e.printStackTrace();
}
}
}
4、NIO
 http://activemq.apache.org/configuring-transports.html

 http://activemq.apache.org/tcp-transport-reference.html
package com.study.mq.a1_example.transport; import org.apache.activemq.ActiveMQConnectionFactory; import javax.jms.*; // http://activemq.apache.org/configuring-transports.html
// http://activemq.apache.org/tcp-transport-reference.html
public class ConsumerAndProducerNIO {
public static void main(String[] args) {
ActiveMQConnectionFactory connectionFactory = null;
Connection conn = null;
Session session = null;
MessageConsumer consumer = null;try {
// 1、创建连接工厂
connectionFactory = new ActiveMQConnectionFactory("nio://activemq.tony.com:61616");
// 2、创建连接对象
conn = connectionFactory.createConnection();
conn.start();
// 3、 创建session
session = conn.createSession(false, Session.AUTO_ACKNOWLEDGE);
// 4、创建点对点接收的目标
Destination destination = session.createQueue("queue1");
// 5、创建生产者消息
MessageProducer producer = session.createProducer(destination);
// 设置生产者的模式,有两种可选
producer.setDeliveryMode(DeliveryMode.NON_PERSISTENT);
// 6、创建一条消息
String text = "Hello world!";
TextMessage message = session.createTextMessage(text);
// 7、发送消息
producer.send(message);
// 8、创建消费者消息
consumer = session.createConsumer(destination);
// 9、接收消息
Message consumerMessage = consumer.receive();
if (consumerMessage instanceof TextMessage) {
System.out.println("收到文本消息:" + ((TextMessage) consumerMessage).getText());
} else {
System.out.println(consumerMessage);
} consumer.close();
session.close();
conn.close();
} catch (JMSException e) {
e.printStackTrace();
}
}
}
5、组播形式,自动发现服务器
- 组播的形式自动发现服务器: http://activemq.apache.org/multicast-transport-reference.html
- 自己电脑上启动一个activemq,在activemq.xml connector加上
- <transportConnector name="openwire" uri="tcp://0.0.0.0:61616?trace=true&maximumConnections=1000&wireFormat.maxFrameSize=104857600" discoveryUri="multicast://default"/>
- 玩一玩就行,跨网络啥的,要配置网络.客户端不用这个,一般是服务器集群用得到
package com.study.mq.a1_example.discovery; import org.apache.activemq.ActiveMQConnectionFactory; import javax.jms.*; // 组播的形式自动发现服务器: http://activemq.apache.org/multicast-transport-reference.html
// 自己电脑上启动一个activemq,在activemq.xml connector加上
// <transportConnector name="openwire" uri="tcp://0.0.0.0:61616?trace=true&maximumConnections=1000&wireFormat.maxFrameSize=104857600" discoveryUri="multicast://default"/>
// 玩一玩就行,跨网络啥的,要配置网络.客户端不用这个,一般是服务器集群用得到
public class ConsumerAndProducerMulticastDiscovery {
public static void main(String[] args) {
ActiveMQConnectionFactory connectionFactory = null;
Connection conn = null;
Session session = null;
MessageConsumer consumer = null;try {
// 1、创建连接工厂(不需要手动指定,自动发现)
connectionFactory = new ActiveMQConnectionFactory("discovery:(multicast://default)");
// 2、创建连接对象
conn = connectionFactory.createConnection();
conn.start();
// 3、 创建session
session = conn.createSession(false, Session.AUTO_ACKNOWLEDGE);
// 4、创建点对点接收的目标
Destination destination = session.createQueue("queue1");
// 5、创建生产者消息
MessageProducer producer = session.createProducer(destination);
// 设置生产者的模式,有两种可选
producer.setDeliveryMode(DeliveryMode.NON_PERSISTENT);
// 6、创建一条消息
String text = "Hello world!";
TextMessage message = session.createTextMessage(text);
// 7、发送消息
producer.send(message);
// 8、创建消费者消息
consumer = session.createConsumer(destination);
// 9、接收消息
Message consumerMessage = consumer.receive();
if (consumerMessage instanceof TextMessage) {
System.out.println("收到文本消息:" + ((TextMessage) consumerMessage).getText());
} else {
System.out.println(consumerMessage);
} consumer.close();
session.close();
conn.close();
} catch (JMSException e) {
e.printStackTrace();
}
}
}
6、AMQP协议

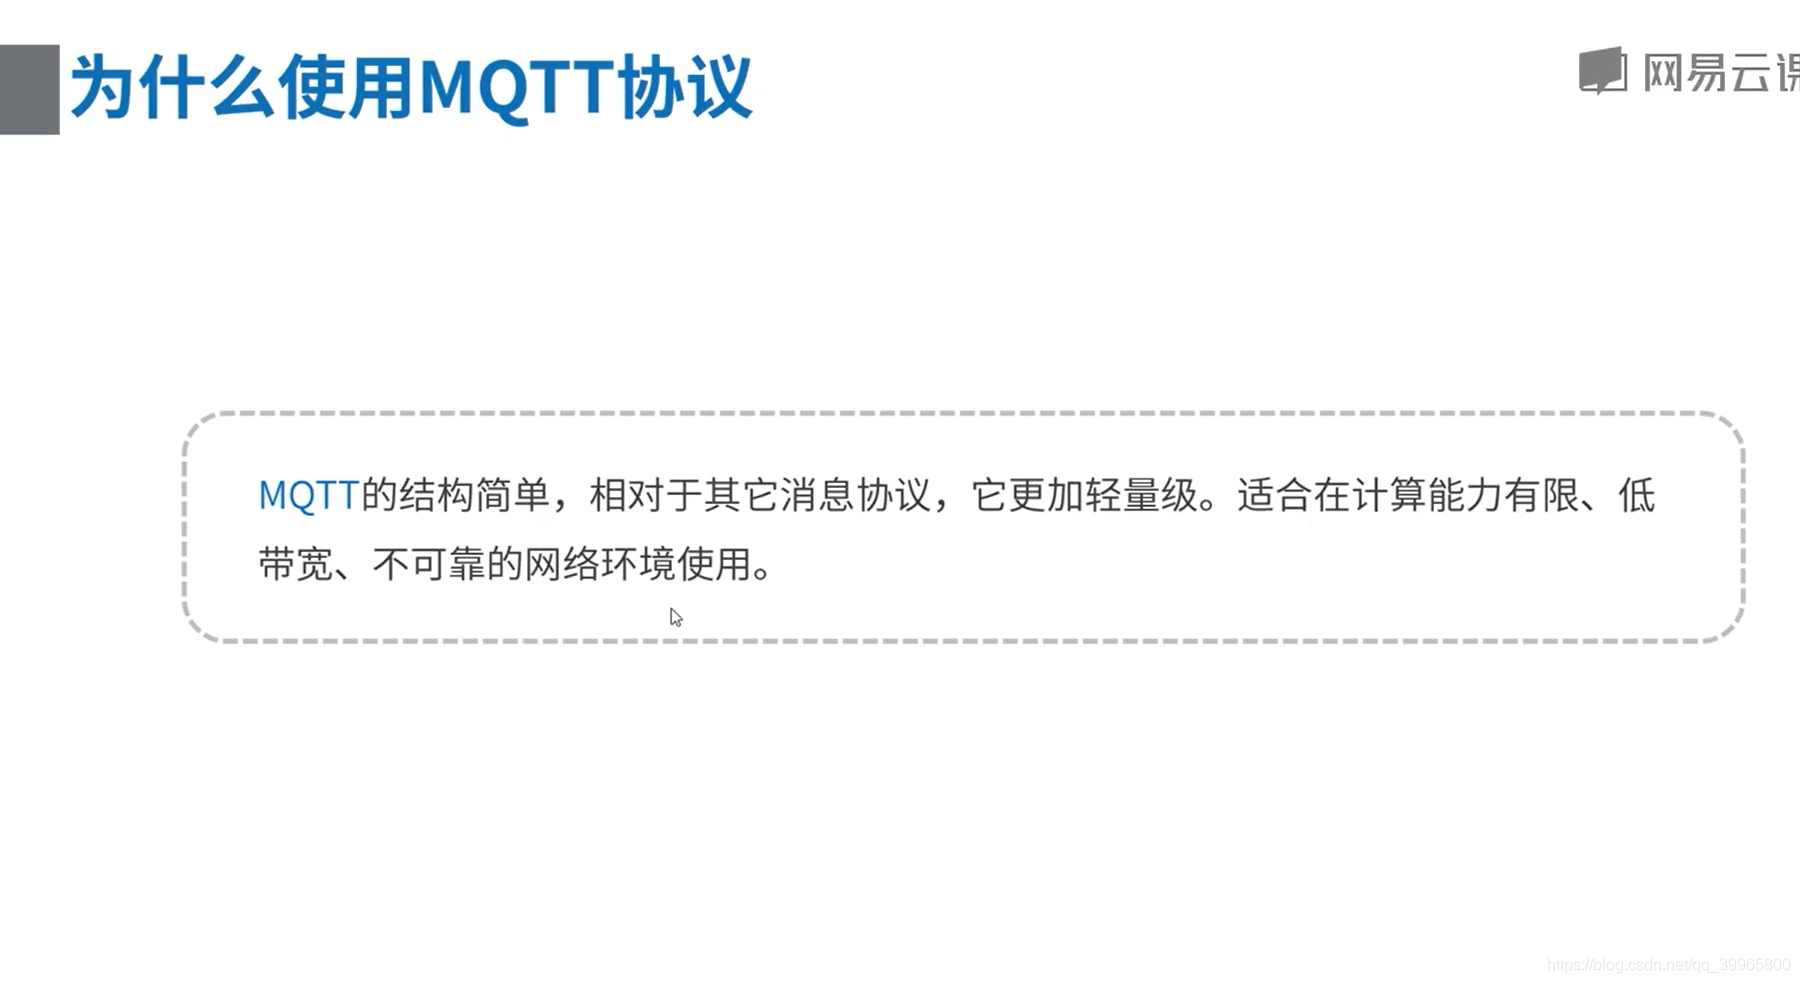
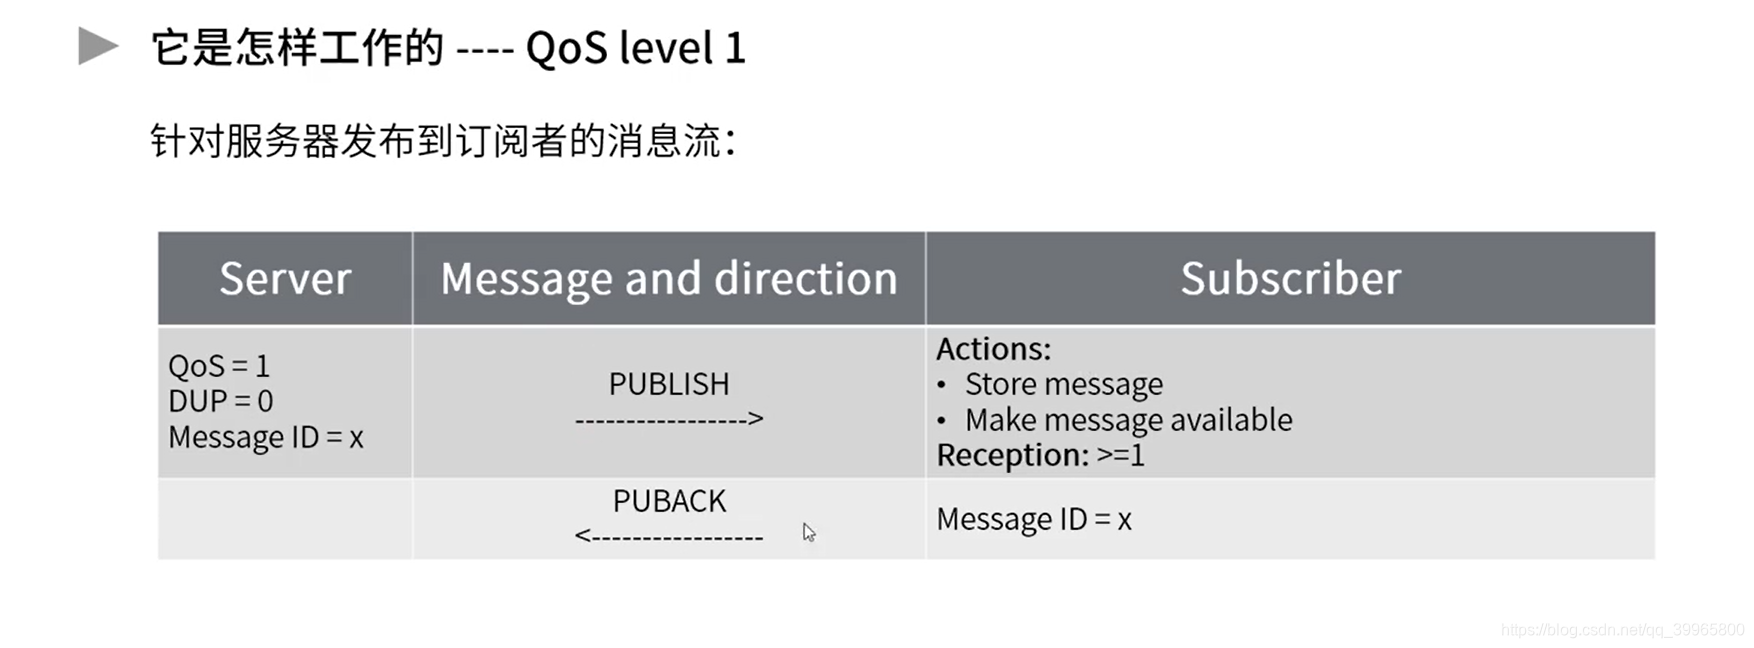
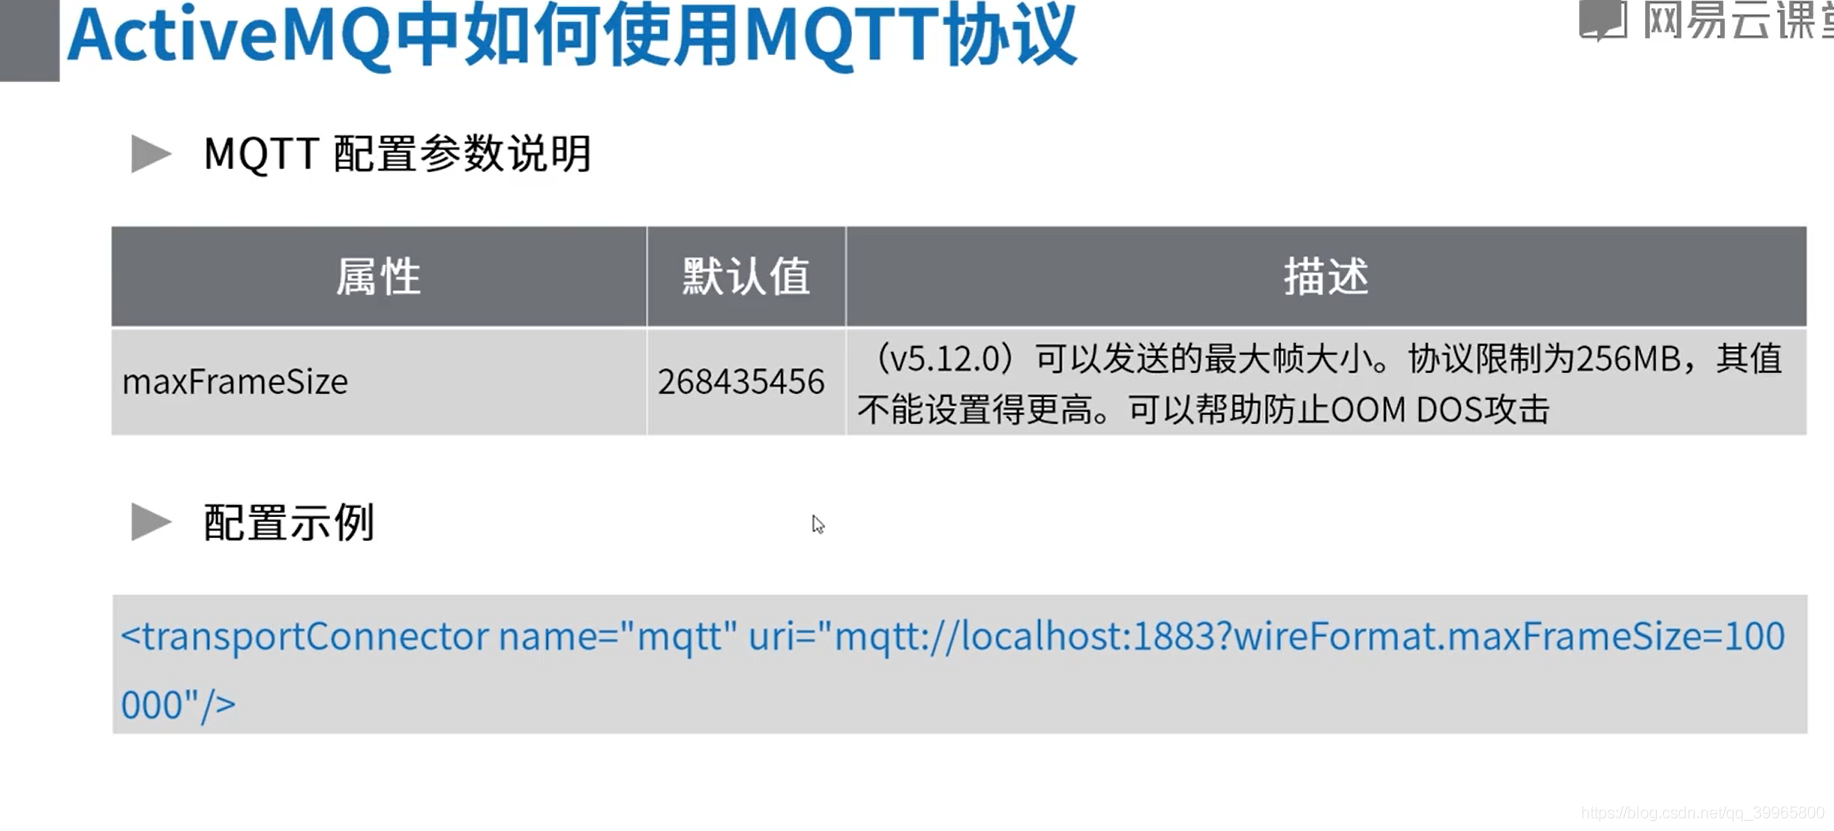
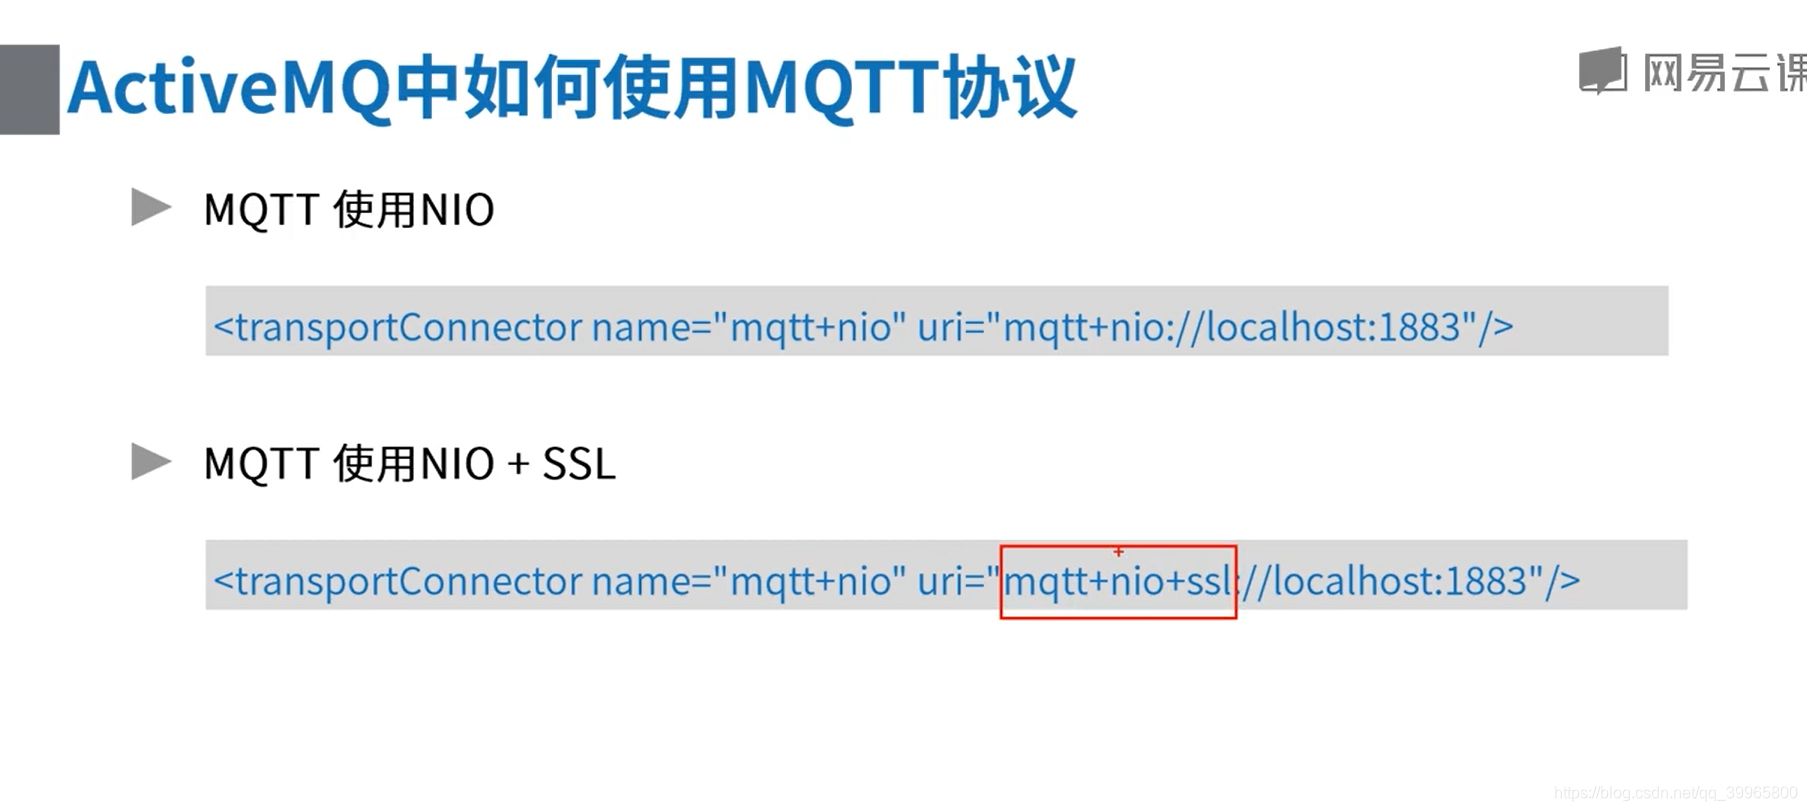
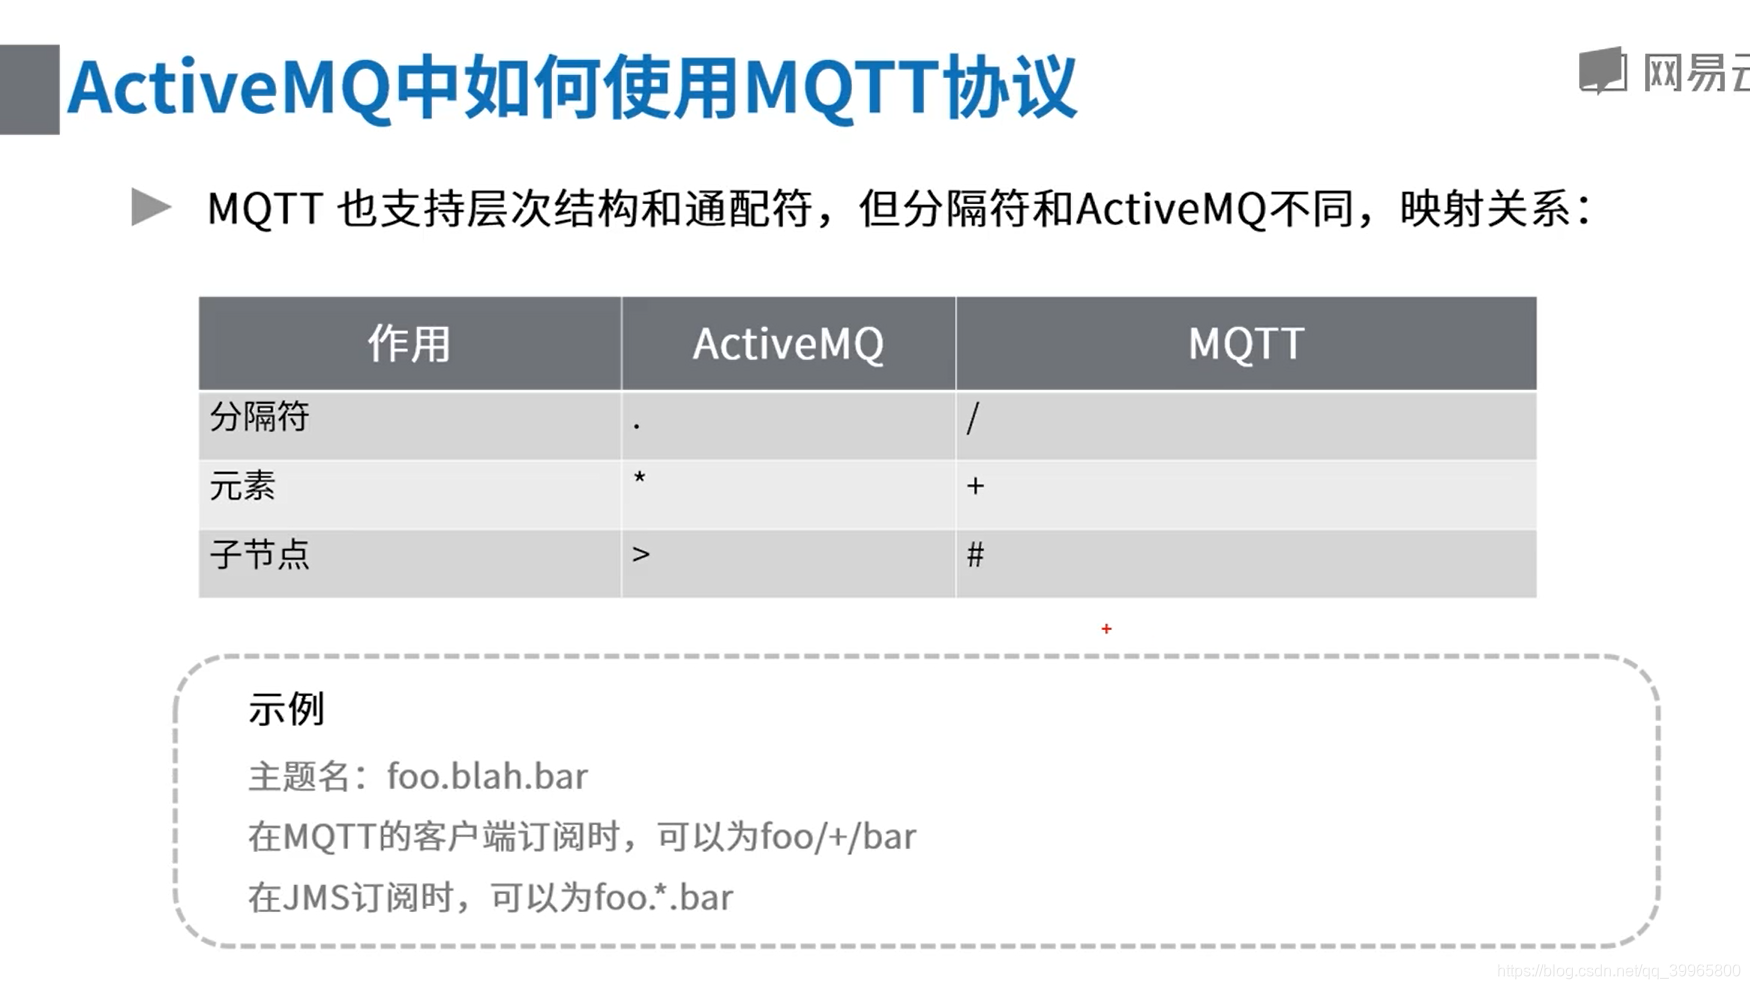
7、MQTT协议
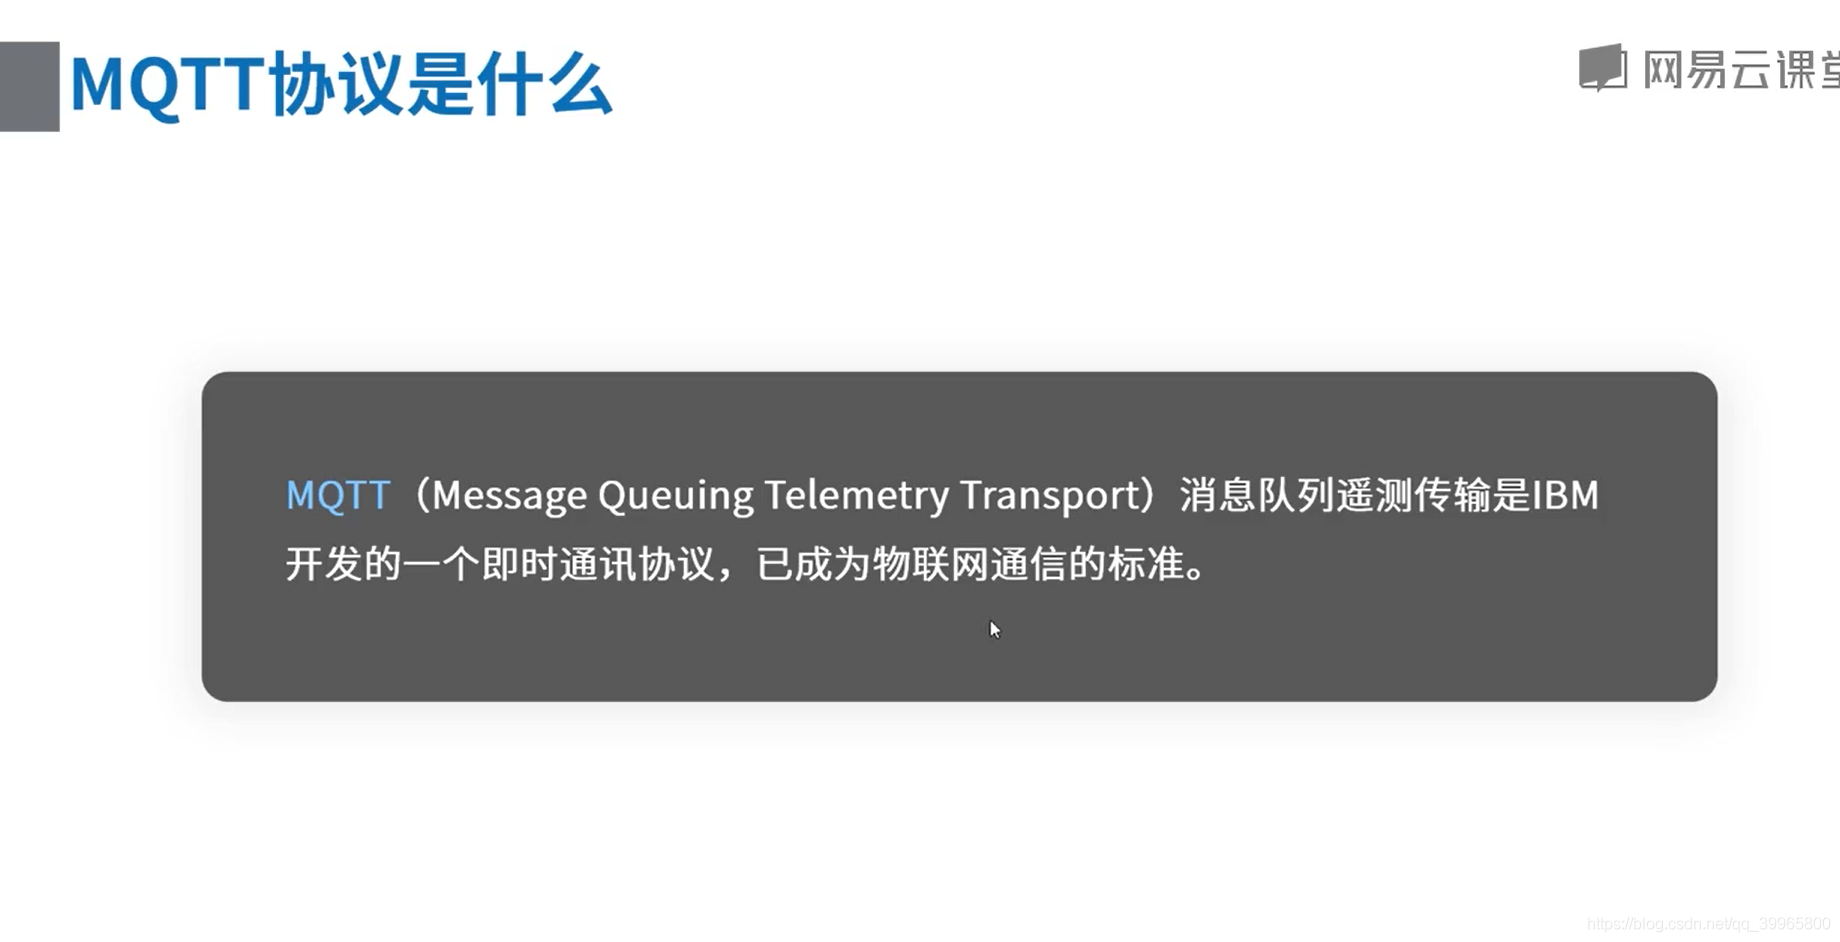
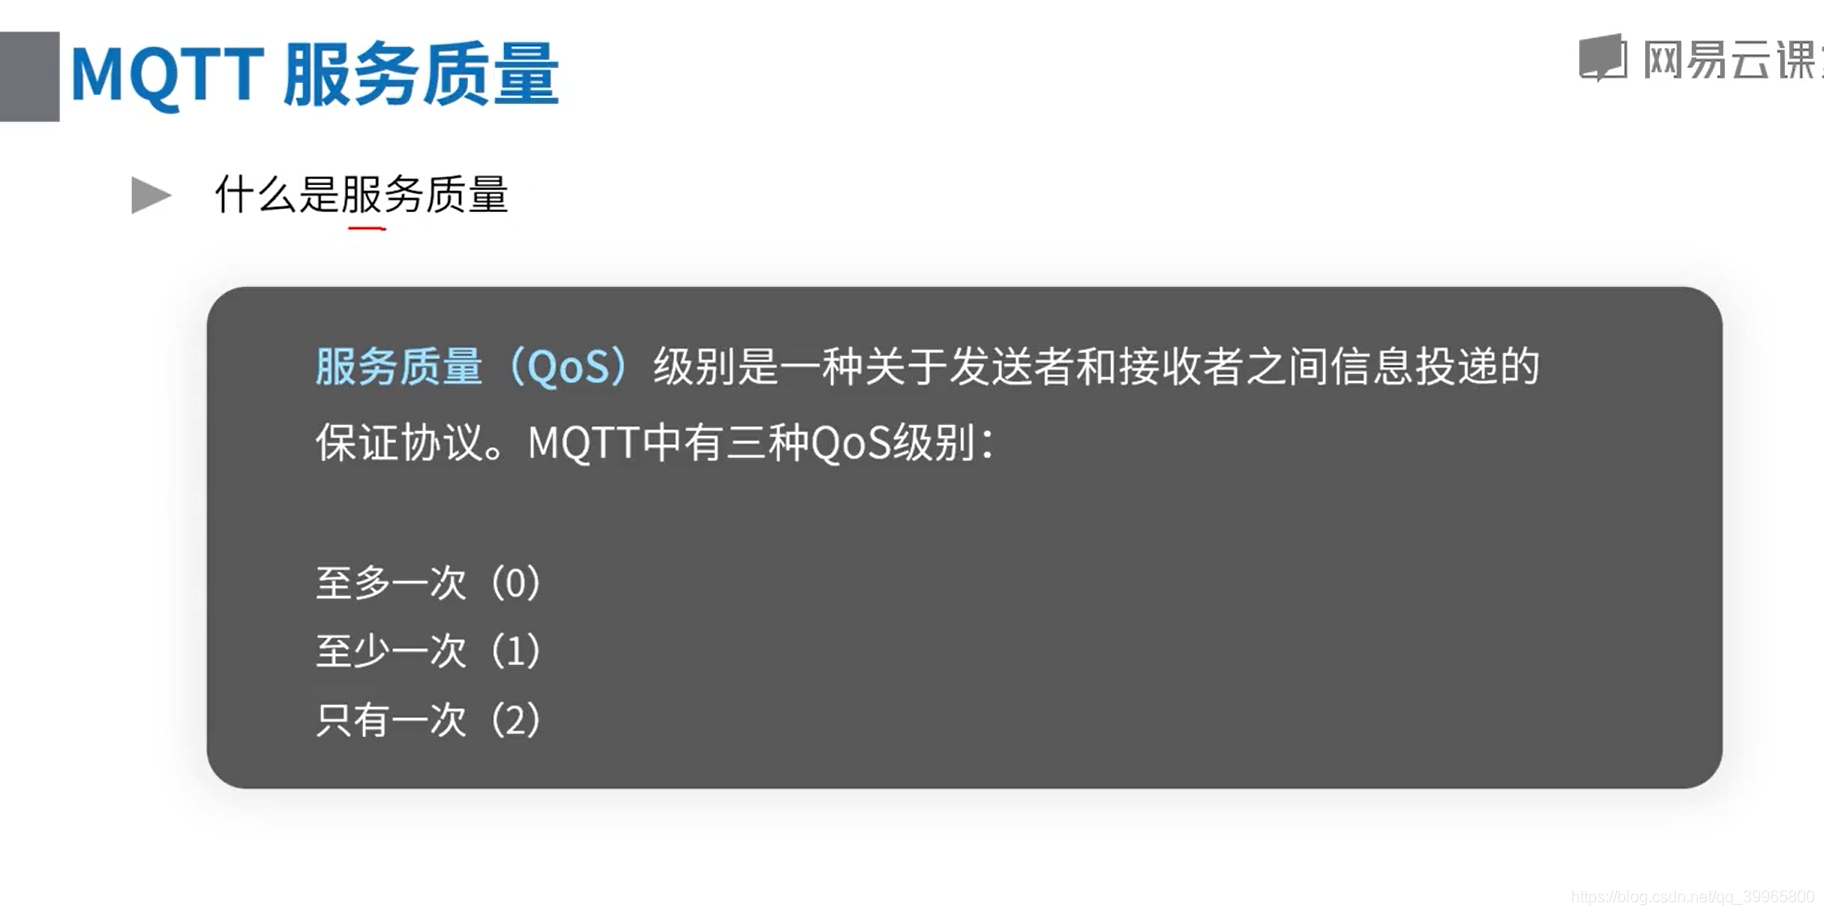
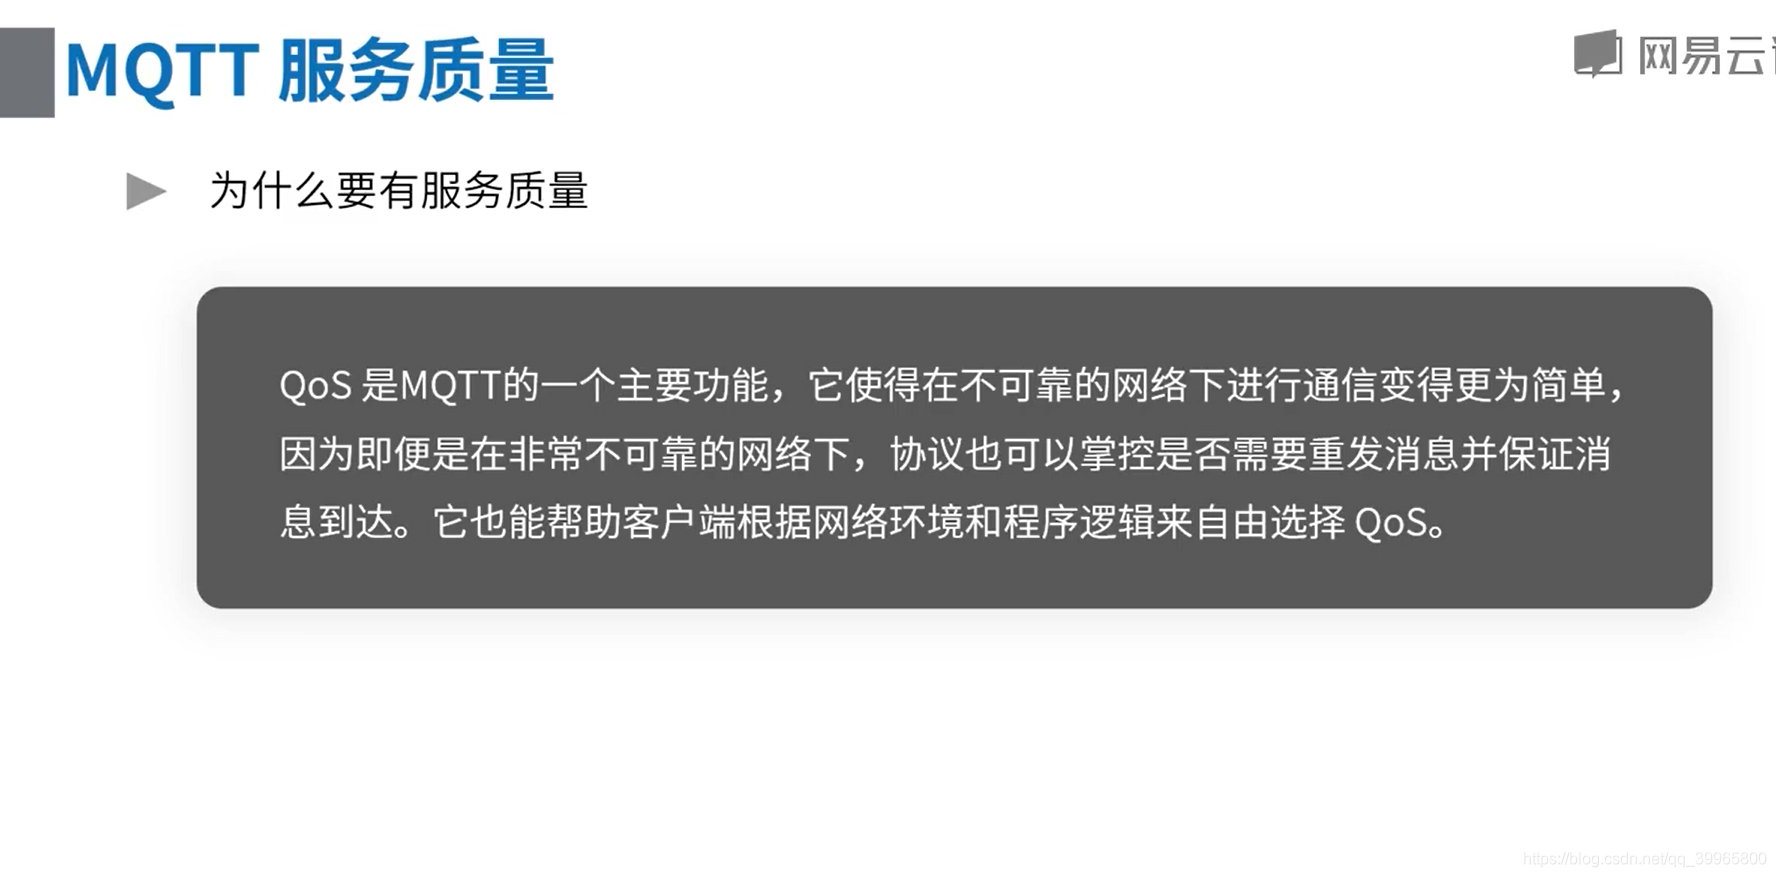
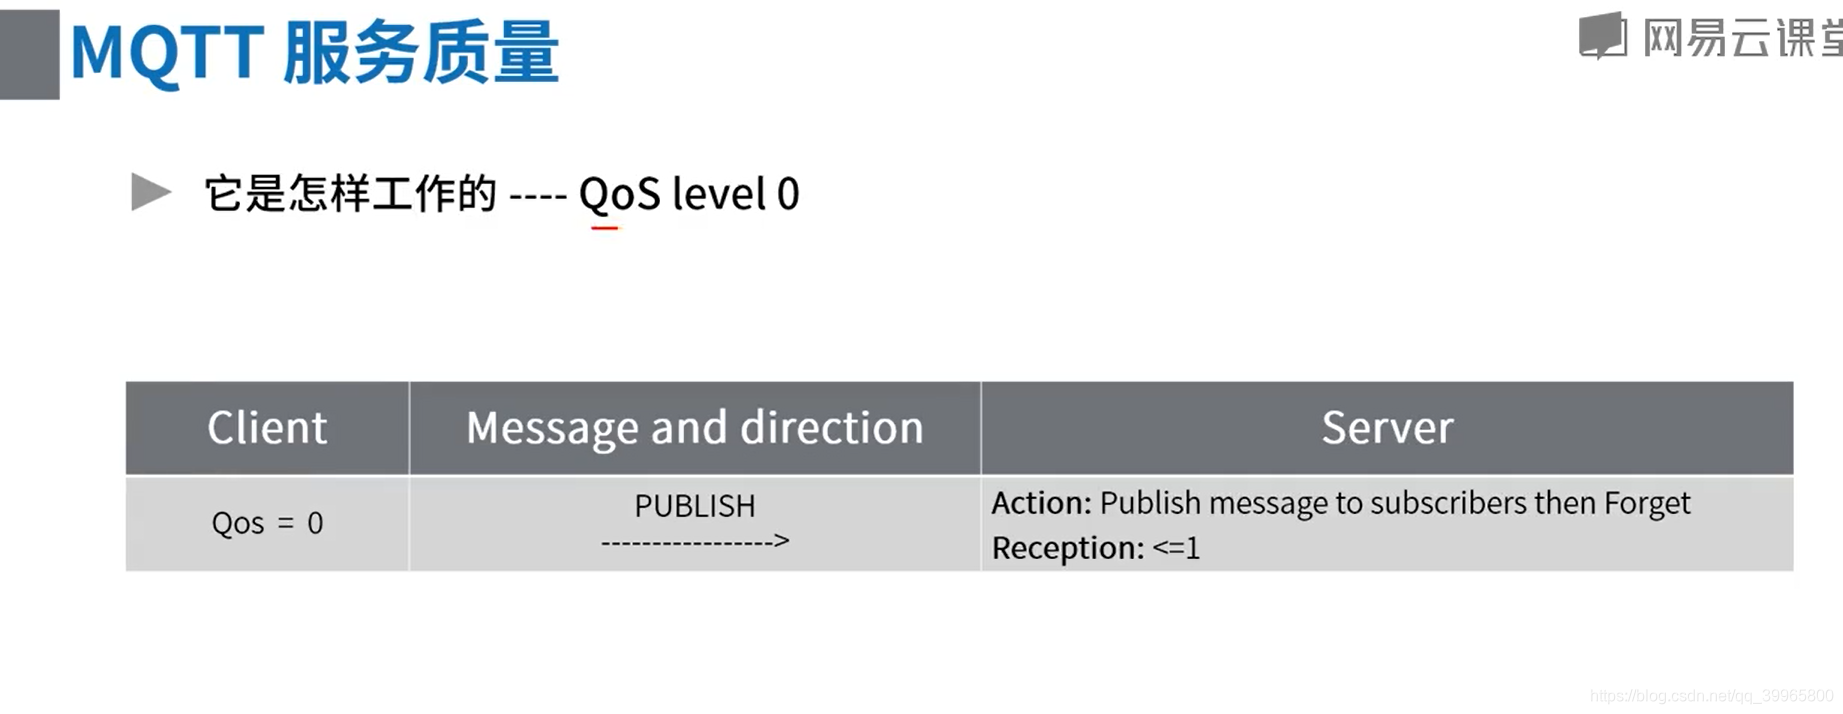

没收到消息会进行重发
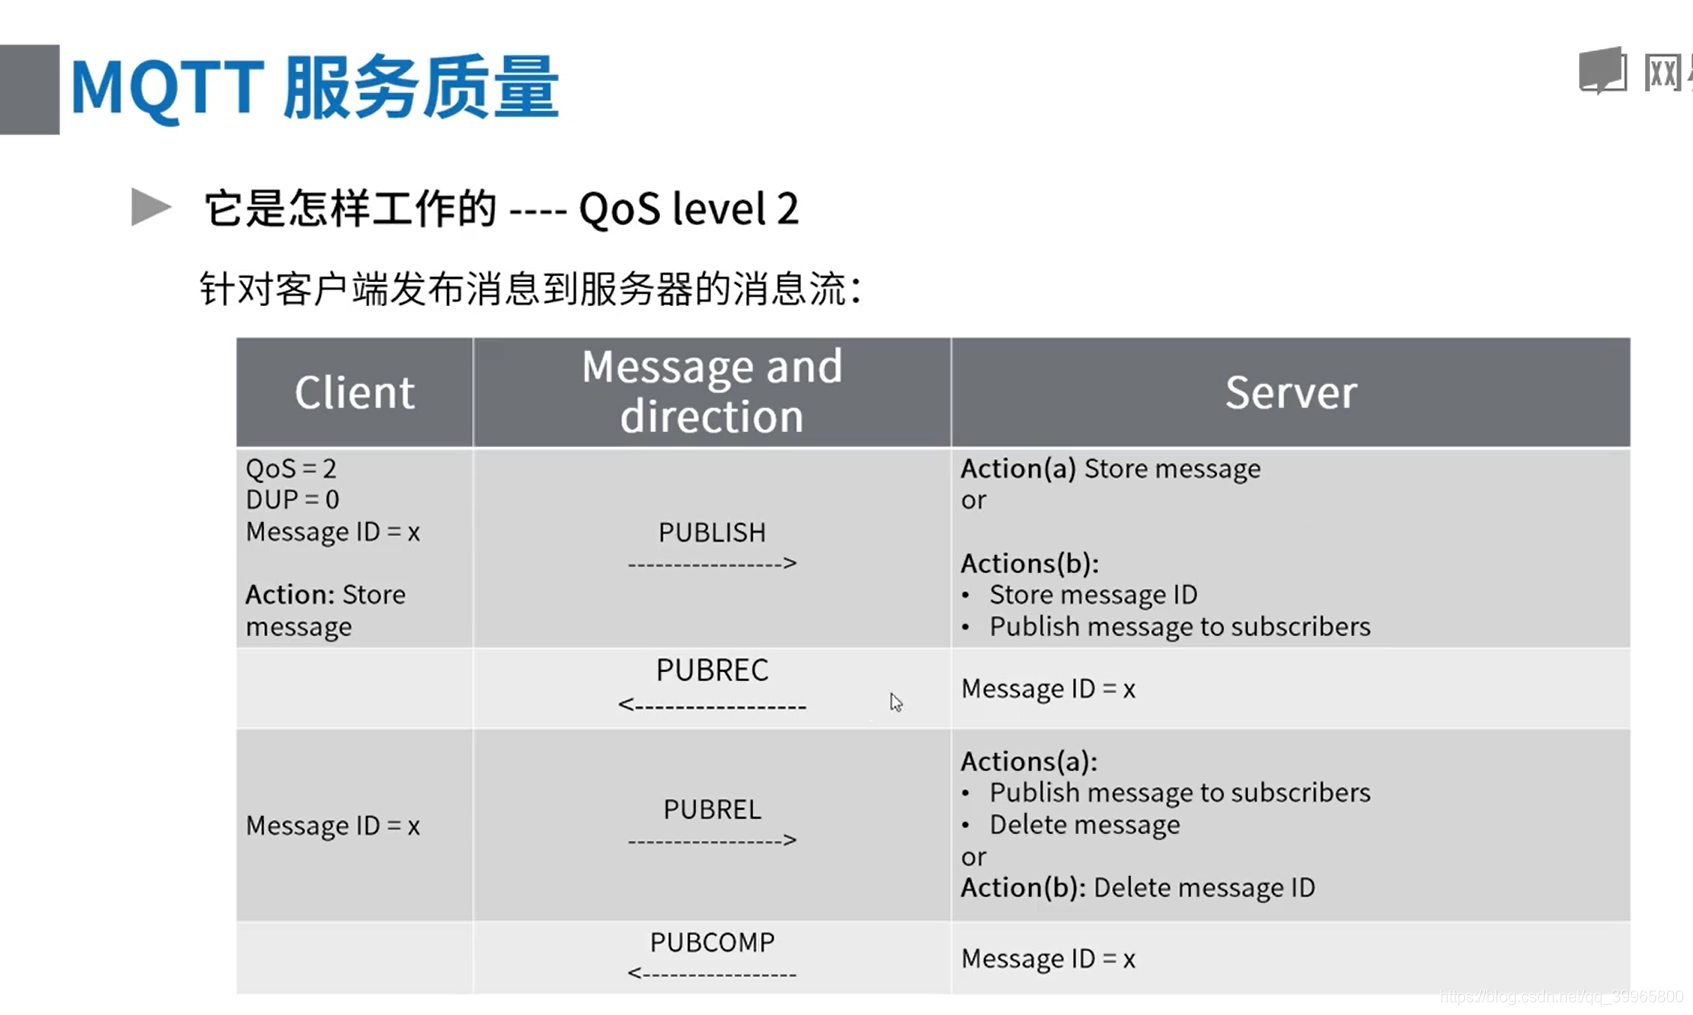
有一个去重的操作,并且性能很差

MQTT实际操作
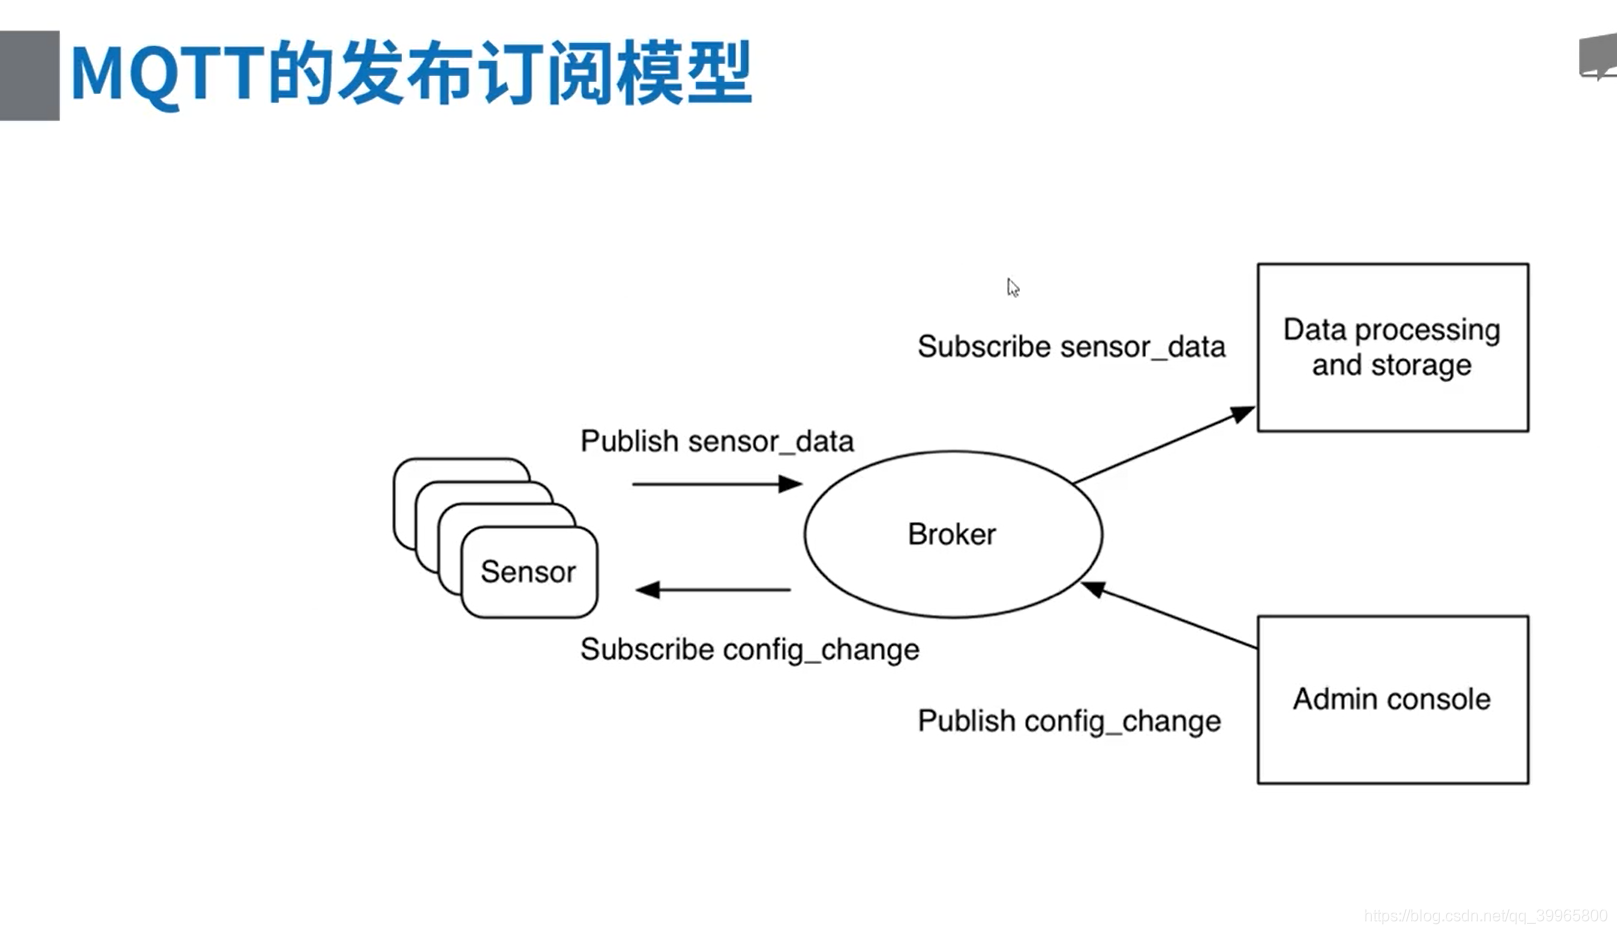
是一种发布订阅模式
        <dependency>

            <groupId>org.eclipse.paho</groupId>

            <artifactId>org.eclipse.paho.client.mqttv3</artifactId>

            <version>1.2.0</version>

        </dependency>
package com.study.mq.a2_mqtt; import org.eclipse.paho.client.mqttv3.IMqttDeliveryToken;
import org.eclipse.paho.client.mqttv3.MqttCallback;
import org.eclipse.paho.client.mqttv3.MqttClient;
import org.eclipse.paho.client.mqttv3.MqttConnectOptions;
import org.eclipse.paho.client.mqttv3.MqttException;
import org.eclipse.paho.client.mqttv3.MqttMessage;
import org.eclipse.paho.client.mqttv3.persist.MemoryPersistence; public class MqttProducer {
private static int qos = 1;
private static String broker = "tcp://activemq.tony.com:1883";
private static String userName = "admin";
private static String passWord = "admin";private static MqttClient connect(String clientId, String userName,
String password) throws MqttException {
MemoryPersistence persistence = new MemoryPersistence();
MqttConnectOptions connOpts = new MqttConnectOptions();
connOpts.setCleanSession(true);
connOpts.setUserName(userName);
connOpts.setPassword(password.toCharArray());
connOpts.setConnectionTimeout(10);
connOpts.setKeepAliveInterval(20);
// String[] uris = {"tcp://10.100.124.206:1883","tcp://10.100.124.207:1883"};
// connOpts.setServerURIs(uris); //这个是mqtt客户端实现的负载均衡和容错
MqttClient mqttClient = new MqttClient(broker, clientId, persistence);
mqttClient.setCallback(new PushCallback("test"));
mqttClient.connect(connOpts);
return mqttClient;
} private static void pub(MqttClient sampleClient, String msg, String topic)
throws Exception {
MqttMessage message = new MqttMessage(msg.getBytes());
message.setQos(qos);
message.setRetained(false);
sampleClient.publish(topic, message);
} private static void publish(String str, String clientId, String topic) throws Exception {
MqttClient mqttClient = connect(clientId, userName, passWord);
if (mqttClient != null) {
pub(mqttClient, str, topic);
System.out.println("pub-->" + str);
}
if (mqttClient != null) {
mqttClient.disconnect();
}
} public static void main(String[] args) throws Exception {
publish("message content", "producer-client-id-0", "x/y/z");
}
}
class PushCallback implements MqttCallback {
private String threadId;public PushCallback(String threadId) {
this.threadId = threadId;
} public void connectionLost(Throwable cause) {
cause.printStackTrace();
} public void deliveryComplete(IMqttDeliveryToken token) {
System.out.println("服务器是否正确接收---------" + token.isComplete());
} public void messageArrived(String topic, MqttMessage message) throws Exception {
String msg = new String(message.getPayload());
System.out.println(threadId + " " + msg);
}
}
package com.study.mq.a2_mqtt; import org.eclipse.paho.client.mqttv3.IMqttMessageListener;
import org.eclipse.paho.client.mqttv3.MqttClient;
import org.eclipse.paho.client.mqttv3.MqttConnectOptions;
import org.eclipse.paho.client.mqttv3.MqttException;
import org.eclipse.paho.client.mqttv3.persist.MemoryPersistence; public class MqttConsumer {
private static int qos = 2;
private static String broker = "tcp://activemq.tony.com:1883";
private static String userName = "admin";
private static String passWord = "admin";private static MqttClient connect(String clientId) throws MqttException {
MemoryPersistence persistence = new MemoryPersistence();
MqttConnectOptions connOpts = new MqttConnectOptions();
connOpts.setCleanSession(false);
connOpts.setUserName(userName);
connOpts.setPassword(passWord.toCharArray());
connOpts.setConnectionTimeout(10);
connOpts.setKeepAliveInterval(20);
MqttClient mqttClient = new MqttClient(broker, clientId, persistence);
mqttClient.connect(connOpts);
return mqttClient; } public static void sub(MqttClient mqttClient, String topic) throws MqttException {
int[] Qos = {qos};
String[] topics = {topic};
mqttClient.subscribe(topics, Qos, new IMqttMessageListener[]{(s, mqttMessage) -> {
System.out.println("收到新消息" + s + " > " + mqttMessage.toString());
}});
} private static void runsub(String clientId, String topic) throws MqttException {
MqttClient mqttClient = connect(clientId);
if (mqttClient != null) {
sub(mqttClient, topic);
}
} public static void main(String[] args) throws MqttException {
runsub("consumer-client-id-1", "x/y/z");
}
}
发布订阅
订阅这个topic的客户端都会收到消息
package com.study.mq.a1_example.helloworld.topic; import org.apache.activemq.ActiveMQConnectionFactory; import javax.jms.*; // 发布订阅 - 1个生产者对多个消费者
public class Producer {
public static void main(String[] args) {
// brokerUrl: http://activemq.apache.org/connection-configuration-uri.html
new ProducerThread("tcp://activemq.tony.com:61616", "topic1").start();
}static class ProducerThread extends Thread {
String brokerUrl;
String destinationUrl; public ProducerThread(String brokerUrl, String destinationUrl) {
this.brokerUrl = brokerUrl;
this.destinationUrl = destinationUrl;
} @Override
public void run() {
ActiveMQConnectionFactory connectionFactory;
Connection conn;
Session session; try {
// 1、创建连接工厂
connectionFactory = new ActiveMQConnectionFactory(brokerUrl);
// 2、创建连接对象md
conn = connectionFactory.createConnection();
conn.start();
// 3、创建会话
session = conn.createSession(false, Session.AUTO_ACKNOWLEDGE);
// 4、创建发布的目标 topic
Destination destination = session.createTopic(destinationUrl);
// 5、创建生产者消息
MessageProducer producer = session.createProducer(destination);
// 设置生产者的模式,有两种可选 持久化 / 不持久化
producer.setDeliveryMode(DeliveryMode.NON_PERSISTENT);
// 6、创建一条文本消息
String text = "Hello world!";
TextMessage message = session.createTextMessage(text);
for (int i = 0; i < 1; i++) {
// 7、发送消息
producer.send(message);
}
// 8、 关闭连接
session.close();
conn.close();
} catch (JMSException e) {
e.printStackTrace();
}
}
}
}
package com.study.mq.a1_example.helloworld.topic;

import org.apache.activemq.ActiveMQConnectionFactory;

import javax.jms.*;

// 非持久订阅者

// 非持久订阅只有当客户端处于连接状态才能收到发送到某个主题的消息,

// 而当客户端处于离线状态,这个时间段发到主题的消息它永远不会收到

public class Consumer {

    public static void main(String[] args) {

        new ConsumerThread("tcp://activemq.tony.com:61616", "topic1").start();

        new ConsumerThread("tcp://activemq.tony.com:61616", "topic1").start();

    }

}

class ConsumerThread extends Thread {

    String brokerUrl;

    String destinationUrl;

    public ConsumerThread(String brokerUrl, String destinationUrl) {

        this.brokerUrl = brokerUrl;

        this.destinationUrl = destinationUrl;

    }

    @Override

    public void run() {

        ActiveMQConnectionFactory connectionFactory;

        Connection conn;

        Session session;

        MessageConsumer consumer;

        try {

            // brokerURL http://activemq.apache.org/connection-configuration-uri.html

            // 1、创建连接工厂

            connectionFactory = new ActiveMQConnectionFactory(this.brokerUrl);

            // 2、创建连接对象

            conn = connectionFactory.createConnection();

            conn.start(); // 一定要启动

            // 3、创建会话(可以创建一个或者多个session)

            session = conn.createSession(false, Session.AUTO_ACKNOWLEDGE);

            // 4、创建订阅的目标 topic  一条消息,多个订阅者接收

            Destination destination = session.createTopic(destinationUrl);

            // 5、创建消费者消息 http://activemq.apache.org/destination-options.html

            consumer = session.createConsumer(destination);

            // 6、接收消息(没有消息就持续等待)

            Message message = consumer.receive();

            if (message instanceof TextMessage) {

                System.out.println("收到文本消息:" + ((TextMessage) message).getText());

            } else {

                System.out.println(message);

            }

            consumer.close();

            session.close();

            conn.close();

        } catch (JMSException e) {

            e.printStackTrace();

        }

    }

}
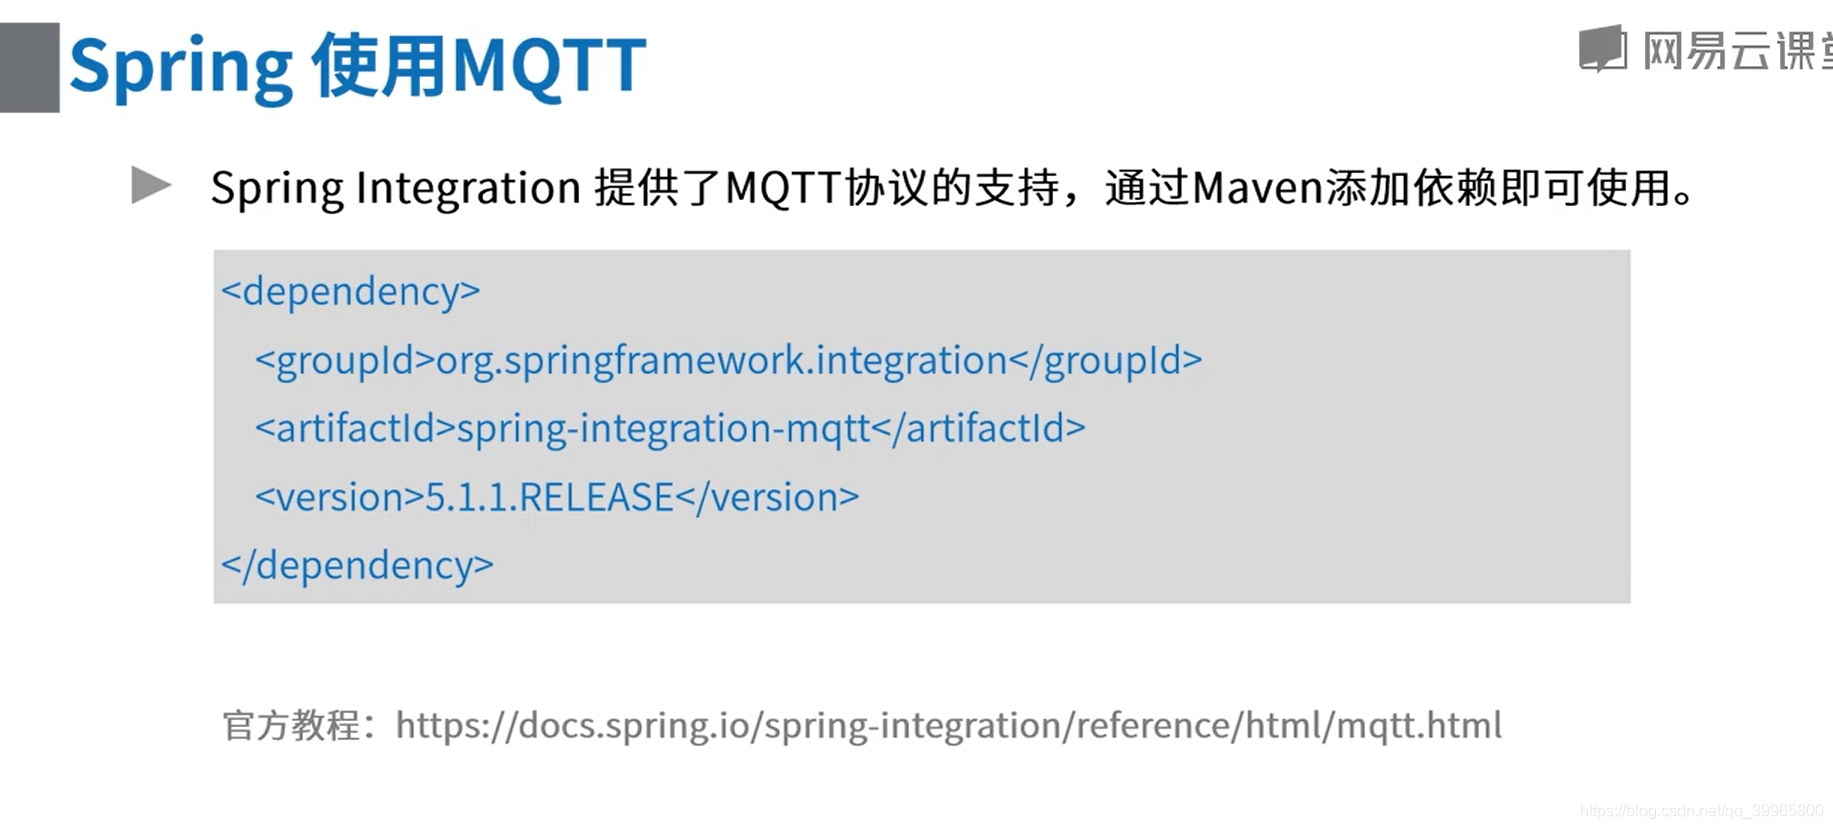
MQTT Spring使用
        <dependency>

            <groupId>org.springframework.integration</groupId>

            <artifactId>spring-integration-mqtt</artifactId>

        </dependency>
package mqtt; import org.apache.commons.logging.Log;
import org.apache.commons.logging.LogFactory;
import org.eclipse.paho.client.mqttv3.IMqttClient;
import org.eclipse.paho.client.mqttv3.MqttConnectOptions; import org.springframework.boot.SpringApplication;
import org.springframework.boot.autoconfigure.SpringBootApplication;
import org.springframework.context.annotation.Bean;
import org.springframework.integration.dsl.IntegrationFlow;
import org.springframework.integration.dsl.IntegrationFlows;
import org.springframework.integration.dsl.Pollers;
import org.springframework.integration.dsl.SourcePollingChannelAdapterSpec;
import org.springframework.integration.endpoint.MessageProducerSupport;
import org.springframework.integration.handler.LoggingHandler;
import org.springframework.integration.mqtt.core.DefaultMqttPahoClientFactory;
import org.springframework.integration.mqtt.core.MqttPahoClientFactory;
import org.springframework.integration.mqtt.inbound.MqttPahoMessageDrivenChannelAdapter;
import org.springframework.integration.mqtt.outbound.MqttPahoMessageHandler;
import org.springframework.integration.mqtt.support.DefaultPahoMessageConverter;
import org.springframework.messaging.Message;
import org.springframework.messaging.MessageHandler;
import org.springframework.messaging.MessagingException; import java.util.function.Consumer; @SpringBootApplication
public class MqttApplication {
private static final Log LOGGER = LogFactory.getLog(MqttApplication.class);public static void main(final String... args) {
// https://spring.io/projects/spring-integration
// https://github.com/spring-projects/spring-integration-samples/
SpringApplication.run(MqttApplication.class, args);
} @Bean
public MqttPahoClientFactory mqttClientFactory() {
DefaultMqttPahoClientFactory factory = new DefaultMqttPahoClientFactory();
MqttConnectOptions options = new MqttConnectOptions();
options.setServerURIs(new String[]{"tcp://activemq.tony.com:1883"});
options.setUserName("admin");
options.setPassword("admin".toCharArray());
factory.setConnectionOptions(options);
return factory;
} // publisher
@Bean
public IntegrationFlow mqttOutFlow() {
// IntegrationFlows.from 数据来源,可以设定为每秒去取数据
return IntegrationFlows.from(() -> "hello mqtt", new Consumer<SourcePollingChannelAdapterSpec>() {
@Override
public void accept(SourcePollingChannelAdapterSpec sourcePollingChannelAdapterSpec) {
sourcePollingChannelAdapterSpec.poller(Pollers.fixedDelay(1000));
}
})
.transform(p -> p + " sent to MQTT")
.handle(mqttOutbound())
.get();
} @Bean
public MessageHandler mqttOutbound() {
// 创建handller
MqttPahoMessageHandler messageHandler = new MqttPahoMessageHandler("client-si-producer-0", mqttClientFactory());
messageHandler.setAsync(true);
messageHandler.setDefaultTopic("x/y/z");
return messageHandler;
} // consumer
@Bean
public IntegrationFlow mqttInFlow() {
return IntegrationFlows.from(mqttInbound())
.transform(p -> p + ", received from MQTT")
.handle(printHandler())
.get();
} private MessageHandler printHandler() {
return new MessageHandler() {
@Override
public void handleMessage(Message<?> message) throws MessagingException {
System.out.println(message.getPayload().toString());
}
};
} @Bean
public MessageProducerSupport mqttInbound() {
MqttPahoMessageDrivenChannelAdapter adapter = new MqttPahoMessageDrivenChannelAdapter("client-si-consumer-1",
mqttClientFactory(), "x/y/z");
adapter.setCompletionTimeout(5000);
adapter.setConverter(new DefaultPahoMessageConverter());
adapter.setQos(1);
return adapter;
}
}
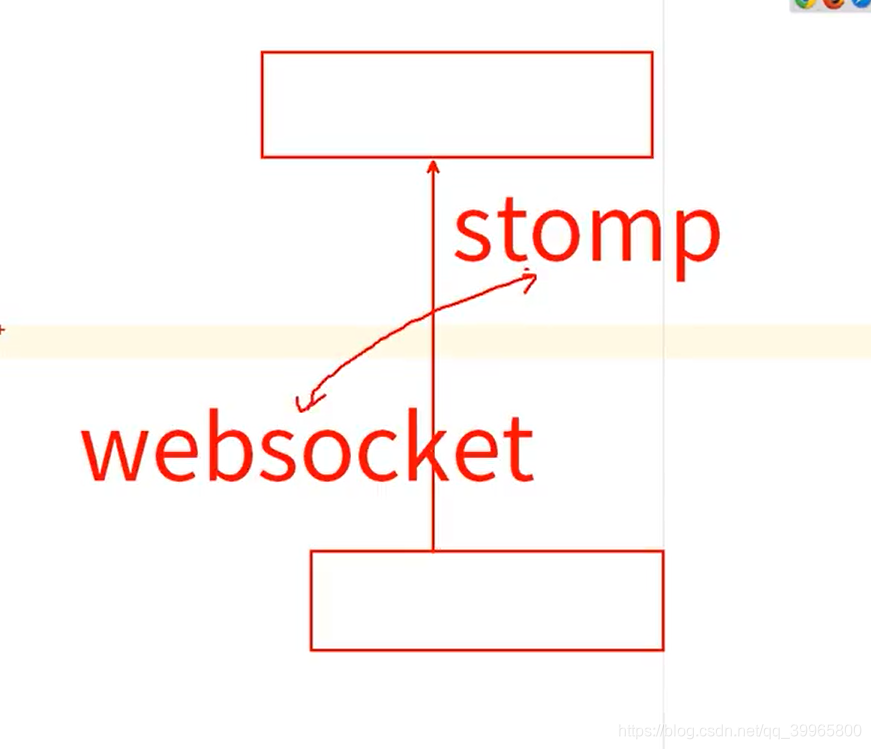
Websocket
只是一个连接方式
package com.study.mq.a3_websocket_stomp; import org.apache.activemq.ActiveMQConnectionFactory;
import org.apache.activemq.transport.stomp.Stomp;
import org.apache.activemq.transport.stomp.StompConnection;
import org.apache.activemq.transport.stomp.StompFrame; import javax.jms.*; // http://activemq.apache.org/stomp.html
public class ConsumerAndProducerStomp {
public static void main(String[] args) throws Exception {
// 直接用Stomp代码的方式
ConsumerAndProducerStomp.stompTest();
}public static void stompTest() throws Exception {
StompConnection connection = new StompConnection();
connection.open("activemq.tony.com", 61613); connection.connect("system", "manager"); // 发送两条数据
connection.begin("tx1");
connection.send("/topic/test-stomp", "message1");
connection.send("/topic/test-stomp", "message2");
connection.commit("tx1"); // 订阅/topic/test-stomp
connection.subscribe("/topic/test-stomp", Stomp.Headers.Subscribe.AckModeValues.CLIENT); connection.begin("tx2");
// 接收数据并打印
StompFrame message = connection.receive();
System.out.println(message.getBody());
connection.ack(message, "tx2");
// 继续接收
message = connection.receive();
System.out.println(message.getBody());
connection.ack(message, "tx2"); connection.commit("tx2");
connection.disconnect();
}
}
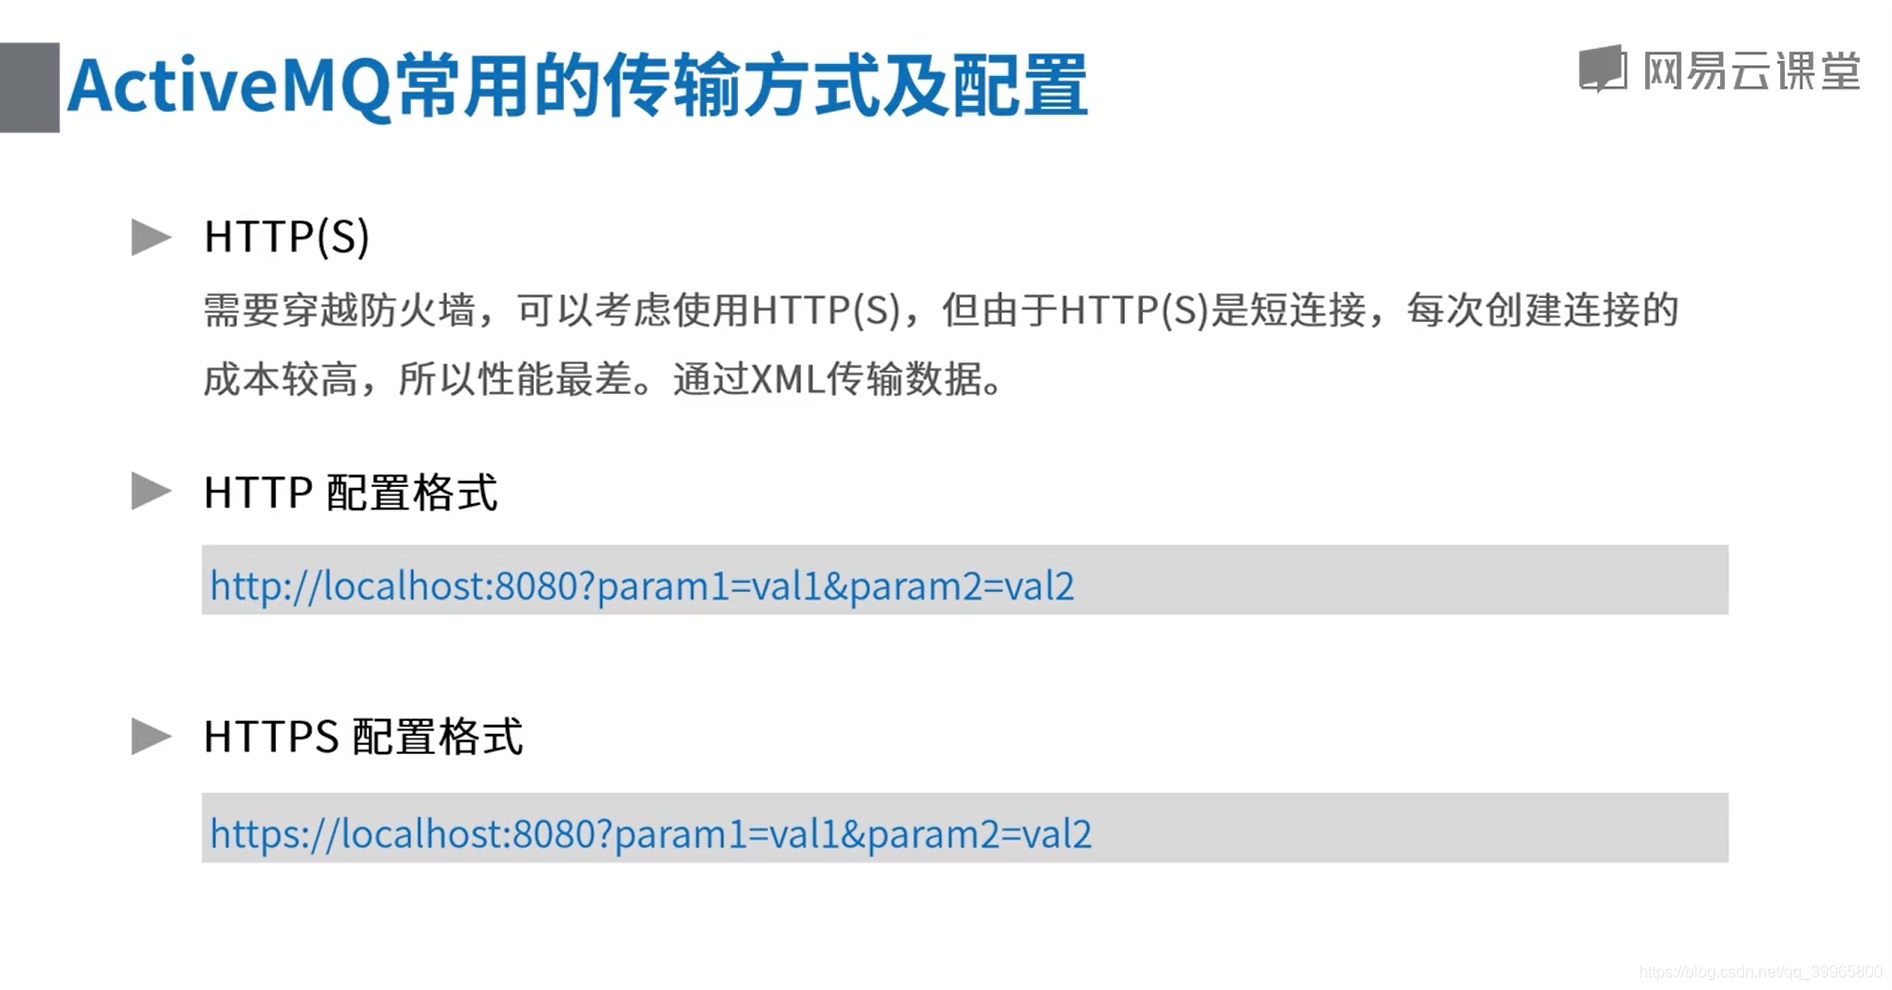
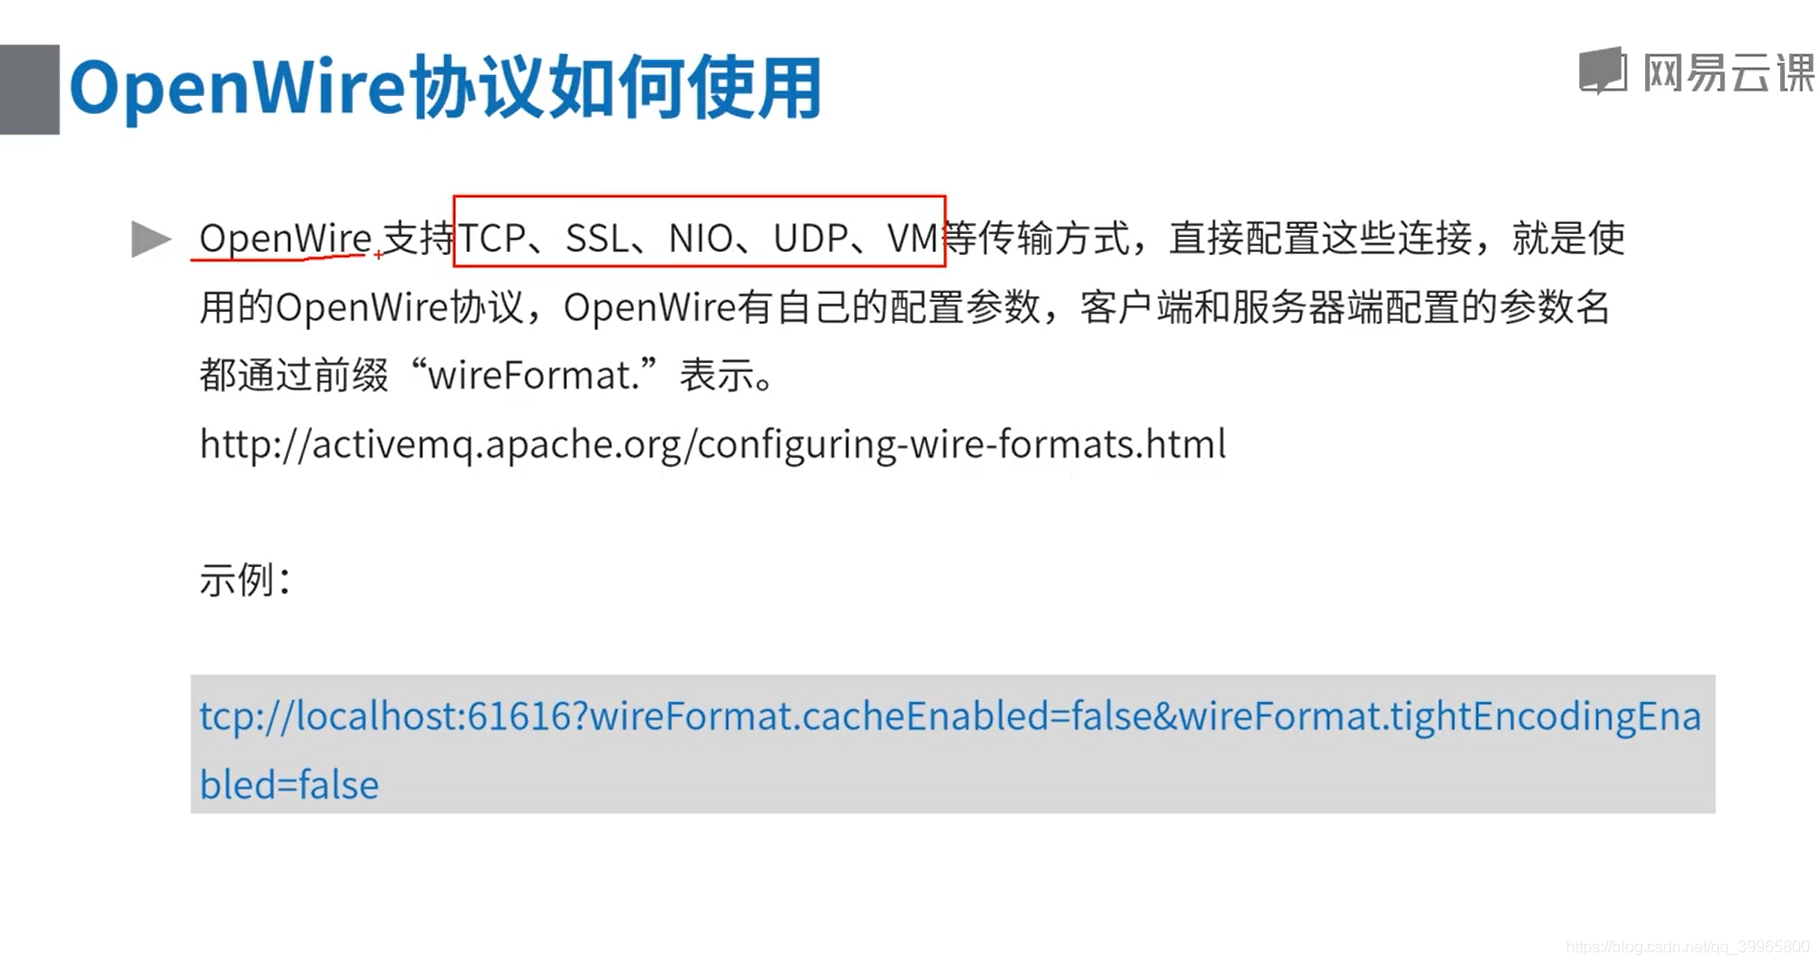
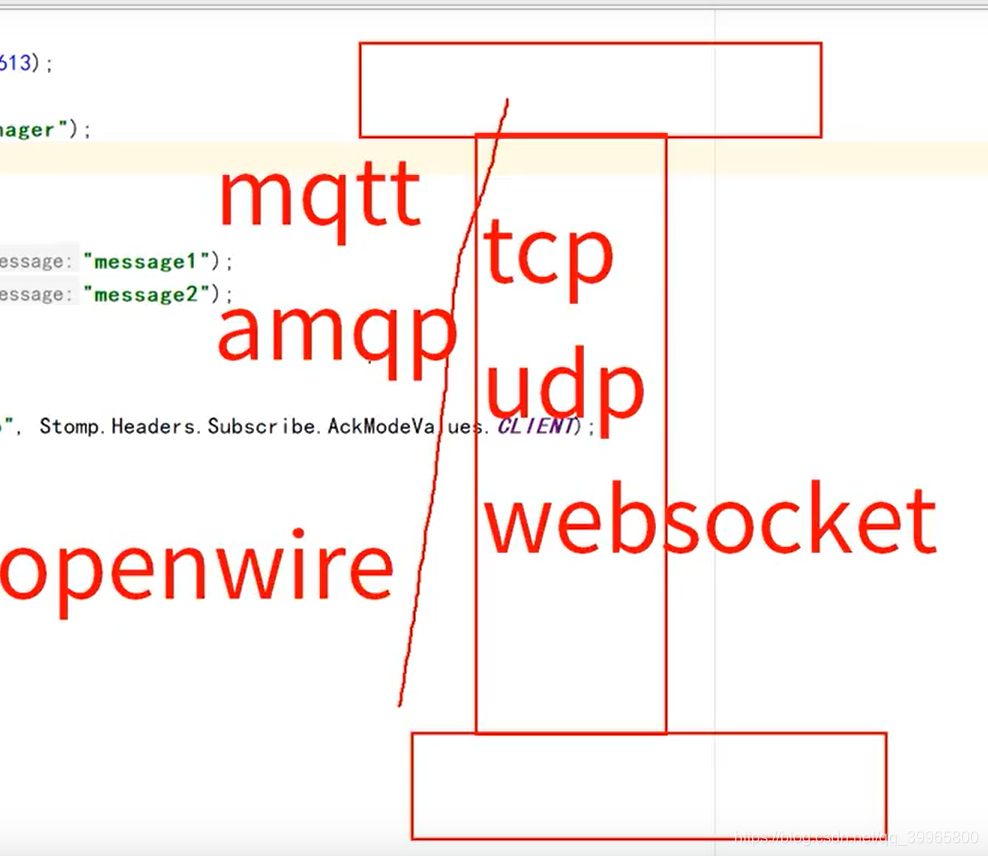
连接协议和消息协议是不同的,连接协议是tcp之类的,消息协议是AMQP
消息中间件-ActiveMQ支持的消息协议的更多相关文章
- ActiveMQ支持的消息协议
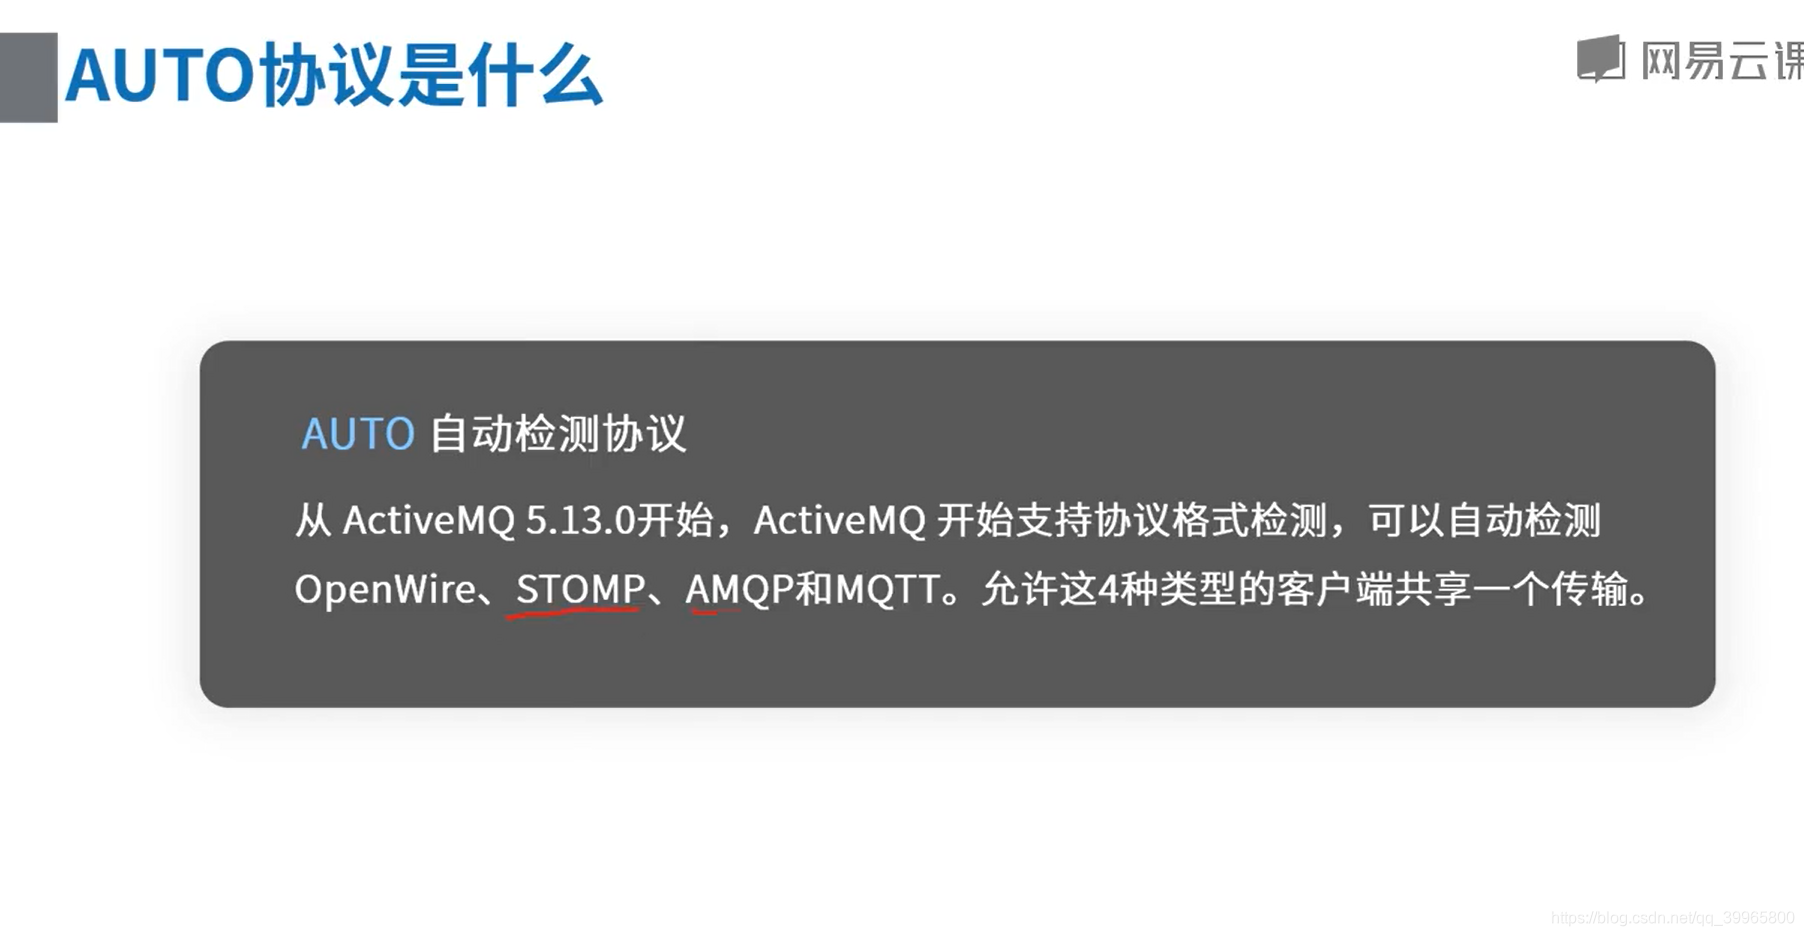
ActiveMQ支持哪些协议 ActiveMQ支持多种协议传输和传输方式,允许客户端使用多种协议连接ActiveMQ支持的协议:AUTO,OpenWire,AMQP,Stomp,MQTT等Active ...
- ActiveMQ学习笔记(7)----ActiveMQ支持的传输协议
1. 连接到ActiveMQ Connector: Active提供的,用来实现连接通讯的功能,包括:client-to-broker,broker-to-broker.ActiveMQ允许客户端使用 ...
- 分布式-信息方式-ActiveMQ支持的传输协议和配置
ActiveMQ支持的传输协议和配置■ Connector: ActiveMQ提供的,用来实现连接通讯的功能.包括: client-to-broker ...
- ActiveMQ支持的传输协议
------------------------------------------------------ ActiveMQ支持的client-broker通讯协议有:TCP.NIO.UDP.SSL ...
- JMS学习十(ActiveMQ支持的传输协议)
ActiveMQ提供了一种连接机制,这种连接机制使用传输连接器(TransportConnector)实现客户端与代理(client - to - broker)之间的通信. 网络连接器(networ ...
- 消息中间件-activemq实战之消息持久化(六)
对于activemq消息的持久化我们在第二节的时候就简单介绍过,今天我们详细的来分析一下activemq的持久化过程以及持久化插件.在生产环境中为确保消息的可靠性,我们肯定的面临持久化消息的问题,今天 ...
- 消息中间件ActiveMQ使用详解
消息中间件ActiveMQ使用详解 一.消息中间件的介绍 介绍 消息队列 是指利用 高效可靠 的 消息传递机制 进行与平台无关的 数据交流,并基于 数据通信 来进行分布式系统的集成. 特点(作用) ...
- 消息中间件--ActiveMQ&JMS消息服务
### 消息中间件 ### ---------- **消息中间件** 1. 消息中间件的概述 2. 消息中间件的应用场景 * 异步处理 * 应用解耦 * 流量削峰 * 消息通信 --------- ...
- 消息中间件-activemq消息机制和持久化介绍(三)
前面一节简单学习了activemq的使用,我们知道activemq的使用方式非常简单有如下几个步骤: 创建连接工厂 创建连接 创建会话 创建目的地 创建生产者或消费者 生产或消费消息 关闭生产或消费者 ...
随机推荐
- NGK公链脱颖而出,成为值得期待的项目!
当下2020年是动荡的一年,全世界经济危机汲汲可危,在这个特殊的时刻,有人抱怨说这是最坏的年代,也有人庆幸说这是最好的年代,历史不会重演,但总是惊人的相似,首先带你回顾一下上一次金融危机出现的2008 ...
- HTTP 1.x 学习笔记 —— Web 性能权威指南
HTTP 1.0的优化策略非常简单,就一句话:升级到HTTP 1.1.完了! 改进HTTP的性能是HTTP 1.1工作组的一个重要目标,后来这个版本也引入了大量增强性能的重要特性,其中一些大家比较熟知 ...
- 死磕Spring之IoC篇 - BeanDefinition 的加载阶段(XML 文件)
该系列文章是本人在学习 Spring 的过程中总结下来的,里面涉及到相关源码,可能对读者不太友好,请结合我的源码注释 Spring 源码分析 GitHub 地址 进行阅读 Spring 版本:5.1. ...
- 微信小程序开发小技巧:
小技巧:输入view.tabs_content就可以生成下面的代码. 输入p10,就可以得到: 输入jc:c得到:文字水平对齐 输入d:f得到: 输入ai:c得到: 输入bb得到: currentCo ...
- win10 查看已保存的wifi密码
netsh wlan show profile name="WIFINAME-Test" key=clear C:\windows\system32> C:\window ...
- HoloWAN在连接路由器时应该选择WAN口还是LAN口,有什么区别?
HoloWAN在连接路由器时应该选择WAN口还是LAN口,有什么区别? 在解决问题前,需要连接到,路由器的WAN口和LAN口的作用不同. WAN口是对外的接口,连接广域网.当联网设备和路由器都开启了D ...
- 002-LED闪烁
LED闪烁 功能:控制LED模块的小灯闪烁 #include<reg52.h> // 头文件 sbit LED = P2^0; // LED接低电平 void main() //主函数 { ...
- 记录PHP post提交表单导入mysql中文乱码的问题
记录记录PHP post提交表单导入mysql中文乱码的问题 关于乱码,这是个糟糕的问题!涉及到很多地方 解决思路:程序所涉及的环境字符集不一致导致 mysql出现乱码一般是mysql数据库内部的字符 ...
- C#的常见集合接口提供的功能
C#的常见集合接口提供的功能 这里的功能都是泛型版本的常见功能,列出来,也许后面用得上吧,没有放非泛型版本,因为觉得用得不多,也就没有整理 IEnumerable<T> ICollecti ...
- 越来越受欢迎的Vue想学么,90后小姐姐今儿来教你
摘要:Vue的相关技术原理成为了前端岗位面试中的必考知识点,掌握 Vue 对于前端工程师来说更像是一门"必修课". 本文原作者为尹婷,擅长前端组件库研发和微信机器人. 我们发现, ...