
linux Samba 搭建
Samba is a free and open-source software package that provides seamless file and print services to SMB/CIFS clients. Samba is freely available, unlike other SMB/CIFS implementations and allows for interoperability between Linux/Unix servers and Windows OS-based clients. Using Samba we can easily share files and folders between GNU/Linux and Windows OS systems.
In this tutorial we are going to implement Samba server on OpenSUSE 13.1.
Install Samba
Login as root user:
> su
Install Samba with following command:
# zypper install samba*
Configure Fully Accessed Anonymous Share
Let us create directory /share1 and set full permission. Anybody can access this share:
# mkdir /share1

# chmod -R 777 /share1/
Open up Samba configuration file /etc/samaba/smb.conf file:
# vi /etc/samba/smb.conf
And edit as follows;
Make sure that you have the following line in [global] section. If not found, just add it as shown below:
[...]

passdb backend = tdbsam

[...]
Scroll down further and add this share details at the bottom of the Samba configuration file:
[Full Share]

         path = /share1

         writable = yes

         browsable = yes

         guest ok = yes

         guest only = yes

         create mode = 0777

         directory mode = 0777
Save and close the file. Enable and start Samba service to save the changes:
# systemctl enable smb.service

# systemctl enable nmb.service

# systemctl start smb.service

# systemctl start nmb.service
Test Samba Configuration
Execute the following command to verify the Samba configuration file. It displays the errors if we have any:
# testparm
The above command will display the output as shown below:
Load smb config files from /etc/samba/smb.conf

rlimit_max: increasing rlimit_max (1024) to minimum Windows limit (16384)

Can't find include file /etc/samba/dhcp.conf

Processing section "[homes]"

Processing section "[profiles]"

Processing section "[users]"

Processing section "[groups]"

Processing section "[printers]"

Processing section "[print$]"

Processing section "[Full Share]"

Loaded services file OK.

Server role: ROLE_STANDALONE

Press enter to see a dump of your service definitions

[global]

     map to guest = Bad User

     printcap name = cups

     logon path = \\%L\profiles\.msprofile

     logon drive = P:

     logon home = \\%L\%U\.9xprofile

     usershare allow guests = Yes

     idmap config * : backend = tdb

     cups options = raw

[homes]

     comment = Home Directories

     valid users = %S, %D%w%S

     read only = No

     inherit acls = Yes

     browseable = No

[profiles]

     comment = Network Profiles Service

     path = %H

     read only = No

     create mask = 0600

     directory mask = 0700

     store dos attributes = Yes

[users]

     comment = All users

     path = /home

     read only = No

     inherit acls = Yes

     veto files = /aquota.user/groups/shares/

[groups]

     comment = All groups

     path = /home/groups

     read only = No

     inherit acls = Yes

[printers]

     comment = All Printers

     path = /var/tmp

     create mask = 0600

     printable = Yes

     print ok = Yes

     browseable = No

[print$]

     comment = Printer Drivers

     path = /var/lib/samba/drivers

     write list = @ntadmin, root

     force group = ntadmin

     create mask = 0664

     directory mask = 0775

[Full Share]

     path = /share1

     read only = No

     create mask = 0777

     directory mask = 0777

     guest only = Yes

     guest ok = Yes
I don’t want to mess up iptables, so i turned it off:
# rcSuSEfirewall2 stop
Test Anonymous Samba Share on Windows OS Client
Login to Windows OS machine and go to Start -> Run. Enter the IP address of your Samba server.
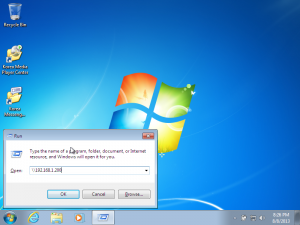 Now you’ll able to access the fully accessed Samba share from your Windows OS clients.
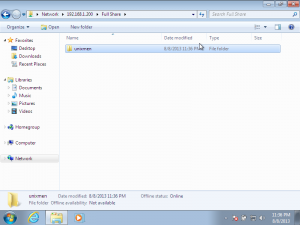
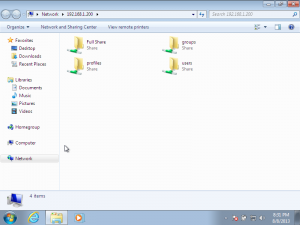 Create some files and folders in side the share. In my case, I created a folder called unixmen in my fully accessed anonymous Samba share called Full Share.
 Create an Authenticated Share
Let us create a Samba user called sk under Samba group called smbgroup:
# useradd sk

# passwd sk

# groupadd smbgroup

# usermod -a -G smbgroup sk
Now assign the user sk to Samba user database with following command:
# smbpasswd -a sk

New SMB password:

Retype new SMB password:

Added user sk.
Create a new share called /share2 and assign this share to smbgroup, so that the users of smbgroup can access the /share2 directory:
# mkdir /share2

# chmod -R 755 /share2/

# chown -R sk:smbgroup /share2
Add the above /share2 directory details in Samba configuration file as shown below;
Open up samba configuration file:
# vi /etc/samba/smb.conf
Add the /share2 details at the end:
[secure]

        path = /share2

        writable = yes

        browsable = yes

        guest ok = no

        valid users = @smbgroup
Restart Samba service to save the changes:
# systemctl restart smb.service

# systemctl restart nmb.service
Now test the configuration file with following command:
# testparm
You may see the following like output:
Load smb config files from /etc/samba/smb.conf

rlimit_max: increasing rlimit_max (1024) to minimum Windows limit (16384)

Can't find include file /etc/samba/dhcp.conf

Processing section "[homes]"

Processing section "[profiles]"

Processing section "[users]"

Processing section "[groups]"

Processing section "[printers]"

Processing section "[print$]"

Processing section "[Full Share]"

Processing section "[secure]"

Loaded services file OK.

Server role: ROLE_STANDALONE

Press enter to see a dump of your service definitions

[global]

    map to guest = Bad User

    printcap name = cups

    logon path = \\%L\profiles\.msprofile

    logon drive = P:

    logon home = \\%L\%U\.9xprofile

    usershare allow guests = Yes

    idmap config * : backend = tdb

    cups options = raw

[homes]

    comment = Home Directories

    valid users = %S, %D%w%S

    read only = No

    inherit acls = Yes

    browseable = No

[profiles]

    comment = Network Profiles Service

    path = %H

    read only = No

    create mask = 0600

    directory mask = 0700

    store dos attributes = Yes

[users]

    comment = All users

    path = /home

    read only = No

    inherit acls = Yes

    veto files = /aquota.user/groups/shares/

[groups]

    comment = All groups

    path = /home/groups

    read only = No

    inherit acls = Yes

[printers]

    comment = All Printers

    path = /var/tmp

    create mask = 0600

    printable = Yes

    print ok = Yes

    browseable = No

[print$]

    comment = Printer Drivers

    path = /var/lib/samba/drivers

    write list = @ntadmin, root

    force group = ntadmin

    create mask = 0664

    directory mask = 0775

[Full Share]

    path = /share1

    read only = No

    create mask = 0777

    directory mask = 0777

    guest only = Yes

    guest ok = Yes

[secure]

    path = /share2

    valid users = @smbgroup

    read only = No
Test Authenticated Share on Windows OS Client
Now go to the Windows OS client and check the authenticated share. It will ask you to enter username and password to access the Samba shares. Enter the username and password that you have created earlier. You’re done!
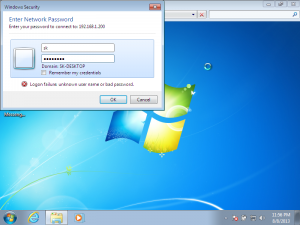 That’s it. Now you’ll able to access the Samba shares.
转:https://www.unixmen.com/install-and-configure-samba-server-on-opensuse-13-1/
linux Samba 搭建的更多相关文章
- 【转帖】Linux上搭建Samba,实现windows与Linux文件数据同步
Linux上搭建Samba,实现windows与Linux文件数据同步 2018年06月09日 :: m_nanle_xiaobudiu 阅读数 15812更多 分类专栏: Linux Samba 版 ...
- Samba搭建Linux和Windows文件共享服务
一.Samba简介 Samba是在Linux和UNIX系统上实现SMB协议的一个免费软件,由服务器及客户端程序构成.SMB(Server Messages Block,信息服务块)是一种在局域网上共享 ...
- Linux服务器搭建相关教程链接整理
Linux: Linux 教程 | 菜鸟教程 linux下如何添加一个用户并且让用户获得root权限 - !canfly - 博客园 Git: 在 Linux 下搭建 Git 服务器 - 黄棣-dee ...
- Linux samba多用户挂载
samba 多用户挂载 通过multiuser挂载选项,使用基于密码验证和cifscreds实现访问控制在默认情况下,samba共享挂载后,是通过挂载时的验证来实现对挂载资源的访问控制.通过新的mul ...
- Linux Samba安装与使用
一 安装环境: 虚拟机:RedHat 5.4 192.168.75.128 主机环境:WIN7 32bit 192.168.75.1 网络连接方式:NAT 二 安装步骤: 说明: Ø samb ...
- Linux环境搭建-在虚拟机中安装Centos7.0
最近在空闲时间学习Linux环境中各种服务的安装与配置,都属于入门级别的,这里把所有的学习过程记录下来,和大家一起分享. 我的电脑系统是win7,所以我需要在win7上安装一个虚拟机-VMware,然 ...
- windows和linux中搭建python集成开发环境IDE——如何设置多个python环境
本系列分为两篇: 1.[转]windows和linux中搭建python集成开发环境IDE 2.[转]linux和windows下安装python集成开发环境及其python包 3.windows和l ...
- MongoDB学习笔记—Linux下搭建MongoDB环境
1.MongoDB简单说明 a MongoDB是由C++语言编写的一个基于分布式文件存储的开源数据库系统,它的目的在于为WEB应用提供可扩展的高性能数据存储解决方案. b MongoDB是一个介于关系 ...
- Linux下搭建个人网站
前不久在阿里买了一个服务器,然后开始第一次尝试搭建自己的个人网站.前端采用了bootstrap框架,后端采用的是PHP,数据库使用的是Mysql.新手第一次在linux下搭建遇见很多问题,在这里分享一 ...
随机推荐
- python使用pip安装模块出错 Retrying (Retry(total=0, connect=None, read=None, redirect=None, status=None))
python使用pip安装模块出错 Retrying (Retry(total=0, connect=None, read=None, redirect=None, status=None)) 问题: ...
- 你的 JVM 基础“大厦”稳健吗?
[从 1 开始学 JVM 系列] JVM 对于每位 Java 语言编程者来说无疑是"重中之重",尽管我们每天都在与它打交道,却很少来审视它.了解它,慢慢地,它成为了我们" ...
- shell脚本之case语句
case ... esac 为多选择语句,与其他语言中的 switch ... case 语句类似,是一种多分枝选择结构,每个 case 分支用右圆括号开始,用两个分号 ;; 表示 break,即执行 ...
- Gitlab - 安装的社区版 Gitlab-ce,解决访问网页报502-Whoops, GitLab is taking too much time to respond的问题
问题背景 在自己虚拟机(centos7)上装了 Gitlab-ce,就是社区版的 Gitlab,版本是 13.0+ 问题描述 浏览器访问 Gitlab 网站,报 502 问题翻译 502-Whoops ...
- jq的选择器中带有特殊符号无法获取元素
因项目需要,将元素id命名为数组(array[i].string) 使用jq去获取该id的元素时,返回的是个undefined.即jq获取不到该元素,因为该元素中的id含有特殊字符"[&qu ...
- project read error(项目读取错误)
maven的pom文件出现project read error 1,打开电脑cmd操作界面,在cmd界面找到打开出错项目的文件夹; 比如我的项目文件夹在D:\>eclipse-jee-file\ ...
- Docker修改容器中的时间
Docker修改容器中的时间 前言 在公司开发时使用 Docker 创建数据库(SQL Server)的实例十分方便,还原数据库也只要设置好共享文件夹,在 SQL Server Management ...
- CodeForce-811B Vladik and Complicated Book(水题)
http://codeforces.com/problemset/problem/811/B 题意: 给定一个长度为 N 不重复的数字序列,然后对其进行 M 次询问. 每次询问含L,R,X三个值,问如 ...
- Stage 1 项目需求分析报告
迷你商城后台管理系统-- 需求分析 1. 引言 作为互联网热潮的崛起,消费者们的普遍差异化,实体商城要想在互联网的浪潮中继续发展,就需要制定出针对用户以及消费者的消费习惯以及喜爱品种的消费方案.从而企 ...
- jvm运行过程
------------恢复内容开始------------ 把文件编译成字节码文件的叫编译器的前端, 线程共享的方法去和堆,非线程共享的:java虚拟机栈,本地方法栈,还有程序计数器 都是每个线程独 ...