centos6.6部署mysql mmm高可用架构
一、环境简述
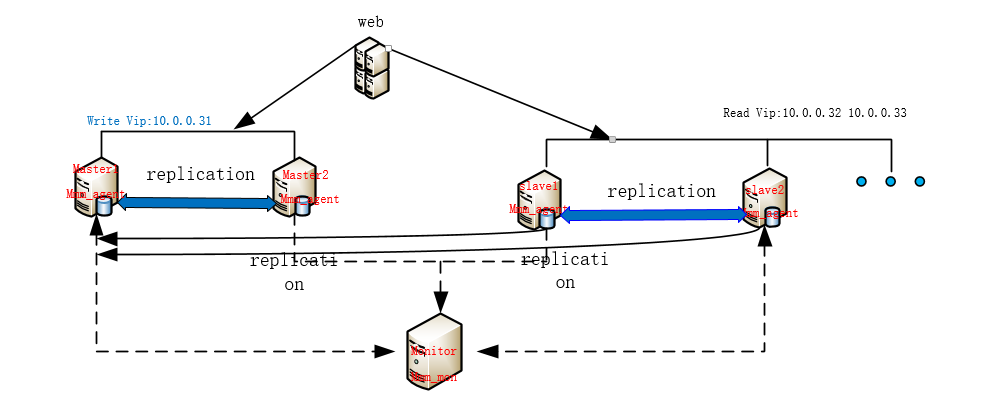
1、工作逻辑图
2、MySQL-MMM优缺点
- 优点:高可用性,扩展性好,出现故障自动切换,对于主主同步,在同一时间只提供一台数据库写操作,保证的数据的一致性。
- 缺点:Monitor节点是单点,可以结合Keepalived实现高可用,对主机的数量有要求,需要实现读写分离,对程序来说是个挑战。
3、MySQL-MMM工作原理
MMM(Master-Master replication managerfor Mysql,Mysql主主复制管理器)是一套灵活的脚本程序,基于perl实现,用来对mysql replication进行监控和故障迁移,并能管理mysql Master-Master复制的配置(同一时间只有一个节点是可写的)。
- mmm_mond:监控进程,负责所有的监控工作,决定和处理所有节点角色活动。此脚本需要在监管机上运行。
- mmm_agentd:运行在每个mysql服务器上的代理进程,完成监控的探针工作和执行简单的远端服务设置。此脚本需要在被监管机上运行。
- mmm_control:一个简单的脚本,提供管理mmm_mond进程的命令。
mysql-mmm的监管端会提供多个虚拟IP(VIP),包括一个可写VIP,多个可读VIP,通过监管的管理,这些IP会绑定在可用mysql之上,当某一台mysql宕机时,监管会将VIP迁移至其他mysql。
在整个监管过程中,需要在mysql中添加相关授权用户,以便让mysql可以支持监理机的维护。授权的用户包括一个mmm_monitor用户和一个mmm_agent用户,如果想使用mmm的备份工具则还要添加一个mmm_tools用户。
4、需求描述
- 操作系统:CentOS 6.6_X64
- 数据库:MySQL 5.1
- MMM:MySQL-MMM 2.2.1

虚拟IP地址(VIP):
| ip | role |
| 10.0.0.31 | writer |
| 10.0.0.32 | reader |
| 10.0.0.33 | reader |
数据库同步需要的用户:
| function | description | privileges |
| monitor user | mmm监控用于对mysql服务器进程健康检查 | REPLICATION CLIENT |
| agent user | mmm代理用来更改只读模式,复制的主服务器等 | SUPER, REPLICATION CLIENT, PROCESS |
| replication user | 用于复制 | REPLICATION SLAVE |
二、db1,db2,db3和db4安装数据库并配置
# 初始密码为空,进入数据库改相对安全,在命令行用mysqladmin修改密码显示不安全。
[root@db1 ~]# yum install mysql-server mysql

[root@db1 ~]# service mysqld start

[root@db1 ~]# mysqladmin -u root password “yourpassword”
# 修改配置这里以db1为例子
[root@db1 ~]# vi /etc/my.cnf   #添加如下

[mysqld]

binlog-do-db=test           #需要记录二进制日志的数据库,多个用逗号隔开

binlog-ignore-db=mysql,information_schema  #不需要记录二进制日志的数据库,多个用逗号隔开

auto_increment_increment=  #字段一次递增多少

auto_increment_offset=     #自增字段的起始值,值设置不同

replicate-do-db=test        #同步的数据库,多个写多行

replicate-ignore-db = information_schema #不同步的数据库,多个写多行

server_id =                #每台设置不同

log_bin = mysql-bin

log_slave_updates           #当一个主故障,另一个立即接管

sync-binlog=               #每条自动更新,安全性高,默认是0

[root@db1 ~]# service mysqld restart
#使用scp分别复制到其他主机 改下server_id 分别对应db 1 2 3 4(记得先将各个主机配置文件改名.bak后缀)
三、配置db1和db2主主同步
#先查看下log bin日志和pos值位置
mysql> show master status;

+------------------+----------+--------------+--------------------------+

| File             | Position | Binlog_Do_DB | Binlog_Ignore_DB         |

+------------------+----------+--------------+--------------------------+

| mysql-bin.000004 |      106 | test         | mysql,information_schema |

+------------------+----------+--------------+--------------------------+

1 row in set (0.00 sec)

grant replication slave on *.* to 'replication'@'10.0.0.%' identified by 'replication';

Query OK, 0 rows affected (0.03 sec)

mysql> flush privileges;

Query OK, 0 rows affected (0.00 sec)

# 这里的log-file  和 log-pos 记录的是你需要同步的主库的master信息。即db1同步db2的master db2同步db1的。

mysql> change master to

    -> master_host='10.0.0.23',

    -> master_user='replication',

    -> master_password='replication',

    -> master_log_file='mysql-bin.000002',

    -> master_log_pos=106;

Query OK, 0 rows affected (0.03 sec)

mysql> start slave;

Query OK, 0 rows affected (0.00 sec)
#查看db1和db2上面的sql线程和io线程状态
#在db1上查看

mysql> show slave status \G;

*************************** 1. row ***************************

               Slave_IO_State: Waiting for master to send event

                  Master_Host: 10.0.0.23

                  Master_User: replication

                  Master_Port: 3306

                Connect_Retry: 60

              Master_Log_File: mysql-bin.000003

          Read_Master_Log_Pos: 932

               Relay_Log_File: mysqld-relay-bin.000002

                Relay_Log_Pos: 831

        Relay_Master_Log_File: mysql-bin.000003

             Slave_IO_Running: Yes

            Slave_SQL_Running: Yes

              Replicate_Do_DB: test

          Replicate_Ignore_DB: information_schema

#在db2上查看

mysql> show slave status\G;

*************************** 1. row ***************************

               Slave_IO_State: Waiting for master to send event

                  Master_Host: 10.0.0.22

                  Master_User: replication

                  Master_Port: 3306

                Connect_Retry: 60

              Master_Log_File: mysql-bin.000004

          Read_Master_Log_Pos: 599

               Relay_Log_File: mysqld-relay-bin.000002

                Relay_Log_Pos: 497

        Relay_Master_Log_File: mysql-bin.000004

             Slave_IO_Running: Yes

            Slave_SQL_Running: Yes

              Replicate_Do_DB: test

          Replicate_Ignore_DB: information_schema
#在db1和db2上test库互插数据各自验证
#db1插

mysql> use test

Database changed

mysql> create table user (name varchar(10),gender int(2));

Query OK, 0 rows affected (0.03 sec)

#db2看

mysql> use test;

Reading table information for completion of table and column names

You can turn off this feature to get a quicker startup with -A

Database changed

mysql> show tables;

+----------------+

| Tables_in_test |

+----------------+

| user           |

+----------------+

1 row in set (0.00 sec)

mysql> select * from user;

+-----------+--------+

| name      | gender |

+-----------+--------+

| xiaozhang |      1 |

+-----------+--------+
----------------------------------------------------------------------------------spilit---------------------------------------------------------------------------------------
#db2插
mysql> use test;
Database changed
mysql> create table person(name varchar(10),salary int(5));
Query OK, 0 rows affected (0.05 sec)
mysql> insert into person values('sb','10');
Query OK, 1 row affected (0.01 sec)
#db1看
mysql> show tables;
+----------------+
| Tables_in_test |
+----------------+
| person |
| user |
+----------------+
2 rows in set (0.00 sec)
mysql> select * from person;
+------+--------+
| name | salary |
+------+--------+
| sb | 10 |
+------+--------+
1 row in set (0.00 sec)
如果都没问题,表示双主已经配置成功。
四、配置slave1和slave2做为master1的从库
#先看下db1上master1状态值
mysql> show master status;

+------------------+----------+--------------+--------------------------+

| File             | Position | Binlog_Do_DB | Binlog_Ignore_DB         |

+------------------+----------+--------------+--------------------------+

| mysql-bin.000004 |     1047 | test         | mysql,information_schema |

+------------------+----------+--------------+--------------------------+

1 row in set (0.00 sec)
在slave1和slave2分别执行changemaster同步db1上的master binlog文件和位置:老规矩两个线程必须都为yes
#slave1 执行(db3)
mysql> change master to

    -> master_host='10.0.0.22',

    -> master_user='replication',

    -> master_password='replication',

    -> master_log_file='mysql-bin.000004'

    -> ,master_log_pos=1047;

Query OK, 0 rows affected (0.06 sec)

mysql> start slave;

Query OK, 0 rows affected (0.00 sec)

mysql> show slave status \G;

*************************** 1. row ***************************

               Slave_IO_State: Waiting for master to send event

                  Master_Host: 10.0.0.22

                  Master_User: replication

                  Master_Port: 3306

                Connect_Retry: 60

              Master_Log_File: mysql-bin.000004

          Read_Master_Log_Pos: 1047

               Relay_Log_File: mysqld-relay-bin.000002

                Relay_Log_Pos: 251

        Relay_Master_Log_File: mysql-bin.000004

             Slave_IO_Running: Yes

            Slave_SQL_Running: Yes

              Replicate_Do_DB: test

          Replicate_Ignore_DB: information_schema
#动手多敲敲命令,没办法脑子不好的我就多动动手咯。slave2(db4) input again
在slave1和slave2查看如下说明主从复制成功。但是数据没过来,这是因为主从复制原理只同步配置完后的增删改记录,以后的数据是不能同步的,我们可以把主的数据库备份了,然后在送数据库还原。
#在slave1和slave2上查看都是空的。
mysql> use test

Database changed

mysql> show table;

mysql> show tables;

Empty set (0.00 sec)
#在db1上备份test 库 scp传到slave1 和 slave2 并导入
mysql> system mysqldump -uroot -p123 test >test.sql
[root@db1 ~]# scp test.sql root@10.0.0.24:~/
The authenticity of host '10.0.0.24 (10.0.0.24)' can't be established.
RSA key fingerprint is 98:3f:4e:61:76:6c:6f:b9:ba:5e:94:00:6c:ef:25:fd.
Are you sure you want to continue connecting (yes/no)? yes
Warning: Permanently added '10.0.0.24' (RSA) to the list of known hosts.
root@10.0.0.24's password:
test.sql 100% 2430 2.4KB/s 00:00
[root@db1 ~]# scp test.sql root@10.0.0.25:~/
The authenticity of host '10.0.0.25 (10.0.0.25)' can't be established.
RSA key fingerprint is 98:3f:4e:61:76:6c:6f:b9:ba:5e:94:00:6c:ef:25:fd.
Are you sure you want to continue connecting (yes/no)? yes
Warning: Permanently added '10.0.0.25' (RSA) to the list of known hosts.
root@10.0.0.25's password:
test.sql 100% 2430 2.4KB/s 00:00
[root@db3 ~]# mysql -uroot -p123 test < test.sql
[root@db4 ~]# mysql -uroot -p123 test < test.sql
#查看
mysql> use test
mysql> show tables;
+----------------+
| Tables_in_test |
+----------------+
| person |
| user |
+----------------+
2 rows in set (0.00 sec)
五、MySQL-MMM安装配置
CentOS6 默认没有 mysql-mmm 软件包,官方推荐使用 epel 的网络源,五台都安装epel:
rpm -ivh http://mirrors.ustc.edu.cn/fedora/epel/6/x86_64/epel-release-6-8.noarch.rpm
1、monitor节点安装
[root@monitor ~]# yum -y install mysql-mmm-monitor
2、四台db节点安装
[root@db1 ~]# yum -y install mysql-mmm-agent
3.在四台db节点授权monitor和agent用户访问
mysql> GRANT REPLICATION CLIENT ON *.* TO 'mmm_monitor'@'10.0.0.%' IDENTIFIED BY 'monitor';
Query OK, 0 rows affected (0.00 sec)
mysql> grant super,replication client,process on *.* to 'mmm_agent'@'10.0.0.%' identified by 'agent';
Query OK, 0 rows affected (0.00 sec)
4、修改mmm_common.conf文件(五台相同)
[root@db1 ~]# vim /etc/mysql-mmm/mmm_common.conf
active_master_role writer
<host default>
cluster_interface eth0
pid_path /var/run/mysql-mmm/mmm_agentd.pid
bin_path /usr/libexec/mysql-mmm/
replication_user replication
replication_password replication
agent_user mmm_agent
agent_password agent
</host>
<host db1>
ip 10.0.0.22
mode master
peer db2
</host>
<host db2>
ip 10.0.0.23
mode master
peer db1
</host>
<host db3>
ip 10.0.0.24
mode slave
</host>
<host db4>
ip 10.0.0.25
mode slave
</host>
<role writer>
hosts db1, db2
ips 10.0.0.31 #只有一个host可以writer,一般写操作是这个模式
mode exclusive
</role>
<role reader>
hosts db3, db4
ips 10.0.0.32, 10.0.0.33 #多个host可以reader
mode balanced
</role>
#其他主机分别将配置改名备份 然后db1分别scp传到其他4个主机。
mv /etc/mysql-mmm/mmm_common.conf /etc/mysql-mmm/mmm_common.conf.bak
[root@db1 ~]# scp /etc/mysql-mmm/mmm_common.conf root@10.0.0.22:/etc/mysql-mmm/
The authenticity of host '10.0.0.22 (10.0.0.22)' can't be established.
RSA key fingerprint is 98:3f:4e:61:76:6c:6f:b9:ba:5e:94:00:6c:ef:25:fd.
Are you sure you want to continue connecting (yes/no)? yes
Warning: Permanently added '10.0.0.22' (RSA) to the list of known hosts.
root@10.0.0.22's password:
mmm_common.conf 100% 840 0.8KB/s 00:00
5、修改四台db代理端 mmm_agent.conf 文件
include mmm_common.conf

# The 'this' variable refers to this server.  Proper operation requires

# that 'this' server (db1 by default), as well as all other servers, have the

# proper IP addresses set in mmm_common.conf.

this db1 #不同主机对应不同的db名称
6、修改管理端mmm_mon.conf文件
[root@monitor ~]# vi /etc/mysql-mmm/mmm_mon.conf
include mmm_common.conf

<monitor>

    ip                  127.0.0.1

    pid_path            /var/run/mysql-mmm/mmm_mond.pid

    bin_path            /usr/libexec/mysql-mmm

    status_path         /var/lib/mysql-mmm/mmm_mond.status

    ping_ips            10.0.0.22,10.0.0.23,10.0.0.24,10.0.0.25 #真实数据库IP,>来颊侧网络是否正常

    auto_set_online      #恢复后自动设置在线时间

    # The kill_host_bin does not exist by default, though the monitor will

    # throw a warning about it missing.  See the section 5.10 "Kill Host

    # Functionality" in the PDF documentation.

    #

    # kill_host_bin     /usr/libexec/mysql-mmm/monitor/kill_host

    #

</monitor>

<host default>

    monitor_user        mmm_monitor

    monitor_password    monitor

</host>
六、启动MySQL-MMM
1、db代理端启动
[root@db1 ~]# /etc/init.d/mysql-mmm-agent start

[root@db1 ~]# chkconfigmysql-mmm-agent on
2、monitor管理端启动
[root@monitor1 ~]# /etc/init.d/mysql-mmm-monitor start

[root@monitor1 ~]# chkconfigmysql-mmm-monitor on
坑:
如果出现Configuration file /etc/mysql-mmm/mmm_common.conf is world readable!这种错误,需要查看/etc/mysql-mmm/mmm_common.conf文件的权限,应该是 chmod  /etc/mysql-mmm/mmm_common.conf

集群中所有配置文件的权限最好都设置为640,否则启动 MMM 服务的时候可能出错
七、测试集群
1、查看集群状态
mmm_control show
centos6.6部署mysql mmm高可用架构的更多相关文章
- mysql mmm高可用架构设计
项目概述:搭建主从,双主,安装Perl模块 安装配置mmm软件 测试 硬件环境:4台虚拟PC 软件环境:rehl6.5 MySQL-5.6.26 percona-xtrabackup-2.3.4 ...
- CentOS 搭建 Mysql MMM 高可用架构
环境 CentOS Mysql 5.1 前提 安装了EPEL,详细安装步骤请參照 http://blog.csdn.net/robinsonmhj/article/details/36184863 机 ...
- MySQL集群搭建(3)-MMM高可用架构
1 MMM 介绍 1.1 简介 MMM 是一套支持双主故障切换以及双主日常管理的第三方软件.MMM 由 Perl 开发,用来管理和监控双主复制,虽然是双主架构,但是业务上同一时间只允许一个节点进行写入 ...
- 美团点评MySQL数据库高可用架构从MMM到MHA+Zebra以及MHA+Proxy的演进
本文介绍最近几年美团点评MySQL数据库高可用架构的演进过程,以及我们在开源技术基础上做的一些创新.同时,也和业界其它方案进行综合对比,了解业界在高可用方面的进展,和未来我们的一些规划和展望. MMM ...
- mysql复制(高可用架构方案的基础)
mysql复制:把一个数据库实例上所有改变复制到另外一个数据库库服务器实例的过程特点:1.没有改变就无所谓复制 ;改变是复制的根本与数据源2.所有的改变:是指可以复制全部改变,也可以复制部分改变 可以 ...
- Mysql MMM 高可用
一.Mysql MMM 高可用概况: mmm_mond 负责所有的监控工作的监控守护进程,决定节点的移除等: mmm_agentd 运行在mysql服务器上的代理守护进程,通过简单远程服务集提供给 ...
- 搭建MySQL MMM高可用
搭建MMM: 1,安装 agent 节点执行 yum install -y mysql-mmm-agent 2, monitor 节点执行 yum install -y mysql-mmm-monit ...
- Oracle Compute云快速搭建MySQL Keepalived高可用架构
最近有个客户在测试Oracle Compute云,他们的应用需要使用MySQL数据库,由于是企业级应用一定要考虑高可用架构,因此有需求要在Oracle Compute云上搭建MySQL高可用集群.客户 ...
- mysql实现高可用架构之MHA
一.简介 MHA(Master HA)是一款开源的 MySQL 的高可用程序,它为 MySQL 主从复制架构提供了 automating master failover 功能.MHA 在监控到 mas ...
随机推荐
- cocos2d-x 3.0环境配置(转)
cocos2d-x 3.0发布有一段时间了,作为一个初学者,我一直觉得cocos2d-x很坑.每个比较大的版本变动,都会有不一样的项目创建方式,每次的跨度都挺大…… 但是凭心而论,3.0RC版本开始 ...
- SpringMVC---springMVC配置文件(springweb.xml)简介
再web.xml中设置HTTP请求的中央调度处理器DispatcherServlet时,会指定SpringMVC配置文件,这里取名springweb.xml是因设置DispatcherServlet时 ...
- ionic2升级到ionic3并打包APK
通过IONIC2升级到3的时候,经过我一系列的测试,以及网上各种办法,现将新测有效的方法记录如下,本人按如下方法,对多个项目升级后,都能正常打包成APK IONIC 2到3的升级: 1.拷贝ionic ...
- android中Activity中的WindowManager与Window
在做项目的过程中,需要实现Activity非全屏显示.窗口背景透明显示的效果. 在实现这些功能的过程中,涉及到Window与WindowManager两个类,经过查一些相关资料,了解二者之间的不同点如 ...
- apache的/etc/httpd/conf/httpd.conf和/usr/local/apache2/conf/httpd.conf区别
一.问题 centos系统用yum安装完apache后,重启后有时会失效,然后去网上找资料,发现有的说重启命令是这样的: /etc/init.d/httpd restart 而有的呢,说重启命令应该是 ...
- 使用Html5shiv.js让ie支持html5
ie低版本不支持html5标签,可以引入一段脚本,在ie浏览器中创建html5的标签. 1,可以在网上下载html5shiv的压缩包,引入压缩版的html5shiv.min.js即可. 脚本引用要在h ...
- PAT——乙级1028
这道题花了我半个多小时,对呀乙级算是挺多时间的了. 1028 人口普查 (20 point(s)) 某城镇进行人口普查,得到了全体居民的生日.现请你写个程序,找出镇上最年长和最年轻的人. 这里确保每个 ...
- Android 图片文字单位 px、dp、sp区别
文章来源:http://www.cnblogs.com/bjzhanghao/archive/2012/11/06/2757300.html px:像素,一个像素点,1px代表屏幕上一个物理的像素点: ...
- table内容超出宽度时隐藏并显示省略标记
HTML中,一个表格,要达到二个条件: 1.内容多了不自动换行: 2.固定单元格宽度.如果内容超出,则隐藏: 如 果在IE下,只是写成<table style="table-layou ...
- Linux静态ip设置及一些网络设置
网络服务配置文件 /etc/sysconfig/network 网络接口配置文件 /etc/sysconfig/network-scripts/ifcfg-INTERFACE_NAME 修改IP永久生 ...